background image

16 - 1

16.1  Clean

16.1.1  Display operation of clean

9

UTILIT

Y

 FUNCTION

10

LANGUA

GE 

SETTI

NG

11

COMMUNICA

TION 

INT

E

RF

A

C

SETTIN

G

12

DIS

P

LA

Y AND 

OPE

R

A

T

IO

SETTING

S

13

C

L

O

C

K SE

TTI

N

G

AND BA

TTER

Y


ST

A

T

US

 DI

SPL

A

Y

14

FI

LE DISP

LA

Y

15

GO

T DEB

U

G

16

CLE

A

NIN

G

 OF 

DI

SPL

A

Y

 SECTI

ON

16. CLEANING OF DISPLAY SECTION

(CLEAN)

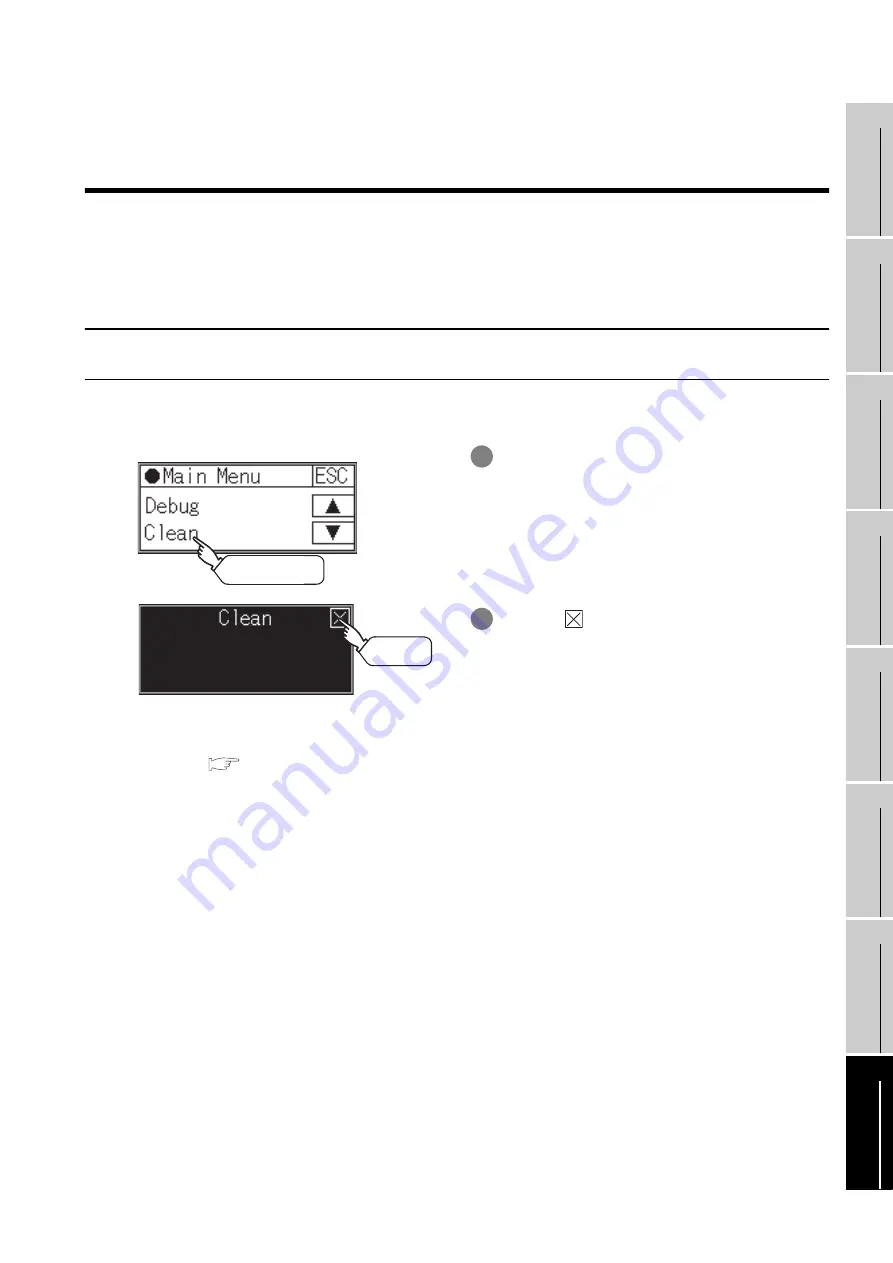
In utility, the screen can be set as not to be effected by touching the screen when clean with clothes.
For cleaning method, refer to "Section 18.3 Cleaning Method".

16.1 Clean

16.1.1 Display operation of clean

For details of cleaning method, refer to the following.

Section 18.3 Cleaning Method

1

Touch [Clean] to bring up the setting window.

2

Touching 

 key closes the screen.

3

Even if touch points other than the upper left 
corner and upper right corner of the screen, the 
GOT does not operates.

Main Menu

Touch [Clean].

Touch

Содержание GOT1000 Series

Страница 1: ......

Страница 2: ......

Страница 3: ...oing so can cause an accident due to false output or malfunction If a communication fault including cable disconnection occurs during monitoring on the GOT communication between the GOT and PLC CPU is suspended and the GOT becomes inoperative A system where the GOT is used should be configured to perform any significant operation to the system by using the switches of a device other than the GOT o...

Страница 4: ...f all phases of the external power supply used by the system before mounting or removing the GOT to from the panel Not doing so can cause the unit to fail or malfunction When installing the battery or memory board wear an earth band etc to avoid the static electricity The static electricity can cause the unit to fail or malfunction Be sure to shut off all phases of the external power supply used b...

Страница 5: ...unction due to the damage of the screws or the GOT Exercise care to avoid foreign matter such as chips and wire offcuts entering the GOT Not doing so can cause a fire failure or malfunction CAUTION Plug the communication cable into the connector of the connected unit and tighten the mounting and terminal screws in the specified torque range Undertightening can cause a short circuit or malfunction ...

Страница 6: ...ts of the unit directly Doing so can cause a unit malfunction or failure The cables connected to the unit must be run in ducts or clamped Not doing so can cause the unit or cable to be damaged due to the dangling motion or accidental pulling of the cables or can cause a malfunction due to a cable connection fault When unplugging the cable connected to the unit do not hold and pull the cable portio...

Страница 7: ... confirm that the adequate battery life remains on the rating plate Transporting the GOT with the low battery voltage or the battery the reached battery life may unstabilize the backup data unstable during transportation Make sure to transport the GOT main unit and or relevant unit s in the manner they will not be exposed to the impact exceeding the impact resistance described in the general speci...

Страница 8: ...HIS MANUAL Chapter 2 Section 8 2 Chapter 11 Section 15 2 App 1 App 4 Index 1 Section 8 4 Oct 2008 JY997D24701 E ABBREVIATIONS AND GENERIC TERMS IN THIS MANUAL HOW TO READ THIS MANUAL Chapter 1 Chapter 2 Chapter 3 Chapter 4 Chapter 5 Chapter 6 Chapter 7 Chapter 8 Chapter 9 Chapter 11 Chapter 12 Chapter 13 Chapter 14 Chapter 17 Chapter 18 App 1 App 2 Index Chapter 15 16 Dec 2008 JY997D24701 F ABBREV...

Страница 9: ...7D24701 K ABBREVIATIONS AND GENERIC TERMS ABOUT MANUALS HOW TO READ THIS MANUAL Chapter 1 Section 2 2 Chapter 3 Chapter 8 Chapter 9 Chapter 11 Chapter 12 Chapter 15 Chapter 17 Chapter 18 App 2 Section 11 1 6 Section11 1 7 Section 15 3 This manual confers no industrial property rights or any rights of any other kind nor does it confer any patent licenses Mitsubishi Electric Corporation cannot be he...

Страница 10: ...uses the product associated with this manual This product has been manufactured as a general purpose part for general industries and has not been designed or manufactured to be incorporated in a device or system used in purposes related to human life Before using the product for special purposes such as nuclear power electric power aerospace medicine or passenger movement vehicles consult with Mit...

Страница 11: ...rmance Specifications 3 2 3 3 Power Supply Specifications 3 14 4 PART NAME 4 1 to 4 12 4 1 Front Panel 4 1 4 1 1 GT1020 GT1030 4 1 4 1 2 GT104 4 1 4 1 3 GT105 4 2 4 2 Back Panel 4 3 4 2 1 GT1020 LBD LWD LBDW LWDW 4 3 4 2 2 GT1020 LBD2 LWD2 LBDW2 LWDW2 4 5 4 2 3 GT1020 LBL LWL LBLW LWLW 4 6 4 2 4 GT1030 LBD LWD LBDW LWDW 4 7 4 2 5 GT1030 LBD2 LWD2 LBDW2 LWDW2 4 9 4 2 6 GT1030 LBL LWL LBLW LWLW 4 10...

Страница 12: ...5 7 4 7 1 6 GOT s ground 7 5 7 1 7 The cause of malfunctions related wiring Remedy 7 6 7 2 Wiring inside and outside the panel 7 8 7 2 1 Wiring inside 7 8 7 2 2 Outside the panel 7 8 7 2 3 Attaching surge killers to control equipment 7 9 8 OPTION 8 1 to 8 24 8 1 Protective Sheet 8 1 8 1 1 Applicable protective sheet 8 1 8 1 2 Installing procedure 8 2 8 2 RS 232 USB conversion adaptor 8 3 8 2 1 Sha...

Страница 13: ...ng function 10 1 10 1 2 Language display operation 10 1 10 1 3 Language setting operation 10 1 11 COMMUNICATION INTERFACE SETTING COMMUNICATION SETTING 11 1 to 11 24 11 1 Standard I F Setting 11 1 11 1 1 Standard I F functions 11 1 11 1 2 Standard I F display operation 11 1 11 1 3 Display contents of standard I F 11 2 11 1 4 Detail information setting operation 11 6 11 1 5 Channel setting operatio...

Страница 14: ... 14 2 14 2 1 Function of OS information 14 2 14 2 2 Display operation of OS information screen 14 2 14 2 3 OS information operation 14 3 14 3 Font Data 14 4 14 3 1 Function of font data 14 4 14 3 2 Display operation of font data screen 14 4 14 3 3 Font data operation 14 5 14 4 Clear data 14 6 14 4 1 Clear data functions 14 6 14 4 2 Clear data display 14 6 14 4 3 Clear data operation 14 6 14 5 GT10...

Страница 15: ...tions 15 42 16 CLEANING OF DISPLAY SECTION CLEAN 16 1 16 1 Clean 16 1 16 1 1 Display operation of clean 16 1 17 OS INSTALLATION 17 1 to 17 4 17 1 About the OS 17 1 17 2 Standard monitor OS Communication Driver Installation 17 1 17 3 Standard Monitor OS Communication Driver Installation Using Memory Board 17 3 17 3 1 Installation method when the GOT is turned on 17 3 18 MAINTENANCE AND INSPECTION 1...

Страница 16: ...s Describes methods of the GT Designer3 installation operation basic operation for drawing and transmitting data to GOT1000 series Sold separately 1 SH 080866ENG 1D7MB9 GT Designer3 Version1 Screen Design Manual For GOT1000 Series Functions 1 2 GT Designer3 Version1 Screen Design Manual For GOT1000 Series Functions 2 2 Describes methods of the GT Designer3 installation operation basic operation fo...

Страница 17: ...bbreviation of GT1565 VTBA GT1565 VTBD GT1562 VN Abbreviation of GT1562 VNBA GT1562 VNBD GT155 GT1555 V Abbreviation of GT1555 VTBD GT1555 Q Abbreviation of GT1555 QTBD GT1555 QSBD GT1550 Q Abbreviation of GT1550 QLBD GT15 GT15 Abbreviation of GT1595 GT1585 GT157 GT156 GT155 GT115 GT1155 Q Abbreviation of GT1155 QTBDQ GT1155 QSBDQ GT1155 QTBDA GT1155 QSBDA GT1155 QTBD GT1155 QSBD GT1150 Q Abbrevia...

Страница 18: ...10 communication unit GT15 75J71LP23 Z 1 GT15 75J71BR13 Z 2 CC Link IE controller network communication unit GT15 J71GP23 SX CC Link communication unit GT15 J61BT13 GT15 75J61BT13 Z 3 CC Link interface unit GT11HS CCL Interface converter unit GT15 75IF900 Serial multi drop connection unit GT01 RS4 M Connection Conversion Adapter GT10 9PT5S Abbreviations and generic terms Description Printer unit G...

Страница 19: ...SCB GT15 50PSGB GT15 50PSCW GT15 50PSGW For GT11 GT11 50PSCB GT11 50PSGB GT11 50PSCW GT11 50PSGW GT11H 50PSC For GT10 GT10 50PSCB GT10 50PSGB GT10 50PSCW GT10 50PSGW GT10 40PSCB GT10 40PSGB GT10 40PSCW GT10 40PSGW GT10 30PSCB GT10 30PSGB GT10 30PSCW GT10 30PSGW GT10 20PSCB GT10 20PSGB GT10 20PSCW GT10 20PSGW Protective cover for oil GT05 90PCO GT05 80PCO GT05 70PCO GT05 60PCO GT05 50PCO USB enviro...

Страница 20: ...eviation of GX Works2 with the simulation function GX Simulator Abbreviation of SW D5C LLT E EV type ladder logic test tool function software packages SW5D5C LLT EV or later versions Document Converter Abbreviation of document data conversion software Document Converter for GOT1000 series PX Developer Abbreviation of SW D5C FBDQ E type FBD software package for process control MT Works2 Abbreviatio...

Страница 21: ...actured by Schneider Electric SA SIEMENS PLC Abbreviation of PLC manufactured by Siemens AG Temperature controller OMRON temperature controller Abbreviation of temperature controller manufactured by OMRON Corporation SHINKO indicating controller Abbreviation of temperature controller manufactured by Shinko Technos Co Ltd CHINO controller Abbreviation of temperature controller manufactured by CHINO...

Страница 22: ... check operation Carries out write read check of memory When drive is not displayed When the drive memory to check is not displayed confirm the mounting procedure or memory type with reference to the following CF card inserting removing method Section 7 1 CF Card When no faults are found in mounting etc a memory failure may be arosen Replace the CF card or Flash memory For details of Flash memory ...

Страница 23: ...ay Comment display and Numeric display can be arditrarily arranged on the display A horizontal format or vertical format may be selected for displaying a user s project Moreover multiple screens created within drawing software can be individually selected or overlapped for the display For details refer to the following GT Designer2 Version Basic Operation Data Transfer Manual GT Designer2 Version ...

Страница 24: ...he GT Works 2 GT Designer2 GT Works 3 GT Designer3 in PDF format Purpose GT Designer2 Version Basic Operation Data Transfer Manual 1 GT Designer3 Version Screen Design Manual Fundamentals 1 GT Designer2 Version Screen Design Manual 1 GT Designer3 Version Screen Design Manual Functions 1 Installing product on PC Creating projects Creating screens Drawing figures Making Common Settings Placing Setti...

Страница 25: ...y function b GT Simulator 2 Version Operation Manual Describes how to simulate the created project data with GT Simulator2 c GT Converter2 Version Operating Manual Describes how to use the GT Converter2 Purpose GT15 General Description GT 11 General Description GT 10 General Description GT15 User s Manual GT11 User s Manual GT10 User s Manual GOT1000 Series Connection Manual 1 Confirming part name...

Страница 26: ...maximum of 115 2kbps High speed display and high speed touch switch response 2 More efficient GOT operations including screen design startup adjustment management and maintenance works Recipe function Device monitor function and FX list editor function for GT104 GT105 only and Device monitor for GT105 only Factory installed OS on the GOT For GT1020 GT1030 and GT104 LED type backlight is adopted no...

Страница 27: ...ntroller The communication driver for the FX series is factory installed 2 Install the project data that were created with GT Designer2 or GT Designer3 on the GOT End Start the monitor Display each screen Connect the GOT and the destination connector Check the communication settings Turn on the GOT power and the system of the connection destination Start Connect GOT and PC with a RS 232 USB conver...

Страница 28: ...annot be connected to printers RS 232 USB conversion adaptor GOT Serial multi drop connection unit Personal computer Commercially available Protective sheet RS 232 cable designed exclusively for use with the GOT USB cable designed exclusively for use with the GOT GT10 LDR Memory Loader USB connecting cable supplied RS 232 Connect to the RS 232 connector of the RS 232 USB conversion adaptor Bar cod...

Страница 29: ...104 GT105 Debug stand and protective cover for oil are only available for GT105 GT10 cannot be connected to printers GOT Personal computer Commercially available Memory board Connector conversion adapter Protective sheet Debug stand Bar code reader Commercially available Protective cover for oil Serial multi drop connection unit MITSUBISHI GOT1000 ...

Страница 30: ... and white A D L 100 to 240VAC 24VDC 5VDC T TFT color High intensity wide angle view N TFT color S STN color L STN monochrome black and white B STN monochrome blue and white GOT 1000 series GT15 GT11 GT10 Panel color type Screen size type Display color type Resolution Power type 2 Blank RS 232 RS 422 W Blank white red pink green red orange Interface type 2 for communication with PLC Backlight type...

Страница 31: ...the option model name 1 There are optional components common for GT15 GT11 and GT10 90 Dedicated for 15 0 80 Dedicated for 12 1 75 Common for 10 4 8 4 70 Dedicated for 10 4 60 Dedicated for 8 4 50 Dedicated for 5 7 40 Dedicated for 4 7 30 Dedicated for 4 5 20 Dedicated for 3 7 15 For GT15 1 11 For GT11 1 09 05 01 10 For GT10 1 For GT15 GT11 GT10 1 G T ...

Страница 32: ...D2 4 5 288 96 dots STN monochrome black and white liquid crystal 3 colors green red orange LED backlight built in battery 24VDC PLC connection interface RS 232 GT1030 LBL LWL 4 5 288 96 dots STN monochrome black and white liquid crystal 3 colors green red orange LED backlight built in battery 5VDC PLC connection interface RS 422 GT1030 LBDW LWDW 4 5 288 96 dots STN monochrome black and white liqui...

Страница 33: ...DIN 8 pins connector and GOT For GT1030 GT1020 GT10 C30R4 8P 3m GT10 C100R4 8P 10m GT10 C200R4 8P 20m GT10 C300R4 8P 30m GT10 C10R4 8PL 1 1m QnA A FXCPU direct connection cable computer link connection cable GT01 C30R4 25P 3m For connecting QnA A FXCPU D sub 25 pins connector and GOT For connecting serial communication unit AJ71QC24 N R4 and GOT For GT104 GT105 GT01 C100R4 25P 10m GT01 C200R4 25P ...

Страница 34: ...able GT09 C30R2 9P 3m For connecting computer link unit serial communication unit and GOT For GT104 GT105 GT09 C30R2 25P 3m Product name Model name Cable length Description RS 422 cable GT09 C30R40101 9P 3m For connecting GOT to OMRON PLC serial communication module serial communication board GT09 C100R40101 9P 10m GT09 C200R40101 9P 20m GT09 C300R40101 9P 30m GT09 C30R40102 9P 3m For connecting G...

Страница 35: ...09 C30R20901 25P 3m For connecting GOT to MATSUSHITA RS422 232C conversion adaptor GT09 C30R20902 9P 3m For connecting GOT to the tool port or RS232C port of MATSUSHITA PLC computer communication unit GT09 C30R20903 9P 3m For connecting GOT to the RS232C port of MATSUSHITA PLC GT09 C30R20904 3C 3m For connecting GOT to the RS232C port of MATSUSHITA PLC Product name Model name Cable length Descript...

Страница 36: ...SCW Display section clear Frame white With a logo 5 sheets GT10 40PSGB 4 7 protective sheet For GT104 Display section antiglare Frame transparent 5 sheets GT10 40PSCB Display section clear Frame transparent 5 sheets GT10 40PSGW Display section antiglare Frame white With a logo 5 sheets GT10 40PSCW Display section clear Frame white With a logo 5 sheets GT10 50PSGB 5 7 protective sheet For GT105 Dis...

Страница 37: ...GT01 C30R2 9S 3m For connecting PC drawing software D sub 9 pins female 2 and GOT For GT104 GT105 For connection to the USB port on the PC RS 232 USB conversion adaptor for data transfer GT10 RS2TUSB 5S RS 232 USB conversion adaptor for data transfer RS 232 USB conversion adaptor and PC are connected with a GT09 C30USB 5P cable Data transfer cable GT09 C30USB 5P 3 3m For connecting PC drawing soft...

Страница 38: ...MELFANSweb home page http wwwf2 mitsubishielectric co jp melfansweb english index_e htm Memory board Sold separately For GT104 GT105 Serial multi drop connection unit Sold separately Connector conversion adapter Sold separately For GT104 GT105 Product name Model name Contents Bar code reader Commercially available bar code reader 6 Product name Model name Contents Memory board GT10 50FMB For copyi...

Страница 39: ...2 only non conductive pollution occurs but temporary conductivity may be produced due to condensation 5 Except 5V power supply type Item Specifications Operating ambient temperature Display section 0 to 50 Other than display section 0 to 55 when horizontally installed 0 to 50 when vertically installed Storage ambient temperature 20 to 60 Operating ambient humidity 1 10 to 90 RH non condensing Stor...

Страница 40: ...3 Flash memory Internal for storing project data 512 Kbytes or less OS Alarm history and Recipe data Life Number of write times 100 000 times Built in interface PLC communication RS 422 1ch Transmission speed 115 200 57 600 38 400 19 200 9 600 4 800bps Connector shape Connector terminal block 9 pins Application PLC communication Hardware version A to D RS 422 485 1ch Transmission speed 115 200 57 ...

Страница 41: ... the outside of the display angle the display color seems like it has changed Please note that it is due to its characteristic Please note that the response time brightness and color of the liquid crystal display panel may vary depending on the usage environmental temperature When the same screen is displayed for a long time an incidental color or partial discoloration is generated on the screen d...

Страница 42: ...e Number of write times 100 000 times Built in interface PLC communication RS 422 1ch Transmission speed 115 200 57 600 38 400 19 200 9 600 4 800bps Connector shape Connector terminal block 9 pins Application PLC communication Hardware version A to D RS 422 485 1ch Transmission speed 115 200 57 600 38 400 19 200 9 600 4 800bps Connector shape Connector terminal block 9 pins Application PLC communi...

Страница 43: ... liquid crystal display panel Please note that it appears due to its characteristic When the display section is seen from the outside of the display angle the display color seems like it has changed Please note that it is due to its characteristic Please note that the response time brightness and color of the liquid crystal display panel may vary depending on the usage environmental temperature Wh...

Страница 44: ...roject data 1 5Mbytes or less OS Life Number of write times 100 000 times Battery GT11 50BAT lithium battery Backup target Clock data alarm history and recipe data Life Approx 5 years Operating ambient temperature of 25 Built in interface PLC communication RS 422 1ch Transmission speed 115 200 57 600 38 400 19 200 9 600 4 800bps Connector shape Connector terminal block 9 pins Application PLC commu...

Страница 45: ...changed Please note that it is due to its characteristic Please note that the response time brightness and color of the liquid crystal display panel may vary depending on the usage environmental temperature When the same screen is displayed for a long time an incidental color or partial discoloration is generated on the screen due to heat damage and it may not disappear To prevent heat damage the ...

Страница 46: ... Number of write times 100 000 times Battery GT11 50BAT lithium battery Backup target Clock data alarm history and recipe data Life Approx 5 years Operating ambient temperature of 25 Built in interface PLC communication RS 422 1ch Transmission speed 115 200 57 600 38 400 19 200 9 600 4 800bps Connector shape Connector terminal block 9 pins Application PLC communication Hardware version A RS 422 48...

Страница 47: ...display color seems like it has changed Please note that it is due to its characteristic Please note that the response time brightness and color of the liquid crystal display panel may vary depending on the usage environmental temperature When the same screen is displayed for a long time an incidental color or partial discoloration is generated on the screen due to heat damage and it may not disap...

Страница 48: ...ife Number of write times 100 000 times Battery GT11 50BAT lithium battery Backup target Clock data alarm history and recipe data Life Approx 5 years Operating ambient temperature of 25 Built in interface RS 422 RS 422 485 1ch Transmission speed 115 200 57 600 38 400 19 200 9 600 4 800bps Connector shape D sub 9 pins Female Application PLC communication Terminating resistor 4 Open 110 330 Switched...

Страница 49: ...n them A crosstalk shadow as an extension of the display may appear on the liquid crystal display panel Please note that it appears due to its characteristic When the display section is seen from the outside of the display angle the display color seems like it has changed Please note that it is due to its characteristic Please note that the response time brightness and color of the liquid crystal ...

Страница 50: ...ernal for storing project data 3Mbytes or less OS Life Number of write times 100 000 times Battery GT11 50BAT lithium battery Backup target Clock data alarm history and recipe data Life Approx 5 years Operating ambient temperature of 25 Built in interface RS 422 RS 422 1ch Transmission speed 115 200 57 600 38 400 19 200 9 600 4 800bps Connector shape D sub 9 pins Female Application PLC communicati...

Страница 51: ...panel Please note that it appears due to its characteristic When the display section is seen from the outside of the display angle the display color seems like it has changed Please note that it is due to its characteristic Please note that the response time brightness and color of the liquid crystal display panel may vary depending on the usage environmental temperature When the same screen is di...

Страница 52: ... LBLW GT1020 LWLW GT1030 LBL GT1030 LWL GT1030 LBLW GT1030 LWLW Input power supply voltage 24VDC 10 15 ripple voltage 200mV or less 5VDC 5 supplied from the PLC Fuse built in not exchangeable 0 4A 0 5A Power consumption 1 9W 80mA 24VDC or less 2 2W 90mA 24VDC or less 1 1W 220mA 5VDC or less At backlight off 1 2W 50mA 24VDC or less 1 7W 70mA 24VDC or less 0 6W 120mA 5VDC or less Inrush current 13A ...

Страница 53: ...1055 QSBD GT1050 QBBD Input power supply voltage 24VDC 10 15 ripple voltage 200mV or less Fuse built in not exchangeable 1 0A Power consumption 3 6W 150mA 24VDC or less 9 84W 410mA 24VDC or less 9 36W 390mA 24VDC or less At backlight off 2 9W 120mA 24VDC or less 4 32W 180mA 24VDC or less Inrush current 15A or less 26 4VDC 2ms Permissible instantaneous power failure time Within 5ms Noise immunity N...

Страница 54: ...ochrome white black liquid crystal 2 Touch key For operating the touch switches in the utility screen and the user creation screen No Name Specifications 1 Display screen Displays the utility screen and the user creation screen GT1045 QSBD 320 240 dots STN color liquid crystal GT1040 QBBD 320 240 dots STN monochrome white blue liquid crystal 2 Touch key For operating the touch switches in the util...

Страница 55: ...en and the user creation screen GT1055 QSBD 320 240 dots STN color liquid crystal GT1050 QBBD 320 240 dots STN monochrome white blue liquid crystal 2 Touch key For operating the touch switches in the utility screen and the user creation screen 3 POWER LED Green light Power is supplied Orange light Screeen saving At backlight off Green Orange flashing Blown backlight bulb POWER LED is not lit Power...

Страница 56: ...anel 4 2 1 GT1020 LBD LWD LBDW LWDW 4 2 Back Panel 4 2 1 GT1020 LBD LWD LBDW LWDW 1 2 1 2 Hardware version A to D Hardware version E or later 3 4 5 6 5 RS 232 FG INPUT 24VDC RS 422 CSB SDA SDB RDA RDB SG RSA RSB CSA ...

Страница 57: ...rface RS 422 For connection to a controller PLC 9 pin connector terminal block 2 Power terminal 24VDC 10 15 3 PC connection interface RS 232 For PC connection OS installation Project data download transparent MINI DIN 6 pins female 4 Rating plate nameplate 5 Hole for unit installation fitting Hole for mounting fitting supplied to mount the GOT on the panel 4 holes at the top and bottom 6 Terminati...

Страница 58: ...2 For connection to a controller PLC 9 pin connector terminal block 2 Power terminal 24VDC 10 15 3 PC connection interface RS 232 For PC connection OS installation Project data download transparent MINI DIN 6 pins female 4 Rating plate nameplate 5 Hole for unit installation fitting Hole for mounting fitting supplied to mount the GOT on the panel 4 holes at the top and bottom 1 2 1 2 3 4 5 5 RS 232...

Страница 59: ...nnection Manual No Name Specifications 1 PLC connection interface RS 422 For connection to a controller PLC 9 pin connector terminal block 2 PC connection interface RS 232 For PC connection OS installation Project data download transparent MINI DIN 6 pins female 3 Rating plate nameplate 4 Hole for unit installation fitting Hole for mounting fitting supplied to mount the GOT on the panel 4 holes at...

Страница 60: ...4 7 4 2 Back Panel 4 2 4 GT1030 LBD LWD LBDW LWDW 4 2 4 GT1030 LBD LWD LBDW LWDW Battery cover opened 5 8 Hardware version A Hardware version B or later 5 7 1 1 2 2 3 4 3 6 ...

Страница 61: ...VDC 10 15 3 PC connection interface RS 232 For PC connection OS installation Project data download transparent MINI DIN 6 pins female 4 Rating plate nameplate 5 Hole for unit installation fitting Hole for mounting fitting supplied to mount the GOT on the panel 4 holes at the top and bottom 6 Battery cover Open or close when replacing the battery 7 Battery GT11 50BAT battery for storing clock data ...

Страница 62: ...ion interface RS 232 For PC connection OS installation Project data download transparent MINI DIN 6 pins female 4 Rating plate nameplate 5 Hole for unit installation fitting Hole for mounting fitting supplied to mount the GOT on the panel 4 holes at the top and bottom 6 Battery cover Open or close when replacing the battery 7 Battery GT11 50BAT battery for storing clock data alarm history and reci...

Страница 63: ...nnection to a controller PLC 9 pin connector terminal block 2 PC connection interface RS 232 For communicating with controller PLC microcomputer board etc D sub 9 pin female 3 Rating plate nameplate 4 Hole for unit installation fitting Hole for mounting fitting supplied to mount the GOT on the panel 4 holes at the top and bottom 5 Battery cover Open or close when replacing the battery 6 Battery GT...

Страница 64: ...USB cover Open or close when using the USB interface 5 Power terminal Power terminal and FG terminal for power supply 24VDC to GOT and grounding 6 Rating plate nameplate 7 Hole for unit installation fitting Hole for the inserting installation fittings accessory during the GOT installation to the panel 4 holes at top and bottom 8 Battery cover Open or close when replacing the battery 9 Battery GT11...

Страница 65: ...rface 5 Power terminal Power terminal and FG terminal for power supply 24VDC to GOT and grounding 6 Power terminal cover Open or close when connecting a power terminal Color transparent Hardware version B or later 7 Rating plate nameplate 8 Hole for unit installation fitting Hole for the inserting installation fittings accessory during the GOT installation to the panel 4 holes at top and bottom 9 ...

Страница 66: ...ot unduly affected by electromagnetic interference immunity The applicable products are requested to meet these requirements The sections 5 1 1 through 5 1 3 summarize the precautions on conformance to the EMC Directive of the machinery constructed using the GOT The details of these precautions has been prepared based on the requirements and the applicable standards control However we will not ass...

Страница 67: ...ase use the GOT whose hardware version is later than that described Confirm the hardware version with the products rating plate Products that the EMC Directive applies to are marked with the CE mark logo Item EMC Directive Hardware version GT1020 LBD LWD LBD2 LWD2 LBL LWL LBDW LWDW LBDW2 LWDW2 LBLW LWLW A GT1030 LBD LWD LBD2 LWD2 LBDW LWDW LBDW2 LWDW2 A GT1045 QSBD GT1040 QBBD A GT1055 QSBD GT1050...

Страница 68: ...e correctly applied precautions the better the systems Electro magnetic Compatibility The ferrite recommended is a TDK ZCAT3035 1330 or similar The ferrite should be placed as near to the 24V DC terminals of the GT1045 QSBD GT1040 QBBD GT1055 QSBD and GT1050 QBBD as possible which should be within 75mm of the GOT terminal GOT Unit Existing Cables User Made Cables GT1020 LBD LWD LBL LWL LBDW LWDW L...

Страница 69: ...ion When installing the memory board and the battery wear an earth band etc to avoid the static electricity The static electricity can cause the unit to fail or malfunction MOUNTING PRECAUTIONS CAUTION Use the GOT in the environment that satisfies the general specifications described in this manual Not doing so can cause an electric shock fire malfunction or product damage or deterioration When mo...

Страница 70: ...en connecting to the GOT Therefore consider the connector dimensions and bending radius of the cable as well for installation RS 232 FG INPUT 24VDC RS 422 CSB SDA SDB RDA RDB SG RSA RSB CSA Unit mm inch 84 3 3 65 2 55 76 2 99 104 4 09 76 2 99 10 0 39 10 0 39 10 0 39 10 0 39 3 0 11 5 0 19 9 5 0 37 4 0 15 23 0 9 25 0 98 to 28 1 1 RS 232 cable for connecting personal computer 80 3 14 or more Mounting...

Страница 71: ...ired Applicable cable Some cables may need to be longer than the specified dimensions when connecting to the GOT Therefore consider the connector dimensions and bending radius of the cable as well for installation 4 5 16 84 3 3 9 5 10 10 17 65 2 55 25 0 98 RS 232 cable for connecting personal computer 25 5 1 to 28 5 1 12 0 37 136 5 35 0 62 10 0 39 84 3 3 10 0 39 0 66 0 39 84 3 3 0 39 Unit mm inch ...

Страница 72: ...cal format is selected the dimension which is rotated 90 degrees clockwise looking from the display section side is required Applicable cable Some cables may need to be longer than the specified dimensions when connecting to the GOT Therefore consider the connector dimensions and bending radius of the cable as well for installation Unit mm inch 129 5 07 121 4 76 102 4 01 40 1 57 Unit mm inch 129 5...

Страница 73: ...imensions Horizontal format Vertical format If the vertical format is selected the dimension which is rotated 90 degrees clockwise looking from the display section side is required Applicable cable Some cables may need to be longer than the specified dimensions when connecting to the GOT Therefore consider the connector dimensions and bending radius of the cable as well for installation Unit mm in...

Страница 74: ...red to allow for the attachment of mounting fixtures Horizontal format Vertical format Unit mm inch A B C C A B Unit mm inch C C GOT A mm inch B mm inch C mm inch GT1020 105 4 13 1 0 03 0 0 66 2 59 1 0 03 0 0 13 0 51 or more GT1030 137 5 39 1 0 03 0 0 66 2 59 1 0 03 0 0 13 0 51 or more GT104 130 5 11 1 0 03 0 0 103 4 05 1 0 03 0 0 13 0 51 or more GT105 153 6 03 2 0 07 0 0 121 4 77 2 0 07 0 0 10 0 ...

Страница 75: ... format GT104 GT105 1 80 mm 3 14 or more if an USB cable memory board is used Installation Environment A B C D E In the presence of radiated noise or heat generating equipment nearby 50 mm 1 97 or more 50 mm 1 97 or more 50 mm 1 97 or more 50 mm 1 97 or more 80 mm 3 14 or more In the absence of radiated noise or heat generating equipment nearby 20 mm 0 79 or more 1 20 mm 0 79 or more 20 mm 0 79 or...

Страница 76: ... radiated noise or heat generating equipment nearby 50 mm 1 97 or more 50 mm 1 97 or more 50 mm 1 97 or more 50 mm 1 97 or more 80 mm 3 14 or more In the absence of radiated noise or heat generating equipment nearby 20 mm 0 79 or more 20 mm 0 79 or more 1 20 mm 0 79 or more 20 mm 0 79 or more 2 Installation Environment A B C D E In the presence of radiated noise or heat generating equipment nearby...

Страница 77: ...e the control panel is 40 to 55 the mounting angle should be in the range from 60 to 105 degrees The GOT will have a longer lifetime if used within the mounting angles shown above Ideally the temperature inside the control panel should not exceed 0 to 40 2 Vertical installation When the temperature inside the control panel is 40 to 50 the mounting angle should be in the range from 60 to 105 degree...

Страница 78: ...ng the packing Install packing to the packing installation groove on the back panel of the GOT For GT105 While referring to the cross sectional view of the packing shown right push the thinner side into the packing groove Right drawing is the example of lateral format 2 Inserting into the panel face Insert the GOT from the front side of the panel Right drawing is the example of lateral format Pack...

Страница 79: ...and then fix them with the mounting screws supplied The GOT will be fixed in 4 upper lower parts Tighten the mounting screw with the specified torque Failure to do so may distort the panel and make a surface waviness on the protective sheet For GT1020 GT1030 GT104 For GT105 4 A protection film is attached on the display section of GOT prior to shipment Remove the film when the installation is comp...

Страница 80: ...r system and the control system separately WIRING PRECAUTIONS DANGER Be sure to shut off all phases of the external power supply used by the system before wiring Failure to do so may result in an electric shock product damage or malfunctions Please make sure to ground FG terminal of the GOT power supply section by applying 100 or less which is used exclusively for the GOT Not doing so may cause an...

Страница 81: ... sleeve to the wire end 1 Electrical wire size 2 Wire end processing 1 Connecting the wire directly a Twist the end of the stranded wire Make sure there are no wire whiskers b Do not solder the wire end 2 Using a ferrules with plastic sleeve to connect the wire A wire with a too thick of a wire sheath may not fit the insulation sleeve Refer to the outline drawing for how to select the proper size ...

Страница 82: ...in For grounding 2mm2 min Solderless terminal M3 solderless terminal Recommended applicable solderless terminal JST Part No FV0 5 3 Pressure Bonding Tool YHT 2622 JST Part No FV1 25 B3A Pressure Bonding Tool YNT 2216 JST Part No FV2 MS3 Pressure Bonding Tool YNT 1614 Tightening torque for the power terminals 0 22 to 0 25 N m Terminal screw Solderless terminal Terminal screw 6 2mm or less 3 2 3 2 6...

Страница 83: ...RT NAME 5 EMC DIRECTIVE 6 INSTALLATION 7 WIRING 8 OPTION 7 1 4 Wiring example GT104 7 1 5 Wiring example GT105 Tightening torque for the power terminals 0 22 to 0 25 N m Tightening torque for the power terminals 0 5 to 0 8 N m INPUT 24V DC DC24V 10 15 Class D grounding Class D grounding DC24V 10 15 INPUT 24V DC ...

Страница 84: ...n in fig 2 below Set the grounding point closer to the GOT to make the grounding cable short as possible Provide grounding using a single grounding wire Refer to the table below to select the proper size grounding wire For GT1020 GT1030 GT104 For GT105 Ground wire size Solid wire Stranded wire Ferrules with plastic sleeve 1 5mm2 AWG16 1 0mm2 AWG16 0 5mm2 AWG20 Ground wire size 2mm2 or more GOT Oth...

Страница 85: ...h other will help minimize noise interference 2 Connecting the ground cable from the panel that houses control equipment to the panel to which the GOT is grounded When running a single ground cable from the panel that houses such piece of control equipment as a sequencer to the panel to which the GOT is grounded the ground cable may have to be directly connected to the terminal on the GOT If elect...

Страница 86: ...taken Wind the wire around the ferrite core several times approx 3 times if a ferrite core is used If the wiring method as shown in Remedy 2 1 is not feasible follow Remedy 2 2 FG Ground cable from the panel that houses control equipment Connection cable Panel grounding Remedy1 1 Use the thickest cable possible Ground cable from the panel that houses control equipment Connection cable Panel ground...

Страница 87: ...ol equipment 7 2 2 Outside the panel To pull the power line and communication cable out of the panel make two pullout holes away from each other and pull the cables through Putting both cables through the same pullout hole will increase noise interference Keep the power line and communication cable inside the duct at least 100 mm away from each other If that is not possible the use of a metal sepa...

Страница 88: ...oblem happens keep the ground cable and communication cable away from the load If that is not possible an installation of a surge killer will help reduce noise interference Place the surge killer as close to the load as possible Remedy for AC inductive load Remedy for DC inductive load Output AC C R L Load Keep the ground cable and communication cable away from each other Place the surge killer ne...

Страница 89: ...PSCW Display section clear Frame white With a logo 5 sheets GT10 30PSGB 4 5 protective sheet For GT1030 Display section antiglare Frame transparent 5 sheets GT10 30PSCB Display section clear Frame transparent 5 sheets GT10 30PSGW Display section antiglare Frame white With a logo 5 sheets GT10 30PSCW Display section clear Frame white With a logo 5 sheets GT10 40PSGB 4 7 protective sheet For GT104 D...

Страница 90: ...ve sheet and attach its adhesive side to the GOT display section When attaching the protective sheet make sure to fit it on the display section closely without leaving any clearance between them 3 Peel off the protective film on the protective sheet Remark Replacement time of protective sheet Check the status of the protection sheet visually by to the daily inspection The visibility becomes worse ...

Страница 91: ...n in the figures below Name Specifications Communication connector for RS 232 connection MINI DIN 6 pins male For connection to the interface for communication with PC on the GOT Communication connector for USB connection USB MINI For connection to the GT09 C30USB 5P USB cable Display LED POWER Green Lit when the power is properly supplied Lit when connected to the PC with a USB cable Display LED ...

Страница 92: ...conversion adaptor 3 Connect the RS 232 connector on the RS 232 USB conversion adaptor to the GOT 4 Connect the USB connector on the GT09 C30USB 5P USB cable to the PC 5 Turn on the GOT power 6 Turn on the PC power 7 Confirm that the POWER LED POWER on the RS 232 USB conversion adaptor is lit Lit POWER LED on the RS 232 USB conversion adaptor indicates that the power is properly supplied from the ...

Страница 93: ...llation is canceled uninstall the driver and install again Please refer to Section 8 2 4 for instructions on uninstalling the driver Please install the driver with the following procedure 1 When the USB cable is connected to the personal computer the following screen is displayed Installation of the software for USB driver For GT Designer2 Insert the included CD ROM into the personal computer s CD...

Страница 94: ...t software begins and ends automatically The CD ROM can be removed from the personal computer at this time If using Windows 2000 or Windows XP proceed to step 4 The following screen is displayed Click Next The installation of the USB Serial Port software will begin If using Windows 2000 a screen to select the location of the installation files is displayed Please select the CD ROM drive 5 The scre...

Страница 95: ...ONFIGURATION 3 SPECIFICATIONS 4 PART NAME 5 EMC DIRECTIVE 6 INSTALLATION 7 WIRING 8 OPTION 6 The following screen is displayed Click Finish The installation of the USB Serial Port software will finish The CD ROM USB driver software can be removed from the personal computer at this time ...

Страница 96: ...properly When this happens reinstall the driver software 1 Detach the USB cable from the personal computer Click Start Control Panel Add or Remove Programs in the menu of the personal computer the window below will be displayed In case of Windows 98SE Windows Millennium Edition and Windows 2000 A screen that is equivalent to the one below is displayed by clicking My Computer Control Panel Add Remo...

Страница 97: ... 1 Applicable battery The following battery is applicable for GT1030 GT104 GT105 8 3 2 Battery specifications Remark For the battery directive in EU member states refer to 18 4 Handling of Batteries and Devices with Built in Batteries in EU Member States Model Contents GT11 50BAT Battery for backup of clock data alarm history and recipe data Item Specifications Type Magnesium manganese dioxide lit...

Страница 98: ...onnector within 30s 5 Insert the new battery into the holder and close the back cover 6 Turn the GOT power on 7 Check if the battery condition is normal with the utility Refer to the following for the details of battery status display Chapter 13 CLOCK SETTINGS AND BATTERY STATUS DISPLAY TIME SETTING AND DISPLAY Connector Back cover Holder Back cover Connector Back cover Holder Connector For GT1030...

Страница 99: ...replacement battery can be confirmed by the lot No marked on the nameplate label affixed on the battery 2 Battery procurement The battery is susceptible to natural discharge Order one when necessary 7 1 0 0 0 Control number Year example 2007 last digit 1 Month example Jan 1 to 9 Jan to Sep X Oct Y Nov Z Dec GRAPHIC OPERATION TERMINAL MODEL IN 20 4 SERIAL MITSUBISHI ELECTRIC CORPORATION MADE IN JAP...

Страница 100: ...equired Refer to the following manual for details about driver installation GT Designer2 Version Basic Operation Data Transfer Manual GT Designer3 Version Screen Design Manual Fundamentals 1 When GT10 LDR is connected to a PC via the USB hub the power supply of the USB hub must be supplied by the AC adopter of the USB hub GT10 LDR connected to the USB hub may not work properly depending on the PC ...

Страница 101: ...data to be transferred 6 ENT key Switch to determine the transfer direction and the data to be transferred and to start the transfer 7 Write protection switch Switch to prevent the memory loader from being written to the data 8 USB port Connection port with a PC with protection cap 9 Reference plate operating instructions Described operating instructions of tne memory loader 10 Reference plate err...

Страница 102: ...r PC The project data or resource data is read out from the memory loader to a PC 3 Memory loader GOT PROJECT OS All data in the memory loader is written to the GOT PROJECT Only the project data in the memory loader is written to the GOT 4 GOT Memory loader PROJECT OS 1 After all data in the memory loader is deleted all data in the GOT is read out to the memory loader PROJECT After all data in the...

Страница 103: ...When transferring the font data from the memory loader to the GOT When transferring the font data from the memory loader to the GOT it takes more time than transferring only the standard monitor OS and communication driver It takes approximately 1 minute and 45 seconds to transfer Standard monitor OS Communication driver It takes approximately 8 minutes and 10 seconds to transfer Standard monitor ...

Страница 104: ...oard 1 Inrtallation Model Contents GT10 50FMB For transferring project data the OS or font data 1 Turn the GOT power off 2 Remove the memory board cover For GT104 For GT105 3 Set to OFF the protection switch in the memory board 4 Mount the memory board to the memory board connector on the GOT rear face For GT104 For GT105 5 Turn the GOT power on 6 Make the setting for transferring the data with th...

Страница 105: ... INSTALLATION 7 WIRING 8 OPTION 2 Removing Precautions for installing removing the memory board When installing or removing the memory board be sure to power off the GOT main unit Install the memory board cover when not using the memory board 1 Turn the GOT power off 2 Pull up the memory board vertically and remove it For GT104 For GT105 Memory board Memory board ...

Страница 106: ...g angle of GOT with the angle adjusting fitting of the stand 2 Put the GOT into the stand from the stand front side and fix it using the fixtures For how to mount the GOT refer to the following Section 6 5 Installation Procedure For details of the stand refer to the following GT05 50STAND GOT1000 Series Stand User s Manual Product name Model Contents Stand GT05 50STAND Stand for 5 7 For GOT1000 Se...

Страница 107: ...below Remove the GOT from the control panel Make sure to externally shut off all phases of the power supply and remove all cables from the GOT in advance Clean dirt off surfaces of the GOT and control panel 1 Check that the rubber packing is installed on the GOT rear face and then fit the protective cover for oil to each corner of the GOT front face Position the POWER LED frame of the cover to the...

Страница 108: ...w one if necessary Do not push the protective cover for oil with pointed tools including mechanical pencils and screwdrivers Doing so causes scraches and damages of the cover Do not clean the protective cover for oil with bleaches thinners organic solvents corrosive chemicals and others Doing so causes changes in shape and color of the cover When the protective cover for oil is attached to the GOT...

Страница 109: ...he GOTs compatible with the GOT multi drop connection 2 Checking method of hardware version Confim the hardware version with the products rating plate GOT Hardware version Standard monitor OS GT1055 QSBD GT1050 QBBD Version C or later Standard monitor OS 01 12 GT1045 QSBD GT1040 QBBD Version A or later GT1030 LBD LWD GT1030 LBDW LWDW Version B or later GT1020 LBD LWD GT1020 LBDW LWDW Version E or ...

Страница 110: ...n D sub 9 pin male For RS 232 connection 5 Connector selection switch for PLC communication Switch for selecting RS 422 or RS 232 set to RS 422 by default 6 USB port For connecting to a personal computer for changing the communication driver 7 Connector for PLC communication D sub 9 pin female For RS 422 connection 8 Protective cover Protect unused D sub connector USB port and switches 9 Terminal ...

Страница 111: ... of 150mm 2 Directly installed to panel Install the multi drop connection module to the panel using 4 5mm holes 2 places 8 8 5 Caution for compliance with EMC Directive Programmable logic controllers are open type devices that must be installed and used within conductive control boxes Please use the Multi Drop Connection Unit while installed in conductive shielded control boxes Please secure the c...

Страница 112: ... the products rating plate 8 9 1 Applicable connector conversion adapter The following connector conversion adapter is applicable 8 9 2 Installing procedure GOT Hardware version Standard monitor OS GT1055 QSBD GT1050 QBBD Version C or later Standard monitor OS 01 12 GT1045 QSBD GT1040 QBBD Version A or later Model Contents GT10 9PT5S For GOT multi drop connection 1 Turn the GOT power off 2 Connect...

Страница 113: ...PC the GOT will not be able to communicate with the PC except when the Data transfer window is on the screen Communication monitor Displays the communication status of each communication port Keyword Sets a keyword of the FX series PLC Screen save Time Sets the screensaver activation time from the last time the screen was touched Setting range 0 to 60 min Screensaver is disabled when it is set to ...

Страница 114: ...LC Display of battery status Data OS information Displays the OS Standard monitor OS BootOS and communication driver versions Clear data Clears the project data and resource data on the GOT GT10 50FMB Datas are transferred between the memory boards Debug Device monitor Device monitor of PLC of intelligent module FX list editor The sequence program of FX PLC can be list edited Clean Display the scr...

Страница 115: ...x for notifying of absence of project data is displayed After the dialog box is displayed touch the button to display the main menu 2 When touching menu call key If you touch the menu call key while user created screen is displayed the main menu is displayed The menu call key can be set with the GOT utility screen or drawing software At factory shipment menu call key position it is set in the top ...

Страница 116: ...ord dialog box is displayed when trying to access the main menu of the utility display The password setting option in drawing software is located in the common menu Enter the password that has been set 1 Input operation of password 1 Input the password after touching to to key 2 Define the password by touching key after inputting password 3 To correct the input character touch key to delete the co...

Страница 117: ...ETTINGS 13 CLOCK SETTINGS AND BATTERY STATUS DISPLAY 14 FILE DISPLAY 15 GOT DEBUG 16 CLEANING OF DISPLAY SECTION When starting the GOT without selecting any language At factory shipment The following screen will be displayed at the initial startup of GOT Touching the button of a desired language restarts the GOT and the language is switched to the selected one ...

Страница 118: ...ows 1 Main Menu The menu items that can be selected from the GOT utility are displayed GT1020 GT104 GT105 1 Use the buttons to select an item from the menu 2 Touching a menu item in the main menu will display the setting screen or following selection screen for the item 3 Touching the button will take the screen back to the user screen ESC ...

Страница 119: ... Close Return button When a middle screen of the layers is displayed if the Close return button in the right corner of screen is touched returns to the previous screen If this button is touched when directly displayed from monitor screen the screen is closed and returns to monitor screen 3 Scroll button For screens in which the content does not fit on one screen page there is a right or down scrol...

Страница 120: ... Language setting operation 1 Language Item Contents Setting range Language Display language in which the utility functions and dialog windows are displayed can be selected or confirmed in this menu Japanese English At factory shipment Japanese 1 Touch Language to bring up the set up screen 2 Select a display language by touching the corresponding button 3 Touch the button to save the setting and ...

Страница 121: ...on interfaces by drawing software The Data Transfer menu displays the screen for transferring project data between the PC and GOT The Communication Monitor menu displays the communication status of each communication port The Keyword menu registers deletes clears and protects a keyword of the FX series PLC 11 1 Standard I F Setting 11 1 1 Standard I F functions 11 1 2 Standard I F display operatio...

Страница 122: ...ion button For GT1020 Select the communication interface to be displayed Standard interface display BOX Driver display BOX Communication interface selection button Channel No specification menu BOX For GT1020 For GT1030 Channel No specification menu BOX button button button button AT Drv AT Drv Standard interface display BOX Driver display BOX Channel No specification menu BOX For GT104 GT105 butt...

Страница 123: ...ce Standard I F 1 for communication with PLC is used depends on the GOT model GT1020 LBD LWD LBL LWL LBDW LWDW LBLW LWLW GT1030 LBD LWD LBL LWL LBDW LWDW LBLW LWLW RS 422 fixed GT1020 LBD2 LWD2 LBDW2 LWDW2 GT1030 LBD2 LWD2 LBDW2 LWDW2 RS 232 fixed The type of the interface Standard I F 2 for connection to PC is always RS 232 b GT104 The standard interface includes the following three types Standar...

Страница 124: ... I F 2 and standard I F 3 the simultaneous setting is possible However when either interface is communicating the communication is not allowed for another interface Setting is not allowed for 2 to 7 Fixed to 9 for the USB interface 4 Driver display BOX The name of the communication driver for which a channel number is assigned is displayed None is displayed in the driver display box in the followi...

Страница 125: ...EBUG 16 CLEANING OF DISPLAY SECTION 5 button Displays the driver setting screen Select the driver to use on the driver setting screen button is displayed in the following cases When setting the ch9 to standard I F 2 6 button Displays the AT command setting screen Set the AT command to use for initializing the modem on the AT command setting screen button is displayed in the following case When ch9...

Страница 126: ...ate to switch them repeatedly The numerical values are set using the ten key depending on the setting 0 to 9 Use these keys to enter numerical values Enter 0 to disable the screensaver function ESC Closes the ten key window without saving any value entered AC Deletes the entire string of numerical characters that are being entered DEL Deletes a digit from a string of numerical characters that are ...

Страница 127: ... depend on the type of communication driver that is installed on the GOT in use Refer to the section below for the setting contents of various drivers GT Designer2 Version Screen Design Manual GT Designer3 Version Screen Design Manual Fundamentals 4 When the button is touched the settings are fixed and the window returns to the previous one Therefore touch the button 5 Touch the button to display ...

Страница 128: ... change the communication parameter setting after downloading project data change the setting at drawing software again For Communication Settings refer to the following manual GT Designer 2 Version Screen Design Manual GT Designer 3 Version Screen Design Manual Fundamentals For installation of Communication driver OS and download of project data refer to the following manual GT Designer 2 Version...

Страница 129: ... displayed on the standard I F 1 of GT1020 or GT1030 2 Channel number 8 and 9 are displayed on the standard I F 2 of GT1020 or GT1030 1 Touch the channel No specification menu box to be set 2 When the channel setting window appears select the channel number 3 When the channel number is selected the settings are fixed and the window returns to the previous one Therefore touch the button 4 Touch the...

Страница 130: ...river setting operation 1 Touch button to bring up the driver setting window 2 The available driver names are displayed on the driver setting screen Select the driver to use 3 When the driver is selected the display returns to the standard IF setting screen Touch button Touch Drv Drv Touch Touch ESC ...

Страница 131: ...mmand operation 1 Touch button to bring up the AT command setting window 2 The AT command set in the drawing software or in the utility of the main unit is displayed When editing the AT command touch button to display the ASCII window Input the AT command in the ASCII window 3 Touch following buttons as necessary button Outputs the AT command to the modem button Disconnects the line 4 After settin...

Страница 132: ... how to install the communication driver from drawing software GT Designer 2 Version Basic Operation Data Transfer Manual GT Designer 3 Version Screen Design Manual Fundamentals Checking method of BootOS Standard monitor OS version 1 Check the version of BootOS or Standard monitor OS installed in GOT at OS information of the utility Refer to the following for details Section 14 2 OS Information 2 ...

Страница 133: ...tion screen of Normal or PC Transfer appears at the startup In the Normal an initial screen appears when the monitor screen has been created and the utility main menu appears when the monitor screen has not been created Data Transfer screen appears in the PC Transfer Standard I F 2 is used in the communication mode to the PC Bringing up the select mode screen Function Contents Data transfer screen...

Страница 134: ...wing software At the completion of data transfer the user created screen will appear Transfer of project data If ESC button on the display screen is pushed during transfer of project data transmission of project data is stopped In that case project data are transfered from drawing software again Transfer of project data from drawing software Completion of data transfer User created screen ...

Страница 135: ...or 11 3 1 Communication Monitor functions 11 3 2 Communication Monitor display operation Function Contents Communication port selection status display Displays the connection status of Standard I F 1 and I F 2 Communication status display Displays the communication status SD send RD receive Communication error status display Displays an error message when a communication error occurs Touch Comm Se...

Страница 136: ... disconnection During normal communication with connection to a device that supports the transparent mode The SD and RD symbols for both I F 1 and I F 2 blink When the connecting cable with the controller is disconnected Only the SD symbol next to I F 1 blinks Display item Channel number Remarks PLC Ch1 PLC appears when connected to a controller PLC or microcomputer BCR Ch8 BCR appears when connec...

Страница 137: ...tion settings of GOT and PLC such as data length stop bit and baud rate ERR Prt The parity check conditions of GOT and PLC are inconsistent Let the parity check condition odd or even of GOT and PLC be consistent ERR Text The sum data is inconsistent Or the contents of the receive data are not consistent with the send command from the GOT Let the communication settings and contents of data be consi...

Страница 138: ...ommunication driver MELSEC FX 01 06 or later must be installed on the GOT For the details of OS installation refer to the following images 17 OS INSTALLATION 11 4 2 Keyword display operation Function Contents Regist Keyword is registered Delete Registered keyword is deleted Clear Keyword protection is cancelled Protect A keyword with cancelled protection is reactivated for protection GT1020 GT104 ...

Страница 139: ...m For the Customer Keyword compatible models refer to the manual of the PLC to be used 2 Select Keyword or Keyword Custom To register only Keyword and 2nd keyword touch Keyword To register Customer Keyword touch Keyword Custom 3 Touch the display part of the keyword to be registered 4 The keyboard for entering a keyword is displayed Enter a keyword and touch the key For the keyword 8 digits from 0...

Страница 140: ...istration conclition to change the setting contents 7 After setting Registration conclition touch the Execute key The registration of the keyword is completed 8 After the completion of the keyword registration touch Touch All Protect Write Protect R W Protect Touch Touch OK ...

Страница 141: ...starting with B Erroneous write prohibition Set the keyword starting with C b When keyword and 2nd keyword are registered Protection level is selected by Registration options 3 Applicability of monitoring for each keyword protection level The applicability of monitoring for each protection level is as follows 1 When the T C set values are specified indirectly changing devices is available 4 Differ...

Страница 142: ...ring a keyword is displayed Enter a keyword and touch the key 4 After completing the keyword entry touch 5 Touch the Execute key 6 The keyword is deleted 7 Touch Touch Touch Target PLC Settings FX PLC compatible with 2nd keyword Input a keyword to be deleted FX PLC not compatible with 2nd keyword Input a keyword to be deleted only into keyword 2nd keyword is ignored Touch ENT Touch Next Touch Touc...

Страница 143: ...2 Touch the display part of the registered keyword 3 The keyboard for entering a keyword is displayed Enter a keyword and touch the key 4 After completing the keyword entry touch 5 Touch the Execute key 6 The protection is cancelled Touch Touch Touch Target PLC Settings FX PLC compatible with customer keyword Input a keyword or cutomer keyword to cancel the protection FX PLC compatible with 2nd ke...

Страница 144: ... Protect 11 4 6 Protect A keyword with cancelled protection is reactivated for protection Keyword protection function is valid when the 2nd keyword is registered 1 Touch Protect to switch to the keyword protection status Touch ...

Страница 145: ...n the drawing software Right click the screen to change the backlight settings on the drawing software and select Screen Property On GT Designer2 the Auxiliary tab is displayed On GT Designer3 the Basic tab is displayed Select the backlight color and backlight blink and click the button For GT Designer3 Also the backlight color can be changed from the system information For details of the system i...

Страница 146: ...ystem information reading device in System Environment of GT Designer2 When using GT Designer3 select valid invalid by the reading device of System Information in GOT Environmental Setting For system information details refer the following GT Designer2 Version Screen Design Manual GT Designer3 Version Screen Design Manual Fundamentals Items Contents Setting range GT1020 GT1030 GT104 GT105 Screen s...

Страница 147: ...NGUAGE SETTING 11 COMMUNICATION INTERFACE SETTING 12 DISPLAY AND OPERATION SETTINGS 13 CLOCK SETTINGS AND BATTERY STATUS DISPLAY 14 FILE DISPLAY 15 GOT DEBUG 16 CLEANING OF DISPLAY SECTION 12 1 2 Display operation of display setting Touch Main Menu Display GOT setup Touch GOT setup Touch Display ...

Страница 148: ...0 to disable the screensaver function ESC Closes the ten key window without saving any value entered AC Deletes the entire string of numerical characters that are being entered DEL Deletes a digit from a string of numerical characters that are being entered ENT Enters the value for the clock that has been entered and closes the ten key pad window Switches between positive and negative values Only ...

Страница 149: ...ECTION 2 Screen save backlight 1 Touch Screen Save to bring up the screensaver setting window 2 Touch Backlight to bring up the backlight setting window 3 Touch the button to turn off turn on the backlight button Screen save Transferring Backlight Unlit button Screen save Transferring Backlight Lit 4 After changing the settings touch the button to save the changes and close the setting window Disp...

Страница 150: ...ngs touch the button to save the changes and close the setting window 1 Touch Bright Contrast to bring up the setting window 2 Touch the and buttons to adjust the brightness of the screen 3 After changing the settings touch the button to save the changes and close the setting window Display Touch Contrast Adjust contrast with the and buttons Touch ESC Display Touch Bright Contrast Adjust brightnes...

Страница 151: ...TERY STATUS DISPLAY 14 FILE DISPLAY 15 GOT DEBUG 16 CLEANING OF DISPLAY SECTION 5 Opening time 1 Touch to bring up the Opening time setting window 2 Touch Opening time to bring up the setting window 3 Touching the set time value can change the setting 4 After changing the settings touch the button to save the changes and close the setting window Display Touch Touch Opening time Touch Touch ESC ...

Страница 152: ...g the project data GT Designer2 Version Screen Design Manual GT Designer3 Version Screen Design Manual Fundamentals Function Contents Setting range GT1020 GT1030 GT104 GT105 Buzzer volume Buzzer volume setting can be changed OFF SHORT LONG At factory shipment SHORT Window move buzzer volume Whether turn ON OFF buzzer when move window can be selected ON OFF At factory shipment ON Calibration Touch ...

Страница 153: ...ION INTERFACE SETTING 12 DISPLAY AND OPERATION SETTINGS 13 CLOCK SETTINGS AND BATTERY STATUS DISPLAY 14 FILE DISPLAY 15 GOT DEBUG 16 CLEANING OF DISPLAY SECTION 12 2 2 Display operation of operation setting GT1030 GT104 GT105 does not have Calibration function Touch Main Menu Operation GOT setup Touch GOT setup Touch Operation ...

Страница 154: ...tting to bring up the buzzer volume setting window 2 Touch Buzzer volume to bring up the setting window 3 Touch a setting item to change the setting Buzzer volume 4 After changing the settings touch the button to save the changes and close the setting window Touch Buzzer setting Operation Touch Buzzer volume Touch SHORT LONG OFF Touch ESC ...

Страница 155: ...ILE DISPLAY 15 GOT DEBUG 16 CLEANING OF DISPLAY SECTION 2 Window move buzzer 1 Touch Buzzer setting to bring up the buzzer volume setting window 2 Touch Window move to bring up the setting window 3 Touch a setting item to change the setting Window move buzzer 4 After changing the settings touch the button to save the changes and close the setting window Touch Buzzer setting Operation Touch Window ...

Страница 156: ...p the setting screen 2 Touch the symbol at the top left corner 3 Touch the symbol at the bottom left corner 4 Touch the symbol at the top right corner 5 Touch the symbol at the bottom right corner 6 completes the calibration process and the Operation window will reappear Touch Calibration Operation Touch Touch Touch Touch 5 ...

Страница 157: ...ibration results in inoperability of the panel the following message will appear button Returns to the touch panel calibration screen button Aborts calibration without saving any changes to the touch panel setting 4 Key reaction 1 Touch to bring up the Key reaction setting window 2 Touch Key reaction to bring up the setting window 3 Touch a setting item to change the setting 4 After changing the s...

Страница 158: ...nvironment of GT Designer2 Same as setting in GOT Setup in GOT Environmental Setting of GT Designer3 GT Designer2 Version Screen Design Manual GT Designer3 Version Screen Design Manual Fundamentals Both Adjust and Broadcast can be used appropriately Same as setting in GOT setup in System Environment of GT Designer2 Same as setting in GOT Setup in GOT Environmental Setting of GT Designer3 GT Design...

Страница 159: ...S DISPLAY 14 FILE DISPLAY 15 GOT DEBUG 16 CLEANING OF DISPLAY SECTION 6 Security 1 Touch Security to bring up the setting window 2 Touching Security level displays the password input window Inputting the password set in the password input window can change the security level 3 After changing the settings touch the button to save the changes and close the setting window Touch Security Operation Tou...

Страница 160: ... the setting screen The button repeats every time it is pressed Change the part to be set as a key position to 3 When the key position is specified by one point the time to switch to the utility when the key position is kept pressing can be set Touch the time area 4 After changing the settings touch the button to save the changes and close the setting window Touch Utility call Operation Touch bott...

Страница 161: ...ck setting menu The voltage status of the built in battery is also displayed 13 1 Time Setting and Display 13 1 1 Time setting and display functions Time settings and displaying of the status of GOT built in battery are possible 13 1 2 Clock display and setting operation GT1020 does not have Battery voltage Function Contents GT1020 GT1030 GT104 GT105 Clock display Carry out the display and setup o...

Страница 162: ...te or time on the ten key pad The day of the week is displayed automatically according to the input date 0 to 9 Use these keys to enter numerical values ESC Closes the ten key window without saving any value entered for the date or time AC Deletes the entire string of numerical characters that are being entered DEL Deletes a digit from a string of numerical characters that are being entered ENT En...

Страница 163: ...OS Standard monitor OS BootOS and communication driver that are written to the GOT Project data and resource data can be deleted with this function 14 1 Data Storage Location The following drive name C or D drive is assigned to the built in Flash Memory or SRAM on the GOT GOT Drive name Allocation GT1020 C drive Flash Memory Internal GT1030 C drive Flash Memory Internal D drive Internal SRAM GT104...

Страница 164: ... information This function displays the version of the OS Standard monitor OS BootOS and communication driver on the built in flash memory C drive 14 2 2 Display operation of OS information screen Touch Main Menu For GT1020 For GT1030 OS information Data Touch Data Touch OS information For GT104 GT105 ...

Страница 165: ...OPERATION SETTINGS 13 CLOCK SETTINGS AND BATTERY STATUS DISPLAY 14 FILE DISPLAY 15 GOT DEBUG 16 CLEANING OF DISPLAY SECTION 14 2 3 OS information operation 1 OS information display For GT1020 1 Touch the and buttons to toggle through the version of the Standard monitor OS Communication driver and BootOS 2 Touch the button to close the screen ESC ...

Страница 166: ...14 3 Font Data 14 3 1 Function of font data The types of fonts that are stored in the C Built in flash memory 14 3 2 Display operation of font data screen Touch Main Menu For GT1020 For GT1030 Font data Data Touch Data For GT104 GT105 Touch Font data ...

Страница 167: ...LAY AND OPERATION SETTINGS 13 CLOCK SETTINGS AND BATTERY STATUS DISPLAY 14 FILE DISPLAY 15 GOT DEBUG 16 CLEANING OF DISPLAY SECTION 14 3 3 Font data operation 1 Font data display For GT1020 1 Touch and button to switch the display of fonts that are stored in the C Built in flash memory 2 Touch the button to close the screen ESC ...

Страница 168: ... Canceling deletion Data deletion cannot be cancelled once the button is pressed at the confirm deletion prompt Double check before touching the button 1 Touch the type of data on the screen to be deleted 2 The dialog mentioned left is displayed for confirmation Touch the button to delete the data or the button to cancel Touch Main Menu Clear data Data Touch Data Touch Clear data Touch Project dat...

Страница 169: ... DISPLAY SECTION 14 5 GT10 50FMB 14 5 1 GT10 50FMB functions For GT104 GT105 only Use the GT10 50FMB type memory board to transfer the project data or OS Copy from the memory board to the GOT Copying from the memory board to the GOT when turning on the power to the GOT Refer to the following Section 17 3 Standard Monitor OS Communication Driver Installation Using Memory Board 14 5 2 GT10 50FMB dis...

Страница 170: ...d to the GOT 2 After selecting the direction touch the OK button To abort copy touch the ABORT button 3 Select the copy target The selection mark is displayed on the side of the selected key OS Projectdata Copies the standard OS communication driver and projectdata Projectdata Copies the projectdata 4 After selecting the copy target touch the OK button To return to the copy direction setting scree...

Страница 171: ...onfirming the copy of the font data is displayed Select YES NO to decide whether to copy the font data or not The selection mark is displayed on the side of the selected key Touch the OK button when the setting is correct and touch the CANCEL button to return to the copy direction selection 6 Confirm the copy direction and copy target When they are set correctly touch the OK button To change the s...

Страница 172: ...the project data does not exist Error message Remedy The version of the standard monitor OS of the GOT main unit does not match with that of the project data in GOT10 50FMB The major version of the standard monitor OS of the GOT main unit does not match with that of the project data in GOT10 50FMB Match the version of the standard monitor OS of the GOT main unit to the major version of the project...

Страница 173: ... controller 1 For details of controllers that can be monitored refer to the following manual GT Designer2 Version Screen Design Manual GOT1000 Series Connection Manual Mitsubishi Products 2 Required OS The OS shown in the table below is required Checking method of OS Communication driver version Check the version of OS or communication driver installed in GOT at OS information of the utility Refer...

Страница 174: ...f data remaining are monitored Devices with 16 bits one word of data remaining are not monitored If an odd number is specified for the first monitor device number the last device number of the specified controller will not be displayed Example When the data entry of the A2NCPU is monitored in units of 32 bits from odd numbers D1 D3 3 Changing the timer counter set values of QnACPU The timer counte...

Страница 175: ...NICATION INTERFACE SETTING 12 DISPLAY AND OPERATION SETTINGS 13 CLOCK SETTINGS AND BATTERY STATUS DISPLAY 14 FILE DISPLAY 15 GOT DEBUG 16 CLEANING OF DISPLAY SECTION 15 2 4 Display operation of device monitor Touch Main Menu For GT1020 For GT1030 Device monitor Debug Touch Debug Touch Device monitor For GT104 GT105 ...

Страница 176: ...nter contacts ON OFF 4 Data type DW FIndicates that the device value is a 32 bit two word module Nothing displayed Indicates that the device value is a 16 bit one word module 5 Present value of word device Present value and set value of timer counter 1 Decimal number 16 bit one word module Six digits including a digit for a sign are displayed Display example 12345 32 bit two word module Ten digits...

Страница 177: ... ON OFF 8 CPU No specification 0 to 4 This item must be set only when the GOT is connected to the Q series CPU in the multiple CPU system or QnUCPU Changing the CPU No cancels the registration for all the devices Section 15 2 7 Device registration Key switch Function DEV Switches the screen to the device registration key window for registering devices to be monitored Section 15 2 7 Device registra...

Страница 178: ...evice monitor Debug With no registered device With registered devices DEV TEST DEC HEX Register devices if necessary Execute the quick test if necessary Switch the numerical notation of word device values between decimal and hexadecimal numbers if necessary Touch Touch Touch Touch Device monitor Section 15 2 7 Device registration Section 15 2 8 Quick test ...

Страница 179: ...evice value is a 32 bit two word module Nothing displayed Indicates that the device value is a 16 bit one word module 2 Device name Set the device name and device number to be monitored 3 Device No Device monitor Connecting to a Q series CPU in the multiple CPU system or QnUCPU 1 2 3 Connecting to a CPU other than the Q series CPU in the multiple CPU system and QnUCPU When registering multiple dev...

Страница 180: ...ets to the one word Switches device names on the keyboard Device name keyboard Deletes all input numbers Registers the input device The device registration is completed Device number keyboard Ends the device registration Input a device name ex D Select a data type ex 16 bit Input a device number ex 12 The device registration is completed by touching the ENT key Touch 16 key Touch 32 key ...

Страница 181: ...dule 2 CPU No specification Changing the CPU No after registering devices cancels the registration for all the devices Check the CPU No before registering the devices 3 Holding registered devices The registration for the devices is not canceled after exiting the device monitor Restarting the GOT cancels the registration for all the devices 4 The number of registered devices The number of registere...

Страница 182: ... changing the settings or current values of the timer or counter read through the manual carefully and make yourself familiar with the operation method During quick test operation never change the data of the devices which are used to perform significant operation for the system False output or malfunction can cause an accident Device monitor Enable the quick test mode 1 Quick test of bit devices ...

Страница 183: ...BATTERY STATUS DISPLAY 14 FILE DISPLAY 15 GOT DEBUG 16 CLEANING OF DISPLAY SECTION 1 Quick test of bit devices Operation example Change the status of bit device M12 from OFF to ON The device name and device number of the selected bit device are highlighted The selected bit device is switched from OFF to ON Touch the bit device to be switched between ON and OFF states Touch ...

Страница 184: ... device value of word device D200 from 43 to 100 Conditions Data range 16 bits device value display format decimal number Input a device value by using the keyboard Input 100 for the operation example The device value of D200 is changed from 43 to 100 Touch ENT key Touch the device value to be changed ...

Страница 185: ...ISPLAY AND OPERATION SETTINGS 13 CLOCK SETTINGS AND BATTERY STATUS DISPLAY 14 FILE DISPLAY 15 GOT DEBUG 16 CLEANING OF DISPLAY SECTION 15 3 FX List Editor For GT104 GT105 only GT104 GT105 can edit the sequence programs of the connected FXCPU using the list editor 15 3 1 Display operation of FX list editor FX list editor Touch FX list editor Main menu Touch Debug Debug ...

Страница 186: ...be checked easily Error messages error codes and number of steps for errors that occur in the FX PLC can be checked Details can be checked immediately even for errors that occur during list editing 3 Commands and devices can be searched and displayed Commands and devices used in sequence programs can be searched The correction position can be searched for cases such as when you want to correct a s...

Страница 187: ...C FX list editor For further information about communication units and cables for each connection form see the following GOT1000 Series Connection Manual 2 Controllers that can be edited with the MELSEC FX list editor 3 Connection forms Available Unavailable 1 Indicates CC Link connection via G4 Target controller FXCPU Function Connection form between GOT and PLC Name Description Direct CPU connec...

Страница 188: ...fer to the following manual for details of the access range GT Designer2 Version Screen Design Manual GOT1000 Series Connection Manual Mitsubishi Products Function Memory that can be monitored 2 FX PLC status Reference Built in memory RAM memory cassette EEPROM memory cassette flash memory cassette EPROM memory cassette Reading sequence programs Displaying sequence programs RUN STOP SubSection 15 ...

Страница 189: ... after the change is made then start the MELSEC FX list editor again If you carelessly change the program on one PLC from multiple units of peripheral equipment including GOT the contents of the program in the PLC CPU and the peripheral equipment may not be the same resulting in an unintended operation of the PLC CPU 3 Sequence program change Stop the FX PLC before changing writing inserting delet...

Страница 190: ...rted End Enter the keyword Subsection 15 3 16 Keywords When no keyword is registered in the connected FX PLC When a keyword is registered in the connected FX PLC Start Turn on the power to the GOT Starting from the utility Display the utility Touch the special function switch Refer to the following manual for how to set the special function switch After the utility is displayed touch Debug self ch...

Страница 191: ...e the screen 1 With setting special function switches FX list monitor the list monitor can be started on the monitor screen When the list monitor is started on the monitor screen the list editor cannot be used For how to set special function switches refer to the following manual GT Designer2 Version Screen Design Manual GT Designer3 Version Screen Design Manual Functions Utility Main Menu or user...

Страница 192: ...ontents No Item Description 1 Mode Displays a mode for MELSEC FX list editor SubSection 15 3 7 Selection and operation of modes Monitor is displayed when the list monitor is executed SubSection 15 3 17 List monitor 2 Error message Displays the contents of errors that occur with the MELSEC FX list editor SubSection 15 3 19 Error Messages and Corrective Actions 3 List display area Displays the seque...

Страница 193: ...ics parameter setting and keyword selection menu Switches between command keyboard 1 and command keyboard 2 Keyboard switching in this section When inputting commands Cancels the key input when only part of the command has been input SubSection 15 3 18 Action for an incorrect key input When option menu is displayed Closes the option menu Commands cannot be deleted with this key SubSection 15 3 12 ...

Страница 194: ...utton the mode changes 2 In the case the mode cannot be changed In the following cases only READ mode is allowed If you try to change to other than READ mode an error message is displayed To change to other than READ mode take the action below Error Message Description Corrective action PLC is running The FX PLC is in the RUN status Stop the FX PLC Can not write The protect switch of the EEPROM me...

Страница 195: ... using cursor keys 1 Operation 2 Example Scroll one line upward or downward 2 Display specifying the step number 1 Operation 2 Example Displaying step number 123 When the specified step number is the operand of an applied instruction If the specified step number is a timer T or counter C set value or the operand of an applied instruction that command section is displayed at the head Scroll with or...

Страница 196: ...nce program display 3 Display scrolling one screen at a time 1 Operation 2 Example Displaying with scrolling one screen at a time MODE GO Read mode MODE GO Set the READ mode Displaying with scrolling one screen at a time 123 MOV 12 K 200 D 58 128 MPP WRITE READ ...

Страница 197: ... label touch or and input the pointer number SubSection 15 3 10 Writing applied instructions 2 Input only when searching for commands requiring a device name and device number 3 After the search results are displayed you can continue searching with the same conditions by touching the key Touching any key other than the key ends the search 2 Example Searching for LD M8000 Pointer P I searches For p...

Страница 198: ...nters interrupt pointers Constant K constant H constant E Bit devices with specifying numbers only Special function unit block buffer memory Devices specified with the operand of an applied instruction Pointers and interrupt pointers can be searched for with command searches Command search in this section 1 MODE SP GO GO Input the device name and device number Read mode GO GO GO Continue to search...

Страница 199: ... the line on which the step number is displayed You cannot write a command with the cursor on an operand or set value line 2 Example a Writing ORB command MODE GO Stop the FX PLC Input the command For overwriting WRITE mode For insertion INSERT mode MODE GO Stop the FX PLC Input the device name and device number Input the command For overwriting WRITE mode For insertion INSERT mode GO SP MODE Stop...

Страница 200: ... NOP 3 NOP 0 LD X 000 1 NOP 2 NOP 3 NOP READ WRITE With or move the cursor to the position to overwrite insert the command OUT SP K 19 GO 100 T 100 OUT M 100 101 NOP 102 NOP 103 NOP 100 OUT M 100 101 OUT T 100 103 NOP 100 OUT M 100 101 OUT T 100 K 19 104 NOP MODE READ WRITE With or move the cursor to the position to overwrite insert the command Set the WRITE or INSERT mode Stop the FX PLC ...

Страница 201: ...hich the step number is displayed You cannot write a command with the cursor on any other line 2 Commands using a text string constant for a command operand such as ASC command With the MELSEC FX list editor text string constants cannot be written as operands such as ASC commands Use GX Developer for writing such commands 2 Example Input DMOVP D0 D2 1 The MOV command is FNC12 Applied instruction n...

Страница 202: ... a set value place the cursor on the line of the operand or set value to be changed the line on which the step number is not displayed If you place the cursor on the command line the input operation is not possible 2 Example Changing MOV D0 D10 to MOV D0 D123 MODE SP GO Read mode Stop the FX PLC Input the device name and device number 2 LDI M 100 3 MOV 12 D 0 D 10 Command line Cannot operate on th...

Страница 203: ...to be deleted Place the cursor on the command line the line on which the step number is displayed You cannot delete the command if the cursor is placed on the line of an operand or set value 2 Example Deleting OUT T10 K100 MODE GO Stop the FX PLC Move the cursor to the command to be deleted DELETE mode 2 LDI M 100 3 MOV 12 D 0 D 10 Command line Place the cursor on this line Operand set value line ...

Страница 204: ... the parameters before program execution are initialized and Latch Clear is executed The memory space becomes the default value the comment area a 0 block the file register space a 0 block and keywords unregistered After All Clear set the above parameters etc again WRITE mode MODE NOP A GO Stop the FX PLC MODE OK OK Cancel NOP A GO Caution The program will be erased Press OK to continue 0 NOP 1 OU...

Страница 205: ... screen The following describes the contents displayed on the PLC diagnostics screen and the function of on screen key 1 Displayed contents No Item Display contents 1 Error message Displays the error message I O configuration error PLC hardware error PC HPP communication error Serial communication error Parameter error Syntax error Circuit error Operation error 2 Detail Displays the error code 3 S...

Страница 206: ...rk Error details For details on an FX PLC error refer to the manual below Programming manual for the FX CPU used 2 Key functions The table below shows the functions of the keys that are used for the operation on the PLC diagnostics screen Key Function Exits the PLC diagnostics ...

Страница 207: ...hen connecting an FX0 S set 0 Setting other than 0 causes a parameter error 2 When the parameters are initialized the display on the MELSEC FX list editor is different from the FX PLC default values but do not change the latch range Changing the latch range causes an error 2 Change targets When a memory cassette is mounted the parameters in the memory cassette are targeted for changes 2 Operation ...

Страница 208: ...s Nf File register space after change blocks Nk Comment space before change blocks Remark Settable range and default value The settable range and the default value depend on the FX PLC type Refer to the following manual for details of the settable range and the default value Programming manual for the FX PLC used No Item Display contents 1 Memory capacity Sets the memory space number of steps If y...

Страница 209: ... AND OPERATION SETTINGS 13 CLOCK SETTINGS AND BATTERY STATUS DISPLAY 14 FILE DISPLAY 15 GOT DEBUG 16 CLEANING OF DISPLAY SECTION 2 Key functions The table below shows the functions of the keys that are used for the operation on the parameter setting screen Key Function Initializes the parameters Completes the changed setting contents Ends parameter setting ...

Страница 210: ...e for when a keyword 2nd keyword is set Function Keyword protection level Reference All operation protect All on line operation protect 2 Read Incorrect write protection Read write protect 2 Incorrect write protect Write protect 2 Keyword not registered keyword protection canceled Reading sequence programs Displaying sequence programs SubSection 15 3 8 Searching commands devices SubSection 15 3 9 ...

Страница 211: ...OT DEBUG 16 CLEANING OF DISPLAY SECTION 2 Operation 3 Keyword screen and protection level When Keyword setup is selected with the MELSEC FX list editor the keyword screen is displayed Refer to the following manual for the procedure for keyword operations Section 11 4 Keyword Remark Keywords Refer to the following manual for details of keyword Programming manual for the FX PLC used OP GO Keyword se...

Страница 212: ...onitor can be started on the monitor screen When the list monitor is started on the monitor screen the list editor cannot be used For how to set special function switches refer to the following manual GT Designer2 Version Screen Design Manual GT Designer3 Version Screen Design Manual Functions OP GO List Monitor OP GO Select List Monitor with or When the list monitor is started on the FX list edit...

Страница 213: ... of device displays 2 Keys The same operations as in the READ mode of the FX list editor can be executed SubSection 15 3 8 Sequence program display 3 Ends the list monitor When the list monitor is executed on the FX list editor screen the screen is switched to the FX list editor screen Type of instructio Description Status Displayed Not displayed LD AND OR Contact instruction Normal open Contact O...

Страница 214: ...ted operation Clear the keyword protection or delete the keyword SubSection 15 3 16 Keywords Can not operate while protected PLC parameter error An FX PLC parameter is defective Set correct parameters in the FX PLC PLC communications error The communication with the FX PLC is defective Check the FX PLC cable and GOT for abnormality Check whether the communication settings are correct or not PLC is...

Страница 215: ...ility the screen can be set as not to be effected by touching the screen when clean with clothes For cleaning method refer to Section 18 3 Cleaning Method 16 1 Clean 16 1 1 Display operation of clean For details of cleaning method refer to the following Section 18 3 Cleaning Method 1 Touch Clean to bring up the setting window 2 Touching key closes the screen 3 Even if touch points other than the u...

Страница 216: ...ard monitor OS For the installation using drawing software refer to the following chapter GT Designer 2 Version Basic Operation Data Transfer Manual GT Designer 3 Version Screen Design Manual Fundamentals 2 Checking method of BootOS Standard monitor OS version a Check the version of BootOS or Standard monitor OS installed in GOT at OS information of the utility Refer to the following for details S...

Страница 217: ...ouching the button will take the screen back to the utility display screen Normal operation of the unit will require an update of the Standard monitor OS 1 Turn on the power while pressing and holding the bottom right corner of the screen 2 The OS installation screen will appear 3 Install the Standard monitor OS and communication driver from drawing software Refer to the chapter below for how to i...

Страница 218: ...on using GT10 50FMB function utility Select OS or project data stored in the memory board and then transfer it to the GOT using the utility function For details of GT10 50FMB function refer to the following Section 14 5 GT10 50FMB 17 3 1 Installation method when the GOT is turned on 1 Operation procedure 1 Power OFF the GOT and attach the memory board which stores the standard OS and communication...

Страница 219: ...he installation is executed the dialog box on the left is displayed 6 Installation is completed Touch the ESC button to restart the GOT and displays the user created to screen If the project data does not exist a message appears to notify that the project data does not exist If an error occurs during copy an error message appears For details of error messages refer to the following Section 14 5 4 ...

Страница 220: ...ertightening can cause a short circuit or malfunction Overtightening can cause a short circuit or malfunction due to the damage of the screws or unit STARTUP AND MAINTENANCE PRECAUTIONS CAUTION Do not disassemble or modify the unit Doing so can cause a failure malfunction injury or fire Do not touch the conductive and electronic parts of the unit directly Doing so can cause a unit malfunction or f...

Страница 221: ... check No foreign matter sticking Remove clean No Inspection Item Inspection Method Criterion Action 1 Surrounding environment Ambient temperature Make measurement with thermometer or hygrometer Measure corrosive gas Display section 0 to 50 C For use in control panel temperature inside control panel is ambient temperature Other portions 0 to 55 C Ambient humidity 10 to 90 RH Atmosphere No corrosiv...

Страница 222: ...Clean screen refer to the following Chapter 16 CLEANING OF DISPLAY SECTION CLEAN Precautions for cleaning Do not use chemicals such as thinner organic solvents and strong acids since they may cause the protective sheet to be deformed or the dissolvable paint on the surface to peel off In addition do not use spray solvents since they may cause the electrical failure of the GOT and peripheral device...

Страница 223: ...t If it exceeds a month from the voltage low detection to battery replacement the clock data or D drive Internal SRAM data may become indefinite Adjust the clock and format the D drive Internal SRAM GT1020 does not have D drive Example of alarm output to external device lamp buzzer etc For GT1030 GT104 GT105 The following describes an example of outputting the battery voltage low signal from a FX ...

Страница 224: ... from other wastes 2 Exportation precautions The new EU Battery Directive 2006 66 EC requires the follwoing when marketing or exporting batteries and or devices with built in batteries to EU member states To print the symbol on batteries devices or their packaging To explain the symbol in the manuals of the products a Labelling To market or export batteries and or devices with built in batteries w...

Страница 225: ... PLC to external devices such as the lamp or buzzer using system information To avoid any screen touch operation by the user who misunderstands it is in screen saving mode install an external alarm and interlock the loads that would cause danger For details of the system information refer to the following GT Designer2 Version Screen Design Manual GT Designer3 Version Screen Design Manual Fundament...

Страница 226: ... 1 External Dimensions External dimensions of GT1020 Unit mm inch 74 2 91 76 2 99 113 4 44 76 2 99 10 0 39 10 0 39 10 0 39 10 0 39 7 5 0 29 9 5 0 37 5 0 19 80 3 14 or more MITSUBISHI GOT1000 27 1 06 23 0 9 84 3 3 65 2 55 Panel thickness 1 to 4mm 0 03 to 0 15 ...

Страница 227: ...ENANCE AND INSPECTION APPENDICES INDEX External dimensions of GT1030 76 10 145 84 10 10 10 21 4 5 MITSUBISHI GOT1000 29 5 25 84 65 0 39 0 17 0 82 80 3 14 or more 0 39 0 39 0 39 0 98 1 16 Unit mm inch 2 55 2 99 3 3 Panel thickness 1 to 4mm 0 03 to 0 15 3 3 84 3 3 5 7 ...

Страница 228: ...BISHI GOT1000 M2 6 Metric screw type 4 40UNC Inch screw type Panel thickness 5mm 0 2 or less 9 5 0 37 9 5 0 37 102 4 01 129 5 07 41 1 61 5 0 19 10 0 39 86 3 38 10 0 39 139 5 47 15 5 0 61 10 0 39 86 3 38 10 0 39 17 5 0 68 52 2 04 112 4 4 Memory board connected Unit mm inch ...

Страница 229: ...PENDICES INDEX External dimensions of GT105 10 0 4 Panel thickness 5mm 0 2 or less M2 6 Metric screw type 10 0 4 120 4 73 6 0 24 164 6 46 120 4 73 22 0 87 22 0 87 23 0 91 120 4 73 135 5 32 53 2 09 152 5 99 47 1 86 56 2 21 62 2 44 4 40UNC Inch screw type Unit mm inch Memory board connected ...

Страница 230: ...RS 422 cable for direct connection to FXCPU and A QnACPU 25 pin D sub GT10 C100R4 25P 10 000 393 7 GT10 C200R4 25P 20 000 787 4 GT10 C300R4 25P 30 000 1181 1 Model name L mm inch Remarks GT10 C30R2 6P 3 000 118 11 RS 232 cable for direct connection to QCPU 6 pin MINI DIN 30 1 18 L 40 1 57 250 9 84 Unit mm inch φ7 0 27 φ13 0 51 GT10 C R4 8P φ25 33 0 98 1 29 55 2 16 16 0 62 30 1 18 L 53 2 08 250 9 8...

Страница 231: ... and A QnACPU 25 pin D sub Model name L mm inch Remarks GT01 C100R4 25P 10 000 393 7 RS 422 cable for direct connection to FXCPU and A QnACPU 25 pin D sub GT01 C200R4 25P 20 000 787 4 GT01 C300R4 25P 30 000 1181 1 GT10 C10R4 8PL 30 1 18 1000 39 37 38 1 49 Unit mm inch φ13 0 51 30 1 18 250 9 84 φ7 0 27 φ25 33 0 98 1 29 30000 1181 1 7 0 28 50 1 97 53 2 09 55 2 17 16 0 63 16 0 63 35 1 38 M2 6 M2 6 Un...

Страница 232: ...0 118 11 RS 232 cable for direct connection to FXCPU special adaptor 25 pin D sub Model name L mm inch Remarks GT01 C30R2 9 3 000 118 11 RS 232 cable for direct connection to FXCPU expansion board 9 pin D sub 50 1 97 16 0 63 35 1 38 13 0 52 6 0 24 L 40 1 58 25 33 0 99 1 3 M2 6 Unit mm inch GT01 C R4 8P 4 40UNC M2 6 30000 1181 1 50 1 97 53 2 09 55 2 17 16 0 63 16 0 63 35 1 38 6 Unit mm inch GT01 C3...

Страница 233: ...TENANCE AND INSPECTION APPENDICES INDEX Model name L mm inch Remarks GT01 C30R2 6P 3 000 118 11 RS 232 cable for direct connection to QCPU 6 pin MINI DIN 30000 1181 1 50 1 97 16 0 63 35 1 38 7 0 28 40 1 58 4 40UNC 20 28 0 79 1 11 13 0 52 Unit mm inch GT01 C30R2 6P ...

Страница 234: ...onversion adaptor External dimensions of GT10 LDR memory loader GOT RS 232 POWER SD RD 23 0 9 75 2 95 24 0 94 6 0 23 φ12 0 47 15 0 59 40 1 57 200 7 87 Unit Weight mm inch Approx 40g GT10 RS2TUSB 5S 110 4 33 90 3 54 70 2 75 21 0 82 14 0 55 240 9 44 Unit mm inch Weight 0 2kg ...

Страница 235: ...nsions of debug stand External dimensions of serial multi drop connection unit External dimensions of connector conversion adapter 19 0 75 Unit mm inch 35 1 38 20 0 79 36 1 42 11 0 44 153 6 05 260 10 24 220 8 67 121 4 77 For angle of 75 Unit mm inch 254 10 0 57 2 25 80 3 15 65 2 56 Unit mm inch 2 4 5 90 3 55 72 2 84 36 1 42 22 0 87 Unit mm inch 48 1 89 ...

Страница 236: ... save backlight ON OFF setting Opening time setting bright contrast Liquid crystal brightness setting Liquid crystal contrast setting Operation Buzzer volume setting Correcting touch position reading error Key reaction Key reaction display Clock setting Setup the method to adjust the time between GOT clock data and clock data of PLC CPU connected with GOT Security 1 Security level change security ...

Страница 237: ...ATION 18 MAINTENANCE AND INSPECTION APPENDICES INDEX 1 It is necessary to set the security level with drawing software Setting items Function GT1020 GT1030 GT104 GT105 Drawing Setting GT Designer2 GT Designer3 Clean Clean Display the screen to clean the display section ...

Страница 238: ...ix 3 2 Transport guidelines Products are packed properly in compliance with the transportation regulations prior to shipment When repacking any of the unpacked products to transport it to another location make sure to observe the IATA Dangerous Goods Regulations IMDG Code and other local transportation regulations For details please consult your transportation company Product name Model Descriptio...

Страница 239: ...d with the version upgrade and the versions of GT Designer2 and OS with which the function is compatible Regarding and the following there may be a case where the function is not supported by a particular type of GOT even when the function is compatible with the version In such a case check the version for the function and the version of the GOT and use GT Designer2 or OS of the later version Appe...

Страница 240: ...ion driver CC Link G4 01 00 GOT multidrop connection Supporting the GOT multidrop connection 2 96A Standard monitor OS 01 11 Communication driver Multidrop Host 01 11 Multidrop Slave 01 11 Microcomputer connection Supporting the data formats of Format 1 and Format 2 2 47Z Standard monitor OS 01 02 Communication driver Computer 01 02 MODBUS RTU connection Supporting MODBUS RTU connection 2 96A Stan...

Страница 241: ...nication driver LS Industrial Systems MASTER K 01 05 ALLEN BRADLEY PLC connection Supporting connection to MicroLogix 1000 1200 1500 series 2 58L Standard monitor OS 01 04 Communication driver AB MicroLogix 01 00 Supporting connection to SLC500 series 2 58L Standard monitor OS 01 04 Communication driver AB SLC 500 01 00 SIEMENS PLC connection Supporting connection to SIEMENS S7 200 series 2 58L St...

Страница 242: ...on GT Designer2 2 77F Directly editing comment group Enables editing the comment group directly in settings for the lamps and touch switches 2 77F Item Description Version of GT Designer2 Version of OS GT 105 104 GT 1030 GT 1020 Figure Supporting piping 2 73B Standard monitor OS 01 00 Enables displaying BMP or JPEG image data reduced to a resolution of 2000 1600 or less on GT Designer2 2 77F Stand...

Страница 243: ...r graph can be set 2 58L Standard monitor OS 01 03 The statistics pie graph can be set 2 58L Standard monitor OS 01 03 Alarm history display Enables selecting whether to set the scrolling comment display suitable for the message display area 2 63R Standard monitor OS 01 06 Comment group can be used 2 73B Standard monitor OS 01 07 Scrolling alarm display The scrolling alarm display applicable 2 73B...

Страница 244: ...App 19 Appendix 4 List of Functions Added by GT Designer2 Version Upgrade For GOT1000 Series MEMO ...

Страница 245: ...t monitor 15 40 Operation Procedures 15 20 Parameter setting 15 35 PLC diagnostics 15 33 Searching commands and devices 15 25 Selection and operation of modes 15 22 Sequence program all clear 15 32 Sequence program display 15 23 Specifications 15 15 System configuration 15 15 Writing commands 15 27 Memory board 2 2 8 16 14 7 Memory loader 2 1 2 2 8 12 O Opening time 12 7 Operation setting 12 9 Opt...

Страница 246: ...Index 2 MEMO ...

Страница 247: ... so by the user 2 Onerous repair term after discontinuation of production 1 Mitsubishi shall accept onerous product repairs for seven 7 years after production of the product is discontinued Discontinuation of production shall be notified with Mitsubishi Technical Bulletins etc 2 Product supply including repair parts is not available after production is discontinued 3 Overseas service Overseas repa...

Страница 248: ...trademarks of Adobe Systems Incorporated Pentium and Celeron are a registered trademarks of Intel Corporation in the United States and other countries Ethernet is a trademark of Xerox Co Ltd in the United States MODBUS is a trademark of Schneider Electric SA Other company and product names herein may be either trademarks or registered trademarks of their respective owners ...

Страница 249: ......

Страница 250: ......

Отзывы: