


34/100
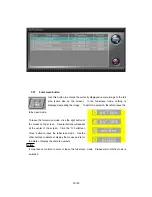
recorder main bodies for the IP masquerade.
“Default User”:
Enter a check in this box. The extension tab will be displayed. Enter the login user ID
number and the password of the recorder. After that, automatic connection or manual
connection can be carried out without entering the login user ID number and the password of
the recorder. If the check is erased and the extension tab is erased, this function will be
disabled. In this case, each time you connect to the recorder, you should enter the login user
ID number and the password of the recorder.
“Detailed Information button:
To store the detailed information on the recorder, click this button. The Properties panel will
appear. Enter the zip code, address, etc. as the detailed information. Freely use this
function.
“When starting you connect auto...”:
Enter a check in this box. The recorder will be automatically connected when the DX-PC200
is started.
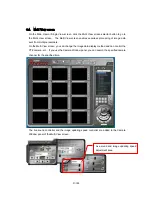
4.2. Recorder Image Search panel
Click the Search button
at the lower section of the Main View or Single View screen.
The Search panel will be opened. The Search panel has several tabs. Use these tabs to
change the search method.
At the upper right section of each tab, there is a dropdown menu box. This box enables
specification of the recorder search device. Use the dropdown menu of this box to select the
recorder for partition.
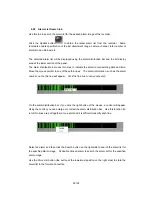
At the right end of the upper bar, there are two buttons: the “
✕
” button for closing the panel
and the“
▲
”button for contracting the panel. After contracting the panel using the “
△
” button,
use the “
▼
” button to enlarge the panel to the original size.
Panel contraction