background image

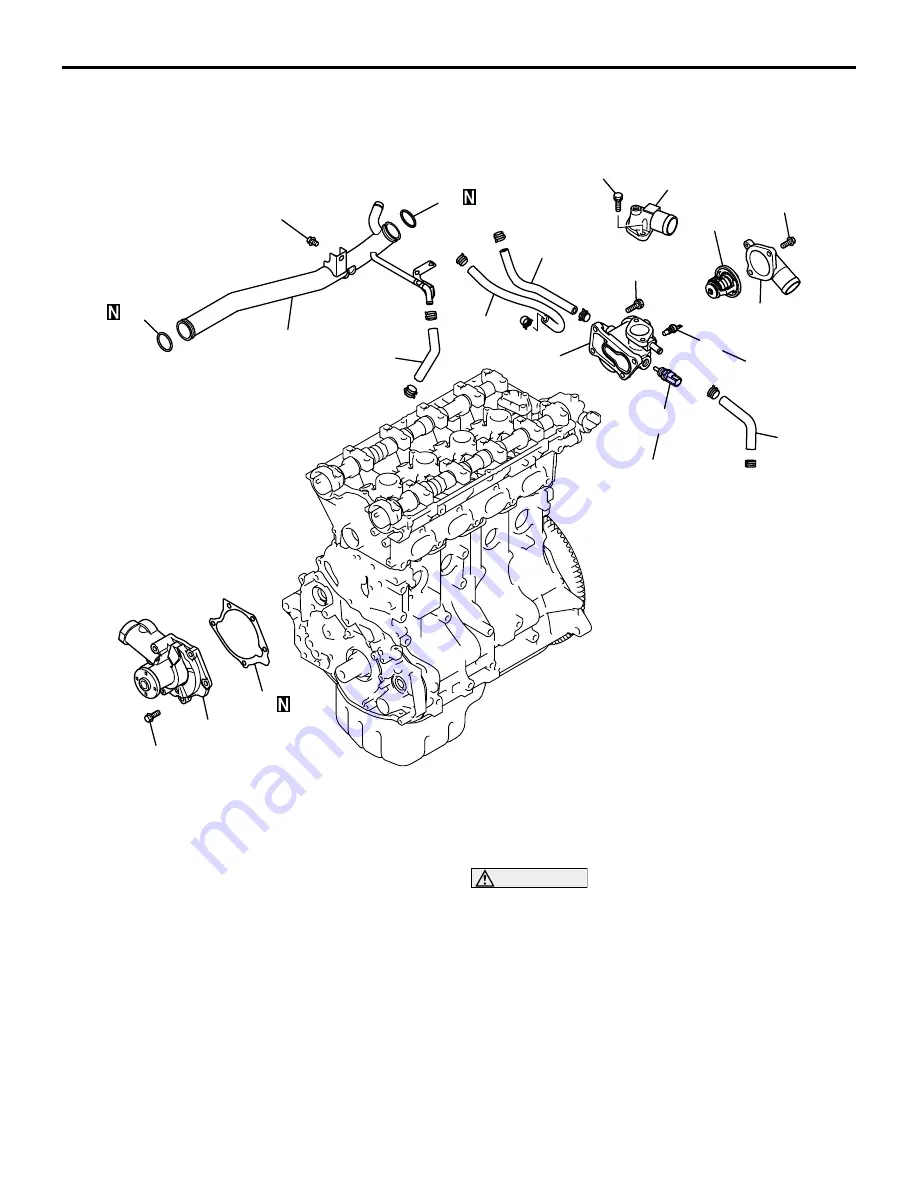
WATER PUMP AND WATER HOSE

ENGINE OVERHAUL <4G63-Turbo>

11D-33

WATER PUMP AND WATER HOSE

REMOVAL AND INSTALLATION

M1113017900372

INSTALLATION SERVICE POINTS
>>A<< O-RING/WATER INLET PIPE 
INSTALLATION

CAUTION

Never allow any oil or grease to touch the 
O-rings.

Clamp the water inlet pipe only after 
installation of the thermostat case.

Replace the O-rings at both ends of the water inlet 
pipe with new ones. Insert the O-rings into the water 
pump and thermostat housing after wetting their 
peripheries with water.

AK304981

13 ± 2 N·m

15

AC

29 ± 10 N·m

14 ± 1 N·m

14

3

2

1

4

5

10

6

8

7

9

13 ± 2 N·m

10.8 ± 1.0 N·m

23 ± 4 N·m

13 ± 2 N·m

11

13

12

Removal sequence

1. Water hose
2. Water hose
3. Water hose
4. Water hose

>>E<<

5. Engine coolant temperature sensor

>>D<<

6. Engine coolant temperature gauge 

unit

7. Water inlet fitting
8. Thermostat

>>C<<

9. Water outlet fitting

>>B<<

10. Thermostat housing

>>A<<

11. O-ring

>>A<<

12. Water inlet pipe

>>A<<

13. O-ring
14. Water pump
15. Water pump gasket

Содержание 4g63

Страница 1: ... 26 FUEL AND EMISSION PARTS 11D 28 REMOVAL AND INSTALLATION 11D 28 INLET MANIFOLD 11D 30 REMOVAL AND INSTALLATION 11D 30 EXHAUST MANIFOLD 11D 31 REMOVAL AND INSTALLATION 11D 31 WATER PUMP AND WATER HOSE 11D 33 REMOVAL AND INSTALLATION 11D 33 ROCKER ARMS AND CAMSHAFT 11D 35 REMOVAL AND INSTALLATION 11D 35 INSPECTION 11D 37 CYLINDER HEAD AND VALVES 11D 40 REMOVAL AND INSTALLATION 11D 40 INSPECTION 1...

Страница 2: ...s match the numbers in the component part drawing and indicate the disassembly sequence Reassembly steps Reassembly steps are omitted wherever reassembly can be achieved simply by performing the disassembly steps in reverse HOW TO USE THIS MANUAL How to Read Explanations Scope of Service Explanations Service steps Classification of Service Points Key service points service standards and instructio...

Страница 3: ...ssembly steps or reassembly steps Denotes non reusable part Tightening torque CRANKSHAFT AND CYLINDER BLOCK Removal steps 1 Drive plate bolt 2 Adapter plate 3 Drive plate 4 Crankshaft bushing 5 Rear plate 6 Bellhousing cover E 7 Oil seal case D 8 Oil seal C 9 Bearing cap bolt 10 Bearing cap B 11 Crankshaft bearing lower A 12 Crankshaft A THRUST BEARING INSTALLATION INSTALLATION SERVICE POINTS AK10...

Страница 4: ...Bore stroke mm 85 88 Displacement mL 1 997 Combustion chamber Pentroof type Number of cylinders 4 Valve mechanism Type Double overhead camshaft Number of intake valves 2 Number of exhaust valves 2 Lash adjusters Hydraulic Rocker arms Roller cam followers Compresssion ratio 9 0 Fuel injection system Electronically controlled multi point injection MPI system Ignition system Electronically controlled...

Страница 5: ...er head bolt nominal length mm 99 4 Valve margin mm Intake valves 1 0 0 5 Exhaust valves 1 5 1 0 Valve stem diameter mm 6 6 Valve face angle 43 5 44 Valve stem to guide clearance mm Intake valves 0 02 0 05 0 10 Exhaust valves 0 05 0 09 0 15 Valve height mm Intake valves 109 5 109 0 Exhaust valves 109 7 109 2 Valve stem projection mm Intake valves 49 2 49 7 Exhaust valves 48 4 48 9 Valve spring fre...

Страница 6: ...5 0 25 0 4 Crankshaft journal diameter mm 57 0 Crankshaft pin diameter mm 45 0 Oil clearance at crankshaft journals mm 0 03 0 04 0 1 Cylinder block gasket surface warp mm 0 05 0 1 Cylinder block gasket surface grinding limit including cylinder head grinding amount mm 0 2 Cylinder block overall height mm 284 Cylinder bore diameter mm 85 Taper of cylinder mm 0 01 or less Cylinder to piston clearance...

Страница 7: ...OLENOID AND VACUUM HOSE Vacuum pipe and hose assembly bolts 11 1 EGR valve bolts 20 2 Engine hanger bolt 19 3 Solenoid valve assembly nut 36 6 Solenoid valve assembly bolts M6 9 0 1 0 Solenoid valve assembly bolts M8 23 4 TIMING BELT Timing belt cover bolts flange bolt 11 1 Timing belt cover bolt washer assembled bolt 9 0 1 0 Power steering pump bracket bolts 49 9 Tensioner pulley bolt 48 5 Tensio...

Страница 8: ... protector bolts 23 3 Turbocharger assembly and pipe assembly bolts nuts 59 5 Oil pipe bolt flange bolt 11 1 Oil pipe bolt eye bolt M10 17 2 Water pipe bolt eye bolt M12 28 5 Water pipe bolt flange bolt 10 1 Exhaust manifold nuts M8 33 6 Exhaust manifold nuts M10 55 10 WATER PUMP AND WATER HOSE Engine coolant temperature sensor 29 10 Engine coolant temperature gauge unit 10 8 1 0 Water outlet fitt...

Страница 9: ...h 19 3 Oil cooler by pass valve 54 5 Relief plug 44 5 Oil filter bracket bolts 19 3 Plug cap 23 3 Flange bolt 36 3 Oil pump case bolts 23 3 Oil pump cover bolts 17 1 Oil pump cover screw 10 2 PISTONS AND CONNECTING RODS Connecting rod cap nuts 20 2 90 to 94 CRANKSHAFT AND CYLINDER BLOCK Flywheel bolts 132 5 Rear plate bolt 11 1 Bell housing cover bolts 9 0 1 0 Rear oil seal case bolts 11 1 Beam be...

Страница 10: ...ng a gasket scraper or wire brush Make sure that the FIPG application surface is flat and smooth Also make sure that the surface is free from oils greases and foreign substances Do not fail to remove old FIPG that may remain in the fastener fitting holes APPLICATION OF FIPG Applied FIPG bead should be of the specified size and free of any break FIPG can be wiped away unless it has completely harde...

Страница 11: ... B MD998785 Sprocket stopper Retention of counterbalancer shaft sprocket MD998767 Tension pulley socket wrench Manipulation of tensioner pulley during adjustment of timing belt tension MD998738 Set screw Retention of tensioner arm and auto tensioner during timing belt installation MD998713 Camshaft oil seal installer Installation of camshaft oil seal MD998442 Air bleed wire Air bleeding of lash ad...

Страница 12: ...D998737 Valve stem seal installer Installation of valve stem seal MD998162 Plug wrench Removal and installation of front case plug cap Use with MD998783 MD998783 Plug wrench retainer Removal and installation of front case plug cap Use with MD998162 MD998371 Silent shaft bearing puller Removal of counterbalancer shaft front bearing MD998372 Silent shaft bearing puller Removal of counterbalancer sha...

Страница 13: ... and rear bearings MD998375 Crankshaft front oil seal installer Installation of crankshaft front oil seal MD998285 Crankshaft front oil seal guide Guide for installation of crankshaft front oil seal MD998780 Piston pin setting tool Removal and press fitting of piston pin MD998776 Crankshaft rear oil seal installer Installation of crankshaft rear oil seal MB990938 Handle Installation of crankshaft ...

Страница 14: ... 44 10 N m 13 1 N m 23 3 N m 25 4 N m 22 4 N m 8 8 1 0 N m 3 0 0 5 N m AC 79 5 N m 44 10 N m 24 4 N m 14 15 Removal steps 1 Oil level gauge 2 O ring 3 Oil level gauge guide 4 O ring 5 Idler pulley 6 Cap 7 Auto tensioner assembly 8 Water pump pulley 9 Alternator brace 10 Alternator 11 Crankshaft pulley 12 Center cover 13 Spark plug cable 14 Ignition coil 15 Spark plug Removal steps Continued ...

Страница 15: ...074 AK400296 11 1 N m AB 19 3 N m 1 8 6 11 1 N m 36 6 N m 23 4 N m 2 7 9 0 1 0 N m 5 3 4 20 2 N m 11 1 N m Removal steps 1 Vacuum pipe and hose assembly 2 Vacuum pipe and hose assembly 3 Vacuum pipe and hose assembly 4 EGR valve 5 EGR valve gasket 6 Solenoid valve 7 Solenoid valve 8 Engine hanger Removal steps Continued ...

Страница 16: ...0 5 N m AB 11 1 N m 8 30 Removal steps 1 Timing belt front upper cover 2 Timing belt front lower cover 3 Power steering pump bracket A M 4 Timing belt L 5 Tensioner pulley 6 Tensioner arm K 7 Auto tensioner 8 Idler pulley 9 Crankshaft angle sensor B J 10 Oil pump sprocket C I 11 Crankshaft bolt D I 12 Crankshaft sprocket I 13 Crankshaft sensing blade 14 Tensioner B E H 15 Timing belt B F G 16 Coun...

Страница 17: ... of the No 1 cylinder piston on compression stroke 3 Loosen the lock nut of the tensioner pulley then remove the timing belt B OIL PUMP SPROCKET REMOVAL 1 Remove the plug on the left side of cylinder block 2 Insert a crosspoint screwdriver shank diameter 8 mm to prevent the counterbalancer shaft from rotating 3 Remove the flange bolt 4 Remove the oil pump sprocket C CRANKSHAFT BOLT REMOVAL 1 Hold ...

Страница 18: ... water pump for leaks 1 Mark the belt running direction for reinstallation 2 Loosen the tensioner B bolt and then remove the timing belt B F COUNTERBALANCER SHAFT SPROCKET REMOVAL 1 Use the special tool Sprocket stopper MD998785 to prevent the counterbalancer shaft sprocket from rotating 2 Remove the counterbalancer shaft mounting bolt G CRANKSHAFT SPROCKET B REMOVAL Use the special tool Crankshaf...

Страница 19: ...pecified sealant Mitsubishi Genuine Part No MD970389 or equivalent C SEMICIRCULAR PACKING INSTALLATION 1 Remove thoroughly the old sealant and FIPG remaining on the semicircular packing cylinder head and rocker cover 2 Apply sealant to the surface indicated in the drawing of the semicircular packing Specified sealant 3M ATD No 8660 or equivalent 3 Install the semicircular packing on the cylinder h...

Страница 20: ...re the FIPG hardens E CRANKSHAFT SPROCKET B INSTALLATION Clean and then degrease the crankshaft sprocket B and the sprocket fitting surface of the crankshaft NOTE Degreasing is necessary to prevent lack of frictional coefficient between the mating surfaces F SPACER INSTALLATION CAUTION If the spacer is opposite in direction to that shown in the drawing when installed it will dam age the oil seal l...

Страница 21: ...oner B center is positioned as shown in the drawing relative to the mounting bolt center 4 Lift the tensioner B with fingers to move it in the direction of the arrow until the tension section of the timing belt becomes taut While keeping the tensioner B in this position tighten its bolt NOTE When the bolt is tightened prevent the tensioner B shaft from turning If the shaft turns the belt will be o...

Страница 22: ...TALLATION 1 Prevent the counterbalancer shaft from rotating in the same method as in the removal procedure 2 Install the oil pump sprocket 3 Apply a thin coat of engine oil to the seating surface of the nut 4 Tighten the flange nut to 54 5 N m K AUTO TENSIONER INSTALLATION 1 If the auto tensioner rod remains in its fully extended position reset it to the retracted position as follows 1 Clamp the a...

Страница 23: ...th and stay there by the force of the valve springs 2 Align the timing mark on the intake camshaft sprocket with that on the rocker cover NOTE The intake camshaft will be turned slightly clockwise from where the timing marks are aligned by the force of the valve springs and stay there 3 Bring the timing mark on the crankshaft sprocket to a point one sprocket tooth away from the mating timing mark ...

Страница 24: ...take camshaft sprocket counterclockwise to bring the timing mark on it one sprocket tooth away from the mating timing mark in the counterclockwise direction Then install the timing belt on the sprocket and hold it in place with a paper clip NOTE The timing marks will be aligned when the belt is installed since the intake camshaft is turned slightly clockwise by the force of the valve springs 7 Tur...

Страница 25: ...ets 13 Turn the crankshaft clockwise to make the timing mark align with the No 1 cylinder top dead center mark 14 Install the special tool Set screw MD998738 and turn down the tool until the wire inserted in the auto tensioner when it was installed can be moved freely 15 Loosen the tensioner pulley lock bolt CAUTION Prevent the timing belt from slipping as it becomes loose following rotation of th...

Страница 26: ... BELT Check closely the entire timing belt Replace it if any of the following conditions is found 1 Hardened back side rubber Back side surface is glossy lacking in elasticity and so hard that no impression is left when pressed with fingernail 2 Cracks in back rubber surface 3 Cracks in canvas 4 Cracks in tooth roots 5 Cracks in belt sides 6 Abnormally worn belt sides NOTE belt sides are normal if...

Страница 27: ...nsioner if the rod is badly worn or damaged 3 Measure the extension length of the rod If it is not within the standard value range replace the auto tensioner Standard value 12 mm 4 Press the rod with a force of 98 to 196 N and measure the amount of retraction If the measurement exceeds the standard value replace the auto tensioner Standard value 1 mm maximum AK301307AD 12 mm AK301308AE 98 to 196 N...

Страница 28: ...LATION M1113002200708 AK400297AB 1 4 2 3 9 10 5 11 19 3 N m 9 0 2 0 N m 11 1 N m 8 7 6 Removal steps 1 Throttle body C 2 Throttle body gasket B 3 Fuel pressure regulator 4 O ring 5 Injector and delivery pipe 6 Insulator 7 O ring A 8 Injector 9 O ring 10 Grommet 11 Delivery pipe Removal steps Continued ...

Страница 29: ...e delivery pipe and check it for smooth rotation again B FUEL PRESSURE REGULATOR INSTALLATION 1 Apply a thin coat of engine oil to a new O ring CAUTION Prevent engine oil from getting into the delivery pipe 2 Insert the fuel pressure regulator into the delivery pipe while turning it in both directions carefully not to damage the O ring 3 Check that the fuel pressure regulator turns smoothly If it ...

Страница 30: ...olts to the specified torque 31 3 N m on both ends after making sure that the stay is in close contact with the bosses on the inlet manifold and cylinder block AK400302 4 AB 36 6 N m 36 6 N m 20 2 N m 31 3 N m 3 2 1 5 23 2 N m Removal steps A 1 Inlet manifold stay 2 Alternator brace stay 3 Inlet manifold 4 Inlet manifold gasket 5 Detonatoin sensor AK400845 Intake manifold stay AB ...

Страница 31: ...21 AC 2 44 5 N m Removal steps 1 Engine hanger 2 Oxygen sensor 3 Turbocharge heat protector 4 Exhaust fitting bracket 5 Exhaust fitting 6 Exhaust fitting gasket 7 Air outlet fitting C 8 Air outlet fitting gasket 9 Oil return pipe 10 Oil return pipe gasket B 11 Oil return pipe gasket 12 Exhaust manifold heat protector 13 Turbocharge assembly and pipe assembly 14 Turbocharge gasket 15 Ring 16 Oil pi...

Страница 32: ...ce 5 Finally tighten the M10 nuts and the M8 nuts to the specified torque both in the indicated sequence Tightening torque 33 6 N m M8 55 10 N m M10 B OIL RETURN PIPE GASKET INSTALLATION Install the oil return pipe gasket with its tab located as shown in the drawing NOTE The gasket on the turbocharger end of the pipe does not require special alignment for installation C OUTLET FITTING GASKET INSTA...

Страница 33: ... water inlet pipe with new ones Insert the O rings into the water pump and thermostat housing after wetting their peripheries with water AK304981 13 2 N m 15 AC 29 10 N m 14 1 N m 14 3 2 1 4 5 10 6 8 7 9 13 2 N m 10 8 1 0 N m 23 4 N m 13 2 N m 11 13 12 Removal sequence 1 Water hose 2 Water hose 3 Water hose 4 Water hose E 5 Engine coolant temperature sensor D 6 Engine coolant temperature gauge uni...

Страница 34: ...ve all old sealant remaining on the threaded hole in the engine coolant temperature gauge unit and the thermostat housing NOTE A new engine coolant temperature gauge unit is coated with sealant It does not require coating with sealant before installation 2 Apply sealant to the indicated threads of the engine coolant temperature gauge unit Specified sealant 3M Nut Locking Part No 4171 or equivalent...

Страница 35: ... 12 13 14 11 8 5 18 1 2 3 4 6 20 1 N m 11 1 N m 22 4 N m 10 8 1 0 N m 14 1 N m 10 2 N m 9 Apply engine oil to all moving parts before installation Removal steps 1 Camshaft position sensor 2 O ring 3 Cover 4 Gasket F 5 Camshaft position sensing cylinder E 6 Camshaft position sensor support D 7 Camshaft oil seal C 8 Bearing cap rear right C 9 Bearing cap rear left C 10 Bearing cap front C 11 Bearing...

Страница 36: ... exhaust camshafts Check the identification mark on each cap before installation Identification mark stamped on front and Nos 2 5 bearing caps I intake camshaft E exhaust camshaft 3 Remove completely sealant remaining on the bearing caps and cylinder head 4 Apply sealant to the surfaces indicated in the drawing Specified sealant 3M ATD No 8660 or equivalent 5 Install each bearing cap and tighten i...

Страница 37: ... located as shown in the drawing INSPECTION M1113005500708 CAMSHAFT Measure the cam height nose to heel diameter If any cam is worn beyond the limit replace the cam shaft Standard value Intake 35 79 mm Exhaust 35 49 mm Limit Intake 35 29 mm Exhaust 34 99 mm LASH ADJUSTERS CAUTION The lash adjuster is a precision engineered component Do not allow dust or other for eign matter to enter it Do not dis...

Страница 38: ...Take the lash adjuster out of the container then move the plunger by pushing the steel ball gently to discharge the diesel fuel from the pressure chamber CAUTION The steel ball spring of the lash adjuster is extremely weak The lash adjuster s functionality may be badly affected if the special tool is inserted too strongly 5 Soak the lash adjuster in the diesel fuel in container B Move the plunger ...

Страница 39: ...old of the steel ball to allow the pressure chamber to be filled with diesel fuel 9 Take the lash adjuster out of the container place it upright with the plunger at the top and push the plunger firmly The plunger must not move at all NOTE If the lash adjuster contracts perform the operations 7 through 9 again Replace the lash adjuster if it still contracts even after the pressure chamber has compl...

Страница 40: ...n 3 15 16 14 9 11 19 12 13 10 20 18 7 17 1 2 8 4 5 6 78 2 N m 0 N m 20 2 N m 90 90 Removal steps A D 1 Cylinder head bolt 2 Cylinder head assembly 3 Cylinder head gasket B C 4 Retainer lock 5 Valve spring retainer B 6 Valve spring 7 Intake valve B C 8 Retainer lock 9 Valve spring retainer B 10 Valve spring 11 Exhaust valve C A 12 Valve stem seal 13 Valve spring seat Removal steps Continued ...

Страница 41: ...stem seal INSTALLATION SERVICE POINTS A VALVE STEM SEAL INSTALLATION CAUTION The special tool must always be used when installing the valve stem seal Improper installation could result in oil leaks past the valve guide 1 Install the valve spring seat 2 Install the valve 3 Apply a thin coat of engine oil to a new valve stem seal 4 Use the special tool Valve stem seal installer MD998737 to install t...

Страница 42: ... that its nominal length shank length is not greater than the limit If the limit is exceeded replace the bolt Limit 99 4 mm 2 Apply engine oil to the threads and washer of the bolt 3 Tighten the bolts to 78 2 N m in the indicated sequence NOTE Use the special tool Cylinder head bolt wrench MB991654 to tighten the bolts 4 Loosen all the bolts completely 5 Tighten the bolts again to a torque of 20 2...

Страница 43: ...e 2 Thoroughly remove oils scale sealants carbon and other contamination Clean the oil passages then check using compressed air that they are not blocked CAUTION The thickness of the metal that can be removed by grinding from both the cylinder head and the mating cylinder block is limited to 0 2 mm in total 3 Check the cylinder head gasket surface for warp using a straightedge and thickness gauge ...

Страница 44: ... and valve stem diameter to calculate the clearance between the valve guide and valve stem If the limit is exceeded replace the valve guide or valve or both Standard values Intake 0 02 0 05 mm Exhaust 0 05 0 09 mm Limits Intake 0 10 mm Exhaust 0 15 mm VALVE SEATS With the valve installed in position and its face pressed against the valve seat measure the valve stem projection distance between the ...

Страница 45: ...linder head due to interference 4 Resurface the valve seat See the VALVE SEAT RECONDITIONING section VALVE GUIDE REPLACEMENT 1 Force out the valve guide toward the cylinder block using a press CAUTION Do not use a replacement valve guide of the same size as the removed one 2 Machine the valve guide hole in the cylinder head to the size matched to the selected oversize valve guide Valve guide hole ...

Страница 46: ...3 Oil filter 4 Transmission stay A L 5 Oil pan lower B L 6 Oil pan upper 7 Oil screen 8 Gasket 9 Oil cooler by pass valve 10 Oil pressure switch K 11 Relief plug 12 Gasket 13 Relief spring 14 Relief plunger 15 Oil filter bracket 16 Gasket C J 17 Plug 18 O ring D I 19 Flange bolt H 20 Front case 21 Gasket 22 Oil pump cover G 23 Oil pump driven gear G 24 Oil pump drive gear F 25 Crankshaft front oil...

Страница 47: ...rawing and support the tool with the special tool to loosen the plug Plug wrench MD998162 Plug wrench retainer MD998783 D FLANGE BOLT REMOVAL 1 Remove the plug on the left side of the cylinder block Insert a cross point screwdriver shank diameter 8 mm into the plug hole more than 60 mm to prevent the left counterbalancer shaft from rotating 2 Loosen and remove the flange bolt E COUNTERBALANCER SHA...

Страница 48: ...603 to the cylinder block 2 Apply engine oil to the rear bearing outer surface and bearing hole in the cylinder block 3 Using special tool Silent shaft bearing installer MD998705 install the rear bearing NOTE The left rear bearing has no oil holes B RIGHT COUNTERBALANCER SHAFT REAR BEARING INSTALLATION 1 Install the guide pin of the Silent shaft bearing installer MD998705 in the threaded hole of t...

Страница 49: ...998705 2 Install the guide pin of the Silent shaft bearing installer MD998705 in the threaded hole of the cylinder block as shown 3 Align the ratchet ball of the special tool with the oil hole in the rear bearing to install the bearing of the special tool 4 Apply engine oil to the front bearing outer surface and bearing hole in the cylinder AK300179 MD998705 MD998705 Guide pin AG AK300622AG MD9987...

Страница 50: ... line up the alignment marks H FRONT CASE INSTALLATION 1 Install the special tool crankshaft front oil seal guide MD998258 on the front end of crankshaft and apply a thin coat of engine oil to the outer surface of the special tool Be sure to use the special tool when the front case is fitted with an oil seal 2 Install the front case on the cylinder block with a new front case gasket in between and...

Страница 51: ...tools to tighten the plug to the specified torque Plug wrench MD998162 Plug wrench retainer MD998783 K OIL PRESSURE SWITCH INSTALLATION CAUTION Be careful not to block the oil passage with seal ant 1 Apply sealant to the threaded portion Specified Sealant 3M ATD Part No 8660 or equivalent 2 Tighten the oil pressure switch together with the cylinder block by the specified torque using of the specia...

Страница 52: ...cations indicated in the drawing CAUTION Do not apply FIPG over remaining old FIPG Doing so could result in oil leakage 4 Thoroughly remove old FIPG from the gasket surfaces of the oil pan upper and lower sections CAUTION Too much FIPG will squeeze out blocking cool ant or oil passages while too thin a bead could result in leakage 5 Apply a 4 mm diameter bead of FIPG to the flange surface all arou...

Страница 53: ...e wrong side facing the oil pan will result in oil leakage Replace the drain plug gasket with a new one Install it with the side indicated in the drawing toward the oil pan INSPECTION M1113008200386 COUNTERBALANCE SHAFTS 1 Check that the oil holes are not blocked Clean if necessary 2 Check the journals for seizure damage and defective contact with bearings If any of these faults is found replace t...

Страница 54: ...hat valve moves smoothly 2 Ensure that the dimension L measures the standard value under normal temperature and humidity Standard value 34 5 mm 3 The dimension must be the standard value when measured after the valve has been dipped in 97 to 103 C oil Standard value 40 0 mm AK000032 L Valve AC ...

Страница 55: ...Apply engine oil to all moving parts before installation 20 2 N m 90º to 94º Removal steps G 1 Connecting rod cap nut A F 2 Connecting rod cap E 3 Connecting rod bearing D 4 Piston and connecting rod assembly 5 Connecting rod bearing C 6 Piston ring No 1 C 7 Piston ring No 2 B 8 Oil ring B A 9 Piston pin 10 Piston 11 Connecting rod 12 Bolt Removal steps Continued ...

Страница 56: ...mbly on the element Base with the front mark facing up 3 Use a press to remove the piston pin NOTE Keep the disassembled pistons piston pins and connecting rods cylinder by cylinder INSTALLATION SERVICE POINTS A PISTON PIN INSTALLATION 1 When replacing a piston check the cylinder bore size mark stamped at the indicated location on the cylinder block and select an appropriate replacement piston usi...

Страница 57: ...in 7 Insert the assembly of piston pin Push rod and Guide A put together in step 4 into the piston holes from the front mark side 8 Screw the tool element Guide B into the tool element Guide A until the gap between both the elements is equal to the dimension L obtained in step 3 plus 3 mm 9 Place the piston and connecting rod assembly onto the element Piston setting base with the front marks facin...

Страница 58: ...ion by finger as shown in the drawing 3 Make sure that the installed side rails move smoothly in either direction C PISTON RING NO 2 PISTON RING NO 1 INSTALLATION Using a piston ring expander install the piston rings with their identification marks facing up toward the piston crown Identification marks No 1 ring 1R No 2 ring 2R NOTE Each of the available piston rings has a size mark as follows Siz...

Страница 59: ...bearing select a bearing of the size appropriate for the crankshaft pin diameter in accordance with the crankshaft pin and connecting rod bearing matching table shown below 2 Crankshaft pin diameter marks are stamped in the indicated locations 3 Connecting rod bearing identification mark is stamped in the indicated location on each bearing Bearing selection example If the crankshaft pin diameter m...

Страница 60: ...ated and must be replaced 2 Apply engine oil to the threads and bearing surface of each nut before installation 3 Finger tighten the nuts on the bolts then tighten the nuts alternately and repeatedly to install the cap properly 4 Tighten the nuts to a torque of 20 2 N m 5 Make a paint mark on the head of each nut CAUTION If the tightening angle is less than 90 ade quate tightness could not be assu...

Страница 61: ...ng 1 0 mm CRANKSHAFT PIN OIL CLEARANCE PLASTIC GAUGE METHOD 1 Wipe off oil from the crankshaft pin and connecting rod bearing 2 Cut a piece of plastic gauge whose length is equivalent to the width of the bearing and place it on the crankshaft pin in parallel with its axis 3 Install the connecting rod cap carefully and tighten the nuts to the specified torque 20 2 N m 90 to 94 4 Remove the nuts the...

Страница 62: ...1 1 N m 9 0 1 0 N m 132 5 N m 11 1 N m Apply engine oil to all moving parts before installation Removal steps 1 Flywheel bolt 2 Flywheel 3 Rear plate 4 Bell housing cover F 5 Oil seal case E 6 Oil seal D 7 Bearing cap bolt D 8 Beam bearing cap C 9 Crankshaft bearing lower 10 Crankshaft C 11 Crankshaft bearing upper B 12 Thrust bearing A A 13 Oil jet 14 Cylinder block Removal steps Continued ...

Страница 63: ...olding them in position C CRANKSHAFT BEARING INSTALLATION 1 Location of crankshaft journal diameter marks Bearing selection example If the crankshaft journal diameter mark is 0 and the cylinder block bearing bore mark is 1 then select a bearing with a 2 mark as the No 1 2 4 or 5 bearing and a bearing with a 1 mark as the No 3 bearing If the crankshaft journal diameter mark is illegible measure the...

Страница 64: ...it 71 1 mm 3 Apply engine oil to the threads and bearing surface of the bolt 4 Tighten the bolts to 25 2 N m in the indicated sequence 5 Make a paint mark on the head of the bolt 6 Make a paint mark on the bearing cap at a point 90 to 100 away from the paint mark made on the bolt head in the tightening direction Crankshaft journal diameter Cylinder block bearing bore Crankshaft bearing Identificat...

Страница 65: ...g cap 8 After installing the beam bearing cap measure the end play of the crankshaft If the end play exceeds the limit replace the crankshaft bearings Standard value 0 05 0 25 mm Limit 0 4 mm E REAR OIL SEAL INSTALLATION Use the special tools to press fit the rear oil seal in the rear oil seal case Handle MB990938 Crankshaft rear oil seal installer MD998776 F REAR OIL SEAL CASE INSTALLATION 1 Remo...

Страница 66: ... 1 mm CYLINDER BLOCK 1 Visually check the cylinder block for scratches rust and any other corrosion Also check it for cracks using a flaw detecting penetrant If any defect is evident replace the cylinder block 2 Use a straightedge and thickness gauge to check the cylinder block top surface for warp Make sure that the surface is free from remaining gasket material and other foreign matter Standard ...

Страница 67: ...diameter measurement calculate the boring finish dimension Boring finish dimension Piston diameter 0 02 0 04 mm clearance between piston and cylinder 0 02 mm honing margin CAUTION To prevent deformation of cylinder block that would result from the heat generated by boring bore the cylinders in the following sequence No 2 No 4 No 1 No 3 4 Bore all the cylinders to the calculated boring finish dimen...

Страница 68: ...NOTES ...

Отзывы: