


68
9 UTILITY FUNCTION
9.3 Utility Display
Display operation of main menu
The following four types of operation can display the main menu.
(Display the main menu after installing the standard monitor OS from GT Designer3 to the GOT built in flash memory.)
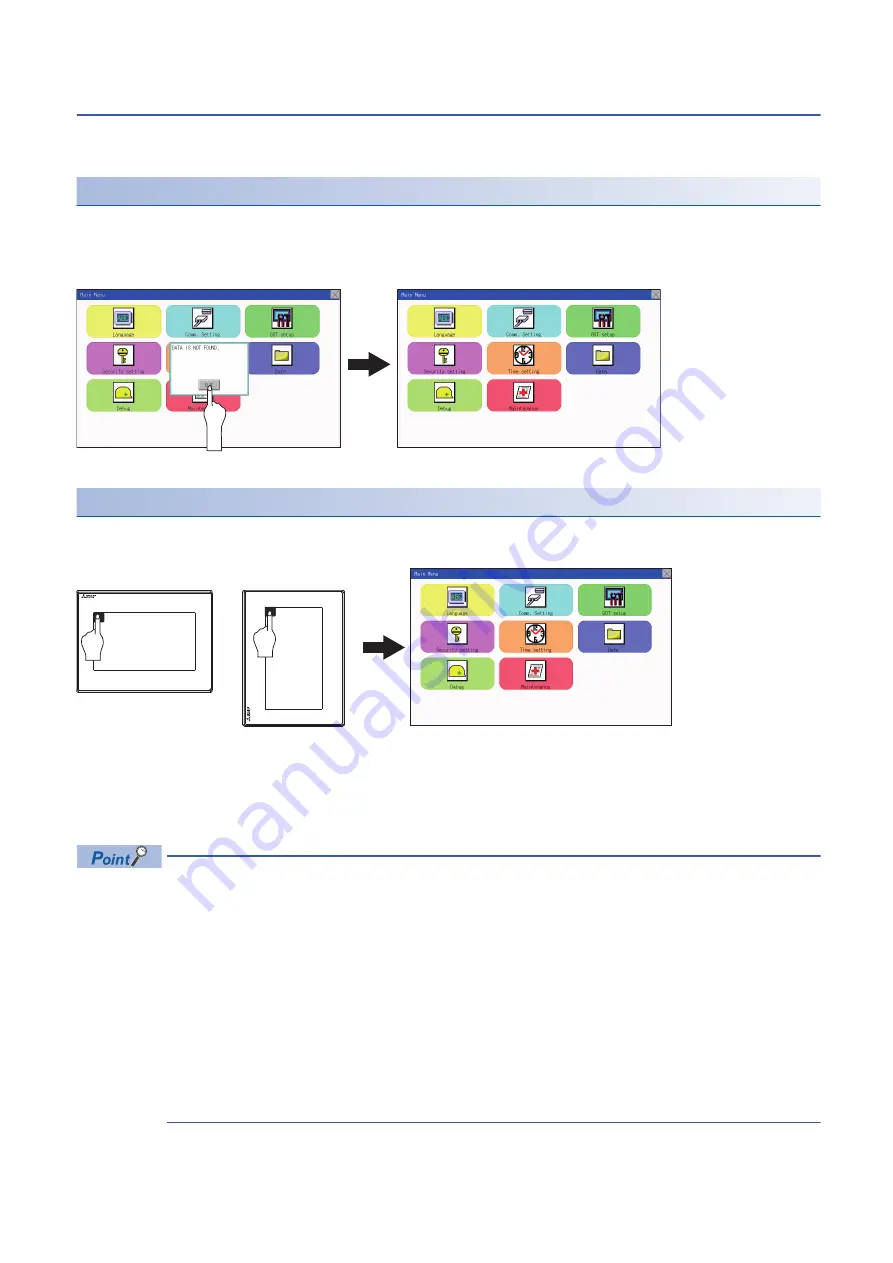
When project data is undownloaded
After the GOT is turned on, a dialog box for notifying of absence of project data is displayed. After the dialog box is displayed,
touch the [OK] button to display the main menu.
When touching utility call key
If you touch the utility call key while user-created screen is displayed, the main menu is displayed.
The utility call key is set in the position on the GOT screen upper left corner at factory shipment.
The utility function windows appear in the horizontal format, and this format cannot be changed.
The utility call key can be set by the GOT utility or GT Designer3.
For the setting method of the utility call key, refer to the following.
Page 113 Setting the utility call keys
GT Designer3 (GOT2000) Screen Design Manual
• Prohibited simultaneous 2-point presses
Do not touch 2 points or more on the GOT screen simultaneously. Touching 2 points or more simultaneously
may activate a part other than the touched point.
• Press time of the utility call key
When having set [Press time] of the utility call key setting screen to other than "0 (s)", keep pressing the touch
panel for the period set to [Press time] or more before leaving the finger from the touch panel.
For utility call key setting, refer to the following.
Page 113 Setting the utility call keys
• When the utility call key is not set
Even when the utility call key is not set (set to the zero point), you can display the main menu by performing
the following operation.
Pressing the special function switch set on the user-created screen
Turning on the power
supply of the GOT
Touch [OK] button
Horizontal format
Vertical format
Содержание GOT SIMPLE Series
Страница 1: ...GOT SIMPLE Series User s Manual GS21 model ...
Страница 2: ......
Страница 20: ...18 MEMO ...
Страница 24: ...22 1 OVERVIEW 1 1 Features MEMO ...
Страница 34: ...32 3 SPECIFICATIONS 3 4 GOT Connector Specifications MEMO ...
Страница 40: ...38 4 PART NAME 4 3 Bottom MEMO ...
Страница 62: ...60 7 WIRING 7 2 Wiring Inside and Outside the Panel MEMO ...
Страница 76: ...74 10 LANGUAGE SETTING LANGUAGE 10 1 Display language setting MEMO ...
Страница 130: ...128 12 DISPLAY AND OPERATION SETTINGS GOT SET UP 12 7 IP Filter Setting MEMO ...
Страница 160: ...158 14 CLOCK SETTINGS TIME SETTING AND DISPLAY 14 1 Time Setting and Display MEMO ...
Страница 268: ...266 16 GOT SELF CHECK DEBUG 16 3 FX3U ENET ADP Communication Setting Function MEMO ...
Страница 274: ...272 17 MAINTENANCE 17 3 Clean MEMO ...
Страница 280: ...278 20 ERROR MESSAGE LIST MEMO ...
Страница 296: ...294 22 TROUBLESHOOTING 22 1 GOT Restoration Sheets MEMO ...
Страница 298: ...296 23 CONNECTION MEMO ...
Страница 305: ...24 APPENDIX 24 1 External Dimensions 303 24 MEMO ...
Страница 309: ......


