background image

Getting Started

xxv

This screen displays the Dial key at the bottom. This key is context-sensitive and cannot be changed.

The 

More

 softkey is also displayed if you have any configured bottom softkeys. For example, in the 

previous figure, the 6930 has three softkeys configured that are viewable on the next softkey “page”. 
Pressing the 

More

 softkey toggles between the first and additional “pages” to display all the rest of 

the configured softkeys (as per the figure below).

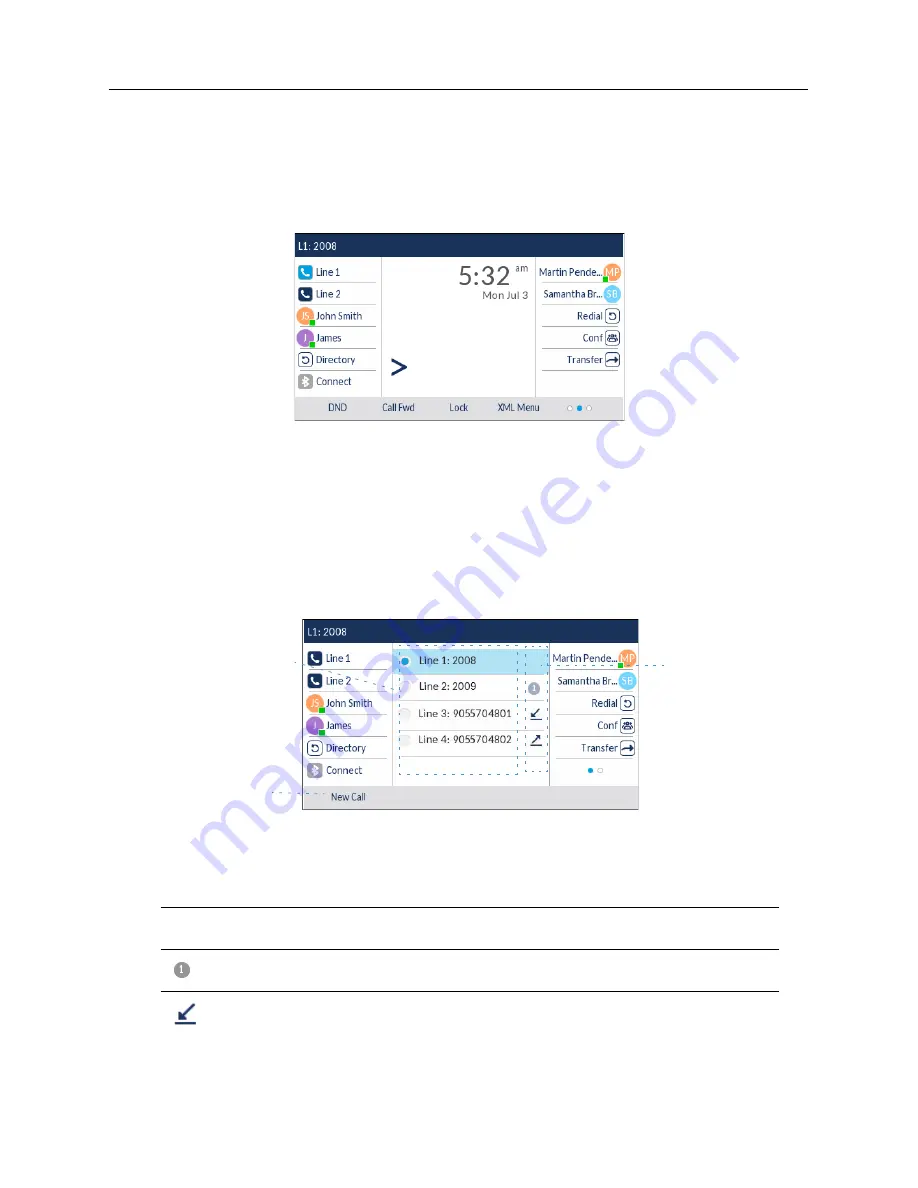
Line Selection Screen

The 

Line Selection

 screen displays a list of the lines that are available on the phone as well as line 

usage indicators that tell you whether or not a line is in use. 

It also allows you to easily select a line to act upon. When a line is not in use, a 

New Call

 key is 

available allowing you to dial out using the selected line. If the line is in use with a call on hold, a 

Pickup

 key is available allowing you to pick up the call on hold on the respective line.

The following table identifies and describes the line usage indicators on the 

Line Selection

 screen.

Indicator/Ic
on

Description

N/A

No icon denotes that no calls are associated with the line and the line is available to be 
used.

The number denotes how many call appearances are being utilized on the respective 
line.

Indicates a call is incoming on the respective line.

Indicators

Available Lines

New Call/
Pickup Key

Line Usage

Содержание MiVOICE 6930

Страница 1: ...Mitel 6930 SIP Phone 58015330 REV00 RELEASE 5 0 0 USER GUIDE ...

Страница 2: ...net sites or in its publications are registered and unregistered trademarks of Mitel Networks Corporation MNC or its subsidiaries collectively Mitel or their respective owners Use of the Trademarks is prohibited without the express consent from Mitel Please contact our legal department at legal mitel com for additional information For a list of the worldwide Mitel Networks Corporation registered t...

Страница 3: ...v Detailed View Call Screen xxvi Multi View Call Screen xxvii UI Navigation xxviii Methods of Customizing Your Phone xxix Phone Options through the IP Phone UI xxix Using the IP Phone UI xxx Phone Options through the Mitel Web UI xxxi Using the Mitel Web UI xxxi Phone Status xxxv Phone Status through IP Phone UI xxxv Finding Your Phone s IP Address xxxvi Phone Status through the Mitel Web UI xxxvi...

Страница 4: ...etooth device lxvii Connecting to a different or disconnected Bluetooth device lxviii Audio lxix Audio Mode lxix Headset lxx Ring Tones and Tone Sets lxxi Display lxxvii Home Screen Settings lxxvii Brightness Settings lxxviii Dialing lxxix Live Dialpad lxxix Speed Dial Edit lxxx Restart lxxx Restarting Your Phone Using the IP Phone UI lxxx Restarting Your Phone Using the Mitel Web UI lxxxi Emergen...

Страница 5: ...GURING XMPP AVATAR c XML Key c Configuring an XML Key Using the Mitel Web UI y ci Accessing the XML Service Using the IP Phone UI ci Flash Key cii Configuring a Flash Key Using the Mitel Web UI cii Sprecode Key cii Configuring a Sprecode Key Using the Mitel Web UI ciii Park Pickup Keys ciii Configuring Park Pickup Keys Using the Mitel Web UI civ Utilizing the Park Call Pickup Parked Call Feature U...

Страница 6: ...Paging Key cxxii Discreet Ringing Key cxxii Configuring a Discreet Ringing Key cxxiii Call History Key cxxiii Configuring a Call History Key Using the Mitel Web UI cxxiv Empty Key cxxiv Configuring an Empty Key Using the Mitel Web UI cxxv None Key cxxv Deleting a Key s Function Using the Mitel Web UI cxxv Making Calls cxxvii Dialing a Number cxxvii Pre Dialing a Number cxxvii Using Handsfree Speak...

Страница 7: ...e Directory cxli Indication of Transferred Calls cxliii Conferencing Calls cxliii Local Conferencing cxliii Ending a Conference and Transferring Remaining Parties cxlvi Ending Calls cxlvi Managing Calls cxlvii Directory cxlvii General Directory Functions cxlviii Local Directory Features cli Downloading the Local Directory to Your PC clvi External Directory Source Features clviii Received Callers L...

Страница 8: ...ty clxxxii Additional Features clxxxiv Display DTMF Digits clxxxiv Configuring Display of DTMF Digits clxxxiv Play Call Waiting Tone clxxxv Configuring Call Waiting Tone clxxxv Stuttered Dial Tone clxxxv Configuring Stuttered Dial Tone clxxxvi XML Beep Support clxxxvi Configuring XML Beep Support clxxxvii Status Scroll Delay clxxxvii Configuring Status Scroll Delay clxxxviii Switch UI Focus to Rin...

Страница 9: ...ng the Expansion Modules cciii Press and Hold to Create a Speed Dial Key cciii Troubleshooting Solutions cciv Why is my display blank cciv Why is my speakerphone not working cciv Why can t I get a dial tone cciv Why doesn t my phone ring cciv Why is the light not coming on with a new voicemail message cciv Why is my handset not working cciv How do I find the IP address of my phone cciv Why does my...

Страница 10: ...Table of Contents xi ...

Страница 11: ...d party peripherals and has an environmentally efficient PoE class 3 rating The Mitel 6930 SIP IP phone is one of the most advanced desktop IP phones available on the market today and is ideal for any enterprise executive or manager Teleworker and Contact Center employee The 6930 SIP IP phone is compatible with select Mitel call managers MiVoice 5000 MX ONE MiVoice Office 400 About this Guide This...

Страница 12: ... port 10 100 1000 Gigabit Ethernet switch lets you share a connection with your computer Embedded Bluetooth 4 0 USB 2 0 port 500mA maximum 12 top softkeys and 5 context sensitive bottom softkeys Press and hold Speed dial key configuration feature Supports up to 24 call lines with LEDs Mobile integration using Bluetooth wireless technology Wideband handset Enhanced wideband full duplex speakerphone...

Страница 13: ...cable to connect from the phone directly tothe network for power no48V AC power adapter required if using Power over Ethernet PoE For Ethernet networks that DO NOT supply power to the phone Use only the GlobTek Inc Limited Power Source LPS adapter model no GT 41080 1848 sold separately to connect from the DC power port on the phone to a power source or Use a PoE power injector or a PoE switch Inst...

Страница 14: ...nd caller information q Handset a Goodbye Key w Speaker s Redial Key e Message Waiting Indicator MWI d Hold Key r Contacts Key f Mute Key t Call History Key g Speaker Headset Key y Voicemail Key h Navigation Keys Select Button u Settings Key j State Sensitive Softkeys i Volume Control k Programmable Keys o Dialpad l LCD Screen q w e r t y u o a s d f g i h j k l k ...

Страница 15: ...your previously dialed calls Pressing the Redial key twice redials the last dialed number displayed on the Home screen For more information see Outgoing Redial Key on page cxv Hold key Places an active call on hold To retrieve a held call press the applicable Line key For more information see Placing a Call on Hold on page cxxxviii Mute key Mutes the microphone so that your caller cannot hear you ...

Страница 16: ...figuring Softkeys on page lxxxiii Dialpad Key Description 0 Dials 0 Dials the Operator on a registered phone 1 Dials 1 2 ABC Dials 2 When entering text this key enters A with one press B with two presses and C with three presses 3 DEF Dials 3 When entering text this key enters D with one press E with two presses and F with three presses 4 GHI Dials 4 When entering text this key enters G with one p...

Страница 17: ...r digits or letters in the IP phone user interface Program a speed dial number see Speed Dial Key on page lxxxviii Press a speed dial key see Speed Dial Key on page lxxxviii Press the keys associated with a Interactive Voice Response IVR system ...

Страница 18: ...screens you may see when the phone is first plugged in or when it is restarted Plugging in and Starting the Phone The 6930 automatically begins the start up sequence as soon as it is connected The phone goes through this process the first time you plug in your phone and every time you restart your phone The phone displays the following startup screens ...

Страница 19: ...while the phone downloads the latest updates Note New updates to your phone can be automatically scheduled from the server This is set up on the phone system by your System Administrator and should be scheduled during non business hours or slow call periods WARNING DO NOT UNPLUG OR REMOVE POWER TO THE PHONE WHILE IT IS CHECKING OR INSTALLING FIRMWARE AND CONFIGURATION INFORMATION ...

Страница 20: ...he following screen displays during startup When the configuration update is complete the phone displays the following screens and then displays the Home screen Network Connected Network Disconnected If your phone successfully connects to the network the phone will go directly to the Home screen ...

Страница 21: ...e UI Overview Home Screen When the phone has successfully updated the configuration and connected to the network the phone displays the Home screen The Home screen displays the current line your name SIP screen name the date and time and various important status messages It is the default screen displayed when the phone is in an idle state Note If the phone displays a No Service status message you...

Страница 22: ...f pending messages but instead just indicate messages are pending by the use of an exclamation mark Missed Calls The Missed Calls icon displays on the Home screen only when incoming calls have not been received The number in the red circle indicates how many calls were missed To access a list of your missed calls press the Received Callers List key Do Not Disturb The Do Not Disturb DND icon displa...

Страница 23: ...erence key Redial was configured as a Redial key and the remaining top softkeys were configured as Busy Lamp Field BLF keys The bottom set of softkeys were configured as DND Do Not Disturb Call FWD Call Forward and Lock Unlock and XML respectively A More softkey as indicated by dots is also displayed at the bottom right of the screen if you have configured more softkeys than can be displayed at on...

Страница 24: ... line usage indicators that tell you whether or not a line is in use It also allows you to easily select a line to act upon When a line is not in use a New Call key is available allowing you to dial out using the selected line If the line is in use with a call on hold a Pickup key is available allowing you to pick up the call on hold on the respective line The following table identifies and descri...

Страница 25: ... the Detailed View Call screen Indicates a call is outgoing on the respective line Indicator Icon Description Call Status Indicators N A No icon denotes that the call is connected and in progress Indicates the call is on hold Indicates the call is an incoming call Indicates the call is an outgoing call Indicates the party is a conference call participant The direction of the arrow denotes where th...

Страница 26: ...a ringing or connected state Moreover the Multi View Call screen is only accessible when more than one call is a ringing or connected state Indicator Icon Description Call Status Indicators N A No icon denotes that the call is connected and in progress Indicates the call is on hold Indicates the call is an incoming call Indicates the call is an outgoing call Indicates the party is a conference cal...

Страница 27: ...navigation keys are used to switch to the different screens and the up and down navigation keys are used to highlight and scroll through the different lines calls on the respective screen Pressing the centerbutton selects sets options and performs various actions such as dialing out when in the Directory Received Callers and Outgoing Redial Lists Navigation Keys Select Button ...

Страница 28: ...customize your phone by pressing the key and accessing the IP phone UI These options allow you to customize the following phone settings Icon Option Status Language Time and Date Settings Time Zone Set Date and Time Directory Settings available only if external directory sources are configured by your Administrator External Sources available only if external directory sources are configured by you...

Страница 29: ... 5 Press the Save softkey to save your changes 6 Press the button or the Quit softkey at any time to exit without saving changes Ring Tones Tone Set Display Dialing Live Dialpad Speed Dial Edit Restart Note The Advanced options are Administrator level functions only and are not accessible by the user These options should only be set up and changed by your System Administrator Notes 1 For more info...

Страница 30: ... To find your phone s IP address see Finding Your Phone s IP Address on page xxxvi Using the Mitel Web UI 1 Open your web browser enter the phone s IP address or host name into the address field and press Enter The following Login screen displays 2 At the prompt enter your username and password and click OK The Status window displays for the IP phone you are accessing Note For a user the default u...

Страница 31: ...the Mitel Web UI Status Operation and Basic Settings Category Description Status The Status section displays the network status and the MAC address of the IP phone It also displays hardware and firmware information regarding the IP phone and information about the SIP account s currently configured on the phone The information in the Status window is read only ...

Страница 32: ...you to configure an additional 16 softkeys with an M680i Expansion Module or an additional 84 softkeys with an M685i Expansion Module if it is attached to the phone This option displays on the side menu of the Mitel Web UI only if an Expansion Module is attached Directory Allows you to copy the Received Callers List and Local Directory from your IP phone to your PC Reset Allows you to restart the ...

Страница 33: ...ng Call Message Waiting Indicator Line DND Key Mode Call Forward Key Mode This category also allows you to configure Incoming Intercom Call Settings Group Paging RTP Settings Ring Tones global and per line basis Time and Date Settings Language Settings Account Configuration Allows you to configure DND and Call Forward by account You can have multiple accounts on the 6930 Custom Ringtones Allows yo...

Страница 34: ... firmware version and boot version Network status including your phone s IP MAC address and LAN PC port information Storage information including how many records are stored in your Local Directory Received Callers and Outgoing Redial lists Error messages from the last reboot or startup Copyright information 1 Press on the phone to enter the Options List 2 Press the select button to enter the Stat...

Страница 35: ...Notes 1 The Directory List detailed in the Storage menu is in reference to the Local Directory 2 If the Received Callers List or Outgoing Redial List is full the Storage screen displays information regarding the age of the oldest record stored in memory forthe respective list instead of the total number of records stored Notes 1 Press the Copyright softkey to view copyright information 2 The Statu...

Страница 36: ...hrough the Mitel Web UI Use the following procedure to view the phone status through the Mitel Web UI 1 Open your web browser enter the phone s IP address or host name into the address field and press Enter 2 In the Username Password window enter your username and password and click OK The Status window displays for the IP phone you are accessing Note The default username is user and the password ...

Страница 37: ...displays the status of your phone which includes the following information Network Status Hardware Information Firmware Information SIP Status SIP Account Status The IP phones show the SIP registration status on the IP phone s Status screen in the Mitel Web UI ...

Страница 38: ... Used 1 650 proxy com 5060 Registered Yes where Account Number is 1 SIP Account is 650 proxy com on port 5060 Status is Registered Backup registrar is used Yes SIP Error Number Displays on accounts when registration fails with the SIP proxy server Example Line SIP Account Status Backup Registrar Used 4 653 proxy com 5060 401 No where Account Number is 4 SIP Account is 653 proxy com on port 5060 St...

Страница 39: ... You can have the IP phone UI and the Mitel Web UI display in a specific language as required When you set the language to use all of the display screens menus services options configuration parameters etc display in that language The IP phones support the following languages English Czech Catalan Valencian Welsh German Danish Spanish Mexican Spanish Euskera Finnish French Galego Canadian French H...

Страница 40: ... choose the desired screen language 5 Press the Save softkey to save your changes The change is dynamic When you exit the Options List the phone will display all menu items in the language you selected Specifying the Language to Use Using the Mitel Web UI 1 Click on Basic Settings Preferences Language Settings Note All languages may not be available for selection The available languages are depend...

Страница 41: ...tify the language characters that you can use to enter text and characters on the 6930 Dialpad Input Alphabet Tables English French Note All languages may not be available for selection The available languages are dependent on the language packs currently loaded to the IP phone by your System Administrator English is the default language and cannot be changed or removed Note You must have the lang...

Страница 42: ...Customizing Your Phone xliii 3 DEF3ÉÈÊË def3éèêë 4 GHI4ÎÏ ghi4îï 5 JKL5 jkl5 6 MNO6ÑÓÒÔÖ mno6ñóòôö 7 PQRS7 pqrs7 8 TUV8 tuv8úùûü 9 WXYZ9 wxyz9 SPACE SPACE Key Uppercase Characters Lowercase Characters ...

Страница 43: ...BC2ÁÀÇ abc2áàç 3 DEF3ÉÈ def3éè 4 GHI4ÏÍ ghi4ïí 5 JKL5 jkl5 6 MNO6ÑÓÒ mno6ñóò 7 PQRS7 pqrs7 8 TUV8ÚÜ tuv8úü 9 WXYZ9 wxyz9 SPACE SPACE Key Uppercase Characters Lowercase Characters 0 0 0 1 1 _ 1 _ 2 ABC2ÄÀ abc2äà 3 DEF3É def3é 4 GHI4 ghi4 5 JKL5 jkl5 6 MNO6Ö mno6ö 7 PQRS7ß pqrs7ß 8 TUV8Ü tuv8ü 9 WXYZ9 wxyz9 SPACE SPACE ...

Страница 44: ...abc2àcç 3 DEF3ÉÈË def3éèë 4 GHI4 ghi4 5 JKL5 jkl5 6 MNO6ÓÒ mno6óò 7 PQRS7 pqrs7 8 TUV8Ù tuv8ù 9 WXYZ9 wxyz9 SPACE SPACE Key Uppercase Characters Lowercase Characters 0 0 0 1 1 _ 1 _ 2 ABC2ÁÀÂÃÇ abc2áàâãç 3 DEF3ÉÊ def3éê 4 GHI4Í ghi4í 5 JKL5 jkl5 6 MNO6ÓÔÕ mno6óôõ 7 PQRS7 pqrs7 8 TUV8ÚÜ tuv8úü 9 WXYZ9 wxyz9 SPACE SPACE ...

Страница 45: ...3DEF Дeëжз3def 4 ИЙКЛ4GHI ийкл4ghi 5 МНОП5JKL мноп5jkl 6 РСТУ6MNO рсту6mno 7 ФХЦЧ7PQRS7 фхЧч7pqrs 8 ШЩЪЫ8TUV шщъы8tuv 9 ЬЗЮЯ9WXYZ ьзюя9wxyz SPACE SPACE Key Uppercase Characters Lowercase Characters 0 0 0 1 1 _ 1 _ 2 ABC2ÅÄÆÀ abc2åäæà 3 DEF3É def3é 4 GHI4 ghi4 5 JKL5 jkl5 6 MNO6ÖØ mno6öø 7 PQRS7ß pqrs7ß 8 TUV8Ü tuv8ü 9 WXYZ9 wxyz9 SPACE SPACE ...

Страница 46: ...navigation key to highlight the Input Language option 4 With Input Language highlighted press the right navigation key to move to selection column Use the up an down navigation keys to scroll through and choose the desired input language Valid values are English default Français French Español Spanish Deutsch German Italiano Italian Português Portuguese Key Uppercase Characters Lowercase Character...

Страница 47: ...default Français French Español Spanish Deutsch German Italiano Italian Português Portuguese Русский Russian Nordic ελληνικά Greek 3 Click Save Settings The change is dynamic The phone and the Mitel Web UI allow you to enter text and characters in the language you selected Latin 2 Character Set The 6930 includes support for ISO 8859 2 Latin2 of multi national languages when displaying and inputtin...

Страница 48: ...ht Savings Date Format Time Zone Set Date and Time Use Network Time configure time servers Enter Time and Date Settings Configuring the Time Format Daylight Savings and Date Format Using the IP Phone UI 1 Press on the phone to enter the Options List Note All time and date settings can be configured using the IP phone UI Time Date Formats and Time Servers are the only two time and date settings tha...

Страница 49: ... the desired time format Valid values are 12 Hour and 24 Hour the default is 12 Hour 5 Press the left navigation key to move back to the options column and press the down navigation key to highlight Daylight Savings 6 With Daylight Savings highlighted press the right navigation key to move to selection column 7 Use the up and down navigation keys to scroll through and choose the desired daylight s...

Страница 50: ...o scroll through and choose the desired date format Valid values are WWW MMM DD default DD MMM YY YYYY MM DD DD MM YYYY DD MM YY DD MM YY MM DD YY MMM DD DD MMM YYYY WWW DD MMM DD MMM DD MM YYYY 11 Press the Save softkey to save your changes Time Zone Configuring the Time Zone Using the IP Phone UI 1 Press on the phone to enter the Options List Note The time and date formats you configure are appl...

Страница 51: ...ime zone that applies to your area The default time zone is US Eastern 6 Press the Save softkey to save your changes Set Date and Time Configuring the Date and Time Using the IP Phone UI With a valid time server enabled your IP phone will synchronize the time displayed with the specified configuration server The phone will use the time from Time Server 1 unless it is not configured or unavailable ...

Страница 52: ...e time server Use the Backspace key to move back a space and delete a character Use the Dot softkey to enter dots within the IP address or domain name Use the 123 softkey to toggle between entering numbers and entering letters 4 If you want to manually set the date and time press the select button to clear the checkmark from the Use Network Time box and disable the setting a Press the down navigat...

Страница 53: ...tings Preferences Time and Date Setting 2 In the Time Format field select the time format you want to use on your phone Valid values are 12h 12 hour format default 24h 24 hour format Note The time format you configure is applicable to the phone s home screen as well as the Received Callers and Outgoing Redial Lists ...

Страница 54: ...g the contact s first name and then last name or vice versa Moreover the option to sort contacts using either their first name or last name is available through the Directory Settings options menu If external Directory sources are configured you can enable disable the respective Directory sources as well as rename Directory folder labels through the Directory External Sources options menu Note The...

Страница 55: ... to move to back to the options column and press the down navi gation key to highlight Sorting Preferences 6 With Sorting Preferences highlighted press the right navigation key to move to selection column 7 Use the up and down navigation keys to and choose the desired sorting preference 8 Press the Save softkey to save your changes External Sources Enabling Disabling Directories and Renaming Label...

Страница 56: ...he Save softkey to save your changes Call Forward Lock Password This category allows you to change the user password for your phone Changing your password ensures that only you can alter your phone settings and helps keep your system secure You can change your user password using the IP phone UI or the Mitel Web UI Note CSV 1 and 2 are enabled by default All other Directory sources are disabled by...

Страница 57: ...ser password 6 Press the Save softkey to save your changes A Password Changed confirmation message displays on the screen Phone Lock You can lock your phone to prevent the phone from being used or configured You can lock the phone using the IP phone UI Mitel Web UI or by configuring a Lock softkey on your phone For more information about configuring a Lock Unlock key on your phone see Phone Lock K...

Страница 58: ...e UI 1 Press on the phone to enter the Options List or press a configured Unlock softkey 2 At the Enter Unlock Password prompt enter your user password and press the Enter softkey or select button 3 At the Unlock the phone prompt navigate to the Yes button and press the select button Configuring Lock Settings Using the Mitel Web UI Setting a User Password 1 Click on Operation User Password Note Al...

Страница 59: ...d You can reset a user password using the Mitel Web UI only 1 Click on Operation Phone Lock 2 In the Reset User Password field click Reset The following screen displays 3 In the Current Password field leave this blank 4 In the New Password field enter a new password 5 In the Password Confirm field re enter your new user password 6 Click Save Settings Note By default the user name is user all lower...

Страница 60: ...ock To Lock the Phone 2 In the Lock the Phone field click Lock The message Phone is locked and lock icon displays on the Home screen Additionally the Message Waiting Indicator MWI will turn on Unlocking the Phone 3 Click on Operation Phone Lock 4 In the Unlock the Phone field click Unlock ...

Страница 61: ...of the same profile will automatically result in the disconnection of the previous device of the same profile If there is no connection to any device within the same profile the phone will actively look for the most recently connected device and will attempt to automatically reconnect Manually disconnecting the device using the device s native UI will not prevent an automatic reconnection You must...

Страница 62: ...y to enable Bluetooth functionality When Bluetooth functionality is enabled a Bluetooth enabled icon appears in the status bar on the Home screen Pairing a Bluetooth device To pair a Bluetooth device 1 Press the Options key on the phone to enter the Settings menu 2 Navigate to the Bluetooth setting and press the Select button or Select softkey 3 Ensure Bluetooth functionality is enabled If it is n...

Страница 63: ...umentation for discovery and pairing procedures that must be performed on your Bluetooth device 2 When attempting to pair a Mitel cordless Bluetooth handset with the Mitel 6930 SIP IP phone the device name will appear in the available devices list as Cordless Handset followed by the last six digits of the handset s MAC address Note For mobile phones and some other Bluetooth devices a Bluetooth pai...

Страница 64: ...d icon appears in the status bar on the Home screen Forgetting a Bluetooth device To forget a Bluetooth device 1 Press the Options key on the phone to enter the Settings menu Notes 1 If pairing or connecting fails a failed error message displays on screen Press Retry to attempt to pair or connect again or Cancel to cancel the attempt 2 If pairing and connecting a mobile phone depending on the conn...

Страница 65: ...On softkey to enable Bluetooth functionality 4 Press the right navigation key to move to the paired Bluetooth device selection column 5 Using the up and down navigation keys highlight the Bluetooth device you want to forget and press the Forget softkey A confirmation message displays on screen 6 Press Yes to forget the Bluetooth device The Bluetooth device is removed from the list of Paired Device...

Страница 66: ... Using the up and down navigation keys highlight the connected Bluetooth device you want to disconnect to and press the Disconnect softkey A confirmation message displays on screen 6 Press the OK button to acknowledge the successful disconnection Renaming a paired Bluetooth device To rename a paired Bluetooth device 1 Press the Options key on the phone to enter the Settings menu 2 Navigate to the ...

Страница 67: ...e Save softkey to save your changes Connecting to a different or disconnected Bluetooth device To connect to a different or disconnected Bluetooth device 1 Press the Options key on the phone to enter the Settings menu 2 Navigate to the Bluetooth setting and press the Select button or Select softkey 3 Ensure Bluetooth functionality is enabled If it is not enabled press the Turn On softkey to enable...

Страница 68: ...in or Cancel to cancel the attempt 2 If connecting a mobile phone depending on the connection state of the mobile phone you may need to retry multiple times before the mobile phone connects successfully Audio Mode Option Description Speaker This is the default setting Calls can be made or received using the handset or handsfree speakerphone In handset audio mode pressing the button on the phone sw...

Страница 69: ...tkey to save your changes Headset The Headset option allows you to set the volume level for the headset microphone and also allows you to enable disable DHSG Configuring Headset Mic Volume and DHSG Using the IP Phone UI 1 Press on the phone to enter the Options List Headset Speaker Incoming calls are sent to the headset first when the button is pressed By pressing the button again you can switch b...

Страница 70: ...vetoback tothe options columnand press thedownnavigation key to highlight DHSG 6 With DHSG highlighted press the right navigation key to move to selection column 7 Use the up and down navigation keys to scroll through and choose whether or not to enable DHSG Valid values are DHSG is OFF default DHSG is ON 8 Press the Save softkey to save your changes Ring Tones and Tone Sets There are several dist...

Страница 71: ... Canada Europe generic tones France Germany Italy Italy2 Malaysia Mexico Note Individual contact ring tones are also supported on the 6930 Individual contact ring tones can be used during incoming calls to help users identify the party calling For more information on individual contact ring tones see Local Directory Features on page cli Configuration Method Valid Values Default Value IP Phone UI G...

Страница 72: ... Web UI Installing a custom ring tone can be performed using the Mitel Web UI only Configuring Ring Tones Using the IP Phone UI Global configuration only 1 Press on the phone to enter the Options List 2 Navigate to the Audio Ring Tones option and press the select button or Select softkey 3 Use the up and down navigation keys to scroll through and choose the desired ring tone Tone 1 through Tone 15...

Страница 73: ... Sets option and press the select button or Select softkey 3 Use the up and down navigation keys to scroll through and choose the desired tone set Valid values are Australia Brazil Canada Europe France Germany Italy Italy2 Malaysia Mexico Brazil Russia Slovakia UK US default 4 Press the Save softkey to save your changes The tone set you select is immediately applied to the IP phone ...

Страница 74: ...ection select a country from the Tone Set field Valid values are Australia Brazil Canada Europe France Germany Italy Italy2 Malaysia Mexico Brazil Russia Slovakia UK US default 3 Select a value from the Global Ring Tone field For per line configuration 4 In the Ring Tone section select a line for which you want to set ring tone Note See the Ring Tones on page lxxii for valid values ...

Страница 75: ...se button 4 Press the Upload button to upload the file to the phone 5 Repeat Steps 2 to 4 to upload additional WAV files to the phone Note See the Ring Tones on page lxxii for valid values Notes 1 Access to the Custom Ringtones Web UI menu is only available if enabled by your System Administrator 2 Ringtones must be in wav format The IP phones support the following WAV file specifications G 711 μ ...

Страница 76: ...en mode provides users with a larger date and time and displays the screen name if configured beside the line number in the top status bar The secondary home screen mode displays both screen name and screen name 2 if configured and are displayed above the smaller repositioned date and time The Screen Saver Timer option allows you to configure the amount of time in seconds the phone must be idle be...

Страница 77: ...efault is 1800 30 minutes 6 Press the Save softkey to save your changes Brightness Settings The Brightness Level option on the IP phone allows you to set the amount of light that illuminates the LCD display Use this option to set the preference of brightness level The Brightness Timer option allows you to set the amount of time you want the LCD display to stay illuminated before turning the backli...

Страница 78: ...6000 seconds Default is 600 10 minutes 7 Press the Save softkey to save your changes Dialing Live Dialpad The Live Dialpad option on the IP phone turns the live dialpad mode on or off With the live dialpad feature enabled the 6930 IP phone automatically dials out and turns on handsfree mode as soon as a dialpad key or softkey is pressed With live dialpad disabled if you dial a number while the pho...

Страница 79: ...ork settings to take effect You may also need to restart your phone if you have been asked to do so by your System Administrator or should you experience any unexpected behavior Restarting Your Phone Using the IP Phone UI 1 Press the button on the phone to enter the Options List 2 Navigate to the Restart option and press the select button or Select softkey 3 When the prompt Restart Phone appears n...

Страница 80: ...y number s on the phone you can dial those numbers directly on the dialpad when required and the phone automatically dials to those emergency services You can set the emergency dial plan using the Mitel Web UI only The following table describes the default emergency numbers on the IP phones Notes 1 Emergency dial plan pattern matching is only functional when the live dialpad feature is enabled For...

Страница 81: ...n Phone Lock 2 In the Emergency Dial Plan field enter the 3 digit number used in your local area to contact emergency services For multiple numbers enter a between each emergency number For example 911 110 Default for this field is 911 999 112 110 3 Click Save Settings to save the emergency dial plan to your phone ...

Страница 82: ...additional 84 softkeys on each M695 Expansion Module 2 The 6930 IP phone allows up to 3 expansion modules on each phone For more information about expansion modules see Model M695 Expansion Module on page ccii Key Function Description None Indicates the key has no function assigned Line Indicates the key is configured for line use programmable on the top softkeys only Speed Dial Indicates the key ...

Страница 83: ...ansfer key You can use this key to perform the BLF function as well as use it as a transfer key to transfer calls programmable on the top softkeys only Speed Dial Xfer Indicates the key is configured as a simplified speed dial key and a transfer key You can use this key to perform speed dial functions as well as use it as a transfer key to transfer calls Speed Dial Conf Indicates the key is config...

Страница 84: ...g the phone will play the configured ring tone once only Pressing the Discreet key will allow you to toggle on off the feature Call History Indicates the key is configured as a Call History key When pressed the Call History softkey allows users the ability to directly access the list of all calls in the Call History Empty Indicates the key has no function assigned but should be displayed as any em...

Страница 85: ... None does not display on the Home screen at all Park Connected Pickup Idle Outgoing Last Call Return Idle Connected Incoming Outgoing Busy Call Forward Idle Connected Incoming Outgoing Busy Speed Dial Xfer Idle Connected Incoming Outgoing Busy Speed Dial Conf Idle Connected Incoming Outgoing Busy Speed Dial MWI Idle Connected Incoming Outgoing Busy Directory Idle Connected Incoming Outgoing Busy ...

Страница 86: ...and Line 2 softkeys are autoconfigured in the 6930 SIP phone due to the absence of Line 1 and Line 2 hardkeys By default the line values for top softkey 1 and topsoftkey 2 are set to Line 1 and Line 2 in the WebUI You can set a softkey to act as a line call appearance key on the 6930 Note Contact your System Administrator for other softkey display behavior options Note Line functionality can only ...

Страница 87: ...ck Save Settings Speed Dial Key The normal function of the speed dial option allows you to dial a number quickly by pressing a key configured for speed dialing You can program the keys on the 6930 to speed dial outside numbers dial directly to another person s line or extension or quickly access features such as Caller ID 69 and voicemail You can create Speed Dial keys using any of the following m...

Страница 88: ...ning phone number using the dialpad on the phone Use the following procedures to set speed dial on the 6930 IP phone Press and Hold to Create a Speed Dial applicable to softkeys dialpad keys ex pansion module keys Pressing and holding a softkey dialpad key or expansion module key on the phone initiates a speed dial feature Notes 1 When creating a Speed Dial key from the IP phone UI you must select...

Страница 89: ... the phone uses Line 1 for the Speed Dial key If you want to use a different line press the left or right navigation keys to select another line 5 Press the Save softkey to save the speed dial information to the key you selected Creating a Speed Dial Key Using the Speed Dial Edit Option applicable to softkeys dialpad keys expansion module keys 1 Press on the phone to enter the Options List Note Yo...

Страница 90: ...ing the dialpad keys 6 Press the down navigation key to move to the Line field and select a line to apply to the key This is the line that the phone opens to dial the number after you press the respective Speed Dial key By default the phone uses Line 1 for the Speed Dial key If you want to use a different line press the left or right keys to select another line 7 Press the Save softkey to save the...

Страница 91: ... dial prefix you must enter the character at the end of the prefix number for example 123456 6 In the Line field select a line to apply to this key Valid values are 1 through 24 7 In the state fields check enable or uncheck disable the states you want to apply to this softkey Expansion Module Keys 8 Select from Key 1 through Key 84 M695 9 In the Type field select Speed Dial to apply to the key 10 ...

Страница 92: ...d dial function Valid values are 1 through 24 5 Click Save Settings Do Not Disturb DND Key The Do Not Disturb DND softkey allows you to quickly turn the DND feature on or off If DND is enabled callers calling into the phone hear a busy signal or a message depending on how your System Administrator set up the configuration server When DND is enabled the icon is displayed on screen in both the statu...

Страница 93: ...he states you want to apply to this softkey Expansion Module Keys 5 Select from Key 1 through Key 84 M695 6 In the Type field select Do Not Disturb to apply to the key 7 Click Save Settings Mobile Key The Mitel 6930 SIP IP Phone supports MobileLink a feature that provides seamless mobile integration using Bluetooth wireless technology This feature allows you to Sync your mobile phone s contact lis...

Страница 94: ... to apply to this softkey Expansion Module Keys 5 Select from Key 1 through Key 84 M695 6 In the Type field select Mobile to apply to the key Click Save Settings For more information on how to use the Mobile Line key see MobileLink on page clxxvii Icon Description Indicates the mobile line is connected with a mobile phone and is idle Blinking Indicates the mobile line is ringing due to an incoming...

Страница 95: ... the co worker s call is on hold the BLF softkey on the Supervisor s phone displays the BLF hold icon Additionally the corresponding softkey LED illuminates to match the monitored user s state either off idle solid busy or fast flashing slow flashing ringing on hold The following table provides the BLF states on the phone and the corresponding LED and icon behavior Notes 1 BLF functionality can on...

Страница 96: ...s key 5 In the Value field enter the phone number or extension you want to monitor 6 In the Line field select a line for which to apply this key Valid values are global 1 through 24 Expansion Module Keys 7 Select from Key 1 through Key 16 M680i or Key 84 M685i 8 In the Value field enter the phone number or extension you want to monitor 9 In the Line field select a line for which to apply this key ...

Страница 97: ...softkey LED illuminates to match the monitored user s state either off idle solid busy or fast flashing slow flashing ringing on hold he following table provides the BLF List states on the phone and the corresponding LED and icon behavior Configuring a BLF List Key Using the Mitel Web UI If you set a key to use BLF List you must also enter a BLF List URI at Operation Softkeys and XML Services The ...

Страница 98: ...y registered to the appropriate SIP proxy you are using Valid values are global 1 through 24 5 In the state fields check enable or uncheck disable the states you want to apply to this softkey 6 In the BLF List URI field enter the name of the BLF list defined on the applicable Mitel call manager Busy Lamp field page for your particular user For example sip 9 192 168 104 13 Expansion Module Keys 7 S...

Страница 99: ...database XMPP avatar is not checked as it is not enabled XML Key The 6930 SIP IP phone has a feature you can enable called XML Extensible Markup Language XML is a markup language much like HTML Your System Administrator can create customized XML menu services and load them to your IP phone These services include things like weather and traffic reports contact information company info stock quotes ...

Страница 100: ...le or uncheck disable the states you want to apply to this softkey Expansion Module Keys 7 Select from Key 1 through Key 84 M695 8 In the Type field select XML 9 In the Value field enter a URI s to apply to this key 10 Click Save Settings Accessing the XML Service Using the IP Phone UI After an XML application s has been saved to your IP phone and a key has been configured to access the XML applic...

Страница 101: ...ash The IP phone generates flash events only when a call is connected and there is an active RTP stream for example when the call is not on hold Configuring a Flash Key Using the Mitel Web UI 1 Click on Operation Softkeys and XML or Click on Operation Expansion Module N Softkeys 2 Select from Key 1 through Key 44 on the Top keys or Select from Key 1 through Key 24 on the Bottom keys 3 In the Type ...

Страница 102: ... display on the IP phone for this key 5 In the Value field enter the appropriate value for accessing specific services from the server 6 In the state fields check enable or uncheck disable the Connected state for this softkey Expansion Module Keys 7 Select from Key 1 through Key 84 M695 8 In the Type field select Sprecode 9 In the Value field enter the appropriate value for accessing specific serv...

Страница 103: ...tkeys and XML or Click on Operation Expansion Module N Softkeys 2 Select from Key 1 through Key 44 on the Top keys or Select from Key 1 through Key 24 on the Bottom keys 3 In the Type field select Park 4 In the Label field enter a label for the Park softkey 5 In the state fields check enable or uncheck disable the Connected state for this softkey 6 Select from Key 1 through Key 44 7 In the Type fi...

Страница 104: ...ific server If the call is parked successfully the response is either a greeting voice confirming that the call was parked or a hang up occurs The parked call party hears music on hold 3 If the call fails you can pick up the call using the next procedure and press the Park key again to retry Step 2 Picking Up a Parked Call 1 Pick up the handset on the phone 2 Enter the extension number where the c...

Страница 105: ...s softkey Expansion Module Keys 5 Select from Key 1 through Key 84 M695 6 In the Type field select Call Fwd 7 Click Save Settings BLF Xfer The BLF key allows one or more extensions to be monitored and once there is any state change with those extensions the key shows the status of the monitored lines The Transfer key allows a call to be transferred to other recipients blindly or consultatively The...

Страница 106: ...again BLF Xfer and Call Forward When the focused line is in the ringing state pressing the BLF Xfer key forwards the call to the extension unconditionally disregarding the status of the monitored extension BLF Xfer and Speed Dial When the focused line and the monitored extension are idle pressing the BLF Xfer key causes the phone to go offhook and dial the number of the extension Configuring a BLF...

Страница 107: ...d Dial Xfer and Speed Dial When the phone is in the idle state pressing the Speed Dial Xfer key causes the phone to go offhook and dial the predefined extension Speed Dial Xfer and Blind Transfer When the phone is connected to a call pressing the Speed Dial Xfer key blind transfers the call to the predefined target If transferring a call fails a message Transfer Failed displays and you can reconne...

Страница 108: ... Line field select the line for which you want to use the key functionality Valid values are global 1 through 24 12 Click Save Settings Speed Dial Conf The 6930 allows you to configure a softkey or expansion module key to be used as a speed dial conference key Speed Dial Conf key while remaining in the current call This key allows a user on a call to conference another party at a pre defined numbe...

Страница 109: ...on or the extension to add to the conference for example 3600 6 In the Line field select the line for which you want to use the key functionality Valid values are global 1 through 24 7 In the state fields check enable or uncheck disable the states you want to apply to this softkey Expansion Module Keys 8 Select from Key 1 through Key 84 M695 9 In the Type field select Speed Dial Conf 10 In the Val...

Страница 110: ...WI key s LED will blink and the UI will display the number of pending messages beside the defined label When you press the configured key the phone will send an INVITE to the configured call URI whereby you will be able to listen to the new messages The Speed Dial MWI key can be configured through the Mitel Web UI Configuring a Speed Dial MWI Key Using the Mitel Web UI 1 Click on Operation Softkey...

Страница 111: ...ntax call URI voicemail URI For example 33123456 3456 0000 domain sip voicemail_peter domain 11 In the Line field select the line for which you want to use the key functionality Valid values are global 1 through 24 12 Click Save Settings Directory Key Using the Mitel Web UI you can assign the Directory key to any key on the top or bottom softkeys on the phone Notes 1 As the example above illustrat...

Страница 112: ...eb UI Configuring a Directory Key Using the Mitel Web UI 1 Click on Operation Softkeys and XML or Click on Operation Expansion Module N Softkeys 2 Select from Key 1 through Key 44 on the Top keys or Select from Key 1 through Key 24 on the Bottom keys 3 In the Type field select Directory 4 In the Label field enter a label to apply to this key 5 In the state fields check enable or uncheck disable th...

Страница 113: ...Received Callers List key to any key on the top or bottom keys on the phone The Received Callers List is a stored log of your incoming calls You can use the Received Callers List key to access a list of callers that called your phone Configuring a Received Callers List Key Using the Mitel Web UI 1 Click on Operation Softkeys and XML or Click on Operation Expansion Module N Note For more informatio...

Страница 114: ...elect from Key 1 through Key 84 M695 7 In the Type field select Callers List 8 Click Save Settings Outgoing Redial Key By default the 6930 has a dedicated Outgoing Redial key However using the Mitel Web UI you can assign the Outgoing Redial key to any key on the top or bottom keys on the phone The Outgoing Redial List is a stored log of your outgoing calls You can use the Outgoing Redial key to ac...

Страница 115: ...ype field select Redial 4 In the Label field enter a label to apply to this key 5 In the state fields check enable or uncheck disable the states you want to apply to this softkey Expansion Module Keys 6 Select from Key 1 through Key 84 M695 7 In the Type field select Redial 8 Click Save Settings Conference Key Using the Mitel Web UI you can assign a Conference key to any key on the top or bottom k...

Страница 116: ...ect Conference 4 In the Label field enter a label to apply to this key 5 In the state fields check enable or uncheck disable the states you want to apply to this softkey Expansion Module Keys 6 Select from Key 1 through Key 84 M695 7 In the Type field select Conference 8 Click Save Settings Transfer Key Using the Mitel Web UI you can assign the Transfer key to any key on the top or bottom keys on ...

Страница 117: ...In the Label field enter a label to apply to this key 5 In the state fields check enable or uncheck disable the states you want to apply to this softkey Expansion Module Keys 6 Select from Key 1 through Key 84 M695 7 In the Type field select Transfer 8 Click Save Settings Intercom Key You can use the Intercom key to automatically connect with a remote extension for outgoing calls and to answer an ...

Страница 118: ...essed 6 In the state fields check enable or uncheck disable the states you want to apply to this softkey Expansion Module Keys 7 Select from Key 1 through Key 84 M695 8 In the Type field select Icom 9 In the Value field enter the predefined number you wish to be dialed when the Intercom key is pressed 10 Click Save Settings Phone Lock Key You can configure a key on the IP phone to use as a lock un...

Страница 119: ...g You enter a multicast IP address es and a port number for the Paging key that when pressed initiates an outgoing multicast RTP session This is called Group Paging on the IP phones You can also specify group paging RTP addresses that the phone listens for when receiving RTP streams You can specify up to 5 listening multicast addresses at the path Basic Settings Preferences Group Paging RTP Settin...

Страница 120: ...ys 3 In the Type field select Paging 4 In the Label field enter a label to apply to this key 5 In the Value field enter a multicast IP address and a port number for the Paging key When you press this key the phone initiates an outgoing multicast RTP session to the specified address using the specified port e g 239 0 1 15 10000 Notes 1 When you select Paging for the Type field the Line field is dis...

Страница 121: ...n the IP phone press the softkey or expansion module key you configured for Paging The phone opens a multicast RTP session and an outgoing OR incoming phone screen displays 2 Press the Drop key to end the multicast RTP session and return to the Home screen Discreet Ringing Key You can configure a Discreet Ringing key on the phone that when pressed allows you to toggle on off the Discreet Ringing f...

Страница 122: ...he Bottom keys 3 In the Type field select Discreet Ringing 4 Click Save Settings Expansion Module Keys 5 Select from Key 1 through Key 84 M695 6 In the Type field select Discreet Ringing 7 Click Save Settings Call History Key In addition to the Received Callers List and Outgoing Redial keys you can configure a Call History key on the phone that when pressed will directly access the list of all cal...

Страница 123: ...one for the key default is Call History 5 Click Save Settings Expansion Module Keys 6 Select from Key 1 through Key 84 M695 7 In the Type field select Call History 8 In the Label field enter a label to display on the phone for the key default is Call History 9 Click Save Settings Empty Key You can set a softkey to force a blank entry on the IP phone display for a specific key You do this by settin...

Страница 124: ...s 3 In the Type field select Empty 4 In the state fields check enable or uncheck disable the states you want to apply to this softkey Expansion Module Keys 5 Select from Key 1 through Key 84 M695 6 In the Type field select Empty 7 Click Save Settings None Key Use the following procedure to delete a key s functionality on the 6930 IP phone Deleting a Key s Function Using the Mitel Web UI 1 Click on...

Страница 125: ...930 SIP Phone User Guide cxxvi 2 Choose the key you want to delete from the phone or expansion module 3 In the Type field select None 4 Click Save Settings The key function is deleted from the IP phone memory ...

Страница 126: ... your call If the Live Dialpad option is on as soon as you press the first digit on the dialpad the phone automatically selects the next available line goes off hook and dials as digits are pressed Pre Dialing a Number You can also make a call by pre dialing a number Pre dialing lets you view a number before you dial With the phone in an idle state and on hook simply use the dialpad to enter the n...

Страница 127: ...a number at the dial tone To answer a call on your phone using handsfree press or the line call appearance button If you are in Speaker audio mode lift the handset and press to switch between handsfree and handset If you are in Speaker Headset audio mode press to switch between handsfree and headset When the handset is on hook press to disconnect the call Using a Headset The 6930 accepts analog an...

Страница 128: ...al tone or to answer an incoming call Depending on the audio mode selected from the Options List a dial tone or an incoming call is received on either the headset or the handsfree speakerphone 4 Press the key to end the call Using Intercom Functionality On the 6930 you can use the Icom key to automatically connect with a remote extension Using the Icom Key 1 Press the Icom key Notes 1 The RJ22 R45...

Страница 129: ...ing Intercom Features in Mitel Web UI Description Microphone Mute Allows you to enable or disable the microphone on the IP phone for Intercom calls made by the originating caller Auto Answer Allows you to enable or disable the IP phone to automatically answer an Intercom call If auto answer is enabled on the IP phone the phone plays a tone if Play Warning Tone is enabled to alert the user before a...

Страница 130: ...i Q audio Indicates active VoIP recording was enabled and the call was recorded Notes 1 When the Outgoing Redial List is full the oldest call records are deleted to accommodate the information of new called parties 2 If the telephone number of an incoming or outgoing call matches a number that you have programmed with a name in a softkey or the Directory the Outgoing Redial List display the same n...

Страница 131: ...the entries in the Outgoing Redial List 4 Press right navigation to see more detailed information about the redial entry Note Press twice to dial the most recent number you dialed from the phone Note The detailed view screen contains the picture ID of the called party if available the date and time of the outgoing call the line on which the call was placed call duration if the call was answered an...

Страница 132: ...ve to entry column 3 Use the up and down navigation keys to scroll through the entries in the Outgoing Redial List 4 Press right navigation key to see more detailed information about the Outgoing Redial List entry 5 Press the Edit softkey 6 Using the dialpad keys edit the name and or number 7 To dial the new number press the select button press lift the handset or press any of the line keys or 8 T...

Страница 133: ...ist 2 With Outgoing highlighted press the right navigation key to move to entry column 3 Use the up and down navigation keys to scroll through the entries in the Outgoing Redial List 4 Press the Delete softkey 5 Press the Delete softkey again to erase the entry Copying Entries to the Local Directory 1 Press the key 2 With Outgoing highlighted press the right navigation key to move to entry column ...

Страница 134: ...e the handset headset or speakerphone When you use the key on your phone you cannot be heard on an active call or on a conference For muted calls the handsfree LED flashes and the key LED is on To switch mute on or off press Note If the contact already exists in the Directory a Contact already exists message displays on the screen Note If you place a muted call on hold the phone automatically take...

Страница 135: ...hat call or navigate to the call on hold and press the Pickup softkey If you cannot answer the call the caller goes to voicemail if voicemail has been configured for your extension Note You can press the Silence softkey when the phone is ringing to immediately silence the ring tone Note The audio mode setting you have selected in Options List Headset Settings on the IP phone UI determines if the c...

Страница 136: ...tly to voicemail without answering the call To do this press without picking up the handset or simply press the Ignore softkey If you are already on the phone your incoming call should go directly to voicemail Your phone screen displays a voicemail icon displaying the number of pending messages Notes 1 Live dialpad is disabled when entering destination numbers using the call deflection feature 2 W...

Страница 137: ...ur caller know that they are still on hold music plays softly if this has been set up for your system The call line appearance light for the line you are on remains solid to indicate that you are still connected Automatic Hold When juggling between calls you do not have to press the button to go from one call to the next The phone automatically puts your current call on hold as soon as you press a...

Страница 138: ...l on hold instead of launching the transfer Transferring Calls You can use the Xfer softkey offered on screen when in a connected call to transfer calls or use a softkey configured with Transfer functionality see Transfer Key on page cxvii Blind Transfer A blind transfer is when you transfer a call directly to another extension without consulting with the person receiving the call To do this simpl...

Страница 139: ...ou can either press the Cancel softkey on the display screen press or hang up the handset 4 Complete either a blind or consultative transfer a To complete a blind transfer press the Xfer softkey key again before the receiving end answers b To complete a consultative transfer press Dial and remain on the line to speak with the Party 2 before either pressing the Xfer softkey key or hanging up the ha...

Страница 140: ...the active call 3 Press the Xfer softkey The active call will be transferred Transferring to a Contact in the Directory Users can complete a transfer to a contact in their Local Directory If a user is in a call and initiates a transfer they can navigate to the Directory screen and use a softkey configured with Transfer functionality to complete a blind or consultative transfer Note Direct transfer...

Страница 141: ...ess the select button to call the contact and then press the Xfer softkey before the receiving end answers b To complete a consultative transfer press the select button to call the contact Remain on the line to speak with Party 2 before pressing the press the softkey configured with Transfer functionality or Xfer softkey again to transfer Party 1 to Party 2 To cancel the transfer press the Cancel ...

Страница 142: ...e parties including yourself in a conference call This is called local conferencing and is the default method of conferencing on the 6930 Creating a Conference Call Using Local Conferencing Use the following procedure to create a conference call using local conferencing 1 When you begin a conference you are the first party in the conference Party 1 Pickup the handset or press the key A line opens ...

Страница 143: ... 6930 SIP Phone User Guide cxliv 4 Press the Conf softkey 5 Enter the phone number of Party 3 6 Wait for Party 3 to answer When Party 3 answers you can consult with them before adding them to the conference ...

Страница 144: ...ight the desired party and press the Drop key Creating a Conference Call By Joining Two Existing Calls 1 Ensureyou are on anactive call with one of theparties with whom you wishtocreatea conference the other party should be placed on hold 2 Press the up and down navigation keys to highlight the party you wish to conference in Note Direct conferencing can be performed in either the Multi View Call ...

Страница 145: ...maining parties If you are the host of a conference call and want to leave the conference simply press the Leave softkey on the phone Your phone leaves the three way conference call but the remaining parties are still connected together Ending Calls To end a call you first need to connect or reconnect to the call if not already connected e g if your caller is on hold Press or the Drop softkey to e...

Страница 146: ...owing for interoperability with multiple directory sources i e Local Directory Corporate and Personal CSV directories LDAP Microsoft Exchange On the 6930 you can access the Directory by pressing the Directory key or the softkey configured for Directory functionality see Directory Key on page cxii Notes 1 As stated above the 6930 IP phone supports enhanced Directory functionality Your Local Directo...

Страница 147: ...ls by pressing the up and down navigation keys to scroll through the list 3 From the number selection column press the right navigation key or the Details softkey to display the contact s details screen You can use the up and down navigation keys to scroll through the list of numbers or press the 4 navigation key to move to the address column and scroll through the contact s addresses using the up...

Страница 148: ...press the right navigation key to display the contact s details screen You can use the up and down navigation keys to scroll through the list of numbers or press the 4 navigation key to move to the address column and scroll through the contact s addresses using the up and down navigation keys 5 Press the key softkey configured with Directory functionality key or Quit softkey to exit Performing a S...

Страница 149: ...es are found navigate to the contact entry and perform your desired action Dialing from the Directory Dialing can be performed by manually navigating to the Directory contact selecting a phone number if the contact has more than one and then pressing the Dial softkey select button Line button button or by simply pick up the handset Use the following procedure on the phone s UI to dial a contact s ...

Страница 150: ...ey will open the Local Directory menu From the Local Directory menu you can search for a contact place a call to the selected contact add new contacts to the Local Directory delete all contacts delete individual contacts or edit existing contacts Users can also view contact details e g title company name numbers work and home addresses e mail addresses etc You can also assign an individual contact...

Страница 151: ...ter the Directory 2 If no external sources are configured simply press the Add New softkey or If external Directory sources are configured enabled and if the Local Directory contains contacts press the right navigation key to move to Local Directory contact column and press the Add New softkey 3 Under the Identity tab use the up and down navigation keys to navigate to the desired fields and using ...

Страница 152: ...ss tab 8 Under the Work Address tab use the up and down navigation keys to navigate to the desired fields and using the dialpad keys input the work address information of the respective contact 9 Press the up navigation key to navigate to the Work Address tab and press the right navigation key to switch to the Home Address tab 10 Under the Home Address tab use the up and down navigation keys to na...

Страница 153: ...ress the Save softkey to save your changes Editing an Existing Local Directory Entry 1 Press the key or a softkey configured with Directory functionality to enter the Directory 2 Optional Using the dialpad keys input the first letters of the contact s name to initialize the search function 3 Use the navigation keys to highlight the contact you want to edit 4 Press the Edit softkey if no external D...

Страница 154: ...act s name to initialize the search function 3 Highlight the desired entry if applicable and press the Delete softkey A Delete selected item or delete all items message will appear on screen 4 Press the Delete All softkey to delete all contacts from your Local Directory or Press the Delete Item softkey to delete the individual entry from your Local Directory Deleting All Entries from the Local Dir...

Страница 155: ... to delete 4 Press the Delete softkey A Delete Name from Local message will appear on screen 5 Press the Delete softkey again to delete the contact from your Local Directory Downloading the Local Directory to Your PC You can download the Local Directory to your PC through the Mitel Web UI The phone stores the directorylist csv file to your PC in comma separated value CSV format You can use any spr...

Страница 156: ...oading the Directory 1 Click on Operation Directory 2 In the Directory field click on Save As A download window displays 3 Click OK 4 Enter the location on your computer where you want to download the Directory and click Save The directorylist csv file downloads to your computer 5 Use a spreadsheet application to open and view the directorylist csv file Import Local Directory to Your PC You can im...

Страница 157: ...es may be configured on your phone Two CSV based directories Lightweight Directory Access Protocol LDAP Directory Microsoft Exchange contacts Exchange 2007 SP1 or greater interface supported When any of these external Directory sources are configured the contacts from the respective sources will be loaded into your Directory From the Directory List you will be able to search for any external Direc...

Страница 158: ...ur telephone logs the name number of the caller when they last called and if the call was answered or missed Additional information such as the duration of the call line used and call features utilized during the call can also be viewed You can view scroll and delete line items in the Received Callers List from the IP phone UI as wells as copy selected entries to the Local Directory You can also d...

Страница 159: ...e call was using Mitel Hi Q audio Indicates active VoIP recording was enabled and the call was recorded Notes 1 When the Received Callers List is full the oldest call records are deleted to accommodate the information of new callers 2 If the telephone number of an incoming or outgoing call matches a number that you have programmed with a name in a softkey or the Directory the Received Callers List...

Страница 160: ...softkey Editing Entries in the Received Callers List In the Received Callers List pressing the Edit softkey allows you to edit the entry s name and or number prior to dialing out or copying to the Local Directory 1 Press the key 2 With Received highlighted press the right navigation key to move to entry column 3 Use the up and down navigation keys to scroll through the entries in the Received Call...

Страница 161: ...ries from the Received Callers List or you can simply delete all entries in the Received Callers List To delete all entries from the Received Callers List 1 Press the key 2 Press the Delete softkey 3 Press the Delete softkey to erase all items To delete an individual entry from the Received Callers List 1 Press the key 2 With Received highlighted press the right navigation key to move to entry col...

Страница 162: ...Delete softkey again to erase the entry Copying Entries to the Local Directory 1 Press the key 2 With Received highlighted press the right navigation key to move to entry column 3 Press the up and down navigation keys to scroll through and highlight the respective Received Callers List entry 4 Press the Copy softkey The entry is copied to the Local Directory ...

Страница 163: ...right navigation key to move to entry column 3 Use the up and down navigation keys to scroll through the entries in the Missed Callers List 4 Press right navigation key to see more detailed information about the Missed Callers List entry 5 To exit the Missed Callers List press the key key or the Quit softkey The missed calls message on the Home screen is cleared upon exit Downloading the Received ...

Страница 164: ... spreadsheet application to open and view the Received Callers List Voicemail The 6930 SIP phone provides a hardkey for configuring voicemail When voicemail functionality is enabled the MWI LED on the Mitel 6920 flashes red and the Voicemail icon displays on the status bar indicating that voicemail messages are available You can access your voicemail service by pressing the Voicemail key Note 1 Vo...

Страница 165: ...since the mobile line is in connected state and displays an error message on the SIP phone screen Voicemail access of Mobile Phone not supported In the mobile line when the call is received from the SIP phone pressing the Voicemail hardkey results in no action since the mobile line is in connected state but no error message is displayed DND and Call Forward The 6930 has a feature that allows you t...

Страница 166: ... setting DND for a specific account at the path Basic Settings Account Configuration Once you enable DND the icon displays on screen for the applicable account The following describes the key behavior for each DND mode Account The DND key toggles the account in focus on the IP phone UI to on or off Phone default The DND key toggles all accounts on the phone to on or off Custom The DND key displays...

Страница 167: ...t Sets DND for a specific account DND key toggles the account in focus on the phone to on or off Phone default Sets DND on for all accounts on the phone DND key toggles all accounts on the phone to on or off Custom Sets the phone to display custom screens after pressing the DND key that list the account s on the phone Note If you make changes to the configuration for DND through the IP phone UI yo...

Страница 168: ...rocedures assume you have already configured a DND key AND assumes there are multiple accounts configured on the phone Notes 1 If there is only one account configured on the phone then the mode setting is ignored and the phone behaves as if the mode was set to Phone 2 Using the Mitel Web UI if you change the DND Key Mode to Phone all accounts synchronize to the current setting of Account 1 Notes 1...

Страница 169: ...s you to enable disable a specific account or all accounts 2 Use the up and down navigation keys to scroll through the accounts and press the select button to enable DND for the selected account 3 Press the Save softkey to save your changes Call Forward Configuration Call Forward on the IP phone allows incoming calls to be forwarded to another destination On the 6930 you can set Call Forward on th...

Страница 170: ...configure a specific mode All Busy and or No Answer for each account independently or all accounts On the 6930 you can set all accounts to All On All Off or copy the configuration for the account in focus to all other accounts using a CopytoAll softkey You can enable different Call Forward rules modes independently for example you can set different phone numbers for Busy All and NoAnswer modes and...

Страница 171: ...eb UI only the account you configured is enabled All other accounts are greyed out but set to the same configuration Using the Mitel Web UI if you make changes to that initial account the changes apply to all accounts on the phone Custom The Custom mode allows you to configure Call Forward for a specific account or all accounts You can configure a specific state All Busy and or No Answer for each ...

Страница 172: ... in the busy state The calls are forwarded to the specified phone number The No Answer option call forwards incoming calls only if the account rings but is not answered in the defined number of rings The call gets forwarded to the specified number 6 For each account in the Value field enter the phone number for which you want the incoming calls to forward to if the phone is in the specified state ...

Страница 173: ... to the Home screen Notes 1 If you selected Account mode in Step 5 you can enable disable each account or all accounts as applicable You can enter different phone number for each enabled state 2 If you selected Custom mode you can enable disable each account or all accounts as applicable You can enter different phone numbers for each enabled state 3 If you selected Phone mode all accounts are set ...

Страница 174: ...ng number for the No Answer state navigate to the No Rings field and press the up and down navigation keys to change the desired number of rings 7 Using the down navigation key move to the On checkbox beside the respective Call Forward mode and press the select button to enable the Call Forward mode 8 Press the Save softkey to save your changes Notes 1 Pressing the down navigation key moves the se...

Страница 175: ...wer state navigate to the No Rings field and press the left and right navigation keys to change the desired number of rings 4 Using the down navigation key move to the On checkbox beside the respective Call Forward mode and press the select button to enable the Call Forward mode 5 Press the Save softkey to save your changes Notes 1 Pressing the down navigation key moves the selection to the next f...

Страница 176: ... key move to the On checkbox beside the respective Call Forward mode and press the select button to enable the Call Forward mode 6 Press the Save softkey to save your changes MobileLink The Mitel 6930 SIP IP Phone supports MobileLink a feature that provides seamless mobile integration using Bluetooth wireless technology MobileLink highlights include the ability to Sync your mobile phone s contact ...

Страница 177: ...with a mobile phone and is idle Blinking Indicates the mobile line is ringing due to an incoming call on your mobile phone Indicates the mobile line is busy Blinking Indicates an ongoing call with active audio on the mobile phone Blinking Indicates the call on the mobile line is on hold Indicates the mobile phone is not connected Note 1 Additional Bluetooth devices connected to your mobile phone e...

Страница 178: ...ed to acknowledge the request on your mobile phone 2 If the update fails a failed to retrieve contacts message displays on screen Press Retry to attempt to update again or Cancel to cancel the attempt 3 Some mobile phones will only sync contacts stored on the phone s flash memory Contacts stored on the phone s SIM card may not sync with the Mitel 6930 IP phone 4 Mobile contacts are cleared from th...

Страница 179: ...m an active mobile call between your mobile phone and Mitel 6930 SIP IP phone Switching mobile phone audio from your Mitel 6930 IP phone to your mobile phone and back again is performed by a one key press method Press the Push call softkey to push the mobile call audio from your Mitel 6930 IP Phone to your mobile phone Note 1 Press the Decline key to reject the incoming mobile phone call 2 When th...

Страница 180: ...call and the second SIP line is ringing Pressing Goodbye key cancels the ringing line when Goodbye Key Cancels Incoming Call is enabled ressing Goodbye key cancels the active call line when Goodbye Key Cancels Incoming Call is disabled If the first line has an active BT Mobile call and the SIP line is ringing Pressing Goodbye key cancels the ringing line when Goodbye Key Cancels Incoming Call is e...

Страница 181: ...sers and administrators can configure this feature through the Mitel Web UI TUI and configuration files using the following new configuration parameters proximity lock proximity unlock proximity lock delay proximity unlock delay When the proximity lock and unlock feature is enabled users and administrators can perform the following configurations on the phones supporting mobile integration Automat...

Страница 182: ...cedure to enable or disable the proximity lock and unlock feature on the 6930 phone using the WebUI 1 Click on Operation Phone Lock 2 Enable or disable the Proximity auto lock and Proximity auto unlock fields using the checkbox 3 Enter the required delay time minutes in the Delay before auto lock and Delay before auto unlock fields 4 Click Save Settings to save your changes ...

Страница 183: ...ing Each key you press on your phone generates two tones of specific frequencies One tone is generated from a high frequency group of tones and the other from a low frequency group If you enable the Display DTMF Digits parameter the digits you are dialing from the dialpad or softkey display to the IP phone s LCD display This parameter is disabled by default no digits display when dialing You can e...

Страница 184: ...g the Mitel Web UI Configuring Call Waiting Tone 1 Click on Basic Settings Preferences General 2 The Play Call Waiting Tone field is enabled by default To disable this field uncheck the box 3 Click Save Settings to save your settings Stuttered Dial Tone You can enable or disable the playing of a stuttered dial tone when there is a message waiting on the IP phone You can configure this feature usin...

Страница 185: ...e a beep to be audible when the phone receives an XML application using the XML Beep Support field at the path Basic Settings Preferences General If you disable this feature then no beep is heard when the XML application arrives to the phone If your System Administrator has set a value for this feature in a custom XML application or in the configuration files the value you set in the Mitel Web UI ...

Страница 186: ... a scroll delay option that allows you to set the time delay in seconds between the scrolling of each status message on the phone You can specify this setting in the Status Scroll Delay seconds field at the path Basic Settings Preferences General The default time is 5 seconds for each message to display before scrolling to the next message You can increase or decrease this time as required Setting...

Страница 187: ...Line You can configure a feature on the 6930 that controls the behavior of the phone when it receives an incoming call when it is already in a connected call When a call comes into the phone and the phone is already on a connected call the phone switches focus to the ringing line to enable the user to see who is calling them You can turn off this functionality so that the phone stays focused on th...

Страница 188: ...nitiate a continuous reminder tone on the active call when another call is on hold For example when this feature is enabled and the call on Line 1 is on hold and then the you answer a call on Line 2 and stay on that line a reminder tone is played in the active audio path on Line 2 to remind you that there is still a call on hold on Line 1 When this feature is disabled a ring splash is heard when t...

Страница 189: ... splash is heard when the active call hangs up and there is still a call on hold 3 Click Save Settings Call Hold Reminder on single hold On the 6930 IP phone you can enable or disable a feature that will start the reminder ring splash timer as soon as you put a call on hold even when no other calls are active on the phone When enabled the phone initiates a reminder ring splash periodically for the...

Страница 190: ... reminder ring splash periodically for the single call on hold When disabled no reminder ring splash is audible 3 Click Save Settings Call Waiting Tone Period You can specify a specific time period in seconds for the call waiting tone to play at regular intervals on an active call using the parameter Call Waiting Tone Period A value of 0 is the default and plays the call waiting tone only once on ...

Страница 191: ...red line parameter on your phone after a call ends incoming or outgoing the display switches back to the preferred line Next time you go off hook to make another call you pickup on the preferred line You can enable the Preferred Line parameter using the Mitel Web UI at the location Basic Settings Preferences General You can also set a Preferred Line Timeout parameter that specifies the number of s...

Страница 192: ...ocus does not change if some digits are entered If no digits are entered or digits were cleared the focus changes to preferred line after the time out has passed without activities Caller ID If the Switch UI Focus To Ringing Line parameter is disabled the User is able to see the Caller ID when the phone switches the focus to the ringing line Factory Default Factory default and recovery mode clears...

Страница 193: ...vity on an active line Default is 0 Valid values are 0 to 999 4 Click Save Settings Goodbye Key Cancels Incoming Calls The 6930 has a feature that allows you to configure the Goodbye key to drop a second incoming call or ignore incoming calls presented to the phone when you are on an active call The parameter is called Goodbye Key Cancels Incoming Call and is configurable through the Mitel Web UI ...

Страница 194: ...e Waiting Indicator Line field is set to ALL lines by default If required change the setting to a specific line by selecting a line from the list Valid values are All and lines 1 through 24 3 Click Save Settings Incoming Intercom Call Features By default the IP phone allows incoming intercom calls to be automatically answered without having to set up an Icom key on your phone The phone automatical...

Страница 195: ...an active call The Allow Barge In parameter controls this feature When you enable the this parameter which is the default value an incoming intercom call takes precedence over any active call by placing the active call on hold and automatically answering the intercom call When you disable this parameter and there is an active call the phone treats an incoming intercom call like a normal call and p...

Страница 196: ... any incoming pages For incoming RTP multicasts the ringing display is dependent on the setting for the Allow Barge In parameter see Allow Barge In on page cxcvi If this parameter is disabled and there is no other call on the phone then the paging is automatically played through the default audio device If there is an existing call on the phone the call initially displays in the ringing state The ...

Страница 197: ...2 and Phone 3 can pickup the same call by pressing the SCA line key Phone 2 and 3 display the call they are bridging into on the LCD of the phones Existing SCA parties in a bridge or one to one call hear an audible beep when another party has joined the call Notes 1 Recipient of a paging call can set a global DND to ignore any incoming pages 2 For incoming paging the phone uses the Intercom config...

Страница 198: ...hat support SCA bridging Bridge active A bridged call is in progress Bridge held The 3rd party i e non SCA party in the bridge is on hold The following tables provide the key states and LED image behavior in an SCA bridge call for users involved in an SCA call local and users not involved in the SCA call remote Line Keys State Line LED for Local Line LED for Remote Idle Off Off Seized Solid Green ...

Страница 199: ...s label corresponding to the line Additionally the softkey s LED will be illuminated Contact your System Administrator for more information State Softkey Image for Local Softkey LED for Local Softkey Image for Remote Softkey LED for Remote Idle Off Off Seized Solid Red Solid Red Progressing outgoing call Solid Red Solid Red Alerting incoming call Flashing Red N A Active Solid Red Solid Red Held Sl...

Страница 200: ...dministrator for more information If these have not been set up you can dial any star code commands on the 6930 phone the same way you would on a regular telephone Other Features A multitude of other features are available depending on whether or not your System Administrator has configured them for use Contact your System Administrator for feature availability and usage information ...

Страница 201: ...ical UI for call status indication The M695 features a 4 3 480x272 pixel color backlit LCD display The M695 Expansion Module keys support the following functions None Speed Dial Conf Line Speed Dial MWI Speed Dial Directory DND Filter Busy Lamp Field BLF Callers List BLF List Redial Auto Call Distribution ACD Conference Extensible Markup Language XML Transfer Flash Intercom Icom Sprecode Phone Loc...

Страница 202: ...Speed Dial Key You can press and hold an expansion module key to create a speed dial key and configure it the same way you configure a speed dial key on the phone For details on creating a speed dial key see Speed Dial Key on page lxxxviii Note For more information about configuring the expansion module keys with these functions see the Configuring Softkeys on page lxxxiii Note For more informatio...

Страница 203: ...t I get a dial tone Check for any loose connections and that the phone has been installed properly For installation instructions please refer to the Installation and Setup section in the Mitel 6930 Installation Guide Why doesn t my phone ring Check the ring volume on your phone It may be turned down or turned off To adjust the ringer volume setting press the volume button when the phone is on hook...

Страница 204: ... phone from the IP phone UI or through the Mitel Web UI See Restarting Your Phone Using the IP Phone UI on page lxxx and Restarting Your Phone Using the Mitel Web UI on page lxxxi for more information How do I lock my phone You can lock your phone to prevent the phone from being used or configured You can lock the phone using any of the following At the path Options Phone Lock on the IP phone UI S...

Страница 205: ...Time Zone Code Table TIME ZONE NAME TIME ZONE CODE AD Andorra AE Dubai AG Antigua AI Anguilla AL Tirane AN Curacao AR Buenos Aires AS Pago Pago AT Vienna AU Lord Howe AU Tasmania AU Melbourne AU Sydney AU Broken Hill AU Brisbane AU Lindeman AU Adelaide AU Darwin AU Perth AW Aruba AZ Baku CET GST AST AST CET AST ART BST CET LHS EST EST EST CST EST EST CST CST WST AST AZT ...

Страница 206: ...ssau BY Minsk BZ Belize EET AST CET EET AST BOT FNT BRT BRT BRT BRS BRT BRS AMS AMT AMT AMT ACT ACT EST EET CST CA Newfoundland CA Atlantic CA Eastern CA Saskatchewan CA Central CA Mountain CA Pacific CA Yukon CH Zurich CK Rarotonga CL Santiago CL Easter CN Beijing CO Bogota CR Costa Rica CU Havana CY Nicosia CZ Prague NST AST EST EST CST MST PST PST CET CKS CLS EAS CST COS CST CST EES CET Time Zo...

Страница 207: ...lisi GF Cayenne GI Gibraltar GP Guadeloupe GR Athens GS South Georgia GT Guatemala GU Guam GY Guyana GMT GMT AST GET GFT CET AST EET GST CST CST GYT HK Hong Kong HN Tegucigalpa HR Zagreb HT Port au Prince HU Budapest HKS CST CET EST CET IE Dublin IS Reykjavik IT Rome GMT GMT CET JM Jamaica JP Tokyo EST JST KY Cayman EST LC St Lucia LI Vaduz LT Vilnius LU Luxembourg LV Riga AST CET EET CET EET Time...

Страница 208: ...ua MX Hermosillo MX Tijuana CET EET CET AST AST CET MUT CST CST CST CST MST MST MST PST NI Managua NL Amsterdam NO Oslo NR Nauru NU Niue NZ Auckland NZ Chatham CST CET CET NRT NUT NZS CHA OM Muscat GST PA Panama PE Lima PL Warsaw PR Puerto Rico PT Lisbon PT Madeira PT Azores PY Asuncion EST PES CET AST WET WET AZO PYS Time Zone Name Time Zone Code Table TIME ZONE NAME TIME ZONE CODE ...

Страница 209: ...MS NOV KRA IRK YAK VLA SAK MAG PET ANA SE Stockholm SG Singapore SI Ljubljana SK Bratislava SM San Marino SR Paramaribo SV El Salvador CET SGT CET CET CET SRT CST TR Istanbul TT Port of Spain TW Taipei EET AST CST UA Kiev US Eastern US Central US Mountain US Pacific US Alaska US Aleutian US Hawaii UY Montevideo EET EST CST MST PST AKS HAS HST UYS VA Vatican CET YU Belgrade CET Time Zone Name Time ...

Страница 210: ...sult from unauthorized and or unlawful use Mitel shall not be liable for any incidental or consequential damages including but not limited to loss damage or expense directly or indirectly arising from the customer s use of or inability to use this product either separately or in combination with other equipment This paragraph however shall not apply to consequential damages for injury to the perso...

Страница 211: ......

Отзывы: