background image

8

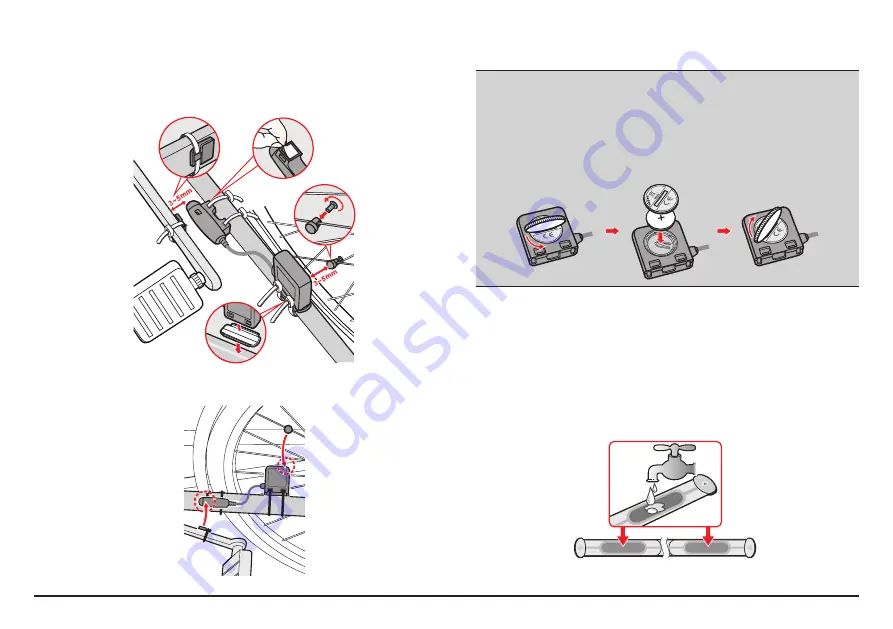
Installing the sensors on your bike

The cadence/speed sensor kit is used for selected models only.

1. 

Follow the instruction below to install the cadence/speed sensor kit on your 
bike. 

a

c

b

d

2. 

Ensure that the magnets are aligned with the sensing area on the sensors.

3. 

When done, you can manually pair the sensor with your device by tapping 

Main menu > Settings > Sensors > Cadence/Speed

.

Information:

The cadence sensor contains a replaceable CR2032 battery. Follow the instructions 

below to replace the battery:
1.  Locate the battery cover on the back of the sensor, and then twist the cover 

anticlockwise (e.g. by using a coin) to remove the cover and battery.

2.  Insert the new battery into the battery chamber and replace the cover.
3.  Twist the cover clockwise (e.g. by using a coin) to close the cover.

Putting on the heart rate monitor

The heart rate monitor is used for selected models only.

Note:

 Please note the heart rate monitor is not a medical device and its readings are not 

a substitute for obtaining measurements that require medical precision. It is strongly 
recommended to consult a doctor if you have a pacemaker or other implemented devices 
before using the heart rate monitor.

1. 

Before using the heart rate monitor, wet the contacts on the back of the 
chest strap.

Note: 

If possible, you can also use an electrolyte gel (usually available in local sports 

stores) to ensure good contact.

Содержание Cyclo 300 Series

Страница 1: ...User Manual User Manual series...

Страница 2: ...product will deliver the described functionality as presented in this User Manual in all material respects Copyright 2014 MiTAC International Corporation Mio is either a registered trademark or trade...

Страница 3: ...p 21 Using WIFI wireless local area network 22 Pairing with your smartphone 23 Receiving incoming calls 23 Receiving text messages 23 Playing music 24 Voice Instructions 24 Customising your device 24...

Страница 4: ...charger or USB cable 4 Bike mount socket For the device mount Cyclo 1 Charge Indicator Indicates the level of internal battery charge Green battery full Orange battery charging 2 POWER button Turns yo...

Страница 5: ...ay be sold separately and used for Cyclo 305 315 505 only Information This device is ANT certified Visit www thisisant com directory for a list of compatible products and apps Getting started Charging...

Страница 6: ...Settings 4 Activate the map Enter the Startup Key which is printed on the bottom of the box and then tap OK to unlock your device You will only have to do this the first time you use the device 5 Onc...

Страница 7: ...wing you to attach the bike mount to your bike securely 1 Select the rubber pad that best fits the handle bars on your bike and then attach it using the two plastic straps 2 Align the latch on the bac...

Страница 8: ...ockwise e g by using a coin to remove the cover and battery 2 Insert the new battery into the battery chamber and replace the cover 3 Twist the cover clockwise e g by using a coin to close the cover P...

Страница 9: ...and replace the cover 3 Twist the cover clockwise e g by using a coin to close the cover Operating basics Using the POWER button Turning on the device Press and hold the POWER button for 3 seconds to...

Страница 10: ...various tasks providing quick access to applications and settings Tap a button to start a task or open another menu Icon Description The Dashboard displays the view of functions including the compass...

Страница 11: ...when the sensor is paired with the device The icon is not displayed when not activated in the Sensors setting The icon is greyed out when activated but not paired with the device The icon is white wh...

Страница 12: ...ntations shown in the following sections may differ from the actual screens and presentations generated by the actual product The Dashboard provides the extended screens that can be used to assist you...

Страница 13: ...current position on the centre of the map Tap anywhere on the Navigation screen to display more buttons Tap to stop navigation Tap to avoid a certain distance of route ahead Starting navigation Using...

Страница 14: ...the Home setup wizard Once your home location has been set on the device simply tap GO on the screen and you will be directed to Home quickly Editing the Home location 1 On the HomeAddress screen tap...

Страница 15: ...isplay more entries if available in the list Note Tap the Sort by button at the bottom of the screen to change the sorting order of the entries by time by name Tracks Tracks are the recorded routes th...

Страница 16: ...he following To install the track to your device copy paste the gpx file to Mio_data Dodge Tracks To retrieve the recording from your device copy paste the gpx file from Mio_data Dodge Tracks Profile...

Страница 17: ...ime mode Assign the desired amount of distance time to ride in the Distance Time field While generating the routes using Time mode you can set the estimated average speed of your trip in the Average S...

Страница 18: ...ice will notify you when you ve reached your target Workout by Distance Workout by Distance is the perfect tool if you want to set how long the workout session should be exactly 1 Tap from the Main me...

Страница 19: ...t the heart rate monitor to the device before you start this workout 1 Tap from the Main menu screen and then select the HR Zone option 2 Complete the following In the Zone field select the proper hea...

Страница 20: ...For selected models only To view the history data tap from the Main menu screen and then select an entry from the list Slide the screen to the left or right using your finger or tap to view details of...

Страница 21: ...in your account you can upload the saved tracks on your device to your MioShare account and download the available tracks on the MioShare to your device Note Do not disconnect your device from the co...

Страница 22: ...p If you select a public network tap directly to start connecting Notes On the WIFI settings screen tap Refresh to search the networks again You can add a network manually by tapping Add Network on th...

Страница 23: ...vice from a list of Bluetooth devices For Android phones open CycloSmart and tap Start Pairing Receiving incoming calls By default you will be notified with a notification and a sound when there is an...

Страница 24: ...sing your device Note Depending on your Mio model certain setting options may not be available There are various customisation options available to enhance your navigation and cycling experience With...

Страница 25: ...ble options may be different depending on the selected routing type Routing type Options City bike Race bike Mountain bike Car Running Major roads V V V V Cycle routes V V V Unpaved roads V V V V Cobb...

Страница 26: ...to turn on and off the Bluetooth function of the device For more information see the Pairing with your smartphone section Note For selected models only WIFI sync Tap the WIFI sync option to turn on th...

Страница 27: ...the Shake Share function For more information of using File Sharing see the Sharing your route with friends in the trip section Note For selected models only Shimano Di2 Note For selected models only...

Страница 28: ...lue will be calculated BPM or by the system based on the data in your profile Custom You can input the Maximum heart rate value manually 2 Define the heart rate range in Zone 1 6 fields according to y...

Страница 29: ...es magnets or high voltage tower This might cause your device point to the wrong direction Language You can select the preferred language displayed for the menus and other interface features while ope...

Страница 30: ...objects on your Mio Do not drop your Mio or subject it to severe shock Do not subject your Mio to sudden and severe temperature changes This could cause moisture condensation inside the unit which co...

Страница 31: ...e a position or GPS fix latitude and longitude for vehicle navigation systems Your Mio receives GPS signals via the internal GPS antenna To guarantee the optimum GPS signal strength ensure your Mio is...

Страница 32: ...or burns do not disassemble crush puncture or dispose of in fire or water Important instructions for service personnel only Caution Risk of explosion if battery is replaced by an incorrect type Dispo...

Страница 33: ...ousehold waste in accordance with the EU directive for waste electrical and electronic equipment WEEE 2002 96 EC Instead it should be disposed of by returning it to the point of sale or to a municipal...

Страница 34: ...s and licensors which are inconsistent herewith shall be disregarded by you and shall not be binding upon Mio its suppliers and licensors if any product model or sample was shown to you such model or...

Страница 35: ...or any reason including but not limited to any failure to comply with any term or condition of this Agreement In such event you must destroy the Product the Software and the Documentation together wit...

Отзывы: