Setup 12-23
Tap [Delete] to delete a user-defined exam in the Exam Mode Library area. See “5.1.3
Quickly Saving Image Settings” for details about creating a user-defined exam mode.
Tap [Default] to set a selected exam mode as the default exam mode. The default exam
mode is marked by a “√”.
5. Tap [Save] to save the settings or tap [Cancel] to cancel changes you made.
12.2.2 Measurement Preset
See the Operator’s Manual [Advanced Volume] for details.
12.2.3 Comment Preset
You can change the annotation menu for current exam mode. The comments in the library are
provided by the system or are user-defined ones.
In Body Mark preset page, you can change the body mark menu for current exam mode. Body
Mark preset is similar to Comment preset, here Comment preset is introduced as an example.
1. Select [Setup] -> [Presets] -> [Comment Preset] to enter the screen.
2. Add comments: directly enter user-defined comment texts, or select comment texts for the
annotation menu for current exam mode.
Directly enter user-defined comment texts: tap in the field box besides “Custom”, enter the
text comment through the soft keyboard, and then tap
. Then the directly-entered
comment will be added to the menu. Swipe downwards to see more comments.
Select available items:
a) First select a comment library in the drop-down list beside “Exam Mode”, all available
items will be displayed on the left.
Menu
display
System library
Содержание TE5
Страница 1: ...TE7 TE5 Diagnostic Ultrasound System Operator s Manual Basic Volume ...
Страница 2: ......
Страница 6: ......
Страница 12: ......
Страница 24: ......
Страница 36: ......
Страница 54: ......
Страница 56: ...4 2 Exam Preparation 4 1 1 New Patient Information The Patient Info screen is shown as follows 2 1 3 ...
Страница 110: ......
Страница 115: ...Display Cine Review 6 5 6 Tap Return on the screen or tap Freeze to exit image compare ...
Страница 120: ......
Страница 124: ......
Страница 156: ......
Страница 174: ......
Страница 192: ...12 18 Setup Select Advanced and do as follows Select MAPS and do as follows ...
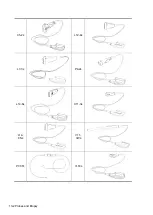
Страница 202: ...13 2 Probes and Biopsy C5 2s L12 4s L7 3s P4 2s L14 6s C11 3s L14 6Ns V11 3Ws P7 3Ts 7LT4s ...
Страница 203: ...Probes and Biopsy 13 3 7L4s P10 4s L20 5s P7 3s L14 5sp SC6 1s SP5 1s 6CV1s L9 3s C5 1s L11 3VNs C4 1s ...
Страница 222: ...13 22 Probes and Biopsy No Name Description 8 Grooves of the needle guided bracket Matched with the tabs of the probe ...
Страница 226: ...13 26 Probes and Biopsy NGB 034 NGB 035 ...
Страница 250: ......
Страница 272: ......
Страница 276: ...A 4 Wireless LAN Tap Add Manually create a network profile to set ...
Страница 282: ......
Страница 318: ......
Страница 322: ......
Страница 323: ...P N 046 006959 07 1 0 ...


