8
2-4 Introduction to installation
Note: If any of the below operation is incorrect, turn off the power immediately and check the image
platform for any improper connections. Go through all steps again.
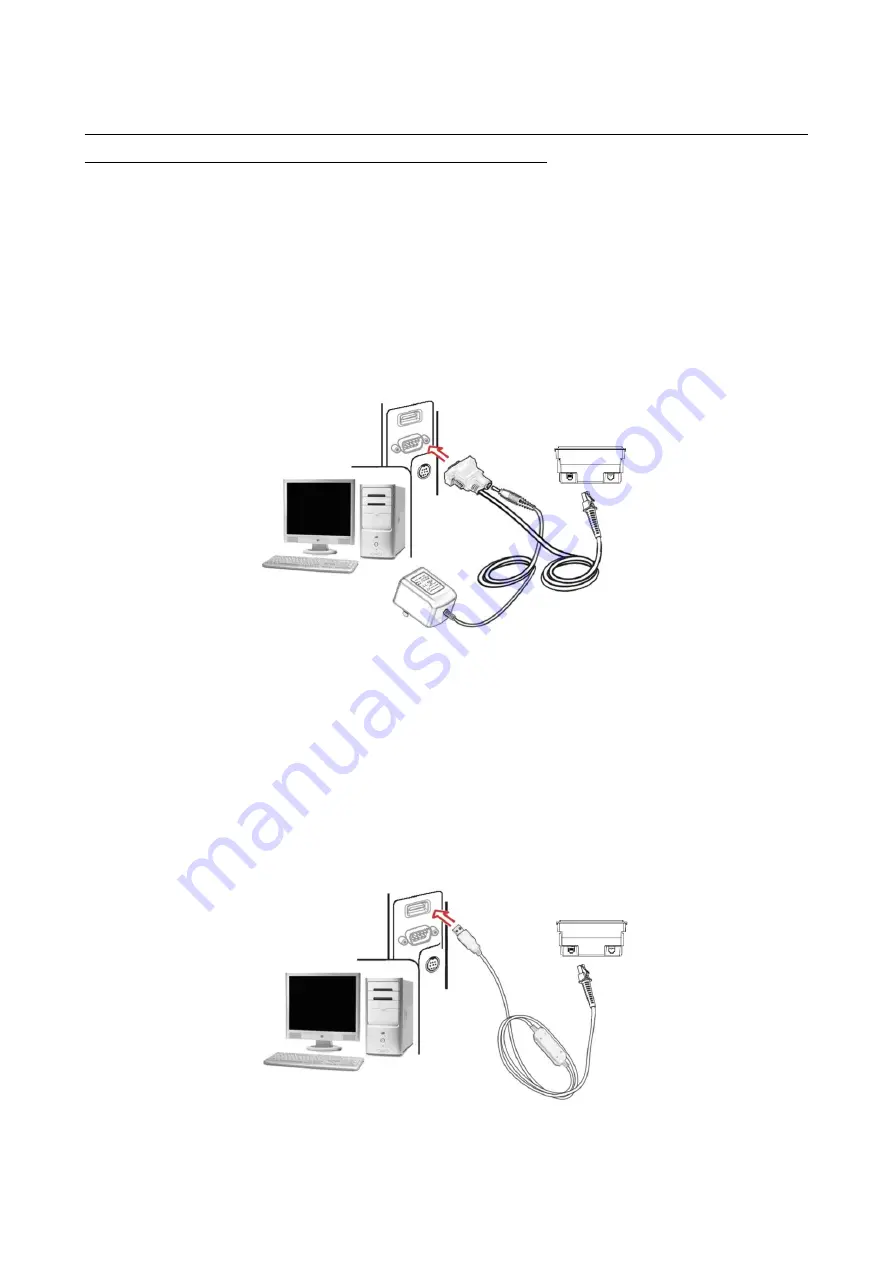
2-4-1 Installation - RS-232
1.
Switch off the host.
2.
Attach the phone jack connector of the RS-232 cable to Host interface on the image platform.
3.
Connect another end of the RS-232 cable to the serial port (PIN 9) on the device.
4.
If the host does not have power supply (on PIN 9), connect the external power supply (5 V DC
adapter) to the RS-232 cable.
5.
Switch on the host. If connect properly, the beeper and the LED of the image platform will indicate.
Figure 2-6 Installation of RS232 cable
2-5-2 Installation - USB
The image platform attaches directly to a USB host.
1.
Attach the phone jack connector of the USB cable to the Host interface on the image platform.
2.
Connect another end of the USB cable to an available USB port of the Host.
3.
If connect properly, the beeper and the LED of the image platform will indicate.
4.
Windows OS will automatically detect the USB device.
Figure 2-7 Installation of USB cable
Содержание MP8608
Страница 1: ...MP8608 Image Platform User Manual Version MP8608_UM_EN_V1 1 1...
Страница 2: ......
Страница 4: ...ii...
Страница 10: ...4 2 2 Dimensions Figure 2 2 Dimensions without stand...
Страница 11: ...5 Figure 2 3 Dimensions with stand...
Страница 12: ...6 Figure 2 4 Dimensions of hanging holes...
Страница 13: ...7 2 3 Field of view Figure 2 5 Field of view Front view...
Страница 27: ...21 Multiple scan setting Single scan setting Option barcode Option Alpha entry next decode attempt Enable 01...
Страница 93: ...87 PDF417 12 890ab xyz MicroPDF417 0239 mdo QR code 1234567890ABCD XYZ Data Matrix 123890abc mdo...
Страница 94: ...88 Aztec Code 12345678901234567890 Han Xin Code 12345678901234567890...
Страница 96: ...90 9 Configuration alphanumeric entry barcode To finish parameter setting please scan the bar code below...


