2-20
Setting of Media Cor-
rection
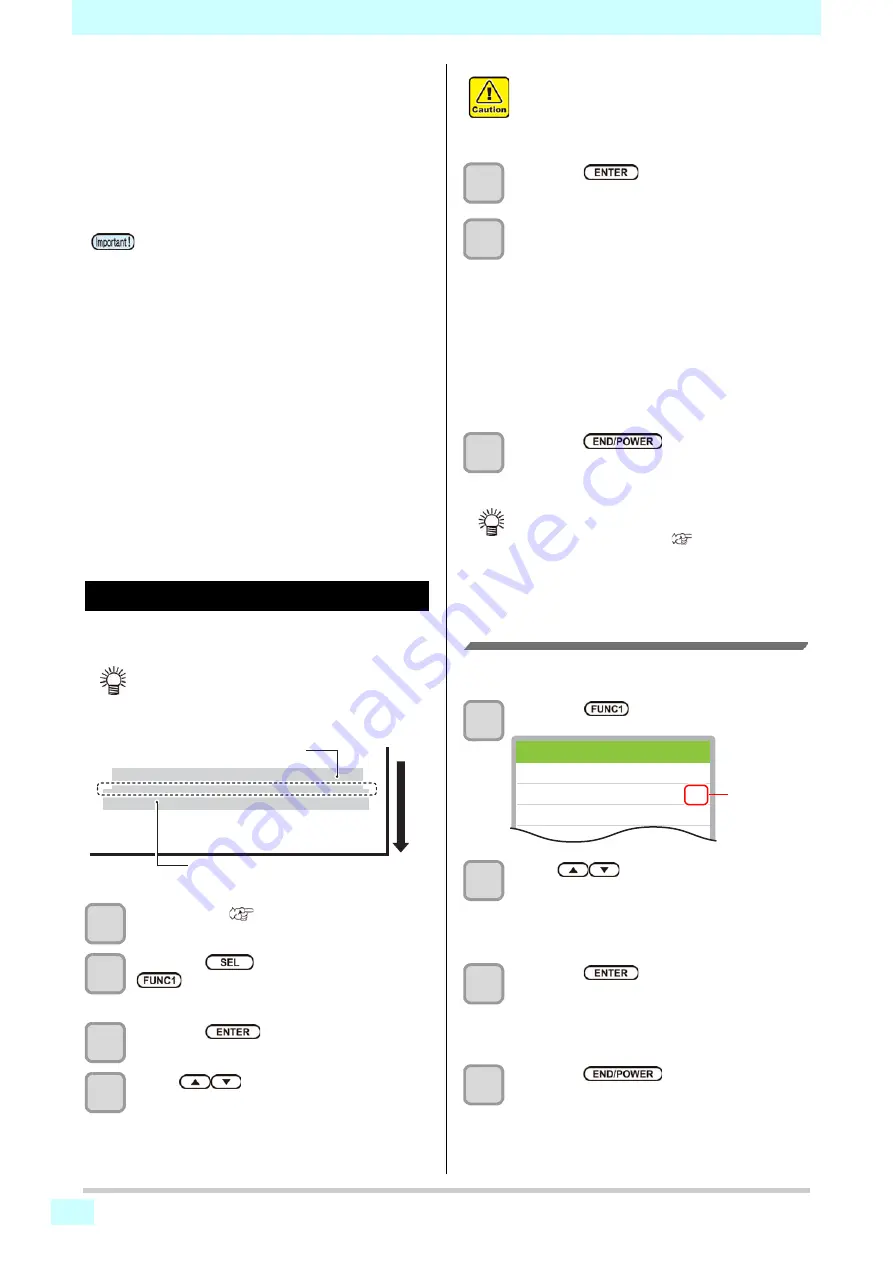
Correct the media feed amount to match the type of
media you are using.
If the correction value is not appropriate, stripes may
appear on the printed image, thus resulting in a poor
printing.
Setting of Media Correction
A pattern for media correction is printed and a media-
feeding rate is corrected.
1
Set a media. (
2
Press the
key, and press the
(ADJUST)
in LOCAL.
• ADJUST MENU appears.
3
Press the
key.
4
Press
to enter resolution.
• Here enter the resolution in the scanning direction
(Y direction) of the media.
5
Press the
key twice to print the
correction pattern.
6
Check the correction pattern and enter a
correction value.
• A screen for entering the correction value
appears.
•
Enter a correction value in "+"
:
The boundary between the two bands is widened.
•
Enter a correction value in "-"
:
The boundary between the two bands is
narrowed.
• When you change the correction value by "30",
the width of the boundary changes by about 0.1
mm.
7
Press the
key several times to
end the setting.
Correcting Media-feeding during
Printing
A media-feeding rate can be corrected even in the remote
mode or when image data is printed.
1
Press the
(ADJUST)
in the Remote.
2
Press
to enter a corrected
feeding rate.
• Corrected feeding rate: -9999 to 9999
• The value entered here is reflected in the
corrected feeding rate soon.
3
Press the
key.
• The changed value is registered.
• When you press the [ENTER] key instead of the
[END/POWER] key, the value entered here will be
invalid.
4
Press the
key several times to
end the setting.
• Be sure to perform feed correction each time
before printing. The media feed amount may vary,
depending on the remaining amount of the roll
media.
• If use by setting the media to Narrow roll holder,
rewind the roll media by hand and set without
slack. There may not be accurate to correct the
feed amount.
• On completion of [MEDIA COMP.] during use of a
roll media, the media returns to the printing origin.
When a roll media is set on the narrow roll holder,
Slack will occur in the roll media of the back side of
this machine.
Before printing, take up the slack in the roll media
by hand; a loose roll media can result in an inferior
image quality.
• When printing with a take-up device, set the media
first and then perform media correction.
• If print without using the take-up device, please
make the correction from sending media to reach
the floor. There is a possibility that the fed amount
can not be adjusted normally.
• Two bands are printed in the correction pattern.
• Make adjustment so that an even color density is
obtained in the boundary between the two bands.
Second band
First band
Media adva
nce d
ire
ction
• Enter a resolution matching the data printed
usually. This machine changes the media feeding
method, depending on the resolution. If you enter
a resolution inconsistent with actual printing, it
may result in an inappropriate feed amount.
• You can select “Feed Comp.” by using the
[FUNCTION] key in the Local without pressing the
[FUNC2] (ADJUST) key. (
Remote <Setup 1>
Feed Comp.
0
Current Value
10
Changed Value
Current
correction
value
Содержание SWJ-320EA
Страница 1: ...MIMAKI ENGINEERING CO LTD https mimaki com D203278 13 Original instructions ...
Страница 72: ...3 24 ...
Страница 116: ...KM FW 1 5 MIMAKI ENGINEERING CO LTD 2018 ...


