background image

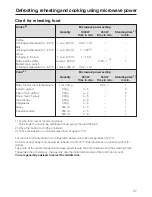
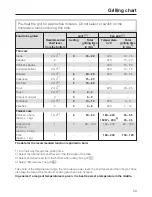
Chart for reheating food

Drinks

2)

Microwave power setting

Quantity

1000 W

Time in min.

450 W

Time in min.

Standing time

1)

in min.

Coffee,
drinking temperature 60 – 65 °C
Milk,
drinking temperature 60 – 65 °C
Water,
bringing to the boil
Baby bottles (milk)
Mulled wine, punch,
drinking temperature 60 – 65 °C

1 cup, 200 ml

1 cup, 200 ml

1 cup, 125 ml

Approx. 200 ml

1 glass, 200 ml

0:50 – 1:10

1– 1:50

3)

1 – 1:50

0:50 – 1:10

0:50 – 1

3)

1

Food

3)

Microwave power setting

Quantity

600 W

Time in min.

450 W

Time in min.

Standing time

1)

in min.

Baby food at room temperature
Cutlets, grilled
Fillet of fish, grilled
Roast meat in gravy
Side dishes
Vegetables
Gravy
Soup/casserole

1 jar, 200 g

200 g
200 g
200 g
250 g
250 g

250 ml
250 ml
500 ml

3 – 5
3 – 4
3 – 5
3 – 5
4 – 5
4 – 5
4 – 5
7 – 8

0:30 – 1


1
2
2
1
1
1
1
1
1

1) Let the food rest at room temperature.

This allows the heat to be distributed more evenly through the food.

2) Place the boiling rod in the container.
3) Times are based on an initial temperature of approx 5 °C.

For food not normally stored in a refrigerator, assume an initial temperature of 20 °C.
All food, except baby food, should be reheated to 70-75°C. See "Guidance on reheating food" for
details.
Take note of the recommended microwave power levels, the time durations and the standing times.
These take the consistency, the quantity and the initial temperature of the food into account.

You are generally advised to select the middle time.

Defrosting, reheating and cooking using microwave power

47

Содержание H 5030 BM

Страница 1: ...structions Microwave combination oven H 5030 BM H 5040 BM To avoid the risk of accidents or damage to the appliance it is essential to read these instructions before it is installed and used for the first time M Nr 07 573 080 en GB ...

Страница 2: ...mmes 19 b Microwave Grill 19 a Microwave Fan plus 19 M Microwave Fan grill 19 Before using for the first time 20 Setting the time of day 20 Changing the time of day 20 Cleaning and heating up for the first time 21 Suitable containers for microwave ovens 22 Material and shape 22 Testing dishes for their suitability 25 Placing the dish in the oven 25 A cover 26 Controls 27 Function selector 27 Tempe...

Страница 3: ...icrowave Fan grill M 36 Microwave Grill b 37 The end of a cooking programme 37 Minute minder egg timer 38 To set the minute minder 38 To cancel the time set for the minute minder 38 System lock 39 Settings 40 To change the status of a setting 41 Defrosting reheating and cooking using microwave power 42 Chart for defrosting 46 Chart for reheating food 47 Chart for cooking food 48 Baking 49 Baking c...

Страница 4: ...olving guide 66 Optional accessories 69 After sales service 70 Electrical connection 71 Installation 72 Appliance dimensions and unit cut out 72 Installation in a tall unit 72 Installation in a base unit 72 Front dimensions 73 Installation 73 Contents 4 ...

Страница 5: ...ce to store or dry items which could ignite easily Moisture evaporates Fire hazard This appliance is not intended for use by persons including children with reduced physical sensory or mental capabilities or lack of experience and knowledge unless they are supervised whilst using it or have been shown how to use it correctly by a person responsible for their safety Safety with children Keep childr...

Страница 6: ... safety regulations It is most important that this basic safety requirement is present and tested regularly and where there is any doubt the household wiring system should be inspected by a qualified electrician The manufacturer cannot be held liable for the consequences of an inadequate earthing system e g electric shock Before connecting the appliance make sure that the connection data on the da...

Страница 7: ...in will not be covered by the guarantee Correct use Caution Danger of burning The oven interior will become very hot when operating with functions which do not use microwave power and also combination programmes which do use microwave power Use oven gloves when placing food in the oven turning or removing it and when adjusting oven shelves etc in a hot oven Take great care not to come in contact w...

Страница 8: ...eat and crisp up rolls or bread or to dry flowers herbs grain etc Use the Fan plus U function for this type of procedure and do not leave the oven unattended Never leave the appliance unattended when cooking with oil or fats as these are a fire hazard if allowed to overheat Never heat undiluted alcohol in the microwave as this can easily ignite If using alcohol in your recipes please be aware that...

Страница 9: ...cushions or pads filled with cherry kernels wheat grain lavender or gel such as those used in aromatherapy These pads can ignite when heated even after they have been removed from the appliance Exercise caution when cooking or reheating food with a high sugar content e g Christmas pudding If heated for too long the sugar may caramelise or ignite Always ensure that this type of procedure is supervi...

Страница 10: ...user could be injured and the appliance damaged The boiling rod ensures that the liquid boils evenly and that bubbles form at an early stage during the operation Make sure that you only use microwave safe containers when using the Microwave Solo function or a combination programme which uses microwave power Observe the instructions given in Suitable containers for microwave ovens Ovenproof earthen...

Страница 11: ...could otherwise cause the egg yolk to explode Danger of inury Food with a thick skin or peel such as tomatoes sausages jacket potatoes and aubergines should be pierced or cut in several places to allow steam to escape and prevent the food from bursting To check food temperature first interrupt the cooking process Only use a thermometer specifically approved for food use to measure the temperature ...

Страница 12: ...al and electronic appliances machines often contain materials which if handled or disposed of incorrectly could be potentially hazardous to human health and to the environment They are however essential for the correct functioning of your appliance or machine Please do not therefore dispose of your old machine or appliance with your household waste Please dispose of it at your local community wast...

Страница 13: ...Appliance overview Control panel aFunction selector bDisplay cSensors V OK W N dTemperature selector Oven interior eGrill element fLighting gThree shelf levels hOven door Guide to the appliance 13 ...

Страница 14: ...The rack is designed to be compatible with microwaves and so can be used with programmes which use microwave power combination programmes Do not place the rack directly on the floor of the oven and do not use it with the Microwave Solo function This could cause arcing which could damage the oven Do not place items weighing more than 8 kg on the rack The rack gets hot when used with combination pro...

Страница 15: ...rds slightly at the front when the safety notches connect with the sides of the oven We recommend using the rack together with the glass tray when cooking items on the rack which might drip Boiling rod When heating liquids the boiling rod provided should always be placed in the container It helps liquids to heat evenly Guide to the appliance 15 ...

Страница 16: ...rowave power is used in conjunction with a traditional function Rapid Heat up S For reducing the pre heating time for the appliance Light T The interior lighting can be switched on separately e g for cleaning the oven Settings Default settings which can be altered individually Automatic switch off For switching off the appliance automatically Delay start For starting the cooking programme at a lat...

Страница 17: ...n you will need to wait a short while before starting the second programme Energy saving function Use Door contact switch If the door is opened during a programme that is not using microwaves the heat in the oven automatically switches off The fans continue to operate As soon as the door is closed again the programme will continue However if the door is opened during a combination programme the co...

Страница 18: ...igorously The friction caused caused by this vibration creates heat which first starts developing around the outside of the food and then slowly penetrates towards the centre The moisture fat and sugar content of food will affect the speed at which it is cooked As heat is produced directly in the food food can generally be cooked without adding much liquid or cooking oil cooking reheating and defr...

Страница 19: ...ion For grilling thick cuts e g rolled meat poultry S Rapid heat up This function heats up the appliance quickly to the temperature required The temperature indicator light will go out when the pre selected temperature has been reached The function selector must then be turned to the function you wish to use for cooking Functions which use microwave energy Combination programmes b Microwave Grill ...

Страница 20: ...s will then start to flash Now use the V or W sensors to enter the minutes Touch the OK sensor This confirms the minutes The time of day you have selected has now been entered After a power failure the current time of day starts flashing To confirm the time of day Touch the OK sensor The appliance will store this time for approx 24 hours After 24 hours it will show 12 00 and will need to be re set...

Страница 21: ...dea to wipe the interior out with a damp cloth first This way any dust or bits of packaging that may have accumulated in the oven compartment during storage and unpacking will be removed Turn the function selector to Fan Plus U The recommended temperature of 160 C will appear Use the temperature selector to set the highest temperature 250 C Heat up the empty appliance for at least an hour The time...

Страница 22: ...ners with hollow handles and lid knobs must only be used in this oven if they have vent holes which allow the moisture to escape Without vent holes there can be a pressure build up causing the container to crack or shatter with the danger of injury Metal Metal containers aluminium foil metal cutlery and china with metallic decoration such as gold rims or cobalt bule must not be used with microwave...

Страница 23: ... shaped cuts of meat poultry or fish small pieces of aluminium foil may be used to mask wing tips or other thin parts for the last few minutes of the process Make sure that the aluminium foil is at least 2 cm from the oven walls at all times Metal meat skewers or clamps should only be used if they are very small in comparison to the size of the cut of meat Glassware Heat resistant glass or ceramic...

Страница 24: ...oven Melamine absorbs microwave energy and gets hot When purchasing plasticware make sure that it is suitable for use in a microwave oven Do not leave the oven unattended when reheating or cooking food in disposable containers made of plastic paper or other inflammable materials Disposable containers such as trays made from polystyrene can only be used for very short timed warming and reheating of...

Страница 25: ... hot it would be unwise to use the dish If a cracking noise is heard accompanied by sparks during the test switch the appliance off imme diately Any crockery which causes this reaction is unsuitable for use with microwave power If any doubt exists about the suitability of a container please contact the supplier This test cannot be used to check whether items with hollow knobs or handles are suitab...

Страница 26: ...pened before they are placed in the oven Do not use a cover if food coated with breadcrumbs is being cooked cooking meals which are to be given a crisp finish using a combination programme which uses microwave power The cover supplied may only be used in Microwave _ Solo mode The cover can only withstand temperatures of up to 110 C Higher temperatures generated by grilling or fan heat could cause ...

Страница 27: ...e function selector to select the required function The function selector can be turned clockwise or anti clockwise _ Microwave a Microwave Fan plus b Microwave Grill M Microwave Fan grill S Rapid heat up U Fan plus Y Grill Fan grill P Defrost T Lighting Settings Temperature selector Use the temperature selector V 6 W to set the temperature The temperature selector can be turned clockwise or anti ...

Страница 28: ...or decreases the microwave power level time entry For selecting the appliance setting and changing the required status N For entering a minute minder time e g for boiling eggs Display N I2 00 h W min W m T S 0 Start V Symbols The following symbols will appear in the display depending on the position of the function selector and or whether a sensor has been touched Symbol Meaning Temperature W Micr...

Страница 29: ...required symbol in the display Then confirm your selection with the OK sensor Triangle V will flash Triangle V will flash for approx 5 seconds Settings can only be changed using the V or W sensors whilst it is flashing If this period has elapsed you will need to call up the required symbol again with the OK sensor The following will change each time the V or W is touched Duration T Microwave Solo ...

Страница 30: ...control panel or on the oven housing unit When the temperature in the oven has fallen sufficiently the cooling fan will switch off automatically Recommended temperature Functions which do not use microwave energy are allocated with recommended temperatures Fan plus U 160 C Grill Y Fixed temperature Fan grill 200 C Rapid heat up S 160 C With the Defrost function the fan circulates the air at room t...

Страница 31: ...he heat produced during the heating up phase When using the Fan plus function it is only necessary to pre heat in a few instances Pre heating may be necessary for foods which cook in less than 20 minutes and for foods such as puff pastry and yeast mixtures where instant heat is required to make them rise quickly for roasting beef fillet Do not use Rapid heat up S to pre heat the oven when baking p...

Страница 32: ...g the Finish time The appliance will switch off automatically at the time you have set Automatic switch off To switch a programme off automatically enter the Duration or the Finish time Example Entering the duration Place the food in the oven Select the function you want and set a temperature The oven heating lighting and cooling fan will switch on 0 00 h m T S V Touch the W sensor repeatedly unti...

Страница 33: ... required function and set the temperature The oven heating lighting and cooling fan will switch on First enter the cooking duration I0 45 h m T S V Touch the W sensor repeatedly until triangle V is underneath the T symbol 0 00 appears in the display Touch the OK sensor I 30 h T V Whilst triangle V is flashing enter the required duration in hours and minutes 1 30 with the W sensor Touch the OK sen...

Страница 34: ...f the programme has been using microwave power the T symbol will flash a buzzer will sound if it is switched on see Settings Audible tone Turn the function selector to 0 The buzzer will stop and the symbols in the display will go out Remove the food from the oven To check and change an entered time It is possible to check or change times entered for a cooking programme at any time by calling up th...

Страница 35: ...ing use the W sensor to enter the required duration in minutes seconds e g 1 minute and 30 seconds After a short while or after touching the OK sensor to confirm the entry the following will appear in the display I 30 W m T Start V Touch the OK sensor to start the programme If no other symbol is selected the duration will be visible counting down in the display At the end of the duration the T sym...

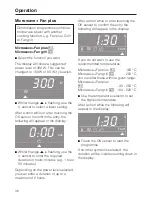
Страница 36: ...ired duration in hours minutes e g 1 hour 30 minutes Depending on the power level selected you can enter a duration of up to a maximum of 2 hours After a short while or after touching the OK sensor to confirm the entry the following will appear in the display I 30 h W m T Start V If you do not want to use the recommended temperatures Microwave Fan plus a 160 C Microwave Fan grill M 200 C you can a...

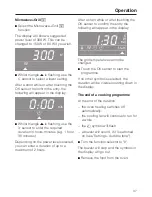
Страница 37: ...er a duration of up to a maximum of 2 hours After a short while or after touching the OK sensor to confirm the entry the following will appear in the display I 30 h W min W m T Start V The grill temperature cannot be changed Touch the OK sensor to start the programme If no other symbol is selected the duration will be visible counting down in the display The end of a cooking programme At the end o...

Страница 38: ...nute A minute minder time of between 5 seconds and 59 minutes 55 seconds can be entered Touch the OK sensor The minute minder time will count down second by second in the display At the end of the time set for the minute minder the N symbol will flash a buzzer will sound if it is switched on see Settings Minute minder the time which has elapsed since the end of the minute minder time was reached F...

Страница 39: ...iangle V is flashing under the 0 symbol use the V or W sensors to select the I or 0 setting 0 The system lock is deactivated I The system lock has been activated The appliance cannot be operated Confirm your choice of setting by touching the OK sensor If the I setting is selected the appliance cannot be operated The 0 symbol will remind you that the system lock has been activated The lock remains ...

Страница 40: ...phase S I short S 2 long The buzzer sounds at the end of a cooking duration and at the end of the heating up phase There are two buzzer tones to select from P 3 Buzzer for minute minder S 0 The buzzer does not sound at the end of the minute minder time S I short S 2 long The buzzer sounds at the end of a minute minder duration There are two buzzer tones to select from P 4 Keypad tone S 0 A keypad ...

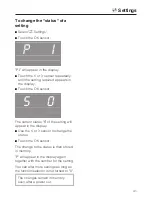
Страница 41: ...ensor S 0 The current status S of the setting will appear in the display Use the V or W sensor to change the status Touch the OK sensor The change to the status is then stored in memory P will appear in the display again together with the number for the setting You can alter more settings as long as the function selector is not turned to 0 The changes remain in memory even after a power cut Settin...

Страница 42: ...ing process 150 W To cook grains and pulses Select Microwave combined with another function if you want to shorten cooking times and have a crisp finish to the dish Microwave Grill b 300 W Fixed temperature Cooking dishes that require a crisp finish and snacks such as croque monsieur Microwave Fan plus a 300 W 160 180 C Ready meals which need to be browned e g gratins etc The duration required dep...

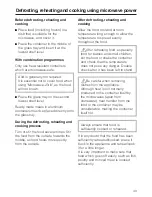
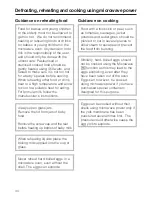
Страница 43: ...ting and cooking Allow the food to stand at room temperature long enough to allow the temperature to spread evenly throughout the food After reheating food especially food for babies and small children stir the food or shake the container and check that the temperature does not pose any danger Double check after it has been left to stand Be careful when removing dishes from the appliance Although ...

Страница 44: ...fore heating up bottles of baby milk When reheating liquids place the boiling rod supplied into the cup or glass Never reheat hard boiled eggs in a microwave oven even without the shell The eggs can explode Guidance on cooking Food with a thick skin or peel such as tomatoes sausages jacket potatoes and aubergines should be pierced or cut in several places to allow steam to escape and prevent the f...

Страница 45: ...d or is not cooked at the end of a set time Check that you remembered to restart the programme after interrupting a cooking process using microwave power Check that the correct duration was selected for the power level chosen when cooking or reheating in microwave mode The lower the power level the longer the duration Food cools down too quickly after being reheated or cooked in microwave mode Whe...

Страница 46: ...15 5 10 5 10 5 10 5 10 Fruit Strawberrries raspberries Red Blackcurrants Plums 250 g 250 g 500 g 7 8 8 9 12 16 5 10 5 10 5 10 Meat Minced beef Chicken 500 g 1000 g 16 18 34 36 5 10 10 15 Vegetables Peas Asparagus Beans Red cabbage Spinach 250 g 250 g 500 g 500 g 300 g 8 12 8 12 13 18 15 20 12 14 5 10 10 15 10 15 10 15 10 15 1 Let the food stand at room temperature This allows the heat to be distri...

Страница 47: ...Soup casserole 1 jar 200 g 200 g 200 g 200 g 250 g 250 g 250 ml 250 ml 500 ml 3 5 3 4 3 5 3 5 4 5 4 5 4 5 7 8 0 30 1 1 2 2 1 1 1 1 1 1 1 Let the food rest at room temperature This allows the heat to be distributed more evenly through the food 2 Place the boiling rod in the container 3 Times are based on an initial temperature of approx 5 C For food not normally stored in a refrigerator assume an i...

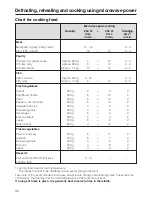
Страница 48: ...eans 300 g 500 g 450 g 500 g 500 g 300 g 500 g 300 g 500 g 500 g 2 6 5 5 3 3 5 4 5 4 6 10 10 10 8 9 8 4 8 12 2 2 2 2 2 2 2 2 2 2 Frozen vegetables Peas mixed veg Spinach Brussels sprouts Broccoli Leeks 450 g 450 g 300 g 300 g 450 g 5 5 4 3 4 11 7 6 6 8 2 2 2 2 2 Desserts Fruit compote 500 ml fruit juice or 500 g fruit 6 8 1 Let the food stand at room temperature This allows the heat to be distribu...

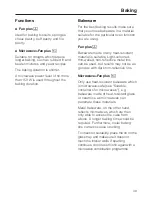
Страница 49: ... Light coloured thin walled non reflective metal tins can be used but results may not be as good as with dark non reflective tins Microwave Fan plus a Only use heat resistant bakeware which is microwave safe see Suitable containers for microwaves e g bakeware made of heat resistant glass or ceramics as microwaves can penetrate these materials Metal bakeware on the other hand reflects microwaves wh...

Страница 50: ...idth of the oven for optimum heat distribution and even results Eating food which has been cooked correctly is important for good health Only bake cakes pizza chips etc until they are golden brown Do not overcook them Even baking and browning is achieved when baking cakes pastries frozen foods such as chips croquettes pizza baguettes etc by selecting the lowest temperature given in the recipe cook...

Страница 51: ...rent tin next time These reflect heat making more difficult for the heat to reach the food The food will not cook through properly Cakes or biscuits are unevenly browned There is always likely to be small differences in the level of browning If the difference is very noticeable check whether the temperature setting is high enough and also the material and colour of the baking tins Bright shiny tin...

Страница 52: ...uark dough Streusel cake glass tray 1 Fresh fruit cake glass tray 1 Stollen White bread Dark rye bread Pizza glass tray 1 Onion tart glass tray 1 Apple turnovers 1 150 170 150 170 140 160 150 170 160 180 150 170 170 190 150 170 150 170 35 45 40 50 55 65 55 65 40 50 110 130 40 50 35 40 25 35 150 80 170 180 35 45 30 40 Choux pastry Eclairs 1 160 180 30 40 Puff pastry 1 170 190 25 35 Meringues Macaro...

Страница 53: ... cooking roast beef or fillet steak The centre would be too well cooked before the exterior is browned Containers For best results make sure that you select containers suitable for roasting Fan plus U The following containers are suitable Roasting tins casserole dishes ovenproof glass earthenware Make sure that the pot and lid have heat resistant handles Microwave Fan plus a Only use heat resistan...

Страница 54: ...heating Exception Pre heat the oven at the temperature suggested when roasting beef and beef fillet Shelf level Fan plus U Insert the rack with the food on it at the lowest shelf level Microwave Fan plus a Place the rack or the glass tray on the lowest shelf level Temperature Please refer to the roasting chart The larger the joint of meat max 3 kg except for poultry the lower the temperature requi...

Страница 55: ...he oven wrap in aluminium foil and leave to stand for about 10 minutes This helps retain the juices when the meat is carved Roasting on the rack When roasting on the rack set a temperature of approx 20 C lower than in a covered pot Add a little fat or oil to very lean meat or place a few strips of streaky bacon on the top Do not add too much liquid during cooking as this will hinder the browning p...

Страница 56: ...y approx 1 kg 170 190 55 65 150 180 45 55 Poultry approx 4 kg 170 190 200 220 150 160 120 150 Whole fish approx 1 5 kg 160 180 45 55 150 170 35 45 Unless otherwise stated the times given are calculated on the basis of an oven which has not been pre heated 1 Temperature in a covered pot If open roasting on the rack set the temperature 20 C lower 2 Do not select a higher temperature than that advise...

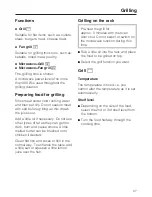
Страница 57: ...an get too dark burn and cause smoke A little melted butter can be brushed onto chicken if desired Clean flat fish and slices of fish in the normal way To enhance the taste add a little salt or squeeze a little lemon juice over the fish Grilling on the rack Pre heat the grill for approx 5 minutes with the oven door shut Do not select or switch on the microwave function during this time Rub a littl...

Страница 58: ...t the 1st or 2nd shelf level from the bottom Grilling duration approx 6 8 min per side Thin pieces of meat or fish approx 7 9 min Thicker pieces approx 10 min cm thickness Rolled meat Testing to see if cooked One way of finding out how far through a piece of meat has been cooked is to press down on it with a spoon If there is very little resistance to the pressure of the spoon it will still be red...

Страница 59: ...32 3 10 12 220 6 8 Peaches 2 3 4 8 220 7 10 Thicker cuts Chicken whole approx 1 kg 1 or 23 2 50 60 180 200 45 55 150 W 200 4 35 45 Rolled meat C 10 cm approx 1 5 kg 1 2 80 100 180 200 80 100 Pork approx 1 kg 1 180 200 100 120 The data for the recommended function is printed in bold 1 Turn half way through the grilling time 2 Select the appropriate shelf level for the thickness of the food 3 Select...

Страница 60: ... was deep frozen The following chart is for guidance only It is important to manually check the food to ensure it is thoroughly defrosted Speise Gewicht Zeit in Min Chicken 800 g 90 120 Meat 500 g 60 90 1 000 g 90 120 Sausage 500 g 30 50 Fish 1 000 g 60 90 Strawberries 300 g 30 40 Cake 500 g 20 30 Bread 500 g 30 50 Useful tips It is particularly important to observe food hygiene rules when defrost...

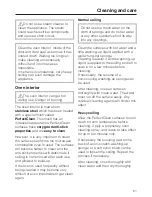
Страница 61: ...ed frequently without being cleaned it may become very difficult or even impossible to get clean again Normal soiling Do not use too much water on the cloth or sponge and do not let water or any other substance find its way into any openings Clean the surfaces with hot water and a little washing up liquid applied with a well wrung out sponge Cleaning is easier if a little washing up liquid is appl...

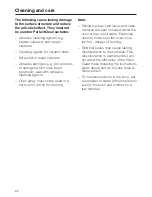
Страница 62: ...sed in a hot oven or left on for too long Note Soiling such as spilt juices and cake mixtures are best removed whilst the oven or tray is still warm Excercise caution make sure the oven is not too hot danger of burning Spilt fruit juices may cause lasting discolouration to the surfaces This discolouration is permanent but will not affect the efficiency of the finish Clean these following the instr...

Страница 63: ...ents are switched off and cool Danger of burning To lower the grill element the nut needs to be unscrewed Lower the grill element gently Do not use force to lower it as this can cause it to break After cleaning the grill element raise it gently back up again Refit the nut and tighten to secure the grill element back in position Cleaning and care 63 ...

Страница 64: ...ces to break When cleaning glass surfaces do not use abrasive cleaning agents e g powder cleaners and cream cleaners hard abrasive sponges and brushes e g pot scourers sharp metal scrapers Appliance front Remove any soiling on the front of the appliance straight away Soiling that is left too long is harder to remove and the surface could become discoloured or altered Clean the front using a damp M...

Страница 65: ...rays glass cleaning agents hard abrasive sponges and brushes e g pot scourers sharp metal scrapers Accessories supplied Rack The surface has been treated with PerfectClean The rack should be cleaned according to the cleaning instructions for PerfectClean described in Cleaning and care oven interior Glass tray The glass tray can be washed in hot water and washing up liquid or in the dishwasher Do n...

Страница 66: ...heck whether the time of day display is set so that it does not show in the display see Settings time of day display Check to see if the mains fuse has tripped If it has call the Miele Customer Contact Centre for help Check that the appliance is plugged into the mains supply and switched on at the socket A programme will not start Check that if using a programme with microwave the door is shut pro...

Страница 67: ... it Check if the rack is inside the oven Always use the glass tray when using the oven in Microwave solo mode The microwave works and the oven heats up but the interior lighting does not come on Check if the halogen lamp is defective If so it needs to be replaced as follows Disconnect the appliance from the electricity supply switch off and unplug at the socket or remove the fuse or switch off at ...

Страница 68: ...e glass piece in the mounting and refit the lamp cover Make sure that the lug on the mounting is correctly located in the notch in the roof of the oven then screw the mounting back into place Reconnect the appliance to the mains supply Fault messages in the display Possible cause and remedy Fault messages are indicated by Fault plus a number Call the Miele Customer Contact Centre Problem solving g...

Страница 69: ...he glass tray on the lowest shelf in the oven The dish is 22 cm deep HUB 61 22 or 35 cm deep HUB 61 35 Gourmet oven dish lid A lid is available separately The gourmet oven dish HUB 61 35 can not be placed in the oven with the lid on This exceeds the height of the oven cavity When ordering a lid please specify the gourmet oven dish it is to be used with 22 or 35 cm deep Pizza dish This circular pan...

Страница 70: ... the model and serial number of your appliance These are given on the data plate which is located on the front of the oven cavity N B A call out charge will be applied for unnecessary service visits where the problem could have been rectified as described in these instructions Please note that telephone calls may be monitored and recorded to improve our service After sales service 70 ...

Страница 71: ...nding on country an additional means of disconnection must be provided for all poles Switches with a minimum all pole contact gap of 3mm are suitable for isolating the appliance These include circuit breakers fuses and protective devices For extra safety it is advisable to protect the appliance with a suitable residual current device RCD Please contact a qualified electrician for advice If the cab...

Страница 72: ... unit Appliances with glass front Appliances with metal front Installation in a base unit If fitted underneath a hob the installation instructions for the hob must also be taken into account Appliances with glass front Appliances with metal front Installation 72 ...

Страница 73: ...The appliance must not be operated until it has been correctly installed in its housing unit Otherwise it poses an electric shock hazard Connect the appliance to the electricity supply Place the oven into the oven housing unit as far as the oven trim and align Open the door and with two screws secure the appliance to the side walls of the furniture unit through the holes in the oven trim Installat...

Страница 74: ...74 ...

Страница 75: ...75 ...

Страница 76: ...Alteration rights reserved 22 2709 H 5030 BM H 5040 BM M Nr 07 573 080 02 ...

Отзывы: