background image

Installation

*INSTALLATION*

33

Installation requirements

The heat-pump dryer must only be installed and commissioned by
a Miele Service engineer or a Miele-authorised Service dealer.

 

The heat-pump dryer must be installed in accordance with all rel-

evant regulations and applicable standards.

 

This heat-pump dryer must only be operated in a room that has

sufficient ventilation and which is frost-free.

General operating conditions

This heat-pump dryer is intended only for use in a commercial envir-
onment and must only be operated indoors.

Ambient temperature for optimum heat-pump operation:

+

10 °C to 

+

40 °C

The ambient temperature for the heat-pump dryer must be at least
10 °C.
At lower ambient temperatures, there is a risk of ice forming on the
lower heat exchanger. This can also result in unexpected condens-
ate formation.

Depending on the nature of the installation site, sound emissions and
vibrations may occur.

Tip: 

Have the installation site inspected and seek the advice of a pro-

fessional in instances where increased noise may cause a nuisance.

Transport

The tumble dryer and heat pump must be separated from one an-
other before being transported. The machines may be damaged if
they are transported without being separated.

The tumble dryer and the heat pump must not be transported
without transport pallets.
Suitable transport aids must always be used during transportation.
Tilting the heat pump by more than 30° should be avoided if at all
possible.

After the heat pump has been transported, it should be left to stand
for approximately one hour before commissioning. If the heat pump is
subjected to especially strong vibrations or is tilted by more than 30°,
it should be left to stand for up to 24 hours.

Содержание 52914009EU

Страница 1: ...structions Commercial heat pump dryers PDR 914 918 922 HP To avoid the risk of accidents or damage to the machine it is essential to read these instruc tions before it is installed and used for the first time en GB M Nr 11 864 650 ...

Страница 2: ...er 16 Reference to optional external devices 17 Setting the display brightness 17 Setting the date 17 Confirming the time of day display query 17 Selecting programme packages 18 Completing the initial commissioning process 19 Drying 20 1 Notes on correct laundry care 20 Washing 20 Drying 20 Care symbols 20 2 Loading the tumble dryer 21 3 Selecting a programme 22 Switching on the tumble dryer 22 4 ...

Страница 3: ...ion requirements 33 General operating conditions 33 Transport 33 Installing the heat pump 34 Installation 36 Securing the machine 38 Electrical connection 38 Air intake vent 40 Air outlet vent 40 Condensate drainage 40 Optional accessories 42 Connector Box 42 XKM 3200 42 Data protection and data security 42 Factory default settings for network configuration 42 Copyrights and licences 43 Payment sy...

Страница 4: ...rogrammes 50 Sort programmes 51 Prog colour allocation 51 Process technology 51 Anti crease 51 Drying levels 52 Further cooling 52 Cooling down temperature 52 Fan pulsed operation 52 Service 52 Clean out the airways 52 Clean the filters 53 Service interval 53 External applications 54 External exhaust flap 54 Additional fan 54 Pressure sensor 54 Peak load signal 54 Peak load prevention 55 COM modul...

Страница 5: ...Contents 5 Technical data 58 Technical data 58 EU declaration of conformity 58 ...

Страница 6: ... machine Old electrical and electronic appliances often contain valuable materi als However they also contain harmful substances which were es sential for their correct functioning and safety These could be haz ardous to human health and to the environment if disposed of with household waste or if handled incorrectly Please do not therefore dispose of your old machine with household waste Please d...

Страница 7: ...mble drying Dry cleaning kits for freshening up garments in a tumble dryer are increasingly available on the market If using do so at your own risk and follow the instructions provided on the packaging Any other applications may be dangerous Miele cannot be held liable for dam age resulting from incorrect or improper use or operation The tumble dryer is not intended for outdoor use Do not install ...

Страница 8: ... thoroughly cleaned and are still soiled with grease oil or other deposits such as kitchen linens or cosmetics cloths with cooking oils grease lo tions etc If items have not been thoroughly cleaned there is a danger that they might ignite when heated even after they have been removed from the tumble dryer at the end of the programme Items e g mops and floor cloths that have been treated with infla...

Страница 9: ...rtant to carry out maintenance on a regular basis In the event of a fault and for cleaning and maintenance purposes the tumble dryer must be disconnected from the power supply The tumble dryer is only disconnected from the power supply if It is switched off at the wall socket or the plug is withdrawn The mains fuse is disconnected The mains fuses have been completely removed See also Installation ...

Страница 10: ...by a Miele authorised technician to protect the user from danger Correct use Always close the drum door after each drying cycle This will prevent Children climbing into the tumble dryer or hiding things in it Pets or other small animals climbing into the tumble dryer Keep the room where the tumble dryer is located free from dust and fluff If the air that is taken into the machine contains dirt par...

Страница 11: ...vapours containing chlorine can also be corrosive Do not store containers of these agents near the tumble dryer Accessories Accessory parts may only be fitted when expressly approved by Miele If other parts are used warranty performance and product liability claims will be invalidated Make sure that you order the correct plinth for this tumble dryer available from Miele as an optional accessory Mi...

Страница 12: ...g e Optical interface For the Customer Service Department f button For switching the tumble dryer on and off Depending on the programming at supervisor level the tumble dryer switches off automatically to save energy It is switched off an adjustable time after the end of the programme Anti crease phase or after being switched on if no further selection is made g Emergency off switch It should only...

Страница 13: ...l the important submenus from the main menu Touch the sensor control at any time to return to the main menu Values set previously are not saved 11 02 Programmes Favourites Supervisor Help Main menu Programmes menu In this menu you can select the drying programmes Favourites menu In this menu you can select 1 favourite programme from a total of 12 favourite pro grammes The drying programmes can be ...

Страница 14: ...y touch the Extra again Setting numerical values You can set numerical values in some menus You can set the numerical values by swip ing your finger up and down on the display 10 11 13 14 12 00 59 58 01 02 Clock display OK Place your finger on the number that you want to change To set the required number swipe your finger up or down on the display Confirm the set numerical value by touching the OK...

Страница 15: ...you can open the pull down menu Touch the bar and drag it down with your finger on the display To close the pull down menu again touch the orange bar and drag it up with your finger on the display Exiting the menu Touch the sensor control to return to the previous screen Entries made before this which have not been confirmed with OK will not be saved Help display With some menus Help appears along...

Страница 16: ...ing process During the initial com missioning process you will need to define the settings for daily use of the tumble dryer Some settings can only be modified during the initial commissioning process After that they can only be changed by the Miele Customer Service Department These settings are also described under Supervisor level Switching on the tumble dryer Press the button The welcome screen...

Страница 17: ... brightness The selected level of brightness is represented by the length of the segment bar Confirm with the OK sensor control The display will change to the next setting Setting the date 22 21 19 18 2022 2021 2020 20 2019 2018 Date OK September August July June May Place your finger on the value that you want to change and move your finger upwards or downwards Once all values have been selected ...

Страница 18: ...ighted in orange Touch the programme to be activated The selected programme is now active and highlighted in orange You can select further programmes if required If you do not want to select any more programmes confirm with OK The display will change to the next setting Tip You can disable a selected programme by touching the pro gramme again Exception The Cottons and Cottons PRO pro grammes canno...

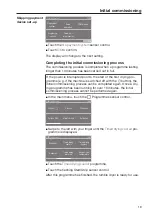
Страница 19: ...he machine is switched off with the button the initial commissioning process can be completed again Once a dry ing programme has been running for over 10 minutes the initial commissioning process cannot be performed again In the main menu touch the Programmes sensor control 11 02 Cottons Programmes Cottons PRO Minimum iron Delicates Cottons Woollens Swipe to the left with your finger until the Tim...

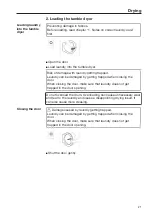
Страница 20: ... foreign objects which were not removed from the laundry Foreign objects in the laundry can melt burn or explode Ensure that any foreign objects e g detergent dispensing aids lighters etc have been removed from the laundry Risk of fire due to incorrect use and operation The laundry can burn and destroy the tumble dryer and the sur roundings See the section on Warnings and safety notes for further ...

Страница 21: ...pped when closing the door When closing the door make sure that laundry does not get trapped in the door opening Do not overload the drum Overloading can cause unnecessary wear and tear to the laundry and cause a disappointing drying result It can also cause more creasing Closing the door Damage caused by laundry getting trapped Laundry can be damaged by getting trapped when closing the door When ...

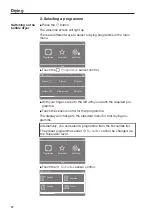
Страница 22: ...imum iron Delicates Cottons Woollens With your finger swipe to the left until you reach the required pro gramme Touch the sensor control for that programme The display will change to the standard menu for that drying pro gramme Alternatively you can select a programme from the Favourites list The preset programmes under Favourites cannot be changed via the Supervisor level 11 02 Programmes Favouri...

Страница 23: ...se Touch the sensor control for the extra you want Only press OK when the extra appears on the display The relevant symbol for the required extra or lights up Low temperat ure Delicate fabrics with the symbol on the care label e g acrylic gar ments are dried at a lower temperature The programme duration is also longer Gentle tumble Sensitive items are dried with fewer drum rotations and a lower dr...

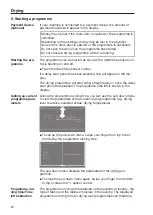
Страница 24: ... either straight away or once the delay start period has elapsed The programme time left is shown in the display Calling up current programme para meters During the programme running time you can use the pull down menu to view the parameters of the current drying programme e g drying level load size selected extras drying temperature 11 02 Time left h 2 27 Status Cottons Drying To call up the pull...

Страница 25: ... crease extra has been selected the drum continues to rotate in intervals after the end of the programme This reduces creas ing if the laundry cannot be removed straight away The Anti crease function is switched off as the factory default set ting and can be activated in the Supervisor level Removing the laundry Open the door Remove everything from the drum Items left in the tumble dryer could be ...

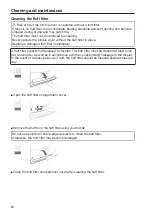
Страница 26: ...uff filter immediately A fluff filter collects fluff released by textiles The fluff filter must be cleaned at least once per working day as well as in accordance with the corresponding message in the display In the event of a heavy build up of fluff the fluff filter should be cleaned several times per day Open the fluff filter compartment cover Remove the fluff from the fluff filter using your han...

Страница 27: ...arched Check the seal Check the latches on the drum door fluff compartment and service panel Check the joint between the tumble dryer and heat pump The air intake to the heat pump and the ventilation openings are located at the back of the machine and on the machine lid Under no circumstances should these vents be sealed or covered by blankets or towels Keep the area around the heat pump dryer in ...

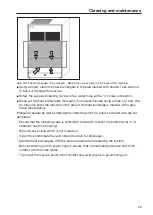
Страница 28: ...s behind the service panel Other areas of the heat pump dryer must never be cleaned with water This poses a risk of death due to electric shock Ensure that the tumble dryer is disconnected from the mains supply before cleaning the heat exchangers Disconnect the system from the mains supply Open the service panel on the back of the heat pump There is a trip hazard and risk of injury when opening th...

Страница 29: ...of the heat exchangers to be cleaned behind the service panel at the back of the machine Using a brush clean the heat exchangers in the area marked with arrows Take care not to bend or damage the louvres Screw the supplied cleaning nozzle onto a water hose with a screw connection Rinse out the heat exchangers thoroughly for several minutes using a hose 4 bar Wa ter may only enter the machine in th...

Страница 30: ...quate ventilation of the installation site If necessary connect the tumble dryer to external duct ing with a fresh air supply The heat pump dryer is designed for a room temperature of up to 40 C Trouble free operation above this temperature is sometimes possible If the temperatures are constantly above 45 C an external cool air supply must be provided You can reduce the wear and tear sustained by ...

Страница 31: ...Problem solving guide 31 Additional technical data for the machine is given on the data plate affixed to the rear wall of the machine ...

Страница 32: ...elephone calls may be monitored and recorded for training purposes and that a call out charge will be applied to service visits where the problem could have been resolved as described in this booklet Please quote the model and serial number of your appliance when contacting Miele This information can be found on the data plate Optional accessories Optional accessories for this tumble dryer are ava...

Страница 33: ... exchanger This can also result in unexpected condens ate formation Depending on the nature of the installation site sound emissions and vibrations may occur Tip Have the installation site inspected and seek the advice of a pro fessional in instances where increased noise may cause a nuisance Transport The tumble dryer and heat pump must be separated from one an other before being transported The ...

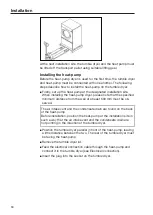
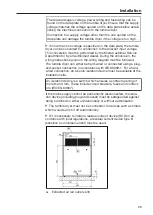
Страница 34: ...specified minimum distance from the wall of at least 500 mm must be ob served The air intake vent and the condensate drain are found on the back of the heat pump Before installation position the heat pump at the installation site in such a way that the air intake vent and the condensate drain are not pointing in the direction of the tumble dryer Position the tumble dryer parallel in front of the h...

Страница 35: ... hori zontally and parallel to one another Tilt the heat pump backwards slightly and move the tumble dryer towards the heat pump until the lower clamping lug on the heat pump is above the lower bevelled edge on the tumble dryer Now carefully tilt the heat pump forwards again so that the clamp ing lug hooks in behind the bevelled edge on the tumble dryer ...

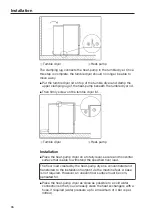
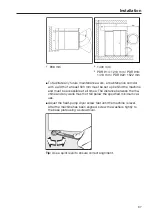
Страница 36: ... Tumble dryer b Heat pump Installation Place the heat pump dryer on a totally level secure and horizontal surface that is able to withstand the specified floor load The floor load created by the heat pump dryer is concentrated and transferred to the installation footprint via the machine feet A base is not required However an uneven floor surface must be com pensated for Place the heat pump dryer ...

Страница 37: ...500 mm must be set up behind the machine and must be accessible at all times The distance between the ma chine and any walls must not fall below the specified minimum val ues Adjust the heat pump dryer screw feet until the machine is level After the machine has been aligned screw the washers tightly to the base plate using a screwdriver Tip Use a spirit level to ensure correct alignment ...

Страница 38: ...llation downtime of at least one hour is required before connecting the tumble dryer to the electricity supply Insufficient downtime before commissioning can damage the heat pump Electrical connection The electrical connection must be established by a qualified electri cian The electrical connection may only be made to an electrical system provided in accordance with all appropriate local and nati...

Страница 39: ...iring diagram must be followed The tumble dryer can either be hard wired or connected using a plug and socket connection in accordance with IEC 60309 1 For a hard wired connection an all pole isolation device must be available at the installation site An isolation device is a switch which ensures a contact opening of more than 3 mm These include circuit breakers fuses and contact ors IEC EN 60947 ...

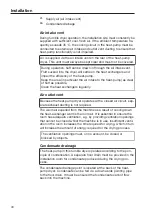
Страница 40: ...ly Air outlet vent Because the heat pump dryer operates with a closed air circuit sep arate exhaust ducting is not required The warm air expelled from the machine as a result of cooling down the heat exchanger warms the room air It is essential to ensure the room has adequate ventilation e g by providing ventilation openings that cannot be closed whilst the machine is in use Insufficient ventil at...

Страница 41: ...nd injury due to using the tumble dryer without the complete casing If the casing is dismantled it is possible to come into contact with live or rotating machine parts Once the tumble dryer has been installed replace all the casing parts that were removed ...

Страница 42: ...provided via the communication module com plies with SELV safety extra low voltage requirements in accordance with EN 60950 Connected external machines must also comply with SELV Data protection and data security When you activate the networking function and connect your appliance to the Internet your appliance sends the following data to the Miele Cloud Appliance serial number Appliance model and...

Страница 43: ...censing terms valid at the time and any further information can be accessed locally by IP using a web browser https IP address Licenses The liability and warranty arrangements for the open source licences displayed at this location only apply in relation to the respective rights holders Payment system The tumble dryer has the option of being controlled by a payment system e g for opera tion in sel...

Страница 44: ...lace Closing the settings menu Touch the sensor The display will then go back to the previous menu level Touch the sensor The display will change to the main menu Controls Display Language The display can be set to appear in one of several different languages To select the lan guage you want go to the Languages sub menu You can change the language as follows Permanently using the supervisor level ...

Страница 45: ...nguages are available If you wish to add a new language to the language menu Six languages can be selected All languages are available If you wish to add a new language to the language menu First select the language you want to replace All available languages are displayed Select and confirm the language to replace the previous language The new language appears instead of the old one Display brigh...

Страница 46: ...icated as a percentage Factory default Without value With value Visibility parameters Various parameters are offered displayed when a programme is selected You can decide which parameters should not be displayed These parameters can then not be edited dur ing programme selection Residual moisture Duration Low temperature Anti crease Load size Drying temperature Display off status The display switc...

Страница 47: ...off status In order to save energy the tumble dryer will switch off automatically after the end of the programme or if no further selection is made You can change this setting Changing this setting leads to increased energy consumption No switch off Factory default Switch off after 15 minutes Switch off after 20 minutes Switch off after 30 minutes Delay start The delay start timer can be activated...

Страница 48: ...nd changes to the tumble dryer before ad justing any of the options below Caution When activating any of these options the Supervisor level will no longer be available You will no longer be able to access the Supervisor level via the display Please follow the instructions below if you wish to change any other settings Opening the Supervisor level launderette version Switch the tumble dryer on and ...

Страница 49: ...s This allows you to specify the scope of the tumble dryer programme You can select all of the programmes or individual programmes from the relevant programme packages The tumble dryer s additional scope of programmes can be configured The programmes are listed under Programme chart Favourite programmes After switching on you can also select a programme via Favourites 12 programmes can be stored a...

Страница 50: ...e programmed at the factory You can change these spe cial programmes The special programmes are added to the programme packages Enter the name and set tings of your special programme into the Special programmes table in the Programme overview chapter Res moisture programme Final residual moisture 6 dry 40 damp Extra drying time 0 60 minutes Temperature Process air cold 75 C Cooling down temperatur...

Страница 51: ...ramme menu single option list You can also move and change the order of the favourites that you edit in the Supervisor level under Favourite programmes Touch the programme that you wish to move Press and hold the sensor until the frame changes Drag the programme to the required place Prog colour allocation You can assign a specific colour to a favourite programme In the list of favourites each fav...

Страница 52: ...rogramme The auto matic cooling phase can be set at a cooler level for all programmes This means that the cooling phase is extended Changing this setting leads to increased energy consumption The setting can be changed from 40 C 55 C Factory default 55 C Fan pulsed operation The fan operates intermittently to release laundry that is stuck in front of the inner drum door With heat pump dryers the f...

Страница 53: ...terval of 5 55 hours Factory default after 55 hours Off Service interval The tumble dryer shows a custom message at a selected interval to prompt you to under take specific maintenance tasks Three different messages can be created 1 2 3 Each message is created in the language and alphabet of the current supervisor language Your message is displayed at the end of the programme and can be acknowledg...

Страница 54: ...ector Box When using a shared exhaust air duct one tumble dryer may have to be switched off or suppressed from the outset if certain pressure levels have built up in the ducting The ex ternal pressure sensor is only checked if the external exhaust air flap and or the external additional fan is set to on A message appears in the display while the exhaust air flap is open Off Not active NO contact A...

Страница 55: ...rent services are not available in all countries For information about availability please visit www miele com WiFi LAN Control the networking of your tumble dryer Networking of the tumble dryer for use with the digital Professional tools is only possible with the external module The internal module can only be used by the Miele Customer Service Department Deactivate visible when the network is ac...

Страница 56: ...oteUpdate function is used for updating the software in your tumble dryer RemoteUpdate is activated by default If you do not install a RemoteUpdate you can continue to use your tumble dryer in the usual way However Miele recommends installing RemoteUpdates Miele s RemoteUpdate function can only be used if the tumble dryer is connected to a WiFi LAN network and you have an account in the Miele Prof...

Страница 57: ... valid at the time and any further information This information can be found under the menu option Settings Machine parameters Legal information Open source licences The liability and war ranty arrangements for the open source licences displayed in this location only apply in re lation to the respective rights holders Payment system The Miele Connector Box accessory unit or the COM module is requi...

Страница 58: ...ate See data plate See data plate Max floor load in operation 1740 N 1928 N 2092 N Product safety standard IEC 335 1 IEC 335 2 11 IEC 335 2 40 Sound pressure level EN ISO 11204 70 dB A 70 dB A 70 dB A Sound power level EN ISO 9614 2 80 dB A 80 dB A 80 dB A Frequency range 2 4000 2 4835 GHz Maximum transmission power 100 mW EU declaration of conformity Miele hereby declares that this PT 015 tumble ...

Страница 59: ......

Страница 60: ...OX14 1TW Professional Sales Tel 0845 365 6608 E mail professional miele co uk Internet www miele co uk professional Miele Australia Pty Ltd ACN 005 635 398 ABN 96 005 635 398 Level 4 141 Camberwell Road Hawthorn East VIC 3123 Tel 1300 731 411 Internet www miele com au professional E mail sales miele professional com au Australia Miele Electrical Appliances Co Ltd 1 3 Floor No 82 Shi Men Yi Road Ji...

Отзывы: