Midland BTX1 Скачать руководство пользователя страница 3

3


 - Midland BTX1 

midlandusa.com

Normally, after the first time, it takes 6 hours for a full charge.

Attention: 

every time the mini USB recharging plug is inserted (or detached), the 

device is automatically turned off. To use it while it is in charge, you should turn the 
device on with the plug already inserted.

Unit and mounting system description

BTX1 description

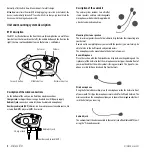
The BTX1 has five buttons on the front; the main three big button are multi func-
tions buttons: the Forward (on the left), the middle button and the Rear (on the 
right), the two small rounded buttons are the  and Volume -.

Description of the wired connections 

On the bottom of the unit you can find three wired connections:

Charger jack:

 recharges the unit using a standard mini USB power supply

Audio kit jack:

 connects an audio kit (stereo headset and microphone)

Auxiliary audio jack (AUX) 2�5mm:

 can be used to connect an audio source, like 

a stereo iPod/MP3 player or GMRS transceiver

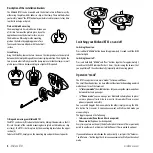
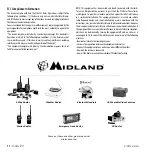
Description of the audio kit

The audio system includes two ultra-flat 
stereo speakers and two interchangeable 
microphones, which are both supplied with 
a bracket and wired connection.

Mounting the stereo speakers

The two stereo speakers have a Velcro/adhesive strip that aids their mounting into 
your helmet.
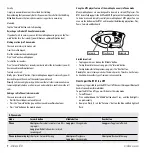
Beware not to  completely cover your ear with the speakers, you must always be 
able to listen to the traffic sound and your indicators.
The microphone can be mounted onto the helmet in two ways:

Boom Microphone

Place the section with the Velcro/adhesive strip between the padding and the 
rigid cover of the helmet so that the microphone is correctly positioned in front of 
your mouth and that the white symbol is facing your mouth. This type of micro-
phone is suited for Open Faced and Flip Front helmets.

Wired microphone

Using the Velcro/adhesive strip, place the microphone inside the helmet in front 
of your mouth. This type of microphone is more suited for Full Faced helmets. The 
mini connector on the microphone allows you to choose the microphone that best 
suits the helmet you are using.

Audio kit jack

The audio kit must then be connected to the central jack of the Midland BTX1 unit 
using the “L” shaped connector. 

Middle button

Volume -

Forward button

Backward button

Charger jack

Audio kit jack

Auxiliary audio jack (AUX)

Содержание BTX1

Страница 1: ... Midland BTX1 on and off 4 Operative mode 4 How to pair two BTX1 units 5 Talk 2 All Pairing to a different brand intercom 6 Pairing the BTX1 to Bluetooth devices 6 How to use the wired audio input 8 Using a GMRS transceiver with the cable connection 8 Setup and special configurations 9 Setup and Firmware update 10 Use at your own risk 10 Warranty 10 FCC Compliance Information 11 ...

Страница 2: ...p to mount the unit onto the helmet 2 clamps to mount the unit onto the helmet 1 mini USB wall mounting power supply with double plug The units included in the TWIN kit are already paired and can therefore be immedi atelyusedinIntercommode Technical specifications of Midland BTX1 General Bluetooth ver 3 0 stereo Headset Handsfree A2DP protocol AGCsystemautomaticallycontrolsthevolumeinrelationtobac...

Страница 3: ...speakers and two interchangeable microphones which are both supplied with a bracket and wired connection Mounting the stereo speakers ThetwostereospeakershaveaVelcro adhesivestripthataidstheirmountinginto your helmet Beware not to completely cover your ear with the speakers you must always be able to listen to the traffic sound and your indicators The microphone can be mounted onto the helmet in t...

Страница 4: ...s the mounting clip and push the unit upwards Switching your Midland BTX1 on and off Switching the unit on Press and hold Middle button down for approximately 3 seconds until the BLUE indicator lights Switching the unit off Press and hold both Middle and Rear buttons together for approximately 3 seconds until the RED indicator flashes 3 times thus lessening the chances that you might turn off the ...

Страница 5: ...e the VOX feature simply by pressing the Backward button for 7 sec Two audible beeps will advise you when the VOX is disabled To turn the VOX on again just press the same button one beep sound will advise you that theVOX is now active or just turn the unit off and on again Adjusting the volume Your Midland BTX1 uses AGC technology which automatically adjusts the listen ing volume in relation to ba...

Страница 6: ...phone mode is active Attention If you need to connect both Phone and GPS you must pair the Phone totheGPSitself Bluetooth connection always in Background This feature lets you keep the Bluetooth connection via the Volume button present in the background when the Intercom is open this allows GPS navigator announcements to be heard while the intercom is open Enabling Disabling the Background feature...

Страница 7: ...obile phone Using the MP3 player feature of the mobile phone only in Phone mode Many mobile phones are now designed to be used as stereo MP3 players The BTX1devicefullysupportstheA2DPandAVRCPprotocolsthatenableyoutolisten to stereo music and remotely control your mobile phone s MP3 player You can even use the buttons on the BTX1 unit to control the following play options Play Pause Forward and Bac...

Страница 8: ...er speed Make a note to remember this setting for future trips Enabling disabling the wired input If needed the wired input can be enabled or disabled Enabling Disabling MakeaLongpressonthe Rear button youwillhearoneau dio beep tone for enabling confirmation and two audio beep tone for disabling Using a GMRS transceiver with the cable connection In order to connect the transceiver to your Midland ...

Страница 9: ...only Adjusting the sensitivity of the microphone VOX To perform this operation you must first enter the setup mode 1 Turn off the unit 2 Press and hold down the Middle button about 7 sec until the Red light is on permanently 3 Your BTX1 is now in Set up mode 4 Press the Rear button until the red light indicator changes to a steady blue 5 Now press Volume or Volume to increase or reduce sensitivity...

Страница 10: ...removal or re installation of the product in a vehicle or other mounting ANY IMPLIEDWARRANTIES INCLUDING WITHOUT LIMITATIONTHE IMPLIEDWAR RANTIESOFMERCHANTABILITYANDFITNESSFORAPARTICULARPURPOSE SHALL BE LIMITED AS SET FORTH HEREIN AND TO THE DURATION OF THE LIMITED WAR RANTY OTHERWISE THE REPAIR OR REPLACEMENT AS PROVIDED UNDER THIS EX PRESS LIMITEDWARRANTY ISTHE EXCLUSIVE REMEDY OFTHE CONSUMER AN...

Страница 11: ...the limits for a Class B digital device pursuant to part 15 of the FCC Rules These limits are designed to provide reasonable protection against harmful interference in a residential installation This equipment generates uses and can radiate radio frequency energy and if not installed and used in accordance with the instructions maycauseharmfulinterferencetoradiocommunications However thereisnoguar...

Отзывы: