6
D: USING THE PRODUCT
Start-up
Purging the system and checking for leakage
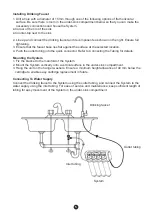
Turn on the drinking faucet and let water flow through the system for 5 minutes. Meanwhile, check
connections for water leakage, and correct leakage should any be found.
The system is ready for use upon completion of the purging action.
Dispensing Drinking Water
To dispense drinking water from the System, turn on the drinking faucet and let water flow through
the System.
Cartridge Replacement
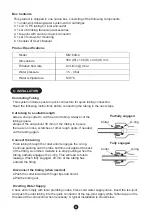
1. Lift up and twist the cartridge clockwise to release it from the manifold. Discard the expended
cartridge.
2. Install a new cartridge by twisting it anti-clockwise and pushing it up against the manifold at the
same time.
3. Perform purging as described in Start-up before resuming usage.
E: MAINTAINING THE PRODUCT
1. To ensure good drinking water quality, it is strongly recommended that cartridge replacement is
performed promptly when the cartridge has reached its full capacity, whichever takes place
earlier.
2. Perform purging as described in Start-up after prolonged period of non-usage, such as 3 days.
3. If the system will not be used for more than 7 days, it is highly recommended to remove and
store the cartridge in a refrigerator (non-freezer compartment). To resume usage, install the
cartridge back into the System (see Cartridge Replacement) and perform purging (see Start-up).
F: TROUBLESHOOTING
Issue
Slow dispensing of drinking
water
Chlorine taste/odour in the
drinking water
Other taste/odour in the
drinking water
Possible cause
Corrective action
Feed water pressure not
within specifications
Cartridge fully expended
Cartridge clogged with
sediments or fouled
prematurely
Cartridge fully expended
Cartridge clogged with
sediments or fouled
prematurely
Use new cartridge
Use new cartridge
Use new cartridge
Use new cartridge
Increase water pressure


