Hello Again
Quick Start Guide
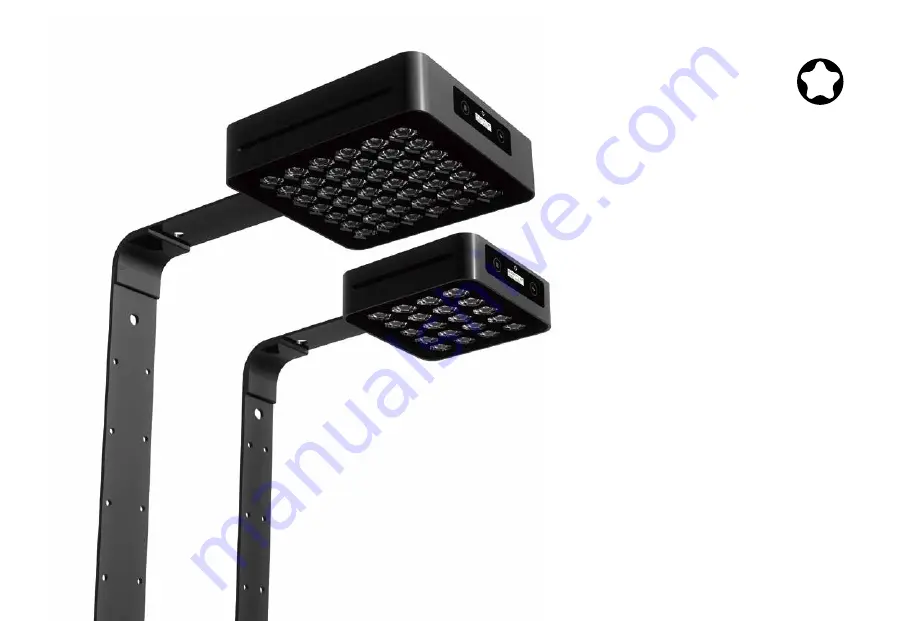
Welcome to your Aqua mini & Aqua Pro
Страница 1: ...HelloAgain Quick Start Guide Welcome to your Aqua mini Aqua Pro ...
Страница 2: ...t A 1 Super bracket Part B 1 Super bracket Part C 1 Super bracket Part D 2 0 Hex key 1 3 0 Hex key 1 AC power cord 1 Plastic Stainless steel Stainless steel Bracket screws 2 Bracket screws 4 1 Aqua mini 1 Super bracket Part A 1 Super bracket Part B 1 Super bracket Part C 1 Super bracket Part D Bracket screws 2 ...
Страница 3: ...gh Intensity 3W Bridgelux Epistar LEDs 1 0kg 2 2pound 2 0kg 4 4pound 140X140X46mm 5 5 x5 5 x1 8 310x180x70mm 12 x7 0 x2 8 AC80 240V 2 0A Suit For Min 240mm Max 600mm UL CE Rosh PSE SAA etc G3 AP 120W 42pcs High Intensity 3W Bridgelux Epistar LEDs 2 0kg 4 4pound 3 5kg 7 7pound 200X200X50mm 7 8 x7 8 x1 9 430x230x70mm 17 x9 0 x2 8 AC80 240V 2 0A Suit For Min 400mm Max 900mm UL CE Rosh PSE SAA etc ...
Страница 4: ...Congratulations on purchasing your Aqua mini Aqua Pro Read this guide to get started to installing your lighting Getting Started Super Bracket Hanging Kits 13 47PM M L 36 C W 100 B 100 1 2 1 2 3 4 3 4 ...
Страница 5: ...nging Kits optional Up and Down Scalable Range Lowest Height Hanging Kits optional 13 47PM M L 36 C W 100 B 100 13 47PM M L 36 C W 100 B 100 13 47PM M L 36 C W 100 B 100 13 47PM M L 36 C W 100 B 100 13 47PM M L 36 C W 100 B 100 13 47PM M L 36 C W 100 B 100 13 47PM M L 36 C W 100 B 100 Min 7 18cm Max 11 5 29 5cm Aqua mini Side Scalable Range Min 9 8 25cm Max 14 5 37cm Aqua Pro Side Scalable Range ...
Страница 6: ...nel A White 7pcs Cool White 12000 16000K Channel B Blue 1pc Deep Blue 470 475nm Channel C Special 1pc Violet 410 415nm Channel C Special 1pc UV 380 395nm Channel C Special 1pc Warm White 3000 3500K Channel C Special 1pc Deep Red 660 665nm Channel C Special 1pc Green 510 520nm Channel C Special 180 120 80 60 30 Aqua mini 24x24 inch area 280 220 160 100 50 500 400 300 600 700 800 18inch height Aqua ...
Страница 7: ...hannel A White 14pcs Cool White 12000 16000K Channel B Blue 4pcs Blue 470 475nm Channel C Special 2pcs Violet 410 415nm Channel C Special 2pcs UV 380 395nm Channel C Special 2pcs Warm White 3000 3500K Channel C Special 2pcs Deep Red 660 665nm Channel C Special 2pcs Green 510 520nm Channel C Special 180 120 80 60 30 Aqua Pro 36x36 inch area 280 220 160 100 50 24inch height 500 400 300 600 700 800 2...
Страница 8: ...wse menu Special Function 1 Hold on 3 second to return to the previous menu Special Function 2 Hold on 3 second under the screen locked to quickly switch the Auto mode and Manual mode Select Adjust Enter the sub menu to adjust the parameters Special Function 1 Hold on 3 second to unlock system Special Function 2 Hold on 3 second to lock system ...
Страница 9: ...enu 3 Press Home Menu to toggle through options 4 Press Select Lock to select 1 Set Clock menu 5 Press Select Lock to adjust Time 6 Press Home Menu to toggle through options 7 Press Home Menu to return to main menu Systems Loading iMOS 3 0M Boot screen 05 30PM A L 33 C W 060 B 060 05 30PM A LT 33 C S 030 Home screen 1 Home screen 2 Auto Mode 05 30PM M L 33 C W 100 B 100 05 30PM M LT 33 C S 100 Hom...
Страница 10: ...3 Press Home Menu to toggle through options 4 Press Select Lock to select 2 Auto Mode menu 5 Press Select Lock to select Set White menu 6 Press Select Lock to adjust DawnTime 7 Press Home Menu to toggle through options 8 Press Home Menu to select Intensity 9 Press Select Lock to adjust Intensity 10 Press Home Menu to toggle through options 11 Press Home Menu to move to next setpoint 12 Repeat Step...
Страница 11: ... unlock controller 2 Press Home Menu to enter main menu 3 Press Home Menu to toggle through options 4 Press Select Lock to select 5 Set Lightning menu 5 Press Home Menu to set Start End Hour 6 Press Select Lock to adjust Start End Hour Press Home Menu to toggle through options 7 Press Home Menu to return to previous menu 8 Press Select Lock to adjust Enable Lightning Yes No 9 Press Home Menu to se...
Страница 12: ...DEMO 3 Press Select Lock button to select YES Note The DEMO will show all your settings in 1 minute The Control system will gradually ramp the intensity of LED between set points The graph below outlines how the LEDs will ramp up and down between settings 00am 05am 09am 12pm 24 Hours Lighting Cycle Overview 03pm 08pm 12am Sunrise Dawn Midday Sunset Dusk Night Night 5 Demo 6 Factory Reset 5 Demo 6 ...
Страница 13: ...el C 0 6 00AM 50 8 00 AM 75 3 00 PM 50 6 00 PM 0 8 00 PM Sunrise Dawn Midday Sunset Dusk Night 0 6 00AM White Channel A 80 8 00 AM 100 12 00 PM 100 3 00 PM 80 6 00 PM 0 8 00 PM Blue Channel B 1 6 00AM 80 7 00 AM 10 10 00 PM 100 3 00 PM 80 6 00 PM 1 8 00 PM 75 12 00 PM Special Channel C 0 6 00AM 50 8 00 AM 75 3 00 PM 50 6 00 PM 0 8 00 PM Sunrise Dawn Midday Sunset Dusk Night 0 6 00AM White Channel ...
Страница 14: ...ng down below the level of the electrical outlet That way if water happens to run down the cord from the tank it will drip off onto the floor rather than into the outlet Drip Loops should always be used to help prevent water from traveling along the cord and coming into contact with an electrical outlet Drip loops must always be below the level of the outlet If the plug or outlet does get wet DO N...
Страница 15: ...r personal injury personal loss or other damages associated with the use of our products In order to request warranty service please email us at support micmol com A purchase receipt is required for any warranty service Products requiring warranty service must be returned to MicMol or authorized MicMol retailer You are responsible for the cost of shipping a warranty claim to MicMol and any damages...
Страница 16: ... 2012 2018 MicMol Limited All rights reserved MicMol the MicMol logo Aqua mini Aqua Pro Aqua Air Aqua CC BloomBee are trademarks of MicMol registered MP003 1720 A Printed in China ...