


15
English
●
When the pilot lamp
fl
ickers (at 0.2-second
intervals), check for and take out any foreign
objects in the charger’s battery connector. If
there are no foreign objects, it is probable that
the battery or charger is malfunctioning. Take it
to your authorized Service Center.
PRIOR TO OPERATION
WARNING
To avoid serious accidents, ensure the switch is
in the OFF position, and pull out the battery.
1. Check the work area environment
Check the work area to make sure that it is clear of
debris and clutter.
Clear the area of unnecessary personnel. Ensure that
lighting and ventilation is adequate.
2. Power
switch
Ensure that the switch is in the OFF position.
3. Installing the sanding belt
CAUTION
Use only sanding belt size speci
fi
ed on the
product nameplate.
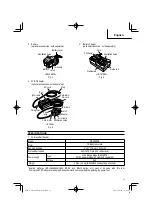
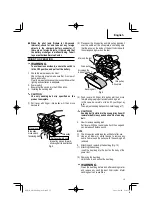
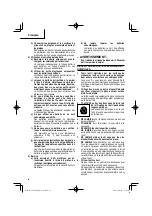
(1) Pull lever with
fi
nger, idle pulley will then move
backward.
Idle pulley
Close lever
Idle pulley
moves back,
tensioning belt.
Pull lever toward you
Idle pulley moves forward,
allowing belt to be attached.
Fig. 8
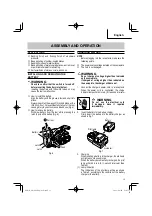
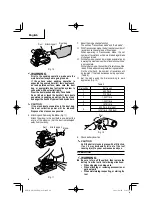
(2) Place over the drive pulley and idle pulley, passing it
over the outside of the shoe plate, and making sure
that the arrow on the inside of the belt coincides with
the corresponding mark on the tool.
Idle pulley
Sanding belt
Mark on the tool
Drive pulley
Arrows on the
inside of the belt
Shoe plate
Fig. 9
(3) Push lever with
fi
nger, idle pulley will then move
forward and give proper tension to sanding belt.
In this case, be careful not to be hit your
fi
nger by
lever.
Then, adjust sanding belt position. (refer to page 17)
CAUTION
Sanding belt installed in the wrong direction will
lower work e
ffi
ciency and shorten life of sanding
belt.
4. How to remove sanding belt
Pull lever with
fi
nger, sanding belt will then sag and
can be taken o
ff
pulleys easily.
NOTE
○
The drive pulley and idle pulley will be hot after use.
○
Use an air blower or similar device to remove any
debris from around the pulleys with the sanding belt
removed.
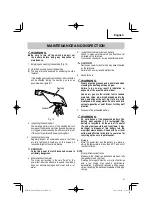
5. Attaching and removing the dust bag (Fig. 10)
(1) Attaching the dust bag
Insert the dust bag into the duct on the body of the
power tool.
(2) Removing the dust bag
Hold the duct, and pull out the dust bag.
WARNING
Clean the dust bag before and after sanding metal,
and remove any sanding dust from inside. Metal
sanding dust can cause
fi
res.
00Book̲SB3608DA̲metabo.indb 15
00Book̲SB3608DA̲metabo.indb 15
2022/08/02 23:45:56
2022/08/02 23:45:56