


15
English
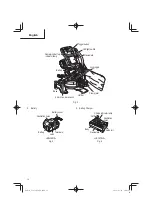
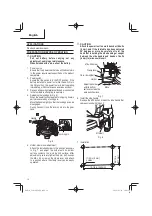
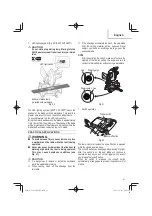
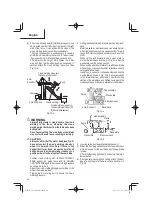
1 in.
(25 mm)
Thick bench
5/16 in. (8 mm) Bolt
Base
Work bench
5/16 in. (8 mm) Nut
Fig. 9
Attach the power tool to a level, horizontal work bench
in accordance with Fig. 9.
Select 5/16 in. (8 mm) diameter bolts suitable in length
for the thickness of the work bench.
Bolt length should be at least 1-3/8 in. (35 mm) plus
the thickness of the work bench.
For example, use 2-11/32 in. (60 mm) or larger bolts
for a 1 in. (25 mm) thick work bench.
The holder attached to the rear of the base helps
stabilize the power tool.
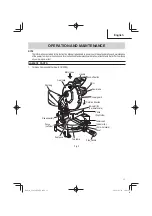
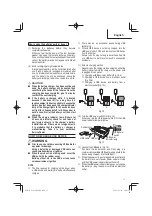
8. Installing the dust bag, holder, stopper and vises
(The holder and stopper are optional accessories.)
Attach the dust bag and vise assembly as indicated in
Fig. 2 and Fig. 3.
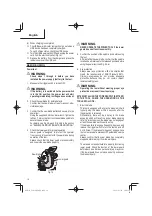
REMOVAL AND INSTRUCTION METHOD
OF BATTERY
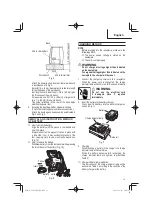
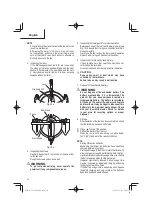
○
How to install the battery.
Align the battery with the groove in tool handle and
slip it into place.
Always insert it all the way until it locks in place with
a little click, If not, it may accidentally fall out of the
tool, causing injury to you or someone around you
(Fig. 10).
○
How to remove the battery.
Withdraw battery from the tool handle while pressing
the latch (2 pcs) of the battery (Fig. 10).
Insert
Push
Pull out
Latch
Battery
Fig. 10
CHARGING METHOD
NOTE
Before plugging into the receptacle, make sure the
following points.
○
The power source voltage is stated on the
nameplate.
○
The cord is not damaged.
WARNING
Do not charge at voltage higher than indicated
on the nameplate.
If charged at voltage higher than indicated on the
nameplate, the charger will burn out.
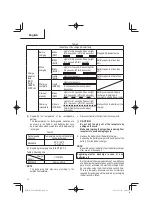
1. Connect the charger’s power cord to a receptacle.
When the power cord is connected, the charge
indicator lamp will blink in red. (At 1-second intervals)
WARNING
Do not use the electrical cord
if damaged. Have it repaired
immediately.
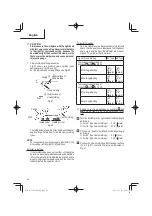
2. Insert the battery to the battery charger.
Firmly Insert the battery into the battery charger as
shown in Fig. 11.
Battery
Charge indicator lamp
Guide rail
Fig. 11
3. Charging
When inserting a battery in the charger, the charge
indicator lamp will blink in blue.
When the battery becomes fully recharged, the
charge indicator lamp will light up in green.(See
Table 2)
(1) Charge indicator lamp indication
The indications of the charge indicator lamp will be
as shown in Table 2, according to the condition of the
battery charger or the battery.
00Book̲C1810DFA̲NA.indb 15
00Book̲C1810DFA̲NA.indb 15
2022/02/22 14:08:13
2022/02/22 14:08:13
Содержание MultiVolt C1810DFA
Страница 113: ...113 00Book C1810DFA NA indb 113 00Book C1810DFA NA indb 113 2022 02 22 14 08 44 2022 02 22 14 08 44...
Страница 114: ...114 00Book C1810DFA NA indb 114 00Book C1810DFA NA indb 114 2022 02 22 14 08 44 2022 02 22 14 08 44...
Страница 115: ...115 00Book C1810DFA NA indb 115 00Book C1810DFA NA indb 115 2022 02 22 14 08 44 2022 02 22 14 08 44...