


Section 7 - Environment and Navigation Menu
Page 94
90-8M0070299
eng
MAY 2012
Using Environment and Navigation Screens
Environment and Navigation Screens
IMPORTANT: The available VesselView menu items and options are dependent on the engine type, and if screens have been
manually turned on or off.
The environment and navigation screens display environment information such as sea depth and sea temperature. When a
global positioning system (GPS) is installed, navigational information will provide current latitude and longitude. If the GPS
source is a chartplotter, a calculated fuel to waypoint will show a green indicator if you have enough fuel to reach your
waypoint.
Env Nav
Depth
Trip Log
Navigation
Fuel To Wpt
/
32710
IMPORTANT: The screens listed in the "Env/Nav" menu are determined by the vessel setup and other components connected
to the VesselView unit. For example, VesselView will not display fuel to waypoint data if the GPS source attached to
VesselView does not have chartplotter capabilities.
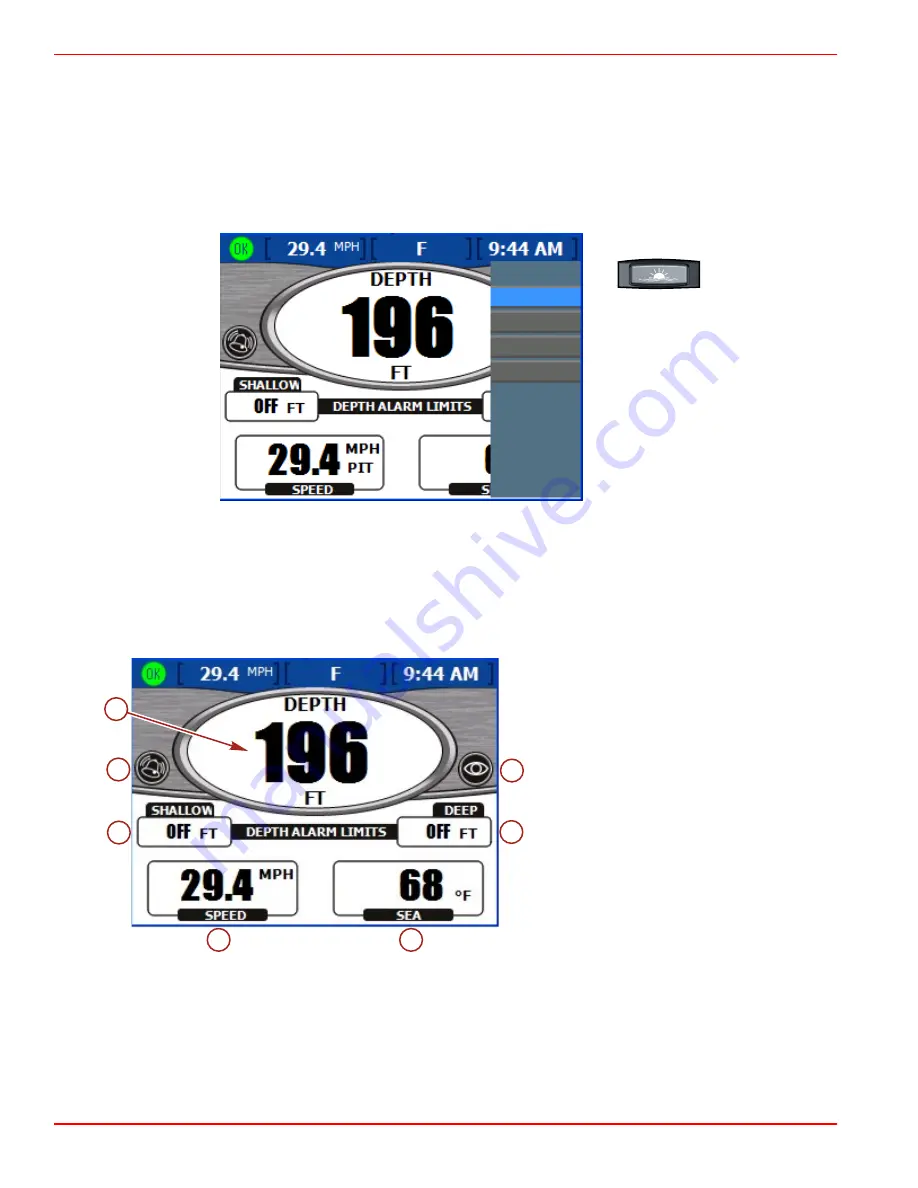
Viewing Depth and Water Temperature
The "DEPTH" screen displays the depth, speed, and sea temperature; and enables you to set both deep and shallow depth
alarms.
a -
Actual depth
b -
Horn alarm activated icon
c -
Shallow alarm limit
d -
Boat speed
e -
Sea temperature
f -
Deep alarm limit
g -
Visual alarm activated icon
NOTE: Shallow depth alarms sound audibly even if the "Warning Horn Off" option is selected in the "Warnings" screen of the
"Settings" menu.
•
Depth is displayed in feet by default. To change the units, refer to
Section 4
‑
Settings
.
•
The "DEPTH" screen displays an icon to indicate that audible or visual alarms are set.
•
"SHALLOW" and "DEEP" alarm settings are displayed based on what has been set in the depth alarms pop‑up window.
•
Speed is displayed using pitot, paddle, or GPS sensor information.
a
b
c
d
e
f
g
27277
Содержание VesselView Mobile
Страница 1: ...2012 Mercury Marine VesselView Version 4 0 0 60 8M0070299 90 8M0070299 512...
Страница 2: ......
Страница 10: ...Section 1 Getting Started Notes Page 6 90 8M0070299 eng MAY 2012...
Страница 56: ...Section 3 Screen Overview and Operation Notes Page 52 90 8M0070299 eng MAY 2012...
Страница 90: ...Section 5 Propulsion Menu Notes Page 86 90 8M0070299 eng MAY 2012...
Страница 96: ...Section 6 Vessel Menu Notes Page 92 90 8M0070299 eng MAY 2012...


