background image

FEATURES AND CONTROLS

41

Tiller Handle Features

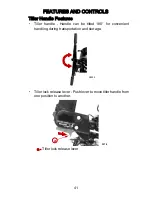
• Tiller  handle  ‑  Handle  can  be  tilted  180°  for  convenient

handling during transportation and storage.

28535

• Tiller lock release lever ‑ Push lever to move tiller handle from

one position to another.

a

3274

a -

Tiller lock release lever

Содержание 15 FourStroke

Страница 1: ...d corner the CE mark This outboard motor manufactured by Mercury Marine Fond du Lac Wisconsin USA or Marine Power Europe Inc Park Industriel de Petit Rechain Belgium complies with the requirements of the following directives by meeting the associated standards as amended Recreational Craft Directive 2003 44 EC amending 94 25 EC Owner s manual A 2 5 ISO 10240 Handling characteristics A 4 ISO 8665 O...

Страница 2: ...Generic immunity standard EN 61000 6 1 Vehicles boats and internal combustion engine driven devices radio disturbance characteristics SAE J551 CISPR 12 Electrostatic discharge testing EN 61000 6 2 EN 61000 4 2 EN 61000 4 3 This declaration is issued under the sole responsibility of Mercury Marine and Marine Power Europe Patrick C Mackey President Mercury Marine Fond du Lac WI USA on December 16 20...

Страница 3: ...ties 16 Before Operating Your Outboard 16 Boat Horsepower Capacity 17 High Speed and High Performance Boat Operation 17 Outboard Remote Control Models 17 Remote Steering Notice 18 Lanyard Stop Switch 19 Protecting People in the Water 21 Passenger Safety Message Pontoon Boats and Deck Boats 22 Wave and Wake Jumping 23 Impact with Underwater Hazards 24 Exhaust Emissions 26 Selecting Accessories for ...

Страница 4: ...er Tilt Features and Operation 52 Warning System Features and Operation 57 Trim Tab Adjustment 59 Operation Pre Starting Check List 60 Operating in Freezing Temperatures 60 Operating in Saltwater or Polluted Water 60 Operating Outboard as an Auxiliary Engine 61 Pre Starting Instructions 61 Engine Break in Procedure 62 Starting the Engine Tiller Handle Models 62 Starting the Engine Remote Control M...

Страница 5: ...osion Control Anode 82 Propeller Replacement 84 Fuse Replacement Electric Start Models 86 Spark Plug Inspection and Replacement 88 Timing Belt Inspection 89 Changing Engine Oil 89 Lubrication Points 92 Gearcase Lubrication 95 Checking Power Tilt Fluid 97 Submerged Outboard 98 Storage Storage Preparation 99 Protecting External Outboard Components 100 Protecting Internal Engine Components 100 Gearca...

Страница 6: ...ay from Home 105 Parts and Accessories Inquiries 105 Service Assistance 105 Mercury Marine Service Offices 106 Engine Installation Boat Horsepower Capacity 108 Start in Gear Protection 108 Selecting Accessories for Your Outboard 108 Lifting the Outboard 109 Installing Outboard 109 Steering Cable Installation 112 Steering Link Rod Fasteners 113 Remote Wiring Harness and Control Cable Installation 1...

Страница 7: ...Fax 920 929 5893 Upon processing the transfer of warranty Mercury Marine will send registration verification to the new owner of the product by mail There is no charge for this service For products purchased outside the United States and Canada contact the distributor in your country or the Marine Power Service Center closest to you Warranty Registration United States and Canada 1 You may change y...

Страница 8: ... Outside the United States and Canada 1 It is important that your selling dealer fills out the Warranty Registration Card completely and mails it to the distributor or Marine Power Service Center responsible for administering the warranty registration claim program for your area 2 The Warranty Registration Card identifies your name and address product model and serial numbers date of sale type of ...

Страница 9: ...is our desire to have ALL products registered at the factory should it ever be necessary to contact you Make sure your dealer distributor fills out the warranty registration card immediately and sends the factory copy to the Marine Power International Service Center for your area 5 For further information concerning the Warranty Registration Card and its relationship to Warranty Claim processing r...

Страница 10: ... commercial use customer Warranty coverage may be terminated for used or repossessed product or product purchased at auction from a slvage yard or from an insurance company CONDITIONS THAT MUST BE MET IN ORDER TO OBTAIN WARRANTY COVERAGE Warranty coverage is available only to retail customers that purchase from a Dealer authorized by Mercury Marine to distribute the product in the country in which...

Страница 11: ...wear and tear damage caused by abuse abnormal use use of a propeller or gear ratio that does not allow the engine to run in its recommended wide open throttle RPM range see the Operation and Maintenance Manual operation of the product in a manner inconsistent with the recommended operation duty cycle section of the Operation and Maintenance Manual neglect accident submersion improper installation ...

Страница 12: ...red by this warranty and those that are not see the Warranty Coverage section of the Operation and Maintenance Manual incorporated by reference into this warranty DISCLAIMERS AND LIMITATIONS THE IMPLIED WARRANTIES OF MERCHANTABILITY AND FITNESS FOR A PARTICULAR PURPOSE ARE EXPRESSLY DISCLAIMED TO THE EXTENT THAT THEY CANNOT BE DISCLAIMED THE IMPLIED WARRANTIES ARE LIMITED IN DURATION TO THE LIFE O...

Страница 13: ... product Unexpired warranty coverage cannot be transferred either to or from a commercial use customer CONDITIONS THAT MUST BE MET IN ORDER TO OBTAIN WARRANTY COVERAGE Warranty coverage is available only to retail customers that purchase from a Dealer authorized by Mercury Marine to distribute the product in the country in which the sale occurred and then only after the Mercury Marine specified pr...

Страница 14: ...wear and tear damage caused by abuse abnormal use use of a propeller or gear ratio that does not allow the engine to run in its recommended wide open throttle RPM range see the Operation and Maintenance Manual operation of the product in a manner inconsistent with the recommended operation duty cycle section of the Operation and Maintenance Manual neglect accident submersion improper installation ...

Страница 15: ...erage section of the Operation and Maintenance Manual incorporated by reference into this warranty DISCLAIMERS AND LIMITATIONS THE IMPLIED WARRANTIES OF MERCHANTABILITY AND FITNESS FOR A PARTICULAR PURPOSE ARE EXPRESSLY DISCLAIMED TO THE EXTENT THAT THEY CANNOT BE DISCLAIMED THE IMPLIED WARRANTIES ARE LIMITED IN DURATION TO THE LIFE OF THE EXPRESS WARRANTY INCIDENTAL AND CONSEQUENTIAL DAMAGES ARE ...

Страница 16: ...spection process is completed and documented Warranty coverage becomes available upon proper registration of the product by the authorized dealer Corrosion prevention devices specified in the Operation and Maintenance Manual must be in use on the boat and routine maintenance outlined in the Operation and Maintenance Manual must be timely performed including without limitation the replacement of sa...

Страница 17: ...haser shall not unless requested by Mercury ship the product or parts of the product directly to Mercury Proof of registered ownership must be presented to the dealer at the time warranty service is requested in order to obtain coverage WHAT IS NOT COVERED This limited warranty does not cover electrical system corrosion corrosion resulting from damage corrosion which causes purely cosmetic damage ...

Страница 18: ...ween the warranted product and the paint For MerCruiser product an unpainted gap of at least 38 mm 1 5 in should be left around the transom assembly Refer to the Operation and Maintenance Manual for additional details For additional information regarding events and circumstances covered by this warranty and those that are not see the Warranty Coverage section of the Operation and Maintenance Manua...

Страница 19: ... is authorized by us Should you have any questions concerning warranty coverage contact your authorized dealer They will be pleased to answer any questions that you may have GENERAL EXCLUSIONS FROM WARRANTY 1 Minor adjustments and tune ups including checking cleaning or adjusting spark plugs ignition components carburetor settings filters belts controls and checking lubrication made in connection ...

Страница 20: ...nance is customer s responsibility unless loss or contamination of same is caused by product failure that would be eligible for warranty consideration 10 Participating in or preparing for racing or other competitive activity or operating with a racing type lower unit 11 Engine noise does not necessarily indicate a serious engine problem If diagnosis indicates a serious internal engine condition wh...

Страница 21: ...r products caused by the installation or use of parts and accessories which are not manufactured or sold by us Failures which are not related to the use of those parts or accessories are covered under warranty if they otherwise meet the terms of the limited warranty for that product ...

Страница 22: ...board properly If you have any questions contact your dealer Safety and operating information that is practiced along with using good common sense can help prevent personal injury and product damage This manual as well as safety labels posted on the outboard use the following safety alerts to draw your attention to special safety instructions that should be followed DANGER Indicates a hazardous si...

Страница 23: ...UM PERSON CAPACITY POUNDS XXX MAXIMUM WEIGHT CAPACITY XXX 26777 High Speed and High Performance Boat Operation If your outboard is to be used on a high speed or high performance boat with which you are unfamiliar we recommend that you never operate it at its high speed capability without first requesting an initial orientation and familiarization demonstration ride with your dealer or an operator ...

Страница 24: ...se self locking nuts must never be replaced with common nuts non locking as they will work loose and vibrate off freeing the link rod to disengage WARNING Improper fasteners or improper installation procedures can result in loosening or disengagement of the steering link rod This can cause a sudden unexpected loss of boat control resulting in serious injury or death due to occupants being thrown w...

Страница 25: ... cm 4 5 feet in length when stretched out with an element on one end made to be inserted into the switch and a snap on the other end for attaching to the operator The lanyard is coiled to make its at rest condition as short as possible to minimize the likelihood of lanyard entanglement with nearby objects Its stretched out length is made to minimize the likelihood of accidental activation should t...

Страница 26: ...ling in one direction drinking alcohol or consuming drugs or daring high speed boat maneuvers While activation of the lanyard stop switch will stop the engine immediately a boat will continue to coast for some distance depending upon the velocity and degree of any turn at shut down However the boat will not complete a full circle While the boat is coasting it can cause injury to anyone in the boat...

Страница 27: ...E YOU ARE CRUISING It is very difficult for a person standing or floating in the water to take quick action to avoid a boat heading in his her direction even at slow speed 21604 Always slow down and exercise extreme caution any time you are boating in an area where there might be people in the water Whenever a boat is moving coasting and the outboard gear shift is in neutral position there is suff...

Страница 28: ...em over the front of the boat Falling over the front of the boat between the two pontoons will position them to be run over by the outboard BOATS HAVING AN OPEN FRONT DECK No one should ever be on the deck in front of the fence while the boat is in motion Keep all passengers behind the front fence or enclosure Persons on the front deck could easily be thrown overboard or persons dangling their fee...

Страница 29: ... 26783 Wave and Wake Jumping Operating recreational boats over waves and wake is a natural part of boating However when this activity is done with sufficient speed to force the boat hull partially or completely out of the water certain hazards arise particularly when the boat re enters the water 26784 The primary concern is the boat changing direction while in the midst of the jump In such case th...

Страница 30: ... steer sharply to one side Impact with Underwater Hazards Reduce speed and proceed with caution whenever you drive a boat in shallow water areas or in areas where you suspect underwater obstacles may exist which could be struck by the outboard or the boat bottom The most important thing you can do to help reduce injury or impact damage from striking a floating or underwater object is to control th...

Страница 31: ... suspected the outboard should be taken to an authorized dealer for a thorough inspection and necessary repair The boat should also be checked for any hull fractures transom fractures or water leaks Operating a damaged outboard could cause additional damage to other parts of the outboard or could affect control of the boat If continued running is necessary do so at greatly reduced speeds WARNING O...

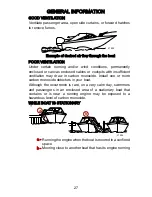
Страница 32: ...cles if the outboard is not attached to the transom correctly If an obstacle is struck at planing speed and the outboard is not securely fastened to the transom it is possible the outboard could lift off the transom and land in the boat Exhaust Emissions BE ALERT TO CARBON MONOXIDE POISONING Carbon monoxide is present in the exhaust fumes of all internal combustion engines This includes the outboa...

Страница 33: ...s with insufficient ventilation may draw in carbon monoxide Install one or more carbon monoxide detectors in your boat Although the occurrence is rare on a very calm day swimmers and passengers in an enclosed area of a stationary boat that contains or is near a running engine may be exposed to a hazardous level of carbon monoxide WHILE BOAT IS STATIONARY 21626 a b a Running the engine when the boa...

Страница 34: ...be safely used with your outboard or outboard operating system Acquire and read the installation operation and maintenance manuals for all your selected accessories Safe Boating Suggestions In order to safely enjoy the waterways familiarize yourself with local and other governmental boating regulations and restrictions and consider the following suggestions Use flotation devices Have an approved p...

Страница 35: ...ur ability to react quickly Prepare other boat operators Instruct at least one other person on board in the basics of starting and operating the outboard and boat handling in case the driver becomes disabled or falls overboard Passenger boarding Stop the engine whenever passengers are boarding unloading or are near the back stern of the boat Just shifting the outboard into neutral is not sufficien...

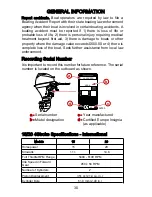
Страница 36: ... value exceeds 500 00 or 4 there is complete loss of the boat Seek further assistance from local law enforcement Recording Serial Number It is important to record this number for future reference The serial number is located on the outboard as shown XX XXXXXXXX XXXX b c a d 32300 a Serial number b Model designation c Year manufactured d Certified Europe Insignia as applicable 15 20 4Stroke Specifi...

Страница 37: ...mm 0 031 0 035 in Gear Ratio 2 15 1 Recommended Gasoline Refer to Fuel and Oil Recommended Oil Refer to Fuel and Oil Gearcase Lubricant Capacity 370 ml 12 5 fl oz Engine Oil Capacity 1 0 liter 1 1 quarts Battery Rating 465 marine cranking amps MCA or 350 cold cranking amps CCA Sound at Drivers Ear ICOMIA 39 94 68 5 ...

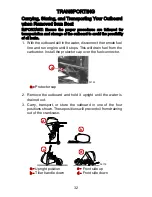
Страница 38: ...ct the remote fuel line and run engine until it stops This will drain fuel from the carburetor Install the protector cap over the fuel connector a 32122 a Protector cap 2 Remove the outboard and hold it upright until the water is drained out 3 Carry transport or store the outboard in one of the four positions shown These positions will prevent oil from draining out of the crankcase a b d c 32179 a...

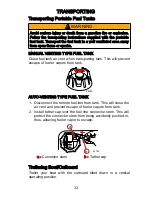
Страница 39: ...n transporting tank This will prevent escape of fuel or vapors from tank 26793 AUTO VENTING TYPE FUEL TANK 1 Disconnect the remote fuel line from tank This will close the air vent and prevent escape of fuel or vapors from tank 2 Install tether cap over the fuel line connector stem This will protect the connector stem from being accidently pushed in thus allowing fuel or vapor to escape F a b 26794...

Страница 40: ...tional clearance may be required for railroad crossings driveways and trailer bouncing 32176 IMPORTANT Do not rely on the power tilt system or the tilt support lever to maintain proper ground clearance for trailering The outboard tilt support lever is not intended to support the outboard for trailering Shift the outboard to forward gear This prevents the propeller from spinning freely ...

Страница 41: ...rand of leaded gasoline USING REFORMULATED OXYGENATED GASOLINES USA ONLY This type of gasoline is required in certain areas of the USA The 2 types of oxygenates used in these fuels are alcohol ethanol or ether MTBE or ETBE If ethanol is the oxygenate that is used in the gasoline in your area refer to Gasolines Containing Alcohol These reformulated gasolines are acceptable for use in your Mercury M...

Страница 42: ...n particularly after storage Any sign of leakage or deterioration requires replacement before further engine operation Because of possible adverse effects of alcohol in gasoline it is recommended that only alcohol free gasoline be used where possible If only fuel containing alcohol is available or if the presence of alcohol is unknown increased inspection frequency for leaks and abnormalities is r...

Страница 43: ...from heat sparks and open flames Remove portable fuel tanks from boat to refill them Always stop engine before refilling tanks Do not completely fill the fuel tanks Leave approximately 10 of the tank volume unfilled Fuel will expand in volume as its temperature rises and can leak under pressure if the tank is completely filled PORTABLE FUEL TANK PLACEMENT IN THE BOAT Place the fuel tank in the boa...

Страница 44: ... or exceed any one or combination of the following American Petroleum Institute API Service Classification SH SG SF CF 4 CE CD CDII Severe engine damage may result from use of an inferior oil 20 40 60 80 F C 0 100 7 4 16 27 18 38 a b 26795 Recommended SAE Viscosity for Engine Oil a SAE 25W 40 viscosity oil may be used at temperatures above 4 C 40 F b SAE 10W 30 viscosity oil is recommended for use...

Страница 45: ...l to the top of the operating range upper hole Oil level is correct as long as it appears in the operating range between the upper and lower hole b c a 31988 a Oil level operating range b Dipstick c Oil fill cap 5 If the oil level is below the operating range lower hole remove the oil fill cap and add approximately 200 ml 7 oz of specified outboard motor oil Allow a few minutes for the added oil t...

Страница 46: ...o the total volume of oil that appears on the dipstick reading This increase in oil volume is known as oil dilution Outboard engines can typically handle large amounts of oil dilution without causing durability problems However to ensure extended life of the outboard engine Mercury recommends that the oil and filter be changed regularly following the oil change interval and using the recommended o...

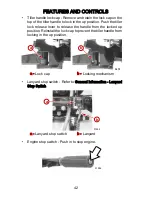
Страница 47: ...le Features Tiller handle Handle can be tilted 180 for convenient handling during transportation and storage 28535 Tiller lock release lever Push lever to move tiller handle from one position to another a 3274 a Tiller lock release lever ...

Страница 48: ...r lock release lever to release the handle from the locked up position Reinstall the lock cap to prevent the tiller handle from locking in the up position a b 3273 a Lock cap b Locking mechanism Lanyard stop switch Refer to General Information Lanyard Stop Switch a b 31955 a Lanyard stop switch b Lanyard Engine stop switch Push in to stop engine 31956 ...

Страница 49: ...aintain the throttle at desired speed Turn knob clockwise to tighten friction or turn knob counterclockwise to loosen friction a b 28542 a Loosen friction counterclockwise b Tighten friction clockwise Throttle only button Pressing the button in while the outboard is in neutral disables the gear shift control of the tiller handle 31957 ...

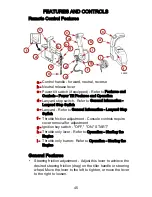
Страница 50: ...in when starting a cold engine Refer to Operation Starting the Engine Low oil pressure warning light Warns the operator the engine has low oil pressure When the low oil pressure light is on or is blinking the engine will run rough and will not exceed 3000 RPM Electric start button electric start models Press button to start engine b a c d 31961 a Choke fast idle b Fuel primer c Low oil pressure wa...

Страница 51: ...e Lanyard Refer to General Information Lanyard Stop Switch f Throttle friction adjustment Console controls require cover removal for adjustment g Ignition key switch OFF ON START h Throttle only lever Refer to Operation Starting the Engine i Throttle only button Refer to Operation Starting the Engine General Features Steering friction adjustment Adjust this lever to achieve the desired steering fr...

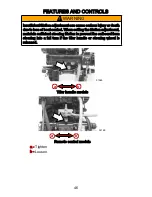
Страница 52: ...death due to loss of boat control When setting the friction adjustment maintain sufficient steering friction to prevent the outboard from steering into a full turn if the tiller handle or steering wheel is released a b 31965 Tiller handle models a b 32190 Remote control models a Tighten b Loosen ...

Страница 53: ...nector protector cap Cooling water intakes The outboard has two water intakes for cooling the engine the primary water intake and the secondary water intake a b 32141 a Secondary water intake b Primary water intake Water pump indicator hole Water spray from the hole indicates the water pump is pumping cooling water up to the engine 31982 ...

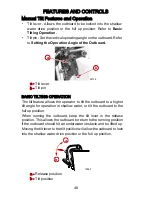
Страница 54: ...TILTING OPERATION The tilt feature allows the operator to tilt the outboard to a higher tilt angle for operation in shallow water or tilt the outboard to the full up position When running the outboard keep the tilt lever in the release position This allows the outboard to return to the running position if the outboard should hit an underwater obstacle and be lifted up Moving the tilt lever to the ...

Страница 55: ...e shallow water drive position on the outboard allows you to position the outboard at a higher tilt angle to prevent hitting bottom IMPORTANT Before tilting the outboard into the shallow water drive position reduce engine speed to idle and shift engine into forward gear IMPORTANT While in the shallow water drive position do not operate the outboard in reverse Operate the outboard at slow speed and...

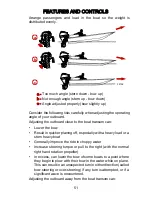
Страница 56: ...ard is adjusted by changing the position of the tilt pin in the six adjustment holes provided Proper adjustment allows the boat to run stable achieve optimum performance and minimize steering effort NOTE Refer to the following lists when adjusting the operating angle of your outboard The tilt pin should be adjusted so the outboard is positioned to run perpendicular to the water when the boat is ru...

Страница 57: ...can Lower the bow Result in quicker planing off especially with a heavy load or a stern heavy boat Generally improve the ride in choppy water Increase steering torque or pull to the right with the normal right hand rotation propeller In excess can lower the bow of some boats to a point where they begin to plow with their bow in the water while on plane This can result in an unexpected turn in eith...

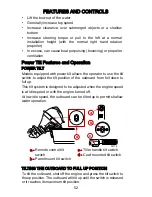
Страница 58: ...lt switch to adjust the tilt position of the outboard from full down to full up This tilt system is designed to be adjusted when the engine speed is at idle speed or with the engine turned off At low idle speed the outboard can be tilted up to permit shallow water operation DN UP UP DN UP DN DN UP a b c d DN UP 32174 a Remote control tilt switch b Panel mount tilt switch c Tiller handle tilt switc...

Страница 59: ...pport bracket Lower the outboard a 31919 a Tilt support lever PROKICKER CENTERING STRAPS FEATURE ProKicker centering straps if equipped will center the outboard and prevent the outboard from turning while the outboard is tilted up The ProKicker centering straps will prevent the outboard from turning when tilted up If using a steering tie bar to a second outboard disconnect the steering tie bar to ...

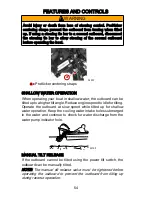
Страница 60: ... in shallow water the outboard can be tilted up to a higher tilt angle Reduce engine speed to idle for tilting Operate the outboard at slow speed while tilted up for shallow water operation Keep the cooling water intake holes submerged in the water and continue to check for water discharge from the water pump indicator hole 32193 MANUAL TILT RELEASE If the outboard cannot be tilted using the power...

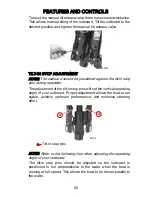
Страница 61: ... operation The adjustment of the tilt in stop pins will set the vertical operating angle of your outboard Proper adjustment allows the boat to run stable achieve optimum performance and minimize steering effort a a 32192 a Tilt in stop pins NOTE Refer to the following lists when adjusting the operating angle of your outboard The tilt in stop pins should be adjusted so the outboard is positioned to...

Страница 62: ...can Lower the bow Result in quicker planing off especially with a heavy load or a stern heavy boat Generally improve the ride in choppy water Increase steering torque or pull to the right with the normal right hand rotation propeller In excess can lower the bow of some boats to a point where they begin to plow with their bow in the water while on plane This can result in an unexpected turn in eith...

Страница 63: ...m Features and Operation LOW OIL PRESSURE WARNING SYSTEM TEST At engine start up the low oil pressure warning light will turn on for 10 seconds as a normal system test a 32189 a Low oil pressure warning light LOW OIL PRESSURE The low oil pressure warning light will turn on if the oil pressure drops too low First stop the engine and check the oil level Add oil if necessary If the oil is at the reco...

Страница 64: ...heating occur and you are stranded stop the engine and allow it to cool down This will usually allow some additional low speed idle running time before the engine starts to overheat again ENGINE OVER SPEED LIMITER If engine speed exceeds 6400 RPM the over speed limiter will be activated The engine timing will be momentarily retarded to prevent operation above this limit Some causes of engine over ...

Страница 65: ...imits to reduce any unequal steering effort Operate your boat at normal cruising speed with the outboard set at the desired operating angle position Turn your boat left and right and note the direction the boat turns more easily If adjustment is necessary loosen the trim tab bolt and make small adjustments at a time If the boat turns more easily to the left move the trailing edge of trim tab to th...

Страница 66: ...inspection checks listed in Maintenance Inspection and Maintenance Schedule Operating in Freezing Temperatures When using your outboard or having your outboard moored in freezing or near freezing temperatures keep the outboard tilted down at all times so the gearcase is submerged This prevents trapped water in gearcase from freezing and causing possible damage to the water pump and other component...

Страница 67: ...Do not spray on corrosion control anodes as this will reduce the effectiveness of the anodes Operating Outboard as an Auxiliary Engine If the outboard is used as an auxiliary engine stop the engine and tilt the outboard out of the water when using the main power source IMPORTANT The outboard must be restrained from bouncing while operating the boat using the main power source Bouncing can damage t...

Страница 68: ...For the first hour of operation run the engine at varied throttle settings up to 2000 RPM or at approximately half throttle 2 For the second hour of operation run the engine at varied throttle settings up to 3000 RPM or at three quarter throttle and at full throttle for approximately one minute every ten minutes 3 For the next eight hours of operation avoid continuous operation at full throttle fo...

Страница 69: ...ueeze the primer bulb after the engine has warmed up 27348 3 Set the lanyard stop switch to the RUN position Refer to General Information Lanyard Stop Switch 19791 4 Set the tiller handle gear shift to the neutral N position N R F 31971 5 Cold engine If the engine is cold press the fuel primer in twice and pull out the choke fast idle knob for starting Push in the choke fast idle knob after engine...

Страница 70: ... warm This will inject fuel into the engine and may cause a hard starting flooded condition IMPORTANT Outboards with battery charging capabilities must not be operated with the battery cables disconnected from the battery Damage to the charging system may result 6 Manual starting models Pull the starter rope slowly until you feel the starter engage then pull rapidly to crank the engine Allow rope ...

Страница 71: ...ly for longer than ten seconds at a time If the engine fails to start wait 30 seconds and try again 31979 8 Flooded engine If the engine will not start push in the throttle only button and advance the throttle grip to fast throttle speed Push in the choke knob and retry starting the engine After the engine has started immediately reduce throttle speed to idle 31957 ...

Страница 72: ...indicator hole stop the engine and check the cooling water intake for obstruction No obstruction may indicate a water pump failure or blockage in the cooling system These conditions will cause the engine to overheat Have the outboard checked by your dealer Operating the engine while overheated will cause serious engine damage WARMING UP ENGINE Before beginning operation allow the engine to warm up...

Страница 73: ... of the bulb is pointing up Squeeze the fuel line primer bulb several times until it feels firm IMPORTANT To prevent engine flooding do not squeeze the primer bulb after the engine has warmed up 27348 3 Set the lanyard stop switch to the RUN position Refer to General Information Lanyard Stop Switch 19791 4 Set the remote control handle to the neutral position ...

Страница 74: ...emperatures above 0 C 32 F Do not use the throttle only feature on the remote control for initial starting After starting the engine you can slowly advance the throttle only feature to increase idle speed until the engine is warmed up Keep engine speed below 2000 RPM 27242 6 Temperatures below 0 C 32 F Use the throttle only feature on the remote control to open the throttle slightly for initial st...

Страница 75: ...for starting 7 Turn the ignition key to the START position and start the engine If the engine is cold push in on the key to choke the engine while cranking If the engine fails to start in ten seconds wait 30 seconds and try again If the engine begins to stall re choke push the key in until the engine is running smoothly 19804 8 Check for the low oil pressure warning light to turn off The low oil p...

Страница 76: ...outboard checked by your dealer Operating the engine while overheated will cause serious engine damage WARMING UP ENGINE Before beginning operation allow the engine to warm up at idling speed for three minutes Gear Shifting IMPORTANT Never shift the outboard into gear unless engine speed is at idle Do not shift the outboard into reverse when the engine is not running Tiller handle models Your outb...

Страница 77: ...gine speed to return to idle N R F 31971 N R F 27237 Always shift the outboard into gear with a quick motion After shifting the outboard into gear advance the remote control lever or rotate the throttle grip tiller handle to increase speed Stopping the Engine 1 Remote control models Reduce engine speed and shift the outboard to the neutral position Turn the ignition key to the OFF position 26843 ...

Страница 78: ...ure WARNING The neutral speed protection device is inoperative when starting the engine with the emergency starter rope Set the engine speed at idle and the gear shift in neutral to prevent the outboard from starting in gear 1 Shift the outboard into neutral 2 Ensure the lanyard stop switch is in the run position 3 Remove and retain the hardware securing the rewind starter Remove the rewind starte...

Страница 79: ...ne WARNING The exposed moving flywheel can cause serious injury Keep your hands hair clothing tools and other objects away from engine when starting or running the engine Do not attempt to reinstall the rewind starter or top cowl when engine is running 5 Refer to the appropriate starting procedure cold or hot 6 Place the starter rope knot into the flywheel notch and wind the rope clockwise around ...

Страница 80: ... Genuine Lubricants EPA Emissions EMISSION CERTIFICATION LABEL An emission certification label showing emission levels and engine specifications directly related to emissions is placed on the engine at time of manufacture SPARK PLUG GAP EMISSION CONTROL INFORMATION THIS ENGINE CONFORMS TO EMISSION REGULATIONS FOR SPARK IGNITION MARINE ENGINES CALIFORNIA AND U S EPA REFER TO OWNERS MANUAL FOR REQUI...

Страница 81: ...ransom Check steering system for binding or loose components Remote control models Visually check steering link rod fasteners for proper tightness See Steering Link Rod Fasteners Check propeller blades for damage AFTER EACH USE Flush out the outboard cooling system if operating in salt or polluted water See Flushing the Cooling System Wash off all salt deposits and flush out the exhaust outlet of ...

Страница 82: ...Power Tilt Fluid Lubricate splines on the driveshaft 1 Remote control models Check control cable adjustments 1 Inspect timing belt See Timing Belt Inspection Check tightness of bolts nuts and other fasteners Check cowl seals to make sure seals are intact and not damaged Check internal cowl sound reduction foam if equipped to make sure foam is intact and not damaged Check that the intake silencer i...

Страница 83: ...open the thermostat and circulate water through the water passages WARNING Rotating propellers can cause serious injury or death Never operate the boat out of the water with a propeller installed Before installing or removing a propeller place the drive unit in neutral and engage the lanyard stop switch to prevent the engine from starting Place a block of wood between the propeller blade and the a...

Страница 84: ...3 Start the engine and run it at idle speed in neutral shift position IMPORTANT Do not run engine above idle when flushing 4 Adjust water flow if necessary so excess water continues leaking out from around the rubber cups to ensure the engine is receiving an adequate supply of cooling water 27260 5 Check for a steady stream of water flowing out of the water pump indicator hole Continue flushing th...

Страница 85: ...y IMPORTANT Read the safety and maintenance instructions which accompany your battery 1 Turn off the engine before servicing the battery 2 Add water as necessary to keep the battery full 3 Make sure the battery is secure against movement 4 Battery cable terminals should be clean tight and correctly installed Positive to positive and negative to negative 5 Make sure the battery is equipped with a n...

Страница 86: ...e battery Drain the fuel system completely Use an approved container to collect and store fuel Wipe up any spillage immediately Material used to contain spillage must be disposed of in an approved receptacle Any fuel system service must be performed in a well ventilated area Inspect any completed service work for sign of fuel leakage FUEL LINE INSPECTION Visually inspect the fuel line and primer b...

Страница 87: ...nuts non locking as they will work loose and vibrate off freeing the link rod to disengage WARNING Improper fasteners or improper installation procedures can result in loosening or disengagement of the steering link rod This can cause a sudden unexpected loss of boat control resulting in serious injury or death due to occupants being thrown within or out of the boat Always use required components ...

Страница 88: ... f Nylon insert locknut 11 16147 3 tighten until it seats then back off 1 4 turn Description Nm lb in lb ft Nylon insert locknut d 27 239 20 Nylon insert locknut f Tighten until it seats then back off 1 4 turn Corrosion Control Anode Your outboard has corrosion control anodes at three different locations An anode helps protect the outboard against galvanic corrosion by sacrificing its metal to be ...

Страница 89: ...as this will reduce effectiveness of the anode POWER TILT MODELS One anode is the trim tab and another anode is installed on the swivel bracket Two anodes are also located on the transom brackets MANUAL TILT MODELS One anode is the trim tab and another anode is installed on the swivel bracket One anode is also located on the transom brackets a b c 32036 Power tilt models a c b 32037 Manual tilt mo...

Страница 90: ...engage the lanyard stop switch to prevent the engine from starting Place a block of wood between the propeller blade and the anti ventilation plate 1 Remove the spark plug leads to prevent the engine from starting 26899 2 Shift the outboard into neutral N N 26838 N R F 31971 3 Straighten the cotter pin and pull it out using a pair of pliers 4 Place a block of wood between gearcase and propeller to...

Страница 91: ...ng and seizing to the propeller shaft especially in saltwater always apply a coat of the recommended lubricant to the entire propeller shaft at the recommended maintenance intervals and also each time the propeller is removed 6 Coat the propeller shaft with Quicksilver or Mercury Precision Lubricants Anti Corrosion Grease or 2 4 C with Teflon 31927 Tube Ref No Description Where Used Part No 94 Ant...

Страница 92: ... specified torque NOTE If the propeller nut doesn t align with the propeller shaft hole after tightening tighten the nut further to align with the hole 10 Align the propeller nut with the propeller shaft hole Insert a new cotter pin in the hole and bend the ends a c b d 31926 a Cotter pin b Propeller nut c Rear thrust washer d Front thrust hub Larger diameter end towards propeller Description Nm l...

Страница 93: ...rload If the cause is not found the fuse may blow again 20 20 20 20 32119 a b c b a Voltage regulator circuit 20 amp fuse b Spare fuse c Electric starting circuit 20 amp fuse Open the fuse holder and look at the silver colored band inside the fuse If band is broken replace the fuse Replace fuse with a new fuse with the same rating a b 28619 Identifying a blown fuse a Good fuse b Blown fuse ...

Страница 94: ...id damaging the spark plug boots do not use any sharp object or metal tool to remove the spark plug boots 1 Remove the spark plug boots Twist the rubber boots slightly and pull off 26899 2 Remove the spark plugs to inspect Replace the spark plug if electrode is worn or the insulator is rough cracked broken blistered or fouled 26946 3 Set the spark plug gap to specification 26947 Spark Plug Spark p...

Страница 95: ...or in the base of the belt teeth Excessive wear at the roots of the cogs Rubber portion swollen by oil Belt surfaces roughened Signs of wear on edges or outer surfaces of belt 31931 Changing Engine Oil ENGINE OIL CAPACITY Engine oil capacity is approximately 1 0 liter 1 1 U S quart OIL CHANGING PROCEDURE 1 Lock the outboard in the full tilt up position 2 Position the outboard so the drain hole is ...

Страница 96: ... remaining oil that was trapped in the engine to return to the drain Return outboard to the full tilt position and drain the remaining oil 5 Lubricate the seal on the drain plug with oil and reinstall Tighten to the specified torque 31922 4537 Description Nm lb in lb ft Drain plug 23 7 210 17 CHANGING OIL FILTER 1 Position the outboard in a level operating position ...

Страница 97: ...filter 3 Place a rag or towel below the oil filter to absorb any spilled oil 4 Unscrew the old filter by turning the filter to the left 5 Clean the mounting base Apply a film of clean oil to the filter gasket Do not use grease Screw the new filter on until the gasket contacts the base then tighten 3 4 to 1 turn 6 If the starter solenoid was removed reinstall the starter solenoid and rubber isolati...

Страница 98: ... quart of oil will bring the oil level to the midpoint of the oil level range Reinstall the oil fill cap c d a b 31997 a Oil level operating range b Midpoint c Dipstick d Oil fill cap 3 Idle engine for five minutes and check for leaks Stop the engine and check the oil level on the dipstick Add oil if necessary Lubrication Points 1 Lubricate the following with Quicksilver or Mercury Precision Lubri...

Страница 99: ...acket transom clamp screws tilt tube throttle shift cables steering cable grease fitting 92 802859A 1 Swivel bracket Lubricate through fitting 31934 Transom clamp screws Lubricate threads Tilt tube Lubricate through fittings b a 31936 a Tilt tube Lubrication fittings b Transom clamp screws ...

Страница 100: ...ting b Steering cable end WARNING Incorrect cable lubrication can cause hydraulic lock leading to serious injury or death from loss of boat control Completely retract the end of the steering cable before applying lubricant 2 Lubricate the following with lightweight oil Steering link rod pivot points Lubricate points 31938 3 Lubricate the following with Quicksilver or Mercury Precision Lubricants A...

Страница 101: ...d will drain out prior to the lubricant or it may be mixed with the lubricant giving it a milky colored appearance If water is noticed have the gearcase checked by your dealer Water in the lubricant may result in premature bearing failure or in freezing temperatures will turn to ice and damage the gearcase Remove the fill drain plug and examine the lubricant draining from the gearcase for metal pa...

Страница 102: ...um or High Performance Gear Lubricant CHECKING LUBRICANT LEVEL AND REFILLING GEARCASE 1 Place the outboard in a vertical operating position 2 Remove the vent plug from the vent hole 3 Place the lubricant tube into the fill hole and add lubricant until it appears at the vent hole IMPORTANT Replace the sealing washers with new sealing washers 4 Stop adding lubricant Install the vent plug and sealing...

Страница 103: ...d fill drain plug and new sealing washer c a b 31933 a Vent plug and new sealing washer b Vent hole c Fill drain plug and new sealing washer Checking Power Tilt Fluid 1 Tilt outboard to the full up position and engage the tilt support lever a 31919 a Tilt support lever ...

Страница 104: ... not available use automotive automatic transmission fluid ATF a 31920 a Fill cap Submerged Outboard A submerged outboard will require service within a few hours by an authorized dealer once the outboard is recovered from the water This immediate attention by a servicing dealer is necessary once the engine is exposed to the atmosphere to minimize internal corrosion damage to the engine ...

Страница 105: ...ine being used contains alcohol it is advisable to drain as much of the remaining gasoline as possible from the fuel tank remote fuel line and engine fuel system Fill the fuel tank and engine fuel system with treated stabilized fuel to help prevent formation of varnish and gum Proceed with the following instructions Portable fuel tank Pour the required amount of gasoline stabilizer follow instruct...

Страница 106: ...recision Lubricants Corrosion Guard on external metal surfaces except corrosion control anodes Tube Ref No Description Where Used Part No 120 Corrosion Guard External metal surfaces 92 802878 55 Protecting Internal Engine Components Remove the spark plugs and add approximately 30 ml 1 oz of engine oil or inject a five second spray of storage seal inside of each cylinder Rotate the flywheel manuall...

Страница 107: ...l down position To prevent problems which can be caused by oil entering the cylinders from the sump store the outboard in one of the four positions shown a b d c 32179 a Upright position b Tiller handle down c Front side up d Front side down Never carry store or transport the outboard in the position shown Engine damage could result from oil draining out of the crankcase 10378 Battery Storage Foll...

Страница 108: ...STORAGE 102 Remove the battery from the boat and check water level Recharge if necessary Store the battery in a cool dry place Periodically check the water level and recharge the battery during storage ...

Страница 109: ... POSSIBLE CAUSES Lanyard stop switch not in RUN position Battery not fully charged Incorrect starting procedure Refer to Operation section Old or contaminated fuel Fuel is not reaching the engine Fuel tank is empty Fuel tank vent not open or restricted Fuel line is disconnected or kinked Primer bulb not squeezed Primer bulb check valve is faulty Fuel filter is obstructed Refer to Maintenance secti...

Страница 110: ...mp failure Ignition system component failure Performance Loss POSSIBLE CAUSES Low oil pressure Check oil level Throttle not fully open Damaged or improper size propeller Incorrect engine timing adjustments or setup Boat overloaded or load improperly distributed Excessive water in bilge Boat bottom is dirty or damaged Battery Will Not Hold Charge POSSIBLE CAUSES Battery connections are loose or cor...

Страница 111: ...he dealer has the necessary information to order parts and accessories for you When inquiring on parts and accessories the dealer requires the model and serial number to order the correct parts Service Assistance Your satisfaction with your outboard product is very important to your dealer and to us If you ever have a problem question or concern about your outboard product contact your dealer or a...

Страница 112: ...ebsite www mercurymarine com Canada Telephone 905 567 6372 Mercury Marine Ltd 2395 Meadowpine Blvd Mississauga Ontario L5N 7W6 Canada Fax 905 567 8515 Australia Pacific Telephone 61 3 9791 5822 Mercury Marine Australia 132 140 Frankston Road Dandenong Victoria 3164 Australia Fax 61 3 9793 5880 Europe Middle East Africa Telephone 32 87 32 32 11 Marine Power Europe Inc Parc Industriel de Petit Recha...

Страница 113: ...pan Telephone 81 053 423 2500 Mercury Marine Japan Anshin cho 283 1 Hamamatsu Shizuoka ken Japan 435 0005 Japan Fax 81 053 423 2510 Asia Singapore Telephone 5466160 Mercury Marine Singapore 72 Loyang Way Singapore 508762 Fax 5467789 ...

Страница 114: ...oubt contact your dealer or the boat manufacturer U S COAST GUARD CAPACITY MAXIMUM HORSEPOWER XXX MAXIMUM PERSON CAPACITY POUNDS XXX MAXIMUM WEIGHT CAPACITY XXX 26777 Start in Gear Protection WARNING Starting the engine with the drive in gear can cause serious injury or death Never operate a boat that does not have a neutral safety protection device The remote control connected to the outboard mus...

Страница 115: ...allation operation and maintenance manuals for all your selected accessories Lifting the Outboard Use the lifting eye on the engine 32072 Installing Outboard WARNING Failure to correctly fasten the outboard could result in the outboard propelling off the boat transom resulting in property damage serious injury or death Before operation the outboard must be correctly installed with the required mou...

Страница 116: ...our boat The boat bottom should be aligned or be within 25 mm 1 in above the anti ventilation plate of the outboard a 27151 a Anti ventilation plate INSTALLING OUTBOARD ON TRANSOM 1 Place the outboard on the centerline of the transom 27005 2 Tighten the transom bracket clamp screws 28501 ...

Страница 117: ...bracket mounting holes Fasten with two bolts flat washers and locknuts Use a marine waterproofing sealer in the holes and around the bolts to make the installation water tight Tighten the bolts to the specified torque a b c d 32041 Power tilt models d a b c 28971 Manual tilt models a Bolt 2 b Washer 2 c Locknut 2 d Transom bracket clamp screw 2 Description Nm lb in lb ft Transom bracket mounting b...

Страница 118: ...re Used Part No 95 2 4 C Marine Lubricant with Teflon Steering cable end 92 802859A 1 2 Insert the steering cable into the tilt tube 32081 3 Tighten the steering cable nut to the specified torque 4 Thread the steering cable seal onto the end of the tilt tube a b 32082 a Steering cable nut b Steering cable seal Description Nm lb in lb ft Steering cable nut 47 5 35 ...

Страница 119: ...he link rod to disengage WARNING Improper fasteners or improper installation procedures can result in loosening or disengagement of the steering link rod This can cause a sudden unexpected loss of boat control resulting in serious injury or death due to occupants being thrown within or out of the boat Always use required components and follow instructions and torque procedures Assemble the steerin...

Страница 120: ...fications a b b c d e b f 31917 a Bolt 12 71970 b Flat washer c Spacer d Nylon insert locknut 11 16147 3 e Steering bracket f Nylon insert locknut 11 16147 3 tighten until it seats then back off 1 4 turn Description Nm lb in lb ft Nylon insert locknut d 27 239 20 Nylon insert locknut f Tighten until it seats then back off 1 4 turn ...

Страница 121: ...ontrol Cable Installation REMOTE WIRE HARNESS CONNECTION 1 Remove the two bolts and remove the access cover a 32048 a Access cover 2 Connect the remote harness to the engine harness connector 3 Route the remote wiring harness through the rubber grommet ...

Страница 122: ...hrough the rubber grommet 2 Open up the clamp in the bottom cowl and position the remote wiring harness below the clamp Connect the 8 pin connector to the engine harness Push the clamp down and secure the remote wiring harness into the bottom cowl SHIFT CABLE INSTALLATION Install the cables into the remote control following the instructions provided with the remote control NOTE The shift cable is ...

Страница 123: ...le from neutral into reverse and advance the handle to full speed position Slowly return the handle back to neutral Place a mark b on the cable next to the end guide c Make a center mark c midway between marks a and b Align the end guide with this center mark when installing cable to the engine 6098 b c a 2 Position the remote control handle into neutral 3 Manually move the shift lever on the engi...

Страница 124: ...tainer a b c d 32105 a Cotter pin retainer b Flat washer c Shift cable d Shift lever 5 Manually shift the outboard into neutral propeller will rotate freely 6 Adjust the cable barrel so the center mark on the cable is aligned with the end guide when the cable barrel is placed in the barrel receptacle ...

Страница 125: ...le guide b Shift the remote control into reverse while turning the propeller The propeller shaft should be locked in gear If not adjust the barrel away from the cable guide Repeat steps a through c c Shift the remote control back to neutral The propeller shaft should turn freely without drag If not adjust the barrel closer to the cable guide Repeat steps a through c THROTTLE CABLE INSTALLATION Ins...

Страница 126: ...hat the installed throttle cable will hold the lever on the carburetor against the full throttle stop 4 Position the throttle cable into the rubber grommet and place the cable barrel into the barrel receptacle c d e f g a b 32069 a Carburetor lever b Full throttle stop c Cotter pin retainer d Flat washer e Cable barrel f Rubber grommet g Throttle lever ...

Страница 127: ...ed against movement preferably in a battery box Make sure battery is equipped with a nonconductive shield to prevent accidental shorting of battery terminals NOTE Electric starting outboards must have the battery cables connected to a battery whenever the engine is running even if started manually as damage to the charging system could result Battery Connections CONNECTING OUTBOARD BATTERY CABLES ...

Страница 128: ...NGINE INSTALLATION 122 DISCONNECTING OUTBOARD BATTERY CABLES First disconnect the black battery cable from the negative terminal and then disconnect the red battery cable from the positive terminal 27158 ...

Отзывы: