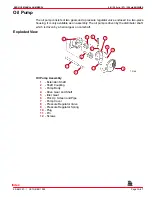


5.0l / 305 cid / 5.7l / 350 cid ENGINES
SERVICE MANUAL NUMBER 24
90-861327--1 OCTOBER 1999
Page 3A-61
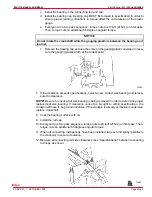
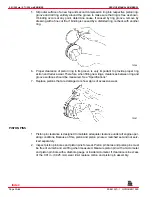
3. Install the bearing cap and evenly torque the retaining bolts to specifications. Bearing
cap MUST be torqued to specification to ensure proper reading. Variations in torque af-
fect the compression of the plastic gauge.
4. Remove bearing cap. The flattened gauging plastic will be found adhering to either the
bearing cap or journal.
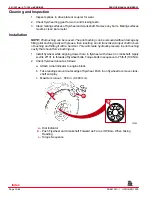
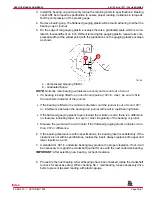
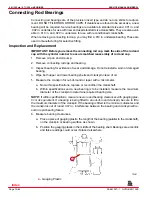
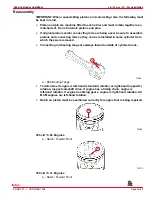
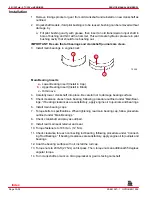
5. On the edge of the gauging plastic envelope there is a graduated scale which is corre-
lated in thousandths of an inch. Without removing the gauging plastic, measure its com-
pressed width (at the widest point) with the graduations on the gauging plastic envelope
as shown.
72358
a
b
a -
Compressed Gauging Plastic
b -
Graduated Scale
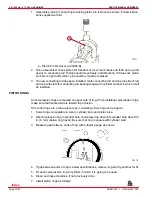
NOTE: Normally main bearing journals wear evenly and are not out of round.
•
if a bearing is being fitted to an out-of-round journal (.001 in. max.), be sure to fit to
the maximum diameter of the journal.
•
If the bearing is fitted to the minimum diameter, and the journal is out of round .001
in., interference between the bearing and journal will result in rapid bearing failure.
•
If the flattened gauging plastic tapers toward the middle or ends, there is a difference
in clearance indicating taper, low spot or other irregularity of the bearing or journal.
•
Measure the journal with a micrometer if the flattened gauging plastic indicates more
than .001 in. difference.
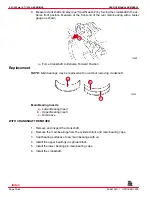
6. If the bearing clearance is within specifications, the bearing insert is satisfactory. If the
clearance is not within specifications, replace the insert. Always replace both upper and
lower inserts as a unit.
7. A standard or .001 in. undersize bearing may produce the proper clearance. If not, it will
be necessary to regrind the crankshaft journal for use with the next undersize bearing.
IMPORTANT: After selecting new bearing, recheck clearance.
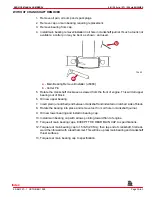
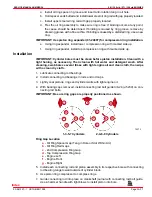
8. Proceed to the next bearing. After all bearings have been checked, rotate the crankshaft
to check for excessive drag. When checking No. 1 main bearing, loosen accessory drive
belts to prevent tapered reading with plastic gauge.
Index
Содержание 305 CID (5.0L)
Страница 116: ...TROUBLESHOOTING SERVICE MANUAL NUMBER 24 Page 1C 34 90 861327 1 OCTOBER 1999 THIS PAGE IS INTENTIONALLY BLANK Index ...
Страница 142: ...MCM MODELS SERVICE MANUAL NUMBER 24 Page 2A 26 90 861327 1 OCTOBER 1999 THIS PAGE IS INTENTIONALLY BLANK Index ...
Страница 166: ...MIE MODELS SERVICE MANUAL NUMBER 24 Page 2B 24 90 861327 1 OCTOBER 1999 THIS PAGE IS INTENTIONALLY BLANK Index ...
Страница 285: ...STARTING SYSTEM SERVICE MANUAL NUMBER 24 Page 4A 30 90 861327 1 OCTOBER 1999 THIS PAGE IS INTENTIONALLY BLANK Index ...
Страница 315: ...IGNITION SYSTEM SERVICE MANUAL NUMBER 24 Page 4B 30 90 861327 1 OCTOBER 1999 THIS PAGE IS INTENTIONALLY BLANK Index ...
Страница 344: ...CHARGING SYSTEM SERVICE MANUAL NUMBER 24 90 861327 1 OCTOBER 1999 Page 4C 29 THIS PAGE IS INTENTIONALLY BLANK Index ...
Страница 345: ...CHARGING SYSTEM SERVICE MANUAL NUMBER 24 Page 4C 30 90 861327 1 OCTOBER 1999 THIS PAGE IS INTENTIONALLY BLANK Index ...
Страница 364: ...INSTRUMENTATION SERVICE MANUAL NUMBER 24 90 861327 1 OCTOBER 1999 Page 4D 19 THIS PAGE IS INTENTIONALLY BLANK Index ...
Страница 365: ...INSTRUMENTATION SERVICE MANUAL NUMBER 24 Page 4D 20 90 861327 1 OCTOBER 1999 THIS PAGE IS INTENTIONALLY BLANK Index ...
Страница 383: ...MAINTENANCE SERVICE MANUAL NUMBER Page 4E 18 90 861327 1 OCTOBER 1999 THIS PAGE IS INTENTIONALLY BLANK Index ...
Страница 721: ...DIAGNOSTICS SERVICE MANUAL NUMBER 24 Page 5G 94 90 861327 1 OCTOBER 1999 THIS PAGE IS INTENTIONALLY BLANK Index ...
Страница 779: ...GENERAL SERVICE MANUAL NUMBER 24 Page 7A 6 90 861327 1 OCTOBER 1999 THIS PAGE IS INTENTIONALLY BLANK Index ...
Страница 803: ...COLLECTORS SERVICE MANUAL NUMBER 23 Page 7C 16 90 861327 1 OCTOBER 1999 THIS PAGE IS INTENTIONALLY BLANK Index ...
Страница 859: ...HURTH TRANSMISSIONS SERVICE MANUAL NUMBER 24 Page 8C 18 90 861327 1 OCTOBER 1999 THIS PAGE IS INTENTIONALLY BLANK Index ...


