background image

Section 5 - Maintenance

90-8M0053263     NOVEMBER  2010

Page  49

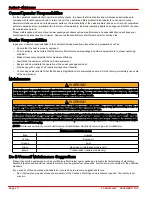
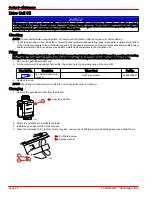
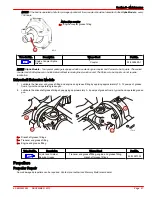
5. Remove the oil vent screw and sealing washer. Allow the oil to drain completely.

a -

Oil vent screw

b -

Sealing washer

IMPORTANT: If any water drained from the oil fill/drain hole, or if the oil appears milky, the sterndrive unit is leaking and

should be checked immediately by your authorized Mercury MerCruiser dealer.

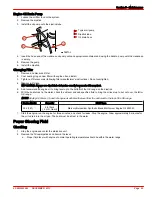
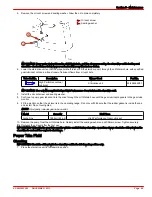
6. Lower the sterndrive unit so that the propeller shaft is level. Fill the sterndrive unit, through the oil fill/drain hole, with specified

gear lubricant until an air‑free stream of lubricant flows from oil vent hole.

Tube Ref No.

Description

Where Used

Part No.

87

High Performance Gear

Lubricant

Sterndrive unit

92-858064K01

IMPORTANT: Use only Mercury/Quicksilver High Performance Gear Lubricant in sterndrive unit.

7. Install the oil vent screw and sealing washer.
8. Continue to pump gear lubricant into the drive through the oil fill/drain hose until the gear lubricant appears in the gear lube

monitor.

9. Fill the monitor so that the oil level is in the operating range. Do not overfill. Ensure that the rubber gasket is inside the cap

and install. Do not overtighten.

NOTE: Oil capacity includes gear lube monitor.

Model

Capacity

Fluid Type

Alpha One

1892 ml (64 oz)

High Performance Gear Lubricant

10. Remove the pump from the oil fill/drain hole. Quickly install the sealing washer and oil fill/drain screw. Tighten securely.
11. Recheck the oil level after the first use.

IMPORTANT: Oil level in the gear lube monitor will rise and fall during sterndrive operation; always check the oil level when the

sterndrive is cool and the engine is shut down.

Power Trim Fluid

Checking

IMPORTANT: Check the oil level with the sterndrive unit in the full down/in position only.
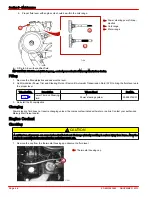
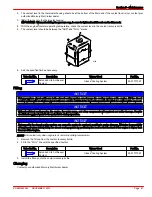
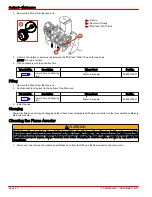
1. Place the sterndrive unit in full down/in position.

a

b

7161

Содержание 3.0L TKS Alpha

Страница 1: ... inboard engines without integral exhaust when installed in a recreational craft in accordance with the manufacturers supplied instructions will meet the exhaust emissions requirements of the directive mentioned above This engine must not be put into service until the recreational craft in which it is to be installed has been declared in conformity if so required with the relevant provision of the...

Страница 2: ...joy using this product for many boating seasons To ensure maximum performance and carefree use we ask that you thoroughly read this manual The Operation Maintenance and Warranty Manual contains specific instructions for using and maintaining your product We suggest that this manual remain with the product for ready reference whenever you are on the water Thank you for purchasing one of our Mercury...

Страница 3: ...t in death or serious injury CAUTION Indicates a hazardous situation which if not avoided could result in minor or moderate injury NOTICE Indicates a situation which if not avoided could result in engine or major component failure IMPORTANT Identifies information essential to the successful completion of the task NOTE Indicates information that helps in the understanding of a particular step or ac...

Страница 4: ......

Страница 5: ...e Engine Trim Trailer 21 Dual Engine Trim Trailer 21 Electrical System Overload Protection Carbureted Engines 22 Audio Warning System 24 Testing The Audio Warning System 24 Section 3 On The Water Safe Boating Suggestions 26 Be Alert to Carbon Monoxide Poisoning 27 Good Ventilation 27 Poor Ventilation 27 Basic Boat Operation 28 Launching and Boat Operation 28 Operation Chart 28 Starting and Stoppin...

Страница 6: ...r 52 Fuel Pump Sight Tube Inspection 52 Lubrication 53 Steering System 53 Manual Steering System 54 Throttle Cable 55 Shift Cable Typical 55 Sterndrive Unit and Transom Assembly 56 Sterndrive U joint Shaft Splines and O rings Sterndrive Unit Removed 56 Engine Coupler 56 Driveshaft Extension Models 57 Propellers 57 Propeller Repair 57 Alpha Propeller Removal 58 Alpha Propeller Installation 58 Drive...

Страница 7: ... Operate Motor Does Not Operate 80 Power Trim Does Not Operate Motor Operates but Sterndrive Unit Does Not Move 80 Section 8 Customer Assistance Information Owner Service Assistance 82 Local Repair Service 82 Service Away From Home 82 Stolen Power Package 82 Attention Required after Submersion 82 Replacement Service Parts 82 Parts and Accessories Inquiries 82 Resolving a Problem 82 Mercury Marine ...

Страница 8: ...Page iv 90 8M0053263 NOVEMBER 2010 ...

Страница 9: ...gines 6 Global Warranty Charts 7 Consumer Application Warranty Chart 8 Commercial Application Warranty Chart 9 Government Application Warranty Chart 10 Mercury Installation Quality Certification Program 10 California Emissions Limited Warranty 11 What Is Covered 11 Duration of Coverage 11 How to Obtain Warranty Coverage 12 What Mercury Will Do 12 What Is Not Covered 12 Disclaimers and Limitations ...

Страница 10: ...re that your warranty coverage begins promptly your selling dealer should fill out the warranty registration card completely and mail it to the distributor responsible for administering the warranty registration and claim program for your area The warranty registration card identifies your name and address product model and serial numbers date of sale type of use and the selling distributor s and ...

Страница 11: ...ity Certified Installer receive one 1 year of additional warranty coverage The repair or replacement of parts or the performance of service under this warranty does not extend the life of this warranty beyond its original expiration date The warranty period is specific to the model covered see your model for the base coverage period Horizon Sterndrive and Inboard Models and MX 6 2 Black Scorpion T...

Страница 12: ...rranty manual in order to obtain warranty coverage Mercury Marine reserves the right to make any warranty coverage contingent upon proof of proper maintenance What Mercury Marine Will Do Mercury Marine s sole and exclusive obligation under this warranty is limited to at our option repairing a defective part replacing such part or parts with new or Mercury Marine certified remanufactured parts or r...

Страница 13: ...towing storage telephone rental inconvenience slip fees insurance coverage loan payments loss of time loss of income or any other type of incidental or consequential damages are not covered by this warranty Also expenses associated with the removal or replacement of boat partitions or other material in order to gain access to the product are not covered by this warranty No individual or entity inc...

Страница 14: ...t Mercury reserves the right to improve or modify products from time to time without assuming an obligation to modify products previously manufactured How to Obtain Warranty Coverage The customer must provide Mercury with a reasonable opportunity to repair and reasonable access to the product for warranty service Warranty claims shall be made by delivering the product for inspection to a Mercury d...

Страница 15: ... at our option repairing a corroded part replacing such part or parts with new or Mercury Marine certified remanufactured parts or refunding the purchase price of the Mercury product Mercury reserves the right to improve or modify products from time to time without assuming an obligation to modify products previously manufactured How to Obtain Warranty Coverage The customer must provide Mercury Ma...

Страница 16: ...ear 1 year 1 year 4 years Europe 2 years 3 years 2 years 2 years 3 years 4 years 3 years 3 years 3 years 4 years Japan 1 year 1 year 1 year 1 year 1 year 1 year 1 year 1 year 1 year 1 year Australia and New Zealand 2 years 3 years 3 years 3 years all Tow Sports 2 years 3 years 3 years 3 years all Tow Sports 3 years 4 years South Pacific 1 year 3 years 1 year 1 year 1 year 3 years 1 year 1 year 3 y...

Страница 17: ... 1 year or 500 hours 1 year or 500 hours 1 year or 500 hours 1 year or 500 hours 1 year or 500 hours 1 year or 500 hours 1 year or 500 hours none none Japan 1 year or 500 hours 1 year or 500 hours 1 year or 500 hours 1 year or 500 hours 1 year or 500 hours 1 year or 500 hours 1 year or 500 hours 1 year or 500 hours none none Australia and New Zealand 1 year or 500 hours 1 year or 500 hours 1 year ...

Страница 18: ... hours 1 year or 500 hours 1 year or 500 hours 1 year or 500 hours none none Japan 1 year or 500 hours 1 year or 500 hours 1 year or 500 hours 1 year or 500 hours 1 year or 500 hours 1 year or 500 hours 1 year or 500 hours 1 year or 500 hours none none Australia and New Zealand 1 year or 500 hours 1 year or 500 hours 1 year or 500 hours 1 year or 500 hours 1 year or 500 hours 1 year or 500 hours 1...

Страница 19: ...ations for inboard and sterndrive engines The regulations apply to all inboard and sterndrive engines that were manufactured for the 2003 model year and later Mercury Marine in compliance with those regulations provides this limited warranty for the emission control systems see the components of the emission control system listed following and further warrants that the inboard or sterndrive engine...

Страница 20: ...ner inconsistent with the recommended operation procedures neglect accident submersion improper installation proper installation specifications and techniques are set forth in the installation instructions for the product improper service jet pump impellers and liners operation with fuels oils or lubricants which are not suitable for use with the product see Specifications alteration or removal of...

Страница 21: ...erndrive engine but Mercury Marine cannot deny warranty solely for the lack of receipts or your failure to ensure the performance of all scheduled maintenance As the inboard or sterndrive engine owner you should however be aware that Mercury Marine may deny you warranty coverage if your inboard or sterndrive engine or a part has failed due to abuse neglect improper maintenance or unapproved modifi...

Страница 22: ...ny manner that would alter the horsepower or allow emissions levels to exceed their predetermined factory specifications Emission Certification Star Label Your boat is labeled on the hull with one of the following star labels The Symbol for Cleaner Marine Engines Means 1 Cleaner Air and Water for a healthier lifestyle and environment 2 Better Fuel Economy burns up to 30 40 percent less gas and oil...

Страница 23: ... marine engine 2004 exhaust emission standards Engines meeting these standards have 20 lower emissions than One Star Low Emission engines Three Stars Ultra Low emission A SS D mc79571 1 The three star label identifies engines that meet the Air Resources Board s Personal Watercraft and Outboard marine engine 2008 exhaust emission standards or the Sterndrive and Inboard marine engine 2003 exhaust em...

Страница 24: ...Section 1 Warranty Notes Page 16 90 8M0053263 NOVEMBER 2010 ...

Страница 25: ...e Table of Contents Lanyard Stop Switch 18 Instrumentation 19 Remote Controls 19 Panel Mount Features 19 Console Mount Features 20 Power Trim 20 Single Engine Trim Trailer 21 Dual Engine Trim Trailer 21 Electrical System Overload Protection Carbureted Engines 22 Audio Warning System 24 Testing The Audio Warning System 24 2 ...

Страница 26: ...r leg or tie a knot in the lanyard Activation of the lanyard stop switch will stop the engine immediately but the boat will continue to coast for some distance depending upon the velocity and degree of any turn at shut down However the boat will not complete a full circle While the boat is coasting it can cause injury to anyone in the boat s path as seriously as the boat would when under power We ...

Страница 27: ...Fuel Gauge Indicates quantity of fuel in tank Hour meter Records engine operating time Bilge Blower Switch Operates bilge blower Ignition Switch Allows operator to start and stop engine Power Trim Gauge Indicates sterndrive unit angle trim up out and down in Remote Controls Your boat may be equipped with a Mercury Precision Parts or Quicksilver remote controls All controls may not have all feature...

Страница 28: ...ing the engine This is done by disengaging the shift mechanism from the control handle The throttle only button can be depressed only when the remote control handle is in the neutral position Control Handles Operation of the the shift and throttle are controlled by the movement of the control handle Push the control handle forward from neutral with a quick firm motion to the first detent for forwa...

Страница 29: ...w of some boats to a point at which they begin to plow with their bow in the water while on plane This can result in an unexpected turn in either direction called bow steering or over steering if any turn is attempted or if a significant wave is encountered mc79530 Single Engine Trim Trailer Single engine applications will have a button that can be pressed to trim the sterndrive unit up or down To...

Страница 30: ...cated and corrected turn off or disconnect all accessories connected to the engine and instrumentation wiring Reset the circuit breaker If the breaker remains open the electrical overload has not been eliminated Further checks must be made on the electrical system Contact your authorized dealer 1 A circuit breaker provides protection for the engine wiring harness and the instrumentation power lead...

Страница 31: ...ignition switch I terminal lead to protect the electrical system Check for blown fuse if the ignition key is turned to the START position and nothing happens and circuit breaker is not tripped mc70525 1 5 The power trim system is protected from overload by a 110 amp fuse and a 20 amp spade fuse on the power trim pump The trim pump may also have an in line circuit protection device in the power tri...

Страница 32: ...the operator that a problem has occurred The audio warning system will sound with a continuous horn if one of the following occurs Engine oil pressure too low Engine temperature too hot Sterndrive oil level too low NOTICE A continuous horn indicates a critical fault Operating the engine during a critical fault can damage components If the warning horn emits a continuous beep do not operate the eng...

Страница 33: ...tion 29 Drain Plug and Bilge Pump 29 Protecting People in the Water 30 While You Are Cruising 30 While Boat Is Stationary 30 High Speed and High Performance Operation 30 Passenger Safety in Pontoon Boats and Deck Boats 30 Boats Having an Open Front Deck 30 Boats With Front Mounted Raised Pedestal Fishing Seats 30 Wave and Wake Jumping 31 Impact with Underwater Hazards 31 Drive Unit Impact Protecti...

Страница 34: ...g Stop the engine whenever passengers are boarding unloading or are near the back stern of the boat Shifting the drive unit into neutral is not sufficient Use personal flotation devices Federal Law requires that there be a U S Coast Guard approved life jacket personal flotation device correctly sized and readily accessible for every person on board plus a throwable cushion or ring We strongly advi...

Страница 35: ...re is complete loss of the boat Seek further assistance from local law enforcement Be Alert to Carbon Monoxide Poisoning Carbon monoxide is present in the exhaust fumes of all internal combustion engines including the outboards sterndrives and inboard engines that propel boats as well as the generators that power various boat accessories Carbon monoxide is a deadly gas that is odorless colorless a...

Страница 36: ...off valve Operate bilge blowers Check steering operation Close seacock if equipped Open fuel shut off valve Flush cooling system if in saltwater Open seacock if equipped Drain bilge Close the drain system Place sterndrive unit in full down in position Check the engine oil Perform all other checks specified by your dealer and or boat builder Listen for Audio Warning Alarm to sound when the ignition...

Страница 37: ...l handle until handle returns to the neutral idle position This may take several tries if the power package was operating above idle RPM when the engine stopped 2 After the handle returns to the neutral idle position resume normal starting procedures Throttle Only Operation 1 Refer to Remote Controls section for remote control features 2 Move the control lever to the idle neutral position 3 Depres...

Страница 38: ...For additional information refer to Hi Performance Boat Operation booklet 90 849250 R2 from your dealer distributor or Mercury Marine Passenger Safety in Pontoon Boats and Deck Boats Whenever the boat is in motion observe the location of all passengers Do not allow any passengers to stand or use seats other than those designated for traveling faster than idle speed A sudden reduction in boat speed...

Страница 39: ...own far enough while airborne upon water contact it may penetrate under the water surface and submarine for an instant This will bring the boat nearly to a stop in an instant and can send the occupants flying forward The boat may also veer sharply to one side Impact with Underwater Hazards Reduce speed and proceed with caution whenever you re driving a boat in shallow water or in areas where the w...

Страница 40: ...lows the sterndrive unit to return to its original operating position preventing loss of steering control and engine overspeed Use extreme caution when operating in shallow water or where underwater objects are known to be present No impact protection is provided in reverse use extreme care to prevent striking submerged objects while operating in reverse IMPORTANT Impact protection system cannot b...

Страница 41: ...er package to operate at or near the top end of the recommended WOT operating RPM range with a normal load If full throttle operation is below the recommended range the propeller must be changed to prevent loss of performance and possible engine damage On the other hand operating an engine above the recommended operating RPM range will cause higher than normal wear and damage After initial propell...

Страница 42: ...ilter Refer to Maintenance Change the sterndrive lube or transmission oil and filter Refer to Maintenance ZF Transmission models 1 End of First Season Checkup At the end of the first season of operation contact an authorized Mercury MerCruiser dealer to discuss and or perform scheduled maintenance items If you are in an area where the product is operated continuously year round you should contact ...

Страница 43: ... 35 Section 4 Specifications Table of Contents Fuel Requirements 36 Fuel Ratings 36 Using Reformulated Oxygenated Gasolines USA Only 36 Gasolines Containing Alcohol 36 Engine Oil 36 Engine Specifications 37 Fluid Specifications 38 Sterndrives 38 Engine 38 4 ...

Страница 44: ... engine will withstand up to 10 alcohol content in the gasoline We do not know what percentage your boat s fuel system will withstand Contact your boat manufacturer for specific recommendations on the boat s fuel system components fuel tanks fuel lines and fittings Be aware that gasolines containing alcohol may increase Corrosion of metal parts Deterioration of rubber or plastic parts Fuel permeat...

Страница 45: ...20W SAE30W SAE40W AIR TEMPERATURE ORDER OF PREFERENCE 32 F 0 C 50 F 10 C 8082 Engine Specifications Models 3 0L TKS Horsepower1 135 Kilowatts1 101 Number of cylinders 4 Displacement 181 cid 3 0L Compression ratio 9 25 1 Idle RPM in neutral 800 Max RPM at WOT 4400 4800 Minimum oil pressure at idle 28 kPa 4 psi Electrical system 12 volt negative ground Minimum battery requirement 375 CCA 475 MCA 90 ...

Страница 46: ...er and fluid lines 3 0L 181 CID Model Capacity Fluid Type Engine Oil With Filter 1 3 8 liters 4 U S qts Mercury Quicksilver Synthetic Blend MerCruiser Engine Oil 25W 40 Seawater Cooling System 2 9 liters 8 5 U S qts Propylene Glycol and Purified Water Closed Cooling System Carbureted only 9 liters 8 5 U S qts Mercury Extended Life Coolant Antifreeze or Extended Life Ethylene Glycol 5 100 Antifreez...

Страница 47: ...t 46 Checking 46 Filling 47 Changing 47 Drive Unit Oil 48 Checking 48 Filling 48 Changing 48 Power Trim Fluid 49 Checking 49 Filling 50 Changing 50 Cleaning the Flame Arrestor 50 Positive Crankcase Ventilation Valve PCV 51 Changing 51 Changing the Water Separating Fuel Filter 52 Fuel Pump Sight Tube Inspection 52 Lubrication 53 Steering System 53 Manual Steering System 54 Throttle Cable 55 Shift C...

Страница 48: ...intenance WARNING Performing service or maintenance without first disconnecting the battery can cause product damage personal injury or death due to fire explosion electrical shock or unexpected engine starting Always disconnect the battery cables from the battery before maintaining servicing installing or removing engine or drive components WARNING Fuel vapors trapped in the engine compartment ma...

Страница 49: ...e they occur The entire power package should be checked carefully including all accessible engine parts Check for loose damaged or missing parts hoses and clamps tighten or replace as necessary Check plug leads and electrical leads for damage Remove and inspect the propeller If badly nicked bent or cracked contact your authorized Mercury MerCruiser dealer Repair nicks and corrosion damage on power...

Страница 50: ...ct the U joints the splines and the bellows Check the clamps Check the engine alignment Lubricate the U joint splines and cross bearing if equipped with a grease fitting Lubricate the gimbal bearing and the engine coupler 2 Every 300 Hours or 3 Years Check the engine mount for tightness and retorque if necessary Check the distributor cap if equipped Check the electrical system for loose damaged or...

Страница 51: ...he disposal or recycling of waste and contain and dispose of fluids as required Checking 1 Stop the engine Allow approximately 5 minutes for the oil to drain into the oil pan The boat must be at rest in the water 2 Remove the dipstick Wipe clean and reinstall fully into the dipstick tube Wait 60 seconds to allow trapped air to vent NOTE Ensure that dipstick is installed with oil level indication m...

Страница 52: ... oil should be changed before placing the boat in storage IMPORTANT Change engine oil when the engine is warm from operation Warm oil flows more freely carrying away more impurities Use only recommended engine oil refer to Specifications Easy Engine Oil Drain System NOTE Boat must be out of water to perform this procedure 1 Loosen the oil filter to vent the system 2 Remove the bilge drain plug 3 P...

Страница 53: ... 5 Add recommended engine oil to bring level up to the bottom of the OK range on the dipstick 6 With the boat at rest in the water check the oil level and add specified fluid to bring the oil level up to but not over the full or OK range NOTE Adding 0 95 liters 1 quart of engine oil will raise the level from the add mark to the top of the OK range Engine Model Capacity Fluid Type 3 0L 181 3 8 lite...

Страница 54: ...bring the fluid level up to the proper level Tube Ref No Description Where Used Part No 114 Power Trim and Steering Fluid Power steering system 92 858074K01 3 Reinstall the fill cap dipstick Changing Power steering fluid does not require changing unless it becomes contaminated with water or debris Contact your authorized Mercury MerCruiser dealer Engine Coolant Checking CAUTION A sudden loss of pr...

Страница 55: ... closed cooling system with an ethylene glycol antifreeze solution suitable to the lowest temperature to which the engine will be exposed NOTICE Without sufficient cooling water the engine the water pump and other components will overheat and suffer damage Provide a sufficient supply of water to the water inlets during operation NOTICE Air trapped in the closed cooling system can cause the engine ...

Страница 56: ... may indicate a water leak somewhere in the sterndrive unit Filling IMPORTANT If more than 59 ml 2 fl oz of High Performance Gear Lubricant is required to fill the monitor a seal may be leaking Damage to the sterndrive unit may occur due to lack of lubrication Contact your authorized Mercury MerCruiser dealer 1 Remove the gear lube monitor cap 2 Fill the monitor with the specified fluid so that th...

Страница 57: ...ll the oil vent screw and sealing washer 8 Continue to pump gear lubricant into the drive through the oil fill drain hose until the gear lubricant appears in the gear lube monitor 9 Fill the monitor so that the oil level is in the operating range Do not overfill Ensure that the rubber gasket is inside the cap and install Do not overtighten NOTE Oil capacity includes gear lube monitor Model Capacit...

Страница 58: ...Power Trim and Steering Fluid Power trim pump 92 858074K01 3 Install the cap Changing Power trim fluid does not require changing unless it becomes contaminated with water or debris Contact your authorized Mercury MerCruiser dealer Cleaning the Flame Arrestor WARNING Fuel is flammable and explosive Ensure that the key switch is off and the lanyard is positioned so that the engine cannot start Do no...

Страница 59: ...f necessary 8 Install the flame arrestor sealing washer and locknut Torque the flame arrestor locknut to specification Description Nm lb in lb ft Flame arrestor nut 12 106 9 Connect the crankcase ventilation hose to the fitting on the flame arrestor and valve cover Positive Crankcase Ventilation Valve PCV Changing NOTE We recommend the use of Mercury MerCruiser replacement parts to ensure complian...

Страница 60: ...the sealing ring on the new filter with engine oil Tube Ref No Description Where Used Part No Synthetic Blend MerCruiser Engine Oil SAE25W 40 Filter sealing ring 92 883725K01 6 Thread filter onto bracket and tighten securely by hand Do NOT use a filter wrench a Fuel filter base b Sealing ring c Fuel filter 7 Open fuel supply valve if equipped 8 Ensure that engine compartment is properly ventilated...

Страница 61: ...If Steering Cable Has Grease Fittings Turn steering wheel until steering cable is fully retracted into cable housing Apply approximately 3 pumps of grease from a typical hand operated grease gun a Steering cable grease fitting Tube Ref No Description Where Used Part No 34 Special Lubricant 101 Steering cable grease fitting 92 802865Q02 2 Turn steering wheel until steering cable fully extended Ligh...

Страница 62: ...ption Where Used Part No Synthetic Blend MerCruiser Engine Oil SAE25W 40 Tie bar pivot points 92 883725K01 5 Upon first starting engine turn steering wheel several times to starboard and then port to ensure that the steering system operates properly before getting underway Manual Steering System 1 Inspect the bushings for debris and lubricate the bushings a Bushings Tube Ref No Description Where U...

Страница 63: ...etic Blend MerCruiser Engine Oil SAE25W 40 Throttle cable pivot points guide contact surfaces 92 883725K01 Shift Cable Typical 1 Lubricate the pivot points and the guide contact surfaces a Pivot points b Guide contact surfaces Tube Ref No Description Where Used Part No Synthetic Blend MerCruiser Engine Oil SAE25W 40 Shift cable pivot points guide contact surfaces 92 883725K01 a 7169 mc79736 a b ...

Страница 64: ...tion refer to Propellers Sterndrive U joint Shaft Splines and O rings Sterndrive Unit Removed 1 Coat sterndrive U joint O rings and driveshaft splines with grease a U joint O rings 3 b Driveshaft splines Tube Ref No Description Where Used Part No 91 Engine Coupler Spline Grease Driveshaft splines and U joint O rings 92 802869A 1 2 For propeller shaft lubrication refer to Propellers Engine Coupler ...

Страница 65: ...U joints do not require lubrication Driveshaft Extension Models 1 Lubricate the transom end grease fitting and engine end grease fitting by applying approximately 10 12 pumps of grease from a typical hand operated grease gun 2 Lubricate the driveshaft grease fittings by applying approximately 3 4 pumps of grease from a typical hand operated grease gun a Driveshaft grease fittings b Transom end gre...

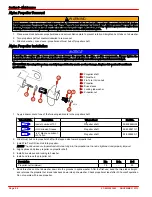
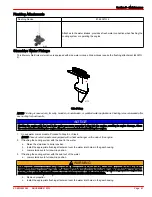
Страница 66: ...racks or other damage Replace tab washer if condition is questionable a Propeller shaft b Thrust hub c Flo Torq II drive hub d Propeller e Drive sleeve f Locking tab washer g Propeller nut 1 Apply a liberal coat of one of the following lubricants to the propeller shaft Tube Ref No Description Where Used Part No 34 Special Lubricant 101 Propeller shaft 92 802865Q02 94 Anti Corrosion Grease Propelle...

Страница 67: ...tudinal cracks in the direction of belt length that join transverse cracks are NOT acceptable Fraying Glazed surfaces Proper tension 6 mm 1 4 in deflection with moderate thumb pressure on the belt at the location that has the longest distance between two pulleys Replacing Front Mount Models Power Steering Pump Drive Belt if equipped 1 Loosen power steering pump attaching bolts and mounting bolts 2...

Страница 68: ...Pivot power steering pump toward engine as required until belt can be removed 3 Install new drive belt on pulleys Adjust the tension to the specification following a Power steering belt b Alternator belt c Alternator Description Deflection 6 mm 1 4 inches Alternator Belt 1 Remove power steering pump drive belt if equipped 2 Loosen the alternator Remove and replace the alternator belt 3 Install pow...

Страница 69: ...engine 1 On seawater cooled models Proceed to Step 5 or Step 6 NOTE Closed cooled models are equipped with a heat exchanger on the side of the engine 2 If flushing the cooling system with the boat in the water a Raise the sterndrive to trailer position b Install the appropriate flushing attachment over the water inlet holes in the gear housing c Lower sterndrive to full down in position 3 If flush...

Страница 70: ...t hose from the thermostat housing and plug the hose to prevent water from siphoning into the boat This prevents seawater from contaminating the engine flush 14 Tag the ignition switch with an appropriate tag requiring the seawater inlet hose to be reconnected prior to operating engine Battery Refer to specific instructions and warnings accompanying your battery If this information is not availabl...

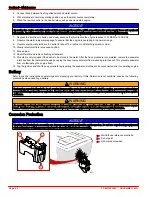
Страница 71: ... the Marine Corrosion Protection Guide 90 88181301 Mercury MerCruiser power packages are equipped with anodes to help protect them from galvanic corrosion under moderate conditions However for severe conditions i e when using a stainless steel propeller docking mooring in areas with rapid water flow etc it is recommended that a Quicksilver Anti Corrosion Anode Kit and or a MerCathode System be ins...

Страница 72: ...arcase Anodic Plate Mounted on the underside of the lower gearcase a Anode Ventilation Plate Anode Mounted on the front of the gearcase a Anode Drive Mounted Anodic Block if equipped Mounted to underside of gimbal housing 5640 MerCathode System Electrode assembly replaces Anodic block System should be tested to ensure adequate output The test should be performed where boat is moored using Quicksil...

Страница 73: ...ash a MerCathode controller b MerCathode assembly Anode Kit if equipped Mounted to the boat transom 5642 Trim Cylinder Anodes Mounted on each trim cylinder a Trim cylinder anodes Bearing Carrier Anode Alpha Located in front of the propeller between the front side of the propeller and the gear housing a Bearing carrier anode b Screws 6206 a b a 7460 a b 7461 ...

Страница 74: ...at transom but you must observe the following IMPORTANT Do NOT paint anodes or MerCathode System reference electrode and anode as this will render them ineffective as galvanic corrosion inhibitors IMPORTANT If anti fouling protection is required for boat hull or boat transom copper or tin base paints if not prohibited by law can be used If using copper or tin based anti fouling paints observe the ...

Страница 75: ...8 Preparing Power Package for Storage 68 Engine and Fuel System Preparation 69 Draining the Seawater System 69 Single Point Drain System 70 Draining the Seawater Section of Models With Closed Cooling 71 Clearing Clogged Blue Drain Hoses 73 Draining the Sterndrive 74 Battery Storage 75 Recommissioning the Power Package 75 6 ...

Страница 76: ...r for Marine Engines added to any fuel remaining in the tank Refer to Fuel Requirements for additional information 3 Flush the cooling system Refer to the Maintenance section IMPORTANT In order to run the engine as required in the remainder of the storage preparation procedure water must be supplied to the engine as described in the flushing procedure 4 Provide cooling water to the engine as done ...

Страница 77: ...119 Storage Seal Rust Inhibitor Carburetor 92 858081K01 g Turn ignition key to OFF position 2 Refer to Flushing the Power Package and appropriately remove the water supply the the seawater pickup pump 3 Clean the flame arrestor and crankcase ventilation hoses and reinstall 4 Lubricate all items listed in the Lubrication section 5 On models with closed cooling systems Test coolant to ensure that it...

Страница 78: ... on the bilge pump 3 Push the quick connect fitting release buttons and remove the blue drain hoses from the bracket a Release button b Blue drain hoses 4 Pull the T handle until the hose guide is in contact with the quick connect fittings a T handle b Hose guide 5 Push down on the T handle to force the blue drain hoses below their connection points on the block 6 Ensure water is draining from blu...

Страница 79: ...ecautionary measure attach a tag to the key switch or steering wheel of the boat reminding the operator to open the seacock or unplug and reconnect the water inlet hose before starting the engine 1 If draining with the boat in the water close the seacock if equipped or remove and plug the water inlet hose If draining with the boat out of the water place the boat on a level surface to ensure comple...

Страница 80: ...in holes speedometer pitot hole and trim tab cavity vent and drain holes are open and unobstructed a Gear housing vent holes b Trim tab cavity drain holes c Gear housing drain hole d Speedometer pitot hole 6 Crank the engine over slightly with the starter motor to purge any water trapped in seawater pickup pump Do not allow the engine to start 7 After the cooling system has been drained completely...

Страница 81: ...ose is flowing freely reconnect it to the bracket 3 Ensure the clogged blue drain hose is in the correct position below its connection point on the block 4 Turn on the bilge pump and supply water to the water inlets If the boat is out of the water install the flushing attachment and open the water source fully to provide maximum water flow a Flushing attachment Flushing Device 91 44357Q 2 9192 Att...

Страница 82: ...oses are within reach b Install the quick connect fittings on the bracket Pull on the blue drain hoses to ensure they are firmly connected c Push down on the T handle until seated 14 If water is draining from the blue drain hose continue with Step 4 of Single Point Drain System Draining the Sterndrive NOTE This procedure is needed only for salty brackish mineral laden or polluted water application...

Страница 83: ...ight CAUTION Disconnecting or connecting the battery cables in the incorrect order can cause injury from electrical shock or can damage the electrical system Always disconnect the negative battery cable first and connect it last 2 Install a fully charged battery Clean the battery cable clamps and terminals and reconnect cables Tighten each cable clamp securely when connecting 3 Coat the terminal c...

Страница 84: ...Section 6 Storage Notes Page 76 90 8M0053263 NOVEMBER 2010 ...

Страница 85: ...es or Backfires 78 Poor Performance 78 Excessive Engine Temperature 79 Insufficient Engine Temperature 79 Low Engine Oil Pressure 79 Battery Will Not Recharge 79 Remote Control Is Difficult to Move Has Excessive Play or Makes Unusual Sounds 80 Steering Wheel Jerks or Is Difficult to Turn 80 Power Trim Does Not Operate Motor Does Not Operate 80 Power Trim Does Not Operate Motor Operates but Sterndr...

Страница 86: ...onent Service the ignition system Clogged fuel filter Replace fuel filter Stale or contaminated fuel Drain fuel tank Fill with fresh fuel Fuel line or tank vent line kinked or clogged Replace kinked lines or blow out lines with compressed air to remove obstruction Faulty wire connections Check wire connections TKS fuse blown Check TKS fuse Replace the fuse if blown Engine Runs Rough Misses or Back...

Страница 87: ...estricted or plugged Clean exhaust elbows Insufficient Engine Temperature Possible Cause Remedy Faulty thermostat Replace Low Engine Oil Pressure Possible Cause Remedy Insufficient oil in crankcase Check and add oil Excessive oil in crankcase causing it to become aerated Check and remove required amount of oil Check for cause of excessive oil improper filling Diluted or improper viscosity oil Chan...

Страница 88: ...on Replace and or adjust Insufficient lubrication on steering components Lubricate Loose or missing steering fasteners or parts Check all parts and fasteners if any are loose or missing see authorized Mercury MerCruiser dealer immediately Contaminated power steering fluid See authorized Mercury MerCruiser dealer Power Trim Does Not Operate Motor Does Not Operate Possible Cause Remedy Blown fuse Re...

Страница 89: ...rvice Assistance 82 Local Repair Service 82 Service Away From Home 82 Stolen Power Package 82 Attention Required after Submersion 82 Replacement Service Parts 82 Parts and Accessories Inquiries 82 Resolving a Problem 82 Mercury Marine Service Offices 83 Ordering Literature 83 United States and Canada 83 Outside the United States and Canada 84 8 ...

Страница 90: ...for most of their life They are also expected to operate in both fresh and saltwater environments These conditions require numerous special parts Exercise care when replacing marine engine parts because specifications are different from those of the standard automotive engine For example one of the most important special replacement parts is the cylinder head gasket Marine engines cannot use steel...

Страница 91: ...ustralia 32 87 32 32 11 32 87 31 19 65 Marine Power Europe Inc Parc Industriel de Petit Rechain B 4800 Verviers Belgium 954 744 3500 954 744 3535 Mercury Marine Latin America Caribbean 11650 Interchange Circle North Miramar FL 33025 U S A 81 53 423 2500 81 53 423 2510 Mercury Marine Japan 283 1 Anshin cho Hamamatsu Shizuoka 435 0005 Japan 65 6546 6160 65 6546 7789 Mercury Marine Singapore 72 Loyan...

Страница 92: ...r for information on additional literature that is available for your particular Mercury MerCruiser power package and how to order that literature Print or type your mailing address which be used as your shipping label and include your order and payment Mail to Mercury Marine Attn Publications Department W6250 West Pioneer Road P O Box 1939 Fond du Lac WI 54936 1939 USA ...

Отзывы: