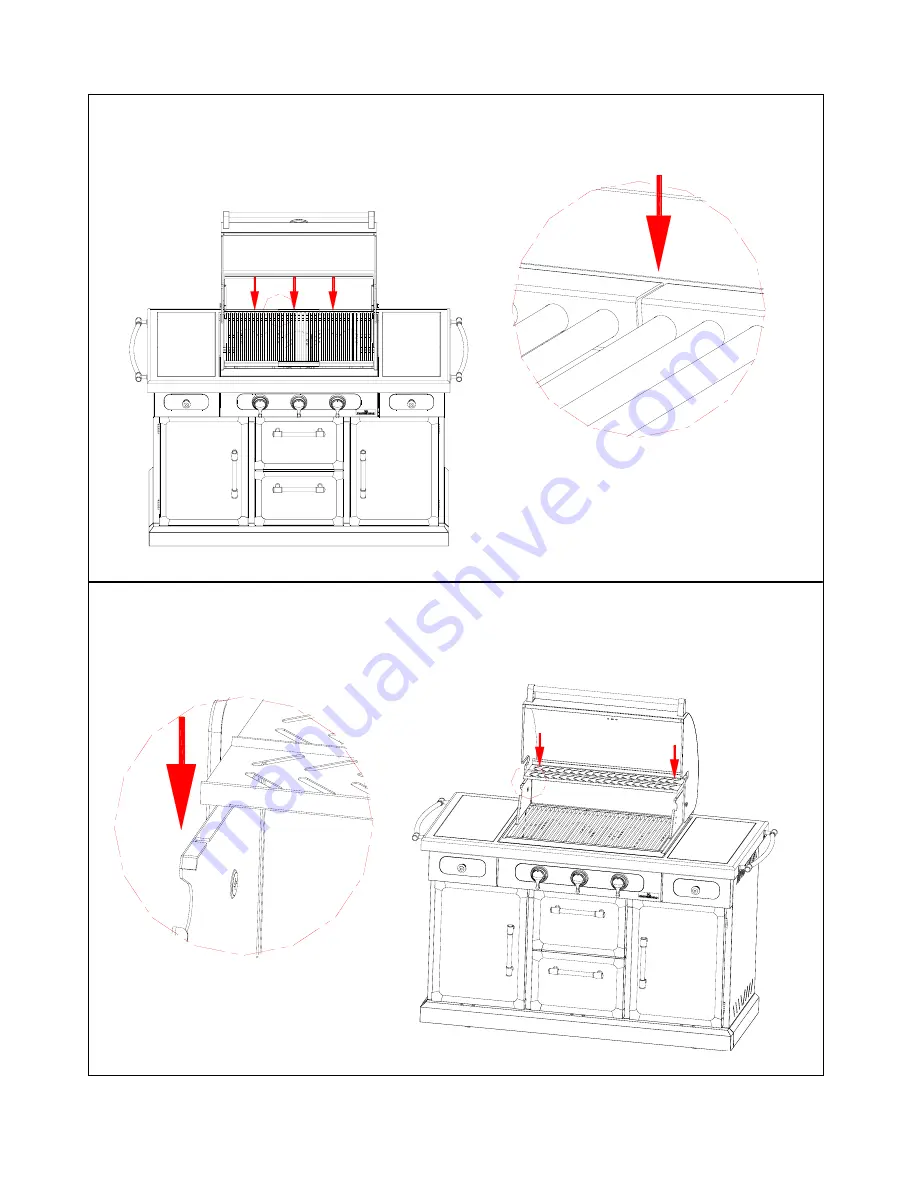
Member's Mark BQ06043-1 Скачать руководство пользователя страница 10


10


STEP 3


– Insert the 3 Cooking Grates into the firebox.  There are 

1

 small and 

2

 large cooking grates. They 

can be inserted in any order. 

STEP 4

  -

 Insert the Warming Rack into the upper sides of the firebox.  Be sure the sides of the 

warming rack fit down into the slots to secure it in place. 


Содержание BQ06043-1

Страница 1: ...ll even if purchasing an assembled grill 4 Keep this Grill Guide for future reference 5 Contact 1 800 933 0527 should you need assembly assistance or have any questions Stop Missing a part No need to...

Страница 2: ...ll or the cover of this Grill Guide 6 Only use the pressure regulator with a type 1 connector that is supplied with this gas grill 7 Before each use check the gas hose for excessive abrasion or wear o...

Страница 3: ...formation and Operation 12 20 Trouble Shooting Guide 21 Frequently Asked Questions 22 Write down here and keep for future reference Date of Purchase _________________ Serial Number ___________________...

Страница 4: ...ct or normal wear and tear This limited warranty will not apply to any grill used for commercial use This limited warranty is the sole warranty given by the manufacturer and is in lieu of all other wa...

Страница 5: ...remove the Grill Island from the carton and steel pallet on the bottom 5 Lay all parts and hardware out and ensure you have everything listed on the Parts and Hardware page before you begin assembly...

Страница 6: ...te Big 53 Cabinet Right Top Back Panel 19 Heat Diffuser Big 54 Cabinet Right Back Panel 20 Heat Diffuser Small 55 Cabinet Left Door Inside Shelf 21 U Main Burner 56 Cabinet Left Door Inside Shelf Supp...

Страница 7: ...7 Detail Parts List...

Страница 8: ...ly Parts List Heat Diffuser Big 2 PCS Warming Rack 1 PC Heat Diffuser Small 1 PC Towel Bar Handle 2 PCS Small Cooking Grate 1PC Large Cooking Grate 2PCS WARNING Always wear protective gloves when asse...

Страница 9: ...are stamped Front and must be at the front of the firebox The sides of the heat diffusers fit down into slots on the front and back of the firebox as shown in the insert STEP 1 Remove 2 Philips head...

Страница 10: ...the firebox There are 1 small and 2 large cooking grates They can be inserted in any order STEP 4 Insert the Warming Rack into the upper sides of the firebox Be sure the sides of the warming rack fit...

Страница 11: ...CSA Label Be sure to clean all foam packing material out of all areas Congratulations Your grill is now fully assembled Please proceed and read the General Information and Operation portion of the Gri...

Страница 12: ...11 Do not put a barbecue cover or other flammable material in the storage area of this grill 12 Do not use charcoal briquettes lava rock or any type of ceramic product in this grill LP Gas and Cylinde...

Страница 13: ...pen flame to check for leaks 1 Test outside in a well ventilated area 2 Use a paintbrush and a solution of 50 liquid soap and 50 water Do not use cleaning agents and they can damage the fuel supply pa...

Страница 14: ...net 3 Unhook the LP cylinder support ring and lower it down over the neck of the LP cylinder Reattach the hook to secure 4 Lock the LP cylinder tray in place by turning the LP cylinder tray stopper to...

Страница 15: ...ockwise WARNING 1 Do not connect this grill to any unregulated sources of propane 2 Before each use check the gas hose for excessive abrasion or wear or cuts Replace a hose assembly showing those sign...

Страница 16: ...ob of the burner you wish to light and turn left to HI LIGHT You will hear a click as a spark is sent to the burner If the burner does not light then turn back to Off and repeat this procedure Continu...

Страница 17: ...hly and wipe dry The stainless steel used in the construction of your grill is 304 commercial grade There are many specific stainless steel cleaners available Follow the manufacturer s directions Alwa...

Страница 18: ...Phillips Head screws 11 Replace the grease tray heat diffusers and cooking grates 12 Perform a Leak Test described earlier in this guide BURNER FLAMES Always inspect the burner flame after lighting A...

Страница 19: ...panel is labeled HI LIGHT LOW and OFF for each burner control knob Simply push in on the temperature control knobs and turn to the desired heat setting A thermometer is placed in the hood so that you...

Страница 20: ...no preheating is necessary for the side burner 2 The thermometer measures the temperature at the top of the lid The temperature down by the cooking grates is generally somewhat warmer 3 Mother Nature...

Страница 21: ...trol panel SUDDEN DROP IN GAS PRESSURE OR FLAMES BLOW OUT 1 Out of gas Check to be sure you still have propane in your tank 2 Your excessive fuel flow valve has tripped thereby reducing the flow of ga...

Страница 22: ...ependent testing center to meet or exceed various CSA and ANSI standards along with various performance standards The burners and gas line in each grill are also individually tested when each grill co...

Отзывы: