background image

37

Part III

Managing Applications

Using the Applications Launcher menu

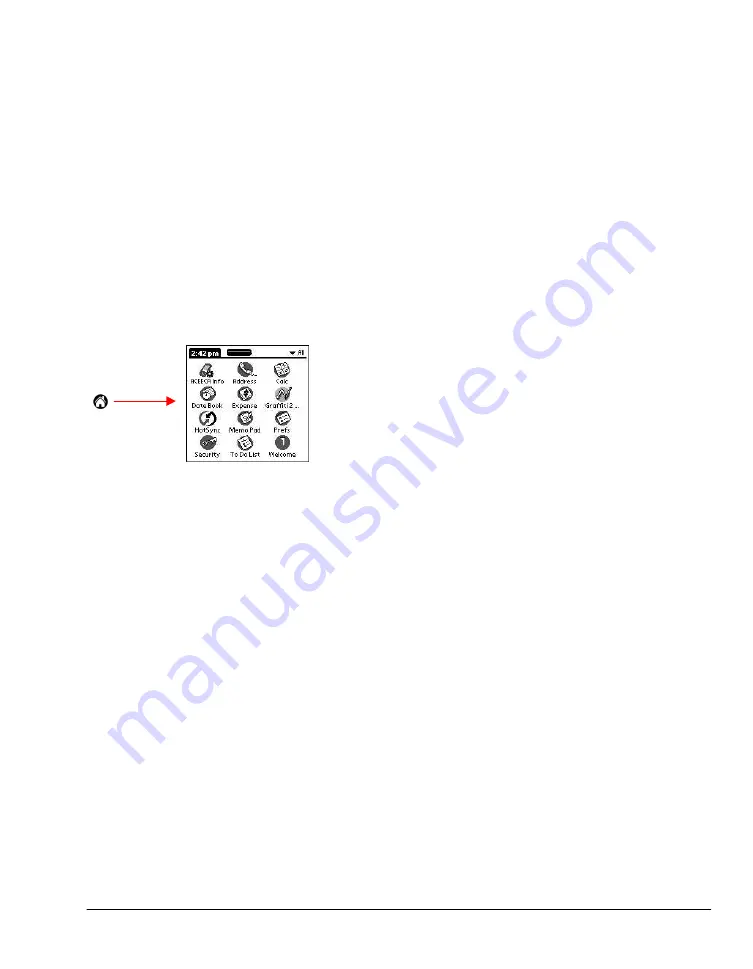
The Applications Launcher menu displays all the available applications on your RDA by default. You
can also display only selected applications by arranging applications into categories.

To open the Applications Launcher:

Tap the Home icon to access the Applications Launcher menu.

Applications
Launcher

Selecting applications

Your Meazura™ MEZ1000 RDA is equipped with a variety of applications. All the applications installed
on your RDA appear in the Applications Launcher menu.

In addition to providing a way for you to open applications, the Applications Launcher menu displays
the current time, battery level, and application category.

Opening an application

Choose from the following options:

·

Tap the Home icon to access the Application Launcher menu, and then tap the icon of the
application you want to open. If you have many applications installed on your Meazura™ MEZ1000
RDA, tap the scroll bar to see all the available applications.

·

Press an application button on the front panel to display the selected application immediately.

·

To switch between applications, tap the Home icon or press an application button on the front panel
of your RDA. Your RDA automatically saves your work in the current application and displays it
when you return to that application.

Categorizing applications

The category feature enables you to manage the number of application icons that appear onscreen in
the Applications Launcher menu. You can assign an application to a category and then display a single
category or all your applications.

To categorize an application:

1.

Tap the Home icon  to access the Application Launcher menu.

2.

Tap the Options icon.

3.

From the App menu, tap Category.

Содержание MEZ1000

Страница 1: ...User s Guide for Meazura MEZ1000 ...

Страница 2: ... when the equipment is operated in a commercial environment This equipment generates uses and can radiate radio frequency energy and if not installed and used in accordance with the instruction manual may cause harmful interference to radio communications Operation of this equipment in a residential area is likely to cause harmful interference in which case the user will be required to correct the...

Страница 3: ...ure that all appropriate testing and other measures are undertaken prior to release to ensure the safe use in such applications If the Meazura MEZ1000 or associated software is used in the aforementioned fields which Aceeca Limited deems unsuitable for its products Aceeca Limited disclaims all liability for any damages caused by such use When your handheld is at the end of its life please ensure y...

Страница 4: ...pening applications 18 Using the RDA interface 19 Using menus and menu commands 19 Displaying tips 19 Entering data 20 Customizing your RDA 20 Selecting the preferences screen 20 Personalizing your RDA 21 Setting the date time and time zone 22 Formatting the date time and numbers 23 Setting the auto off delay time 23 Setting your RDA to stay on while charging 23 Setting the sounds and volumes 24 T...

Страница 5: ... applications 38 Displaying applications by category 38 Changing the Applications Launcher display 38 Changing the view of applications 38 Displaying the last selected category of applications 39 Setting preferences for applications 39 Assigning applications to buttons 39 Changing the Buttons preferences 40 Changing the HotSync buttons preferences 40 Changing what the full screen pen stroke activa...

Страница 6: ...ing the Week view 56 Tips for using Week view 56 Spotting event conflicts 57 Working in Month view 57 Tips for using Month view 57 Working in Agenda view 57 Displaying the Agenda view 58 Tips for using Agenda view 58 Changing the Date Book display 58 Changing the displayed Start and End Times 60 Using the To Do List 61 Opening the To Do List 61 Creating To Do List items 61 Setting To Do List prior...

Страница 7: ...on Manager 77 Insistent alarms 77 Using the Reminder dialog screen 77 Setting alarm volume 78 Setting alarm sound effects 78 Using the Reminders list screen 79 Subtle alarms Part 6 Using an Expansion Card 82 Displaying contents of the expansion card 83 Launching an application from the expansion card 83 Displaying application information from the expansion card 84 Copying an application to your ex...

Страница 8: ...urning off beaming Part 9 Exchanging and Updating Data using HotSync Operations 102 Performing a HotSync operation for the first time 102 Creating a user profile 103 Selecting HotSync setup options 104 Customizing HotSync application settings 105 Using File Link Windows only Part 10 Maintaining Your RDA 107 Environmental Factors 107 Avoiding Hazardous Substances 107 Cleaning your RDA 108 Maintaini...

Страница 9: ...Part 1 Part 1 Introduction to the Meazura MEZ1000 RDA ...

Страница 10: ...n simply by synchronizing your data with Palm Desktop on your computer to create a backup copy Customize your RDA and set different levels of security to prevent unauthorized users from viewing your data System requirements for Windows To install and operate Palm Desktop on Windows your computer system must meet the following requirements Windows 95 or later IBM compatible 486 computer or higher 8...

Страница 11: ...the Palm Desktop folder 3 Follow the installation instructions in Installing Palm Desktop later in this chapter Make sure you install the new software in the same folder as the old software 4 To prepare for the first HotSync operation that will synchronize your new RDA with your new Palm Desktop go to the HotSync Manager and choose Custom NOTE Select your username if it does not already appear in ...

Страница 12: ...mputer To perform a hard reset do the following 1 Press and hold the Power and Backlight buttons together then release the Backlight button only 2 Release the Power button when the Palm Powered logo appears 3 Follow on screen instructions If you want to abandon the hard reset press the down arrow button If you want to continue with the hard reset press the up arrow button NOTE When you perform a h...

Страница 13: ...ith your Meazura MEZ1000 RDA are Address Book Date Book Expense Memo Pad and To Do List Touch Sensitive Screen Displays the applications and data stored in your RDA It is touch sensitive and responds to stylus contact To protect your screen against scratching we recommend using screen protectors Graffiti Pad Write letters and numbers in this area using the Graffiti 2 alphabet For information on ho...

Страница 14: ...move the battery clip simply insert two small flat head screwdrivers one above the clip to push it down the other under the side of the clip to lever it up and away from your RDA Communications and Charging Connector Connects your RDA to the cradle or communications cable which in turn connects to the back of your desktop computer and to the wall current through the AC adapter This allows you to r...

Страница 15: ...ter 10 and IR HotSync operations in chapter 11 for more information Module Fasteners Connecting the cradle The cable or cradle that comes with your Meazura MEZ1000 RDA enables you to synchronize the information on your Meazura MEZ1000 RDA with the Palm Desktop using HotSync technology To connect your cable or cradle on a PC compatible computer Turn off your computer and plug the USB or serial plug...

Страница 16: ...of any scroll bar Adjusting the contrast of your screen You can adjust the contrast of your screen to make it easy to see in a variety of lighting conditions To adjust the contrast of your RDA screen 1 Turn on your device 2 Press and hold the backlight button for approximately 1 5 seconds The Adjust Contrast slider appears 3 Do one of the following Drag the slider to adjust the contrast Tap to the...

Страница 17: ...o see all the available applications TIP You can find an application quickly by writing the Graffiti 2 character for the first letter of its name The Application Launcher scrolls to the first application with a name that begins with that letter ...

Страница 18: ...cate the state of the corresponding option A check mark in a check box means the option is active If a check box is empty tapping it inserts a check mark If a check box is checked tapping it removes the check mark Pick Lists Pick lists display a list of choices Tap the black triangle next to the pick list name to display a list of choices and then tap an item in the list to select it Scroll Bars S...

Страница 19: ... desired command In the text input area on your RDA drag a diagonal line from the lower left to the upper right to display the Command toolbar The command bar is displayed for approximately 4 seconds Tap an icon that represents the command you want or enter the shortcut for the command in the text input area below the Command toolbar For example to choose Select All in the Edit menu draw the Graff...

Страница 20: ...eferences to record a name company name phone number or any other information you want to display on your RDA If you use the Security application to turn off and lock your RDA with a password information that you enter in the Owner Preferences appears the next time you turn on your RDA To change owner preferences on your RDA 1 From the Preferences screen tap Owner from the pick list in the uper ri...

Страница 21: ...st in the upper right corner tap Date Time 3 On the Date Time screen tap the Set Time box then tap the Up or Down arrow to change the hour 4 Tap each minute number and then tap an arrow to change the number 5 If available tap AM or PM 6 Tap OK to set the new time and return to the Date Time screen NOTE To display time based on a 24 hour clock change the time format See Formatting the date time and...

Страница 22: ... well as the week s starting day For example in Germany time often is expressed using a 24 hour clock and the starting day of the week is Monday in the United States however time is expressed using a 12 hour clock with an AM or PM suffix and the starting day of the week is Sunday You can customize your own settings The Time setting defines the format for the time of day which appears in all applic...

Страница 23: ...hat is set in your General Preferences You may choose to have the screen remain visible while charging To set your device to stay on while charging 1 Tap the Home icon to access the Application Launcher menu then tap the Prefs icon 2 In the pick list in the upper right corner tap General 3 Tap the Stay on while charging check box to allow your RDA to stay on while charging Unchecking the box cause...

Страница 24: ...d applications on your RDA so that you can view enter and modify any data stored on your RDA Back up the data stored on your RDA with HotSync technology and synchronize the data on your Palm Desktop Synchronization is a one step procedure that ensures your data is always safe and up to date See Exchanging and Updating Data using HotSync Operations in chapter 10 for more information Import and expo...

Страница 25: ...o your CD ROM drive 3 Follow the onscreen instructions to complete the installation During installation you may be asked to insert your RDA into the cradle or connect it to the communications cable Using your RDA with another personal information manager If you prefer to use another personal information manager PIM such as Microsoft Outlook you can use it instead of installing Palm Desktop All you...

Страница 26: ...Part 2 Part 2 Entering Data in Your Meazura MEZ1000 RDA ...

Страница 27: ... to display the alphabetic or numeric keyboard Tap the ABC dot on the front of your RDA to display the alphabetic keyboard Tap the 123 dot on the front of your RDA to display the numeric keyboard Tap the Options icon then tap Keyboard to display the alphabetic keyboard first by default Tap abc for alphabet keyboard Tap 123 for numeric keyboard 4 To display the international keyboard tap either the...

Страница 28: ...ffiti 2 strokes to create letters numbers punctuation and symbols The Graffiti 2 writing strokes include all letters numbers and symbols found on a standard keyboard Learning to write Graffiti 2 characters With only a few minutes of practice you ll find it easy to enter accurate text and numbers using Graffiti 2 writing strokes The Graffiti 2 demo shows how to use the handwriting software The firs...

Страница 29: ...he stroke at the heavy dot Do not draw the heavy dot it is there only as a guideline The Graffiti 2 writing strokes for letters closely resemble letters of the standard English alphabet both upper case and lower case Graffiti 2 includes symbols made with a single stroke and symbols made with multiple strokes For multi stroke characters a temporary character is displayed after the first stroke to s...

Страница 30: ...e to create the lowercase letter and the uppercase letter 3 Position the stylus in the appropriate place of the text input area 4 Start your stroke at the heavy dot and draw the stroke shape as it appears in the tables 5 Lift the stylus from the screen at the end of the stroke shape 6 Your RDA recognizes your stroke immediately and displays the letter at the insertion point onscreen As soon as you...

Страница 31: ...rom a standard keyboard The period and comma punctuation marks can be written on either side of the text input area the letter or number side Other common punctuation marks can be written on one side of the text input area according to the chart below in general the more frequently used punctuation is on the left side Note that the punctuation characters can also be entered anywhere on the text in...

Страница 32: ...marks using the following strokes TIP Samples of the character strokes are available in the Graffiti 2 Help file To view the Help file use the full screen pen stroke dragging the stylus from the text input area to the top of the screen Note that the accented characters appear on a Punctuation Shift screen but do not use the Shift command To write uppercase accented characters write the letter acro...

Страница 33: ...s You can also create your own for any words letters or numbers You can create ShortCuts with up to 45 characters using the ShortCut preferences For example you could create a ShortCut for your name or for the header of a memo All ShortCuts you create appear on the list in the ShortCut Preferences screen are available in any of your RDA applications and are backed up on your desktop computer when ...

Страница 34: ... To edit a ShortCut 1 In the ShortCut Preferences screen tap the ShortCut you want to edit 2 Tap Edit 3 Make the changes you want then tap OK To delete a ShortCut 1 In the ShortCut Preferences screen tap the ShortCut you want to delete 2 Tap Delete then tap Yes Using your computer keyboard At times you may prefer to use your desktop computer keyboard rather than the onscreen keyboard to enter info...

Страница 35: ...e Palm Powered handhelds or to create a copy of your important Palm Desktop information To import data 1 Open Palm Desktop 2 Click the application into which you want to import data 3 If you are importing records that contain a field with category names do the following a Select All in the Category box b Make sure that the same categories that appear in the imported file also exist in the applicat...

Страница 36: ...Part 3 Part 3 Managing Applications ...

Страница 37: ...he Home icon to access the Application Launcher menu and then tap the icon of the application you want to open If you have many applications installed on your Meazura MEZ1000 RDA tap the scroll bar to see all the available applications Press an application button on the front panel to display the selected application immediately To switch between applications tap the Home icon or press an applicat...

Страница 38: ... as icons As an alternative you can display applications in a list format Changing the view of applications 1 Tap the Home icon to access the Application Launcher menu then tap the Options icon 2 From the Options menu tap Preferences 3 From the View By option tap List then tap OK to see your applications in list format In addition to displaying applications by icon or list you can set an option to...

Страница 39: ... activates the Graffiti 2 Help application or one of your RDA controls using Buttons preferences Drag stylus from input text area to top of screen If you assign a different application to the center button you can still select the original application using the Applications Launcher Changes made in the Buttons Preferences screen or HotSync Buttons dialog box take effect immediately Changing the Bu...

Страница 40: ...ll screen pen stroke activates 1 Tap the Home icon to access the Application Launcher menu 2 Select All or System from the pick list in the upper right corner 3 Select Prefs from the menu 4 In the pick list in the upper right corner tap Buttons 5 In the Buttons Preferences screen tap Pen 6 Tap the pick list and tap one of the following settings for the fullscreen pen stroke Backlight turns on the ...

Страница 41: ...CD using the Palm Install Tool These games include Giraffe a fun simple way to practice Graffiti 2 writing HardBall Puzzle After you install and start a game its instructions appear in the Game menu Depending on the game the Game menu may also contain commands to show high scores start a new game or set preferences for the game Installing add on applications on your RDA in Windows 1 From your comp...

Страница 42: ...alog box list but not from your desktop computer 7 Click Done A message appears to indicate that the application or applications will be installed the next time you perform a HotSync operation 8 Perform a HotSync operation to install the applications See Chapter 11 Exchanging and Updating Data using HotSync Operations for more information Removing applications You can remove add on applications pa...

Страница 43: ...s a gray bar over private records and the Hide option completely removes hides private records Assign a password to viewing options to enhance security Assigning a password requires you to enter a password before private entries can be viewed not assigning a password lets you view private entries when you Show Records from the Security dialog box Lock and turn off your RDA so that a password must ...

Страница 44: ...ick list tap Hide Records 4 When you return to the Address Book records marked as private are not included in the display of names Note that you can mask or hide records without assigning a password or you can assign a password if you want records to remain masked or hidden until a password is entered Assigning and editing passwords You can assign a password to protect your private records and to ...

Страница 45: ...editing passwords earlier in this chapter A password is required before using the Turn Off Lock option 2 Tap Turn Off Lock Device The System Lockout dialog box appears 3 Tap Off Lock You device is turned off and is locked To turn on and unlock your RDA 1 Turn on your RDA 2 Enter your password at the prompt then tap OK Recovering from a forgotten password If the Off Lock option is not active and yo...

Страница 46: ...Part 4 Part 4 Working with Applications ...

Страница 47: ...47 Part IV Working with Applications Your Meazura MEZ1000 includes the following applications Date Book Address Book To Do List Memo Pad Calculator ...

Страница 48: ...es and dates untimed events for example birthdays or anniversaries repeating events such as a weekly meeting held on the same day at the same time continuous events such as a vacation or three day conference and all day events which reflect the default hours of a day as set by the user Display your schedule in different ways by Day Week Month or Agenda view Set an alarm to sound minutes hours or d...

Страница 49: ... events such as a weekly meeting that is held on the same day at the same time each week Continuous events such as a vacation or three day conference All day events which reflect the default length of the day as set by the user Scheduling timed events You can schedule timed events for the current date or for future dates To schedule a timed event for the current date 1 Tap the Home icon to access ...

Страница 50: ...to change minutes Tap to scroll to later hours 6 Tap OK Scheduling a timed event for another date 1 Select the date you want in one of the following ways Tap the desired day of the week in the date bar at the top of the screen If necessary tap the Previous week or Next week scroll arrows to move to another week Tap Go To at the bottom of the screen to open the Go to Date dialog box Select a date b...

Страница 51: ...en then tap No Time and tap OK Scheduling repeating or continuous events The Repeat function lets you schedule events that recur at regular intervals or extend over a period of consecutive days Repeating events include a birthday and a weekly guitar lesson that falls on the same day of the week and the same time of day Continuous events might include a business trip or a vacation 1 Tap the event B...

Страница 52: ...screen opens Repeating or Continuous Events are shown with this icon 3 Tap Delete The Repeating Event screen opens asking for confirmation of the delete TIP You can also select Delete Event from the Record menu This opens the Repeating Event sceen Tap delete 4 Select one of the following options Current deletes a single occurence of this event Future deletes the current event and all future occure...

Страница 53: ...telephone number to an event using the Phone Lookup option For instructions see Using Phone Lookup in chapter 8 Performing Common Tasks Setting the alarm The Alarm setting lets you set an audible alarm for events in your Date Book and display a reminder message on screen For untimed events only the reminder message appears Setting an alarm for an event You can set an alarm for minutes hours or day...

Страница 54: ...r the alarm and the number of times the alarm sounds To set alarm options 1 To open the Preferences dialog box do one of the following In the Date Book tap the Options icon Tap the inverted tab at the top of the Date Book screen to display the menu bar In the text input area drag a diagonal line from the lower left to upper right to display the Command toolbar Type an R the Graffiti 2 ShortCut for...

Страница 55: ...s To display the current time Tap and hold down the stylus on the date in the date bar to display the time When you release the stylus the menu bar appears Working in Week view Week view displays a calendar of your events for an entire week This view lets you quickly review your appointments and available time slots In addition the graphical display helps you spot overlaps and conflicts in your sc...

Страница 56: ... the time selected for a new event Tap any day or date that appears at the top of the Week view to move directly to that day without selecting an event The Week view displays the time span defined by the Start Time and End Time in the Date Book Preferences settings If you have an event before or after this time span a bar appears at the top or bottom of that day s column Use the onscreen scroll ar...

Страница 57: ...ht corner to move forward or backward a month Tap Go To in order to open the date selector and select a different month Use the scroll buttons on the front panel of your RDA to move between months Press the top button to display the previous month the bottom button to display the next month Working in Agenda view The Agenda view lets you view appointments untimed events and To Do List items in a s...

Страница 58: ...ts 1 In Day view or Month view tap the Options icon 2 Tap Options and then tap Display Options 3 For Day view select from the following options Tap Show Time Bars to display time bars showing the duration of an event and any event conflicts Tap Compress Day View to display start and end times for each event but no blank time slots at the bottom of the screen to minimize scrolling Clear the option ...

Страница 59: ...ay option is selected The Week view displays the time span defined by the Start Time and End Time 3 Tap Start Time and use the scroll arrows to select a new start time for the Date Book screens Repeat the step to set a new end time If the time slots you select do not fit on one screen you can tap the scroll arrows to scroll up and down 4 Tap OK ...

Страница 60: ...task Assign a due date for any or all of your To Do List items Assign To Do List items to categories so that you can view them in logical groups For more information see Categorizing records in chapter 8 Performing Common Tasks Sort your To Do List items either by due date priority level or category Attach notes to individual To Do List items for a description or clarification of the task For more...

Страница 61: ...mon Tasks 4 Tap anywhere onscreen to deselect To Do List item TIP If no To Do List item is currently selected writing in the text input area automatically creates a new item Setting To Do List priorities You can set priorities for tasks in your To Do List according to their importance or urgency Items appear by priority and due date at the top of the To Do List by default with 1 the highest priori...

Страница 62: ...n the memory of your RDA You must purge completed items to remove them from memory 2 Tap the check box on the left side of the item Completed To Do List item Changing priorities and due dates You can change the To Do List to display the due date assigned to an item change its priority and assign a category to the task with the To Do Item Details dialog box You can then sort To Do List items by pri...

Страница 63: ...ay completed items and their completion dates as well as due items and their due dates 1 In the To Do List tap Show 2 In the To Do Preferences dialog box choose from the following settings Tap Show Completed Items to display your completed items in the To Do List If this setting is turned off completed To Do items disappear from the list but are kept in the memory of your RDA You must purge comple...

Страница 64: ...p or duplicate names addresses phone numbers and other information Enter up to five phone numbers home work fax car and so on or e mail addresses for each name Define which phone number appears in the Address List for each Address Book entry Attach a note to each Address Book entry in which you can enter additional information about the entry Assign Address Book entries to categories so that you c...

Страница 65: ...er 2 and Palm Desktop online Help for more information To create a new Address Book entry 1 Tap the Home icon to display the Application Launcher menu then tap the Address Book icon to display the Address List 2 Tap New Tap New Cursor at Last name 3 Enter the last name of the person you want to add to your Address Book 4 Tap the First Name field to move to it 5 You can move to any field by tapping...

Страница 66: ...icate an entry the word Copy appears next to the name in the First Name field 1 From the Address Book tap a name you want to duplicate 2 Do one of the following Tap the Address Edit tab at the top of the screen then tap Duplicate Record in the Record menu In the text input area of your device s screen drag a diagonal line from the lower left to upper right to display the Command toolbar then write...

Страница 67: ...t screen Options are Work Home Fax Other and E mail Tap Category and then tap a category in the pick list that you want to assign to the entry Tap Private to hide the entry when Security is turned on 5 To attach a note to the entry tap Note enter information in the text input area and tap OK 6 To delete the entry tap Delete 7 Tap OK Changing the Address Book display You can change how Address Book...

Страница 68: ...ds to identify the information you ll enter in them The names you give the custom fields appear in all entries at the end of the Address Edit screen 4 Tap OK in the Rename Custom Fields dialog box 5 Tap Done Controlling the Address Book display on returning to the application 1 In the Address list or in Address view tap the Options icon 2 Tap Options and then tap Preferences 3 In the Address Book ...

Страница 69: ... kind of message on your connected organizer Drag and drop memos into popular computer applications like Microsoft Word when you synchronize using Palm Desktop and HotSync technology Assign memos to categories so that you can organize and view them in logical groups Write down phone numbers and other types of information Later you can copy and paste this information into other applications ...

Страница 70: ...on the front of your RDA to display the Memo List 2 Tap New Tap New TIP You can also create a new memo by beginning to write in the text input area in the Memo List screen The first letter is automatically capitalized and begins your new memo 3 Enter the text you want to appear in the memo Use the carriage return stroke to move down to new lines in the memo 4 Tap Done You can categorize memos and ...

Страница 71: ...ove to the top first line of the memo Tap Go to Bottom of Page to move to the bottom last line of the memo Changing the order in which memos appear in the Memo List 1 In the Memo List tap the Options icon 2 Tap Options 3 Tap Preferences and choose one of the following options Tap Manual to sort new memos in the sequence in which you create them Tap Alphabetical to sort new and existing memos in nu...

Страница 72: ... lets you perform general mathematical functions such as addition subtraction multiplication and division Use the Calculator to Perform basic calculations Store and retrieve values Display the last series of calculations which is useful for confirming a series of chain calculations ...

Страница 73: ...rst and then press the button The M button places the current number in memory Each new number you enter with the M button is added to the total stored in memory The number that you add can be either a calculated value or any number you enter by pressing the number buttons Pressing this button has no effect on the current calculation or series of calculations it merely places the value into memory...

Страница 74: ...Using the Calculator Working with Applications 3 When you have finished reviewing the calculations tap OK ...

Страница 75: ...75 ...

Страница 76: ...Part 5 Part 5 Using the Attention Manager ...

Страница 77: ...y when new insistent alarms are posted Using the Reminder dialog screen The Reminder dialog screen has three buttons for responding to an alarm OK Makes the reminder go away with no further notification Snooze Switches to the application that was running when the alarm went off and returns to the Reminder dialog screen after five minutes You can go back to the Reminder dialog screen right away by ...

Страница 78: ... times the alarm repeats before giving up Play Every The pause between each time the alarm sounds Using the Reminders list screen The Reminders dialog screen changes to a list of items that require your attention under two insistent alarm conditions When a second application attempts to get your attention and the first has not been dismissed or snoozed When a first application makes a second attem...

Страница 79: ...or more detail see Understanding the blinking alarm indicator below Clear All removes all of the items from the list but does not close the Reminders screen Tap this button to erase a list of events that have passed Subtle alarms Some applications provide a visual and optionally audible indication but do not otherwise disrupt your work flow Subtle alarms do not display a Reminders screen Instead a...

Страница 80: ...Subtle alarms Using the Attention Manager Tapping on the indicator opens the Attention Manager in list mode even if there is only one item ...

Страница 81: ...Part 6 Part 6 Using an Expansion Card ...

Страница 82: ...hen an expansion card is inserted all applications listed in the card s launcher directory is automatically added to a new Launcher category This category is assigned the name of the expansion card volume for example the name My Card is used throughout this section To display the contents of your expansion card 1 Tap the Home icon to access the Applications Launcher menu 2 Tap the All pick list in...

Страница 83: ...launch The selected application is loaded into memory RAM and launched If the application is already resident in RAM it is not loaded again just launched Displaying application information from the expansion card To display information about an application from the expansion card 1 Press the Home icon to access the Applications Launcher menu on the front of your Meazura MEZ1000 2 Tap the Options i...

Страница 84: ... the source using the Copy To and the From pick lists 5 Select the application and then tap Copy The application is then copied to the selected destination 6 Tap Done when you are finished TIP Some applications and databases are copy protected and cannot be beamed These are listed with a lock icon next to them Beaming an application from the expansion card To beam an application from your expansio...

Страница 85: ...tions Launcher menu 2 Tap the Options icon to bring up the App menu 3 Tap Delete 4 Select My Card from the Delete From pick list 5 Tap the application you want to delete then tap Delete The application is deleted Applications that are loaded in ROM for example Memo Pad cannot be deleted and are not listed 6 Once you have deleted your aplication you can tap Done to exit Using CardInfo To use Card I...

Страница 86: ...ame Card dialog box 3 Tap the Rename button To reformat the expansion card 1 To reformat the expansion card tap Card Info select Format Card and tap OK in the Format Card dialog box NOTE Reformatting the expansion card will destroy its data To display more help in using Card Info 1 Tap the Card Info tab in the upper left corner of the screen 2 Select Help from the menu and scroll through the tips ...

Страница 87: ...Part 7 Part 7 Performing Common Tasks ...

Страница 88: ...ect start and end times for your appointment and tap OK 3 Enter text for the record NOTE The RDA automatically capitalizes the first letter of each field except numeric and e mail fields 4 As an option tap Details to select attributes for the record 5 In the Address Book and Memo Pad only tap Done Your RDA saves the new record automatically Editing records After you create a record you can change ...

Страница 89: ...verses the last action taken Cut removes a selection from its current location to memory You can then paste the text into another area of the current application or into a different application Copy copies a selection and moves it to memory You can paste the selection into another area of the current application or into a different application Paste inserts a selection from memory into an area you...

Страница 90: ...the application from which you want to purge records 2 Choose from the following options Tap the Options icon open the Record menu and then tap Purge A confirmation dialog box appears Tap the inverted tab at the top left of the screen open the Record menu and select Purge 3 Choose from the following options For the Date Book select the Delete Events Older Than pick list and select an option 1 week...

Страница 91: ...egory TIP Pressing the Address Book To Do List or Memo Pad button on your RDA toggles through the categories assigned to the application respectively To edit application categories 1 In the Address Book To Do List or Memo Pad application choose from the following options Tap the pick list in the upper right corner of the screen and tap Edit Categories Tap here In the Address Book select a record a...

Страница 92: ...Tap the pick list in the upper right corner of the screen then tap Edit Categories 2 Select the category you want to rename then tap Rename 3 Enter the new name for the category and tap OK 4 Tap OK to exit the Edit Categories dialog box TIP You can move records from multiple categories into a single category by renaming all discrete categories with a single category name Finding records Your RDA l...

Страница 93: ...any or all applications For example if the text dog appears in the Address Book and the Date Book the Find option displays both occurrences in the Find dialog box 1 Tap the Find icon 2 Enter the text you want to find then tap OK Note that the Find option is not case sensitive searching for davidson also finds Davidson TIP Select text in an application before tapping Find to automatically place the...

Страница 94: ...y of the standard applications discussed in this manual with the name and phone number found within your Address Book using Phone Lookup Just place your cursor or drag and highlight a section of text you want to replace then follow step 2 above When the search is complete the name and phone number of the candidate will be added Sorting records You can sort lists of records in various ways dependin...

Страница 95: ...etting to Hide records Private record names are covered with a gray bar when the security setting is set to Mask records If you have assigned a password to your device you must enter it before private records are displayed See Assigning security options in chapter 3 Managing Applications for more information 1 In your application do one of the following Create a new record and tap Edit and then ta...

Страница 96: ...Bar drag your pen diagonally across the text input area from lower left to upper right 2 From the Current Privacy pick list tap Show Records then tap OK 3 If you have assigned a password you must enter the password before the hidden records are displayed 4 Enter your password and then tap Show Attaching notes You can attach notes to records in all the basic applications except the Memo Pad A note ...

Страница 97: ...ommand toolbar In the text area write an F the ShortCut for the Font command 3 Tap the font style you want then tap OK Tap here for small font Tap here for bold font Tap here for large font Getting information on an application You can get information on any application by displaying its About box The About box displays the name and version number of the application To display the About box 1 Tap ...

Страница 98: ...Part 8 Part 8 Beaming Information ...

Страница 99: ...s approximately 4 inches and 1 meter approximately 39 inches apart and the path between the two devices must be clear of obstacles Beaming distance to other Aceeca connected devices may be different Beaming a business card To select a business card for beaming 1 Tap the Home icon to access the Applications Launcher menu 2 Tap the Address Book icon 3 In the Address List create a new entry or select...

Страница 100: ... beamed as indicated by a lock icon 5 When the Beam Status dialog box appears point the IR port directly at the IR port of the receiving RDA After the beaming process is finished the dialog box will automatically close Receiving beamed information To receive beamed information 1 Turn on your RDA 2 Point the IR port directly at the IR port of the transmitting RDA to open the Beam Status dialog box ...

Страница 101: ...Part 9 Part 9 Exchanging and Updating Data using HotSync Operations ...

Страница 102: ... System Administrator preparing several RDA s for a group of users you may want to create a user profile See Creating a user profile later in this chapter before performing the following steps Creating a user profile You can create a user profile to load data into an RDA without associating that data with a user name This feature lets System Administrators configure several Aceeca RDA s with speci...

Страница 103: ...lways Available adds HotSync Manager to the Startup folder and constantly monitors the communication port for synchronization requests from your RDA With this option the HotSync Manager synchronizes data even when Palm Desktop is not running Available Only When Palm Desktop Is Running starts HotSync Manager and monitors requests automatically when you open Palm Desktop Manual monitors requests onl...

Страница 104: ...s how records are handled during synchronization These options are called a conduit By default a HotSync operation synchronizes all files between the RDA and Palm Desktop In general you should leave the settings to synchronize all files The only reason you might want to change these settings is to overwrite data on either your RDA or Palm Desktop or to avoid synchronizing a particular type of file...

Страница 105: ... Custom dialog 7 Click OK 8 Repeat steps 4 through 7 to change conduit settings for other applications 9 Click Done to activate your settings Using File Link Windows only The File Link feature lets you import Address Book and Memo Pad information into your RDA from a separate external file such as a company phone list HotSync Manager stores the data in a separate category on your Palm Desktop and ...

Страница 106: ...Part 10 Part 10 Maintaining Your RDA ...

Страница 107: ...is waterproof and dustproof to IP67 standards and can be operated in most environmental conditions We do not however recommend the RDA be operated in extreme conditions e g Underwater for long periods in extreme hot and cold environments or at extreme altitude Avoiding Hazardous Substances The plastic case of the Meazura MEZ1000 is made of a Bayer Bayblend FR2000 At room temperature the RDA is res...

Страница 108: ...o freezing temperatures Aging will occur much faster at high temperatures such as a hot car and will reduce the life of your battery Purchase a Li Ion battery pack only when you need a replacement ensuring you receive a fresh battery pack Do not use the battery with dry cells or other primary batteries or batteries of a different package type or brand Stop using the battery if it exhibits abnormal...

Страница 109: ...ture range Use the battery only in the specified equipment Do not charge the battery in a place where static electricity is generated or let the battery touch something that is statically charged Recycle and Disposal Methods Lithium ion batteries like all rechargeable batteries are recyclable and should be recycled CAUTION If your battery is damaged or if it no longer holds a charge dispose of it ...

Страница 110: ...Refurbishment Services Maintaining Your RDA For more information about the refurbishment process please contact Aceeca through our website at http www aceeca com ...

Отзывы: