background image

CHAPTER 8: APPLIANCES & ENTERTAINMENT SYSTEMS     35

Audio & Visual Equipment

All audio and visual equipment installed on your boat have separate instruction sheets or manuals that explain their 
use in detail.

Dockside Cable TV & Telephone (If Equipped)

Your boat may be equipped with a dockside cable TV (television) and Telephone inlet

....

To receive cable TV transmissions, the boat must be hooked up to a dockside cable TV source.

The boat must be hooked up to a dockside telephone line for a land based telephone to work.

N OT I C E

AM radio reception may be impaired anytime the engine or generator is running.

Содержание 3100 SCR

Страница 1: ......

Страница 2: ......

Страница 3: ...contained herein Due to our commitment to product improvement Maxum reserves the right to make changes in the product design specifications and equipment at any time with out notice or obligation Ill...

Страница 4: ...sion System If Equipped 14 Fuel System 14 Diagrams 15 Fuel Fill and Vent 15 Fuel Filters 15 Anti siphon Valve CHAPTER 4 CONTROLS 16 Steering 16 Shift Throttle 16 Power Trim and Tilt 17 Trim Tabs 18 Bo...

Страница 5: ...1 HEATING AIR CONDITIONING 39 Air Conditioning System If Equipped CHAPTER 12 ELECTRICAL SYSTEM 40 12 Volt DC System 40 Batteries 41 Alternator 41 Battery Charger 41 12 Volt Accessory Outlets 41 Fuses...

Страница 6: ...lerts you to hazards or unsafe practices which COULD result in severe personal injury or death if the warning is ignored WARNING This box alerts you to hazards or unsafe practices which COULD result i...

Страница 7: ...ervice Contact your dealer if you have any problems with your new boat If your dealer cannot help call our customer service hotline 360 435 8957 or send usa FAX 360 403 4235 Buy replacement parts from...

Страница 8: ...s were selected to provide optimum performance and service Installing different engines or other accessories may cause unwanted handling characteristics Should you choose to install different engines...

Страница 9: ...Zincs Your boat is equipped with sacrificial anodes zincs to protect underwater metal parts from excessive deterioration Check the zincs regularly and replace them if they have deteriorated more than...

Страница 10: ...in injury or death Factors increasing the effects of CO poisoning include Age Smokers or people exposed to high concentrations of cigarette smoke Consumption of alcohol Lung disorders Heart problems P...

Страница 11: ...manual call 800 383 0269 and one will be mailed to you If your boat is not equipped with a carbon monoxide alarm consider purchas ing one from your dealer or marine supply store What To Do If Carbon M...

Страница 12: ...el positions as shown in the illustration above PERSONAL INJURY and or PRODUCT or PROPERTY DAMAGE HAZARD Lift slings may slip on the hull Avoid serious injury or death by securing the slings together...

Страница 13: ...IF EQUIPPED 4 DECK DRAIN PORT HULLSIDE 1 DECK DRAINS 2 AFT BILGE PUMP DRAIN 3 FUEL VENT 4 WATER TANK VENT 5 HOLDING TANK VENT 6 WATER HEATER DRAIN 7 SINK DRAIN 8 GRAY WATER TANK DRAIN IF EQUIPPED 9 GR...

Страница 14: ...INDLASS CONTROLS IF EQUIPPED 4 ANCHOR ROLLER 5 ANCHOR DEAD END 6 SPOTLIGHT IF EQUIPPED 7 ANCHOR LOCKER DRAIN 8 HIDDEN HORN 9 NAVIGATION LIGHTS FOREDECK 1 ALL AROUND LIGHT 2 RADAR IF EQUIPPED 3 TV ANTE...

Страница 15: ...CATIONS 9 1 GRAB RAIL 2 CLEAT STRONG POINT 3 WATER FILL DECK FITTING 4 COURTESY LIGHT 5 TRANSOM SHOWER 6 FUEL FILL DECK FITTING 7 WASTE PUMP OUT DECK FITTING 8 TRANSOM STORAGE BOX 1 2 5 3 2 4 6 7 2 1...

Страница 16: ...AUGE 8 SPEEDOMETER 9 DEPTH SOUNDER 10 SPOTLIGHT CONTROL IF EQUIPPED 11 WINDLASS CONTROL IF EQUIPPED 12 BOW THRUSTER CONTROL IF EQUIPPED 13 12 VOLT ADAPTER 14 THROTTLE SHIFT LEVER 15 TRIM TAB SWITCH 16...

Страница 17: ...rcuit Breakers On the engine Fuel Fill On the starboard aft corner of the deck Fuel Tank In the engine compartment at the front Generator Control Panel On or near the AC panel in the galley Generator...

Страница 18: ...er switch on the main AC panel To make sure the engine compartment is ventilated with fresh air run the bilge blower For at least four minutes before starting the engines During starting Anytime your...

Страница 19: ...rve the following The system will go off automatically whenever direct heat from a fire is detected in the engine compartment The system can be set off manually by pulling the T handle labeled FIRE at...

Страница 20: ...f your passengers the fueling instructions in the Cruiser Yacht Owner s Manual must be carefully followed WARNING CAUTION Avoid the storage or handling of gear near the fuel lines fittings and tank IF...

Страница 21: ...d free of debris Consult with your selling dealer or local marina concerning fuel additives that help to prevent fungus or other buildup in your fuel tank Anti siphon Valve Your boat is equipped with...

Страница 22: ...r s Manual Also read and understand the shifter throttle and engine manuals included in your owner s packet Power Trim and Tilt The sterndrive on your boat is equipped with power trim and tilt Trim an...

Страница 23: ...ther than one long one After each short touch allow several seconds for the hull to react The trim tab hydraulic fluid reservoir is located in the engine compartment The fluid level must be checked pe...

Страница 24: ...cation of the system s battery switch and gear oil reservoir Observe the following about the bow thruster system The bow thruster is an all electric system and is independent of the boat s engines The...

Страница 25: ...ke sure the technician gives you a deviation card which shows the corrections to apply in navigational calculations Keep a copy of the deviation card at each helm DO NOT use the depth finder as a navi...

Страница 26: ...at switches autofloat switches and or switches at the helm Bilge pumps are wired directly to the battery so they will normally function even when the boat is completely shut down and left unattended N...

Страница 27: ...stall the power cartridge 1 Align the tabs and slots and press firmly until the tabs click into place 2 Make sure that the power cartridge is locked into place Autofloat Switches Automatic bilge pumps...

Страница 28: ...must remain closed until the strainer is completely reassembled 3 Take apart the seawater strainer 4 Remove the debris 5 Flush the strainer with water 6 Reassemble the seawater strainer 7 Open the se...

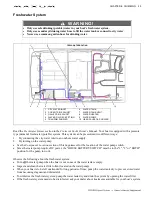
Страница 29: ...pect and clean the water filter often located on the water pump When your boat is to be left unattended for long periods of time pump the water tank dry to prevent stored water from becoming stagnant...

Страница 30: ...is pressurized You do not need to turn on the water pump s DC breaker HOT HAZARD Water heated by the water heater can reach temperatures hot enough to scald the skin WARNING WATER HEATER DAMAGE HAZARD...

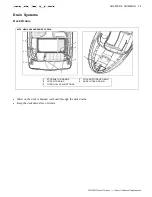
Страница 31: ...r on the deck is drained overboard through the deck drains Keep the deck drains free of debris 1 STORAGE TUB DRAINS 2 COCKPIT DRAINS 3 THRU HULL DRAIN FITTINGS 4 COOLER STORAGE DRAIN 5 ROPE LOCKER DRA...

Страница 32: ...any debris from the box and the filter 3 Clean the sump pump as outlined in the Bilge Pump section of this Supplement Sump System Winterization Drain the sump pump system in the winter months when not...

Страница 33: ...drain into a holding tank The gray water holding tank is connected to a deck fitting for dockside pump out The gray water holding tank should be pumped out each time the fresh water tank is filled 1...

Страница 34: ...pump out You can determine the content level of the holding tank by looking at the side of the tank Empty the holding tank at every opportunity Electric Flush Marine Head If Equipped The electric flus...

Страница 35: ...m the toilet into the holding tank The holding tank is plumbed to a waste fitting on the deck for dockside pump out 1 2 3 5 9 6 4 7 1 SEAWATER PICKUP BALL VALVE 2 MARINE HEAD 3 MARINE HEAD TO VACUUM P...

Страница 36: ...ontinue running the macerator if the waste holding tank is empty 3 Close the underwater discharge seacock when you are done pumping NOTICE Check with local authorities for regulations regarding the le...

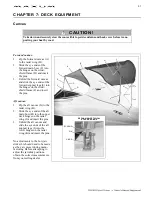
Страница 37: ...main bow H into the upper deck hinges on the radar wing I and insert the pins 3 Unfold the aft canvas and slide the eye ends of the aft support legs J into the lower hinges on the radar wing K and ins...

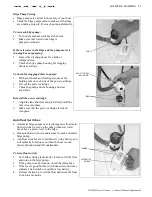
Страница 38: ...move the boat to and directly above the anchor Use the windlass to dislodge the anchor from the bottom by pulling it straight up Windshield Wiper When necessary replace the wiper blade with an 18 blad...

Страница 39: ...Stove If Equipped NOTICE Always keep an approved ABC type fire extinguisher in galley area BURN SCALDING and or FIRE HAZARD Read the stove s instruction manual before using Always keep an approved AB...

Страница 40: ...tinguisher in galley area Do not use the stove while underway Any non cooking devices on or near your stove during use are potential fire hazards DO NOT touch burners grates or nearby surfaces as they...

Страница 41: ...etail Dockside Cable TV Telephone If Equipped Your boat may be equipped with a dockside cable TV television and Telephone inlet To receive cable TV transmissions the boat must be hooked up to a docksi...

Страница 42: ...verted into a berth 1 Remove the table A and the table leg B 2 Lift the dinette seat cushions C 3 Place the filler boards D securely into the recessed edge at the front of the dinette seats 4 Put the...

Страница 43: ...ating can be converted into a flat sunlounge 1 Remove the table A and table leg B 2 Put the filler board C in place so that it fits securely into the recessed edge at the front of the aft cockpit seat...

Страница 44: ...Owner s Manual Interior Exterior Lights The lights are powered by the boat s 12 volt DC system The HOUSE BATTERY SWITCH must be in the 1 2 or BOTH position for the lights to work There are ON OFF ligh...

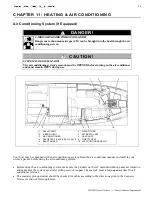
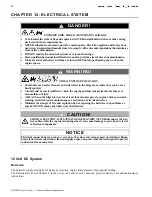
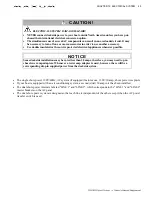
Страница 45: ...r conditioner is in use The seawater pickup strainer should be checked for debris according to the directions given in the Seawater Strainer section of this supplement DANGER CARBON MONOXIDE POISONING...

Страница 46: ...es are turned OFF before performing any work in the engine spaces DANGER FIRE EXPLOSION HAZARD Fuel fumes are heavier than air and will collect in the bilge areas where they can be acci dently ignited...

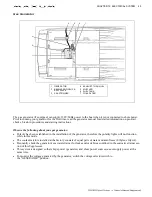
Страница 47: ...ne at the helm and one on the TV cabinet These outlets can be used with any 12 volt device which draws 15 amps or less The 12 volt accessory outlets are protected by 15 amp circuit breakers on the mai...

Страница 48: ...Battery 1 Provides Power for Accessories and Lights Charges Battery 1 POSITION 2 Battery 2 Provides Starting Power Battery 2 Provides Power for Accessories and Lights Charges Battery 2 POSITION BOTH...

Страница 49: ...boat WATER HEATER DAMAGE HAZARD Do not energize the water heater electrical circuit until the heater is COMPLETELY filled with water The tank is full if water flows from the tap when the hot water is...

Страница 50: ...ut door extension cords that are not rated for marine use DANGER SHOCK ELECTRICAL SYSTEM DAMAGE HAZARD Monitor the polarity indicator lights EVERY TIME you connect to shore power When connecting to sh...

Страница 51: ...witch is used ELECTRICAL SYSTEM DAMAGE HAZARD NEVER connect dockside power to your boat outside North America unless you have pur chased the international electrical conversion option The simultaneous...

Страница 52: ...AL INLETS WITH AIR CONDITIONER NOTE IF EQUIPPED SHORE POWER INLET S TYPICAL SHORE POWER INLET FIGURE 1 DUAL SHORE POWER AC PANEL IF EQUIPPED LINE 2 TRANSFER LINE 1 DOCKSIDE MASTER LINE 2 DOCKSIDE MAST...

Страница 53: ...l shock injuries In this case do not turn on the master breaker switch 5 Switch the LINE 1 DOCKSIDE MASTER on 6 If equipped with dual dockside switch the LINE 2 DOCKSIDE MASTER on 7 Turn on the indivi...

Страница 54: ...e that explosive fumes have been removed If you smell any fuel DO NOT start the generator If the generator is already running IMMEDIATELY shut off the generator and all electrical accessories and inve...

Страница 55: ...larity lights will not function while in this mode The coolant mixture installed at the factory consists of equal parts of water and anti freeze Ethylene Glycol Frequently check the generator s seawat...

Страница 56: ...urned to position 1 or 2 4 Slide the master breaker lockouts to cover the dockside master breakers and reveal the generator master breakers 5 Switch the GENERATOR LINE ONE MASTER and the GENERATOR LIN...

Страница 57: ...ights will not function while in this mode Frequently check the generator s seawater strainer for leaks and or debris as outlined in the seawater strainer sec tion of this Supplement This system is de...

Страница 58: ...d dur ing running of the generator 3 Make sure that the battery switch is turned to position 1 or 2 4 Slide the master breaker lockouts to cover the dock side master breakers and reveal the generator...

Страница 59: ...IGHT SWITCHES 14 GALLEY LIGHTS 15 TV CABLE 16 PHONE 17 WINDLASS CONTROLS 18 SPOTLIGHT VIEW IS UNDER SIDE OF DECK 1 2 3 4 5 6 7 8 9 10 11 21 20 19 18 16 15 14 1 TRIM TAB PUMP 2 ENGINE PLUG 3 WATER PUMP...

Страница 60: ...tery System Bow Thruster Battery System If Equipped 1 BATTERIES 2 ENGINE GROUND 3 ENGINE 4 BATTERY SWITCH 5 GROUNDING BAR 2 3 4 2 3 5 1 1 STARBOARD BATTERY 2 BATTERY CHARGER 3 CONTROLS 4 BATTERY SWITC...

Страница 61: ...C System 1 2 3 4 5 6 7 8 9 10 11 12 13 1 WATER HEATER 2 BATTERY CHARGER 3 AFT BERTH OUTLET 4 PANEL 5 REFRIGERATOR 6 MICROWAVE 7 STOVE 8 GALLEY OUTLET 9 TV OUTLET 10 AIR CONDITIONER IF EQUIPPED 11 WATE...

Страница 62: ...IONER STRAINER IF EQUIPPED 2 AIR CONDITIONER PUMP 3 MACERATOR DISCHARGE IF EQUIPPED 4 AIR CONDITIONER PICKUP IF EQUIPPED 5 ZINC PLATE 6 GARBOARD DRAIN 7 GENERATOR PICKUP IF EQUIPPED 8 GENERATOR STRAIN...

Страница 63: ...CHAPTER 12 ELECTRICAL SYSTEM 57 Wire Diagrams Engine Electrical System SHEET 1 OF 4 SYMBOLS SEE SHEET 3 COLOR CODES SEE SHEET 3...

Страница 64: ...58 CHAPTER 12 ELECTRICAL SYSTEM DC Electrical System SHEET 2 OF 4 SYMBOLS SEE SHEET 3 COLOR CODES SEE SHEET 3...

Страница 65: ...CHAPTER 12 ELECTRICAL SYSTEM 59 AC Electrical System SHEET 3 OF 4...

Страница 66: ...60 CHAPTER 12 ELECTRICAL SYSTEM Connector List SHEET 4 OF 4...

Страница 67: ...Owner s Notes...

Страница 68: ...Owner s Notes...

Страница 69: ...Owner s Notes...

Страница 70: ...Owner s Notes...

Страница 71: ......

Страница 72: ......

Отзывы: