background image


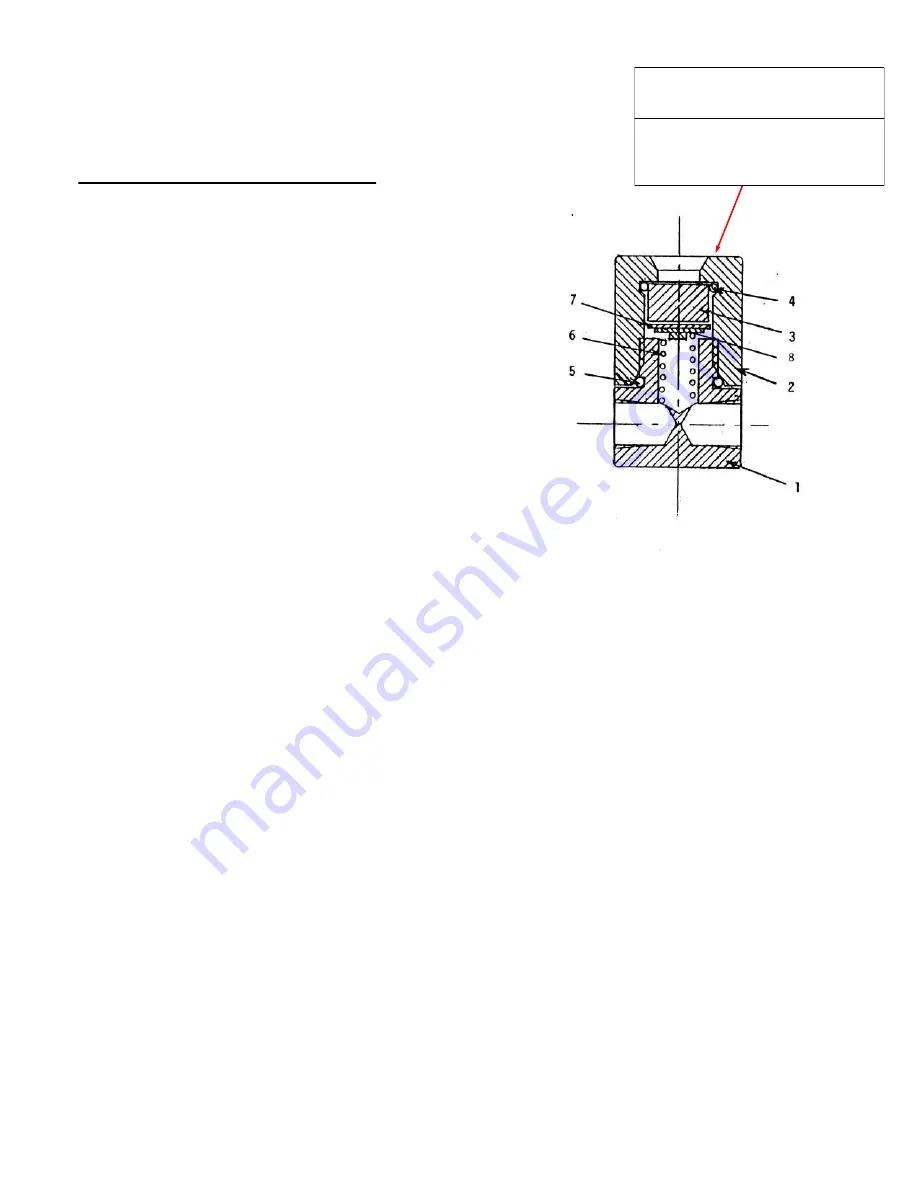
Assembly and Disassembly


Model MI

-

4000 Visual Indicator


Unscrew by hand , counter

-

clockwise, 

to remove and replace elements.  


Reinstall cap hand tight.


BLEED ALL PRESSURE FROM 
UNIT AND SHUT OFF POWER 


Item


Qty


Part No.


Description


1


1


583


Body


2.


1


584


Cap


3


1


593


Window


4


1


592

-

1


O ring 2

-

018


5


1


592

-

2


O ring 2

-

019


6


1


592

-

3


Spring


7


1


592

-

5


Indicator humidity (blue)


8


1


592

-

6


Indicator CO (beige)


NOTES:


1.


Technical bulletin – 588


2.


Use Dow silicone grease 111 or equivalent on


seals and threads


3.


Tighten cap hand tight only


4.


Install window (3) with smooth, small diameter


against O ring (4)


5.


Insure window (3) is fully against should

er

 of cap (2)


6.


Avoid spring or other hard objects touch

ing

 window


7.


Install so both elements can be seen through window,


insure spring is in place to hold element against


window


8.


When installing humidity element place it in cap (2)


with blue face against window


9.


COLOR CHANGE:


-

 Blue to pink means high humidity


-

 Beige to dark brown means dangerous levels of


carbon monoxide


NOTE:


1.


DO NO TOUCH ELEMENTS WITH HANDS


USE CLEAN TWEEZERS OR CLEAN NEEDLE


NOSE PLIERS


2.


MAKE SURE COMPRESSOR AND FILTER


HOUSING ARE COMPLETELY DRAINED OF


ALL AIR PRESSURE PRIOR TO ATTEMPTING


REMOVAL OF CAP FOR MAINTENANCE

.


Page 19 of 22

Содержание 90 PBAC

Страница 1: ...vice max air com Max Air is a registered trademark with the U S patent office copyright 2006 This manual cannot be reproduced without the express written permission of Max Air WARNING DO NOT USE WITH...

Страница 2: ...lling compressor you are now a filling station You must follow all local state and federal regulations Prior to filling a cylinder check the pressure rating and current hydro date stamped on cylinder...

Страница 3: ...e year from purchase date Weight 276 lbs 125kg w 9 HP Honda engine Dimensions 42 L x 20 W x 28 5 H MAX AIR 90 9 0cfm TECHNICAL DESCRIPTION Model Approx output MAX AIR 90 260 L min 9 0cfm Drive motors...

Страница 4: ...small particles of lubricating oil This condensate is a milky fluid and precipitates in the separators 2 3 Technical details of the compressor Block 2 3 1 Crankcase crankshaft piston cylinder The cran...

Страница 5: ...and optimum separation 2 4 Base Frame Protective Frame Covers Depending on the specifications of the buyer the compressor rests on a base frame consisting of welded section steel with an additional f...

Страница 6: ...or disconnect at the power source prior to any work Never weld high pressure tubing Never empty air cylinders completely The closed cylinder should always contain some residual pressure in order to av...

Страница 7: ...set pressure relief blow off on the final stage is usually 10 above the cylinder rated pressure Example if you are filling a 3000 psi rated cylinder you should close the fill valve or shut off the com...

Страница 8: ...with fresh oil at least once a year 4 7 Maintenance and air tightness test Besides the standard stipulated service works 4 8 we recommend you clean the compressor at regular intervals to notice any o...

Страница 9: ...e sure that the holding spring on top is installed properly Only use original cartridges 4 8 5 Condensate drain system Condensate water oil vapors emulsion The color of this emulsion should be milky w...

Страница 10: ...be carefully treated to prevent even the slightest damage Use only gasoline soft brushes of copper or nylon Do not use steel brushes screwdrivers etc Should you detect even the smallest damage rupture...

Страница 11: ...ty valves must be replaced as complete parts 4 9 1 Cylinders When removing and replacing cylinders note that the piston is in the top position must be on the same level with the cylinder top edge Corr...

Страница 12: ...w thread max hex screw M 6 1 0 kpm 7 ft lbs inner hex Screw hex screw M 8 2 5 kpm 18 ft lbs inner hex Screw hex screw M 10 4 5 kpm 32 ft lbs inner hex screw Valve head screw requires torque wrench tig...

Страница 13: ...rrect Blocked cooling tubes or Tighten or replace gaskets leaking Check brush with soap replace Intake filter blocked Replace Intake hose bent Readjust Worn pistons or rings Replace Oil taste in deliv...

Страница 14: ...elief valve factory preset to customer requirement 11 Front bearing cover 22 Check valve INSIDE upper separator 12 Fan wheel 23 Oil fill vent cap screw 13 Oil filler cap 24 Oil level indicator behind...

Страница 15: ...n fold back flat prior to screw down housing cap C Read and remove tape c D Remove snap out plastic plug under tape E Remove plastic plug make sure internal O ring is present and lubricated use silico...

Страница 16: ...H E Close up view of plastic plug E at bottom of cartridge B C D I J F G B C D E K H 27 x 2 dia E A Sealed Foil envelope not shown Part Number LF 65247 35 000 cft 72o F 5000psi Page 15 of 22...

Страница 17: ...d for any sign of moisture F Warning label read and understand this and any labels on the filter G Molecular sieve beige beads removes humidity H Hopcalite catalyst converts trace amounts of carbon mo...

Страница 18: ...14 1 4 x 1 3 4 dia A C E G I B D F H J Part Number LF 1002 10 000 cft 72o F 5000psi NOTE Dimensions exclude threaded plastic nipple w O ring Page 17 of 22...

Страница 19: ...s USAGE The detection disc is specially treated to prolong its life A color change from tan to dark grey will occur in the presence of carbon monoxide The rate if change of color is directly related t...

Страница 20: ...ly 4 Install window 3 with smooth small diameter against O ring 4 5 Insure window 3 is fully against shoulder of cap 2 6 Avoid spring or other hard objects touching window 7 Install so both elements c...

Страница 21: ...ING BLUE Page 20 of 22 Remove top half of element housing and invert Place the blue moisture indicator down inside element against the glass taking care not to touch the blue element with your fingers...

Страница 22: ...be carried out in compliance with the instructions contained in this manual Should the required work not be covered by the manual or assistance be required you are advised to contact Max Air directly...

Страница 23: ..._______ _________________________________________________________________________________ _________________________________________________________________________________ ____________________________...

Отзывы: