Matrx TRX3938 Скачать руководство пользователя страница 1

Installation Instructions:

MaTRx PB-Elite Headrest Mounting Plate

MaTRx PB-Elite Headrest Mounting Plate

Important!  

There are 

uniquely designed 

Headrest Mounting Plates

for the MaTRx PB-Elite

back.  The appropriate headrest plate is determined by the 

width

of the backpan (as illustrated in 

Figure

1.0

below). The mounting location for the headrest plate may also vary depending on the back 

height

(please see 

Section  2.0

p.2

).  The following installation instructions are provided as a guideline

for locating and installing the headrest mounting plate. 

Phillips Screwdriver

13/64” 

or

5mm 

Drill Bit

8

mm

Wrench

Small Level

Grease Pen or Marker

C-Clamp/ Vice Grips

Power Drill

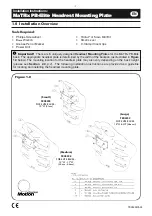
1.0  Installation Overview

Figure 1.0 

(Medium)

TRX3995

FOR ELITE BACKS-

12”W (31cm)

(Small)

TRX3939

FOR ELITE BACKS

18”W & UP (46cm+)

(Large)

TRD0228

(

-05

Tools Required:

TRX3938

FOR ELITE BACKS- 

13”W - 17”W  

(33cm - 43cm)

EN

- 1 -

Содержание TRX3938

Страница 1: ...rest plate may also vary depending on the back height please see Section 2 0 p 2 The following installation instructions are provided as a guideline for locating and installing the headrest mounting p...

Страница 2: ...t 12 31cm Height 16 31cm and 20 41cm Heights ALL Large style plates can be located along the lower edge of the backpan cut out as indicated Medium style plates should be centered bewteen the upper mou...

Страница 3: ...t after drilling Plate Installation 3 Install the mounting screws provided from the inside of the back pan so that they protrude out the back 4 Install the headrest mounting plate onto the screws and...

Страница 4: ...nstallation de la plaque de fixation d appui t te w Tournevis Phillips w Foret 13 64 ou 5 mm w Cl 8 mm w Petit niveau w Crayon gras ou marqueur w Presse en C Pinces w Perceuse 1 0 Aper u de l installa...

Страница 5: ...S les grandes plaques peu vent tre plac es le long du bord inf rieur de la d coupe du pan neau arri re comme indiqu Les plaques moyennes doivent tre cen tr es entre les cannelures de fixation sup rieu...

Страница 6: ...3 Installez les vis de fixation fournies de l int rieur du panneau arri re de mani re qu elles ressortent du dossier 4 Installez la plaque de fixation d appui t te sur les vis et fixez la plaque en pl...

Страница 7: ...w 5 mm Bohrer w 8 mm Schraubenschl ssel w Kleine Wasserwaage w Fettstift oder Marker w C Klemme Spannzangen w Bohrmaschine 1 0 Befestigung bersicht Abbildung 1 0 mittel TRX3939 F R ELITE R CKENLEHNE M...

Страница 8: ...41 cm 16 H he ALLE gro en Platten k nnen an der unteren Kante der ffnung in der R ckenschale wie angegeben angebracht werden Mittelgro e Platten sollten bei einer R ckenlehnenh he von 31 41 cm 12 16...

Страница 9: ...anten die nach dem Bohren entstanden sind Befestigung der Platte 3 F hren Sie die Befestigungsschrauben enthalten von der Innenseite der R ckenschale nach au en sodass sie etwas aus der R ckenschale h...

Страница 10: ...llice o 5 mm w Chiave fissa da 8 mm w Piccola livella w Matita a cera o evidenziatore w Morsetto a C Morsa per tubi w Trapano elettrico 1 0 Panoramica di installazione Figura 1 0 Medio TRX3939 PER GLI...

Страница 11: ...1 cm e 20 pollici 41 cm di altezza TUTTE le piastre grandi possono essere posizionate lungo il bordo inferiore del contorno del pannello dello schienale come indicato Le piastre medie devono essere ce...

Страница 12: ...alla foratura Installazione della piastra 3 Installare le viti di montaggio in dotazione all interno del pannello dello schienale in modo che sporgano dallo schienale 4 Installare la piastra di fissag...

Страница 13: ...ntaje del reposacabezas w Destornillador Phillips w Broca de 13 64 o 5 mm w Llave de tubo de 8 mm w Nivel peque o w Un rotulador w Abrazadera en C Alicates de sujeci n w Taladro 1 0 Descripci n de la...

Страница 14: ...ilustraci n Las placas de estilo mediano deben centrarse entre los soportes de montaje superiores y el recorte de la estructura del respaldo para alturas de respaldo de 31 cm 12 pulg y 41 cm 16 pulg c...

Страница 15: ...yan quedado como resultado de la perforaci n Instalaci n de la placa 3 Instale los tornillos de montaje suministrados desde la parte interior de la estructura del respaldo para que sobresalgan por la...

Страница 16: ...osto de cabe a w Chave de fendas Phillips w Brocas de 5 mm ou 13 64 pol w Chave de caixa de 8 mm w N vel pequeno w Marcador w Grampo em forma de C Pin as de press o w Broca el ctrica 1 0 Descri o gera...

Страница 17: ...s de 31 cm 16 pol e 41 cm 20 pol TODAS as placas grandes podem ser colocadas ao longo da extremi dade inferior do recorte do painel posterior como indicado As placas m dias devem ser centradas entre a...

Страница 18: ...Instale os parafusos de fixa o fornecidos a partir do interior do painel posterior de forma que saiam do encosto 4 Instale a placa de fixa o do encosto de cabe a nos parafusos e fixe a placa utilizan...

Страница 19: ...n til hovedst tten w Phillips skruetr kker w 13 64 eller 5 mm bor w 8 mm skruen gle w Lille vaterpas w Vokspen eller markerpen w Skruetvinge skruestik w Elboremaskine 1 0 Oversigt over montering Figur...

Страница 20: ...jde p 12 31 cm H jde p 12 31 cm og 16 41 cm ALLE plader i st rrelsen Large kan placeres langs den nederste kant p rygl nssk len som er sk ret ud som angivet Plader i st rrelsen Medium skal placeres m...

Страница 21: ...elle skarpe grater efter boringen Montering af plade 3 Installer monteringsskruerne medf lger fra indersiden af rygl nssk len s de stikker ud p bagsiden 4 Installer monteringspladen til hovedst tten p...

Страница 22: ...w Stj rnskruvmejsel w 13 64 eller 5 mm borr w 8 mm skiftnyckel w Litet vattenpass w Sm rjpenna eller m rkpenna w R rkl mma skruvgrepp w Elektrisk borrmaskin 1 0 Monterings versikt Bild 1 0 medium TRX3...

Страница 23: ...h jd 41 cm 16 h jd 31 cm 12 h jd 31 cm 16 och 41 cm 20 h jder Stora plattor av ALLA typer kan placeras l ngs den nedre kanten av bakstycket enligt bilden Plattor av mediumtyp ska centreras mellan de v...

Страница 24: ...rrningen Montering av plattan 3 Montera monteringsskruvarna tillhandah lls fr n insidan av bakstycket s att de inte sticker ut fr n ryggst det 4 Montera monteringsplattan f r huvudst det p skruvarna o...

Страница 25: ...s ruuvimeisseli w 13 64 tai 5 mm poranter w 8 mm ruuviavain w Pieni taso w Tussi w C puristin pihdin leuat w S hk pora 1 0 Asennuksen yleiskuva Kuva 1 0 Keskikokoinen TRX3939 ELITE SELK NOJIIN 18 W EN...

Страница 26: ...korkeus 16 31 cm ja 20 41 cm korkeudet KAIKKI suuret levyt voidaan sijoittaa selk nojan tuen alareunaan kuvan osoittamalla tavalla Keskikokoiset levyt tulee keskitt yl kiinnitysnuppien ja selk nojan t...

Страница 27: ...r v t reunat viilalla Levyn asennus 3 Asenna kiinnitysruuvit kuuluvat toimitukseen selk nojan tuen sis lt niin ett ne ty ntyv t esiin selk nojasta 4 Asenna p tuen kiinnityslevy ruuveihin ja kiinnit le...

Страница 28: ...p rky hlavy p i instalaci w k ov roubov k w vrt k 5 mm nebo 13 64 w 8 mm mont n kl w mal vodov ha w voskov tu ka nebo popisova w sv rky s polouzav en mi elistmi w elektrick vrta ka 1 0 P ehledn inform...

Страница 29: ...t ny pod l doln hrany v ezu ve v lisku op radla kter je ozna en na ilustraci Desky ve st edn m proveden by m ly b t vyst e d ny mezi horn mi mont n mi v stupky a v ezem ve v lisku op radla montuj li s...

Страница 30: ...er ostr ot epy Instalace mont n desky 3 Zasu te mont n rouby jsou sou st dod vky z vnit n strany v lisku op radla tak aby vy n valy na zadn stran op radla 4 Nasa te mont n desku op rky hlavy na rouby...

Страница 31: ...ntageplaat voor de hoofdsteun w Kruiskopschroevendraaier w Boortje van 5 mm w 8mm dopsleutel w Kleine waterpas w Vetpotlood of marker w Stangklem griptang w Boormachine 1 0 Installatie overzicht Afbee...

Страница 32: ...ote stijlplaten kunnen worden be vestigd aan de onderkant van de uitsparing voor het rugdeel zoals aangegeven Medium stijlplaten moeten worden gecentreerd tussen de bovenste sokken en de uitsparing vo...

Страница 33: ...rpe bramen na het boren te verwijderen Bevestiging van de plaat 3 Bevestig de montageschroeven meegeleverd vanuit de binnenkant van het rugdeel zodat de schroeven uit de achterkant steken 4 Bevestig d...

Страница 34: ...ra w 8 mm Mutriv ti w V ike lood w Vahapliiats v i marker w C pitskruvi haaratstangid w Trell 1 0 Paigaldamise levaade Joonis 1 0 Keskmine TRX3995 ELITE I SELJATUGEDELE LAIUSEGA 31 cm 12 TOLLI V ike T...

Страница 35: ...41 cm 20 tolli K IK suured plaadid saab paigaldada seljatoe korpuse alumise re v ljal i kele nagu joonisel n idatud Keskmise suurusega plaadid tuleks 31 cm 12 tolliste ja 41 cm 16 tolliste seljatugede...

Страница 36: ...ud teravate rte eemaldamiseks viili Plaadi paigaldamine 3 Paigaldage kaasas olnud kinnituskruvid korpuse seest poolt nii et need tulevad tagant v lja 4 Asetage peatoe kinnitusplaat kruvidele ja keerak...

Страница 37: ...y minis atsuktuvas w 13 64 col arba 5 mm gr to antgalis w 8 mm ver liaraktis w Nedidel liniuot w Ra iklis w C formos spaustukas griebtuvas w Elektrinis gr tas 1 0 Montavimo ap valga 1 0 pav vidutin TR...

Страница 38: ...20 col 41 cm auk io VISAS dideles plok teles galima statyti palei atramos plok tel s i pjovos apatin kra t kaip parodyta Vidutinio dyd io plok teles galima montuoti tarp vir utini montavimo grioveli i...

Страница 39: ...ntavimas 3 statykite montavimo var tus pateikiamus i vidin s atramos strypo pus s kad jie i siki t i i orin s pus s 4 statykite galvos atramos montavimo plok tel ant var t ir pritvirtinkite 4 pateikta...

Страница 40: ...tugal invacare com Per informazioni Kontaktoplysninger Kontaktinformation Yhteystiedot Norge Invacare AS Grensesvingen 9 Postboks 6230 Etterstad N 0603 Oslo Tel 47 0 22 57 95 00 Fax 47 0 22 57 95 01 n...

Отзывы: