


10
Chapter 2, Installing Your Matrox RT.X2 Hardware
Installing your Matrox RT.X2 card
Your Matrox RT.X2 card is designed to operate in a PCI Express (PCIe) slot in
your computer. If the slot in which you’ll be installing your RT.X2 card already
contains another card, either move it to an unused slot or remove it completely.
To determine the particular slot in which you should install your RT.X2 card for
recommended systems and motherboards, see the Matrox Video Support site at
.
°
To install your RT.X2 card:
1
Turn off your computer, unplug it, and then remove its cover.
2
Make sure the internal power supply cable is connected to your RT.X2 card
as explained in
“Preparing the internal power supply cable on your RT.X2
3
Remove the metal plate located at the back of the PCIe slot you’ll be using
for your RT.X2 card. Save the screw for the mounting bracket.
4
Position your RT.X2 card over the chosen slot and push the card in firmly
and evenly until it is fully seated in the slot.
5
Using the fasten screw you removed in step 3, secure your RT.X2 card to the
computer frame.
6
Connect the male end of the internal power supply cable on your RT.X2 card
to a free power outlet of your computer’s internal power supply.
¡ Important
Make sure that no other devices are sharing this power outlet.
7
Replace your computer’s cover.
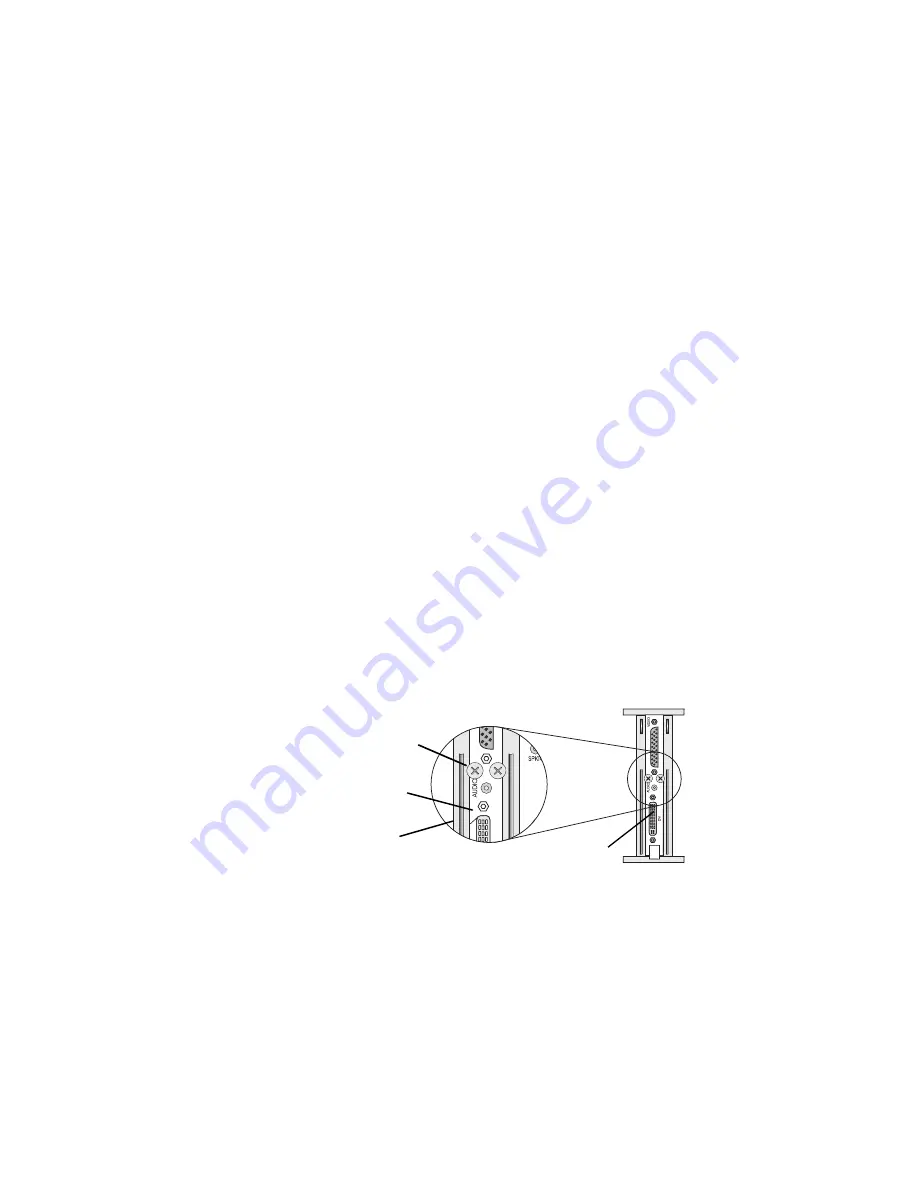
8
Using the two small screws provided with your RT.X2 card, secure the
RT.X2 bracket to the computer frame as shown below. This step is crucial in
making your RT.X2 card FCC compliant.
Before restarting your computer
You must connect your external devices such as the RT.X2 breakout box, DVI
monitor, VTRs, DV camcorder, etc., before attempting to restart your computer.
For details about these tasks, see
Chapter 3, “Connecting External Devices to
.”
Make sure the screw head
overlaps the computer frame
RT.X2 card
Computer frame
Not available on RT.X2 LE/SD
Содержание RT.X2
Страница 1: ...v Y10978 101 0420 Installation Manual January 8 2010 Matrox RT X2 ...
Страница 10: ...viii Contents Your notes ...
Страница 14: ...4 Chapter 1 Welcome to Matrox RT X2 Your notes ...
Страница 15: ...Chapter 2 Installing Your Matrox RT X2 Hardware This chapter describes how to install your Matrox RT X2 card ...
Страница 30: ...20 Chapter 3 Connecting External Devices to Matrox RT X2 Your notes ...
Страница 38: ...28 Chapter 4 Installing Your Matrox RT X2 Software Your notes ...
Страница 48: ...www matrox com video ...


