background image

 Exterior 

Wash

TM

 100 Series User Manual 

15 


AC power 


Warning! Read “Safety Information” on page 5 before attempting to install the 
fixture. Lock out power to the entire installation before working on cables and 
connections. 

Electrical installation must be carried out by qualified professionals only. 

For protection from dangerous electric shock, the fixture must be grounded (earthed). The 
AC power distribution system must be fitted with current overload and ground-fault (earth-
fault) circuit breakers as well as a means to isolate fixtures from power and lock out power 
during service.  

The Exterior Wash

 100 Series is supplied in EU and US models. Both models accept AC power at 

100-240 V nominal or 277 V nominal at 50 or 60 Hz. Do not connect to power at any other voltage or 
frequency. 

You can connect the Exterior Wash 100 Series to either of the following mains power distribution systems: 


Single-phase (live, neutral, ground/earth) system. 


Grounded/earthed three-phase four-wire (three phases, neutral, ground/earth) system. s 

Do not try to connect to a three-phase three-wire (three phases, ground/earth) system. 

There is no power on/off switch. Power is applied to an Exterior Wash

 100 Series fixture as soon as it is 

connected to power. Provide a means to disconnect or shut down power to fixtures that is easily 
accessible and is located close to the fixtures. 

Do not use an external dimming system to supply power to the fixture, as this may cause damage to the 
fixture that is not covered by the product warranty.  

Protecting connections from moisture 

Moisture can cause corrosion in unprotected cable connections. Moisture can also be sucked along the 
inside of cables at breaks or cuts in the cable jacket (for example at connection points) and into fixtures 
because of the vacuum effect of temperature fluctuations inside fixtures. To protect connections and 
fixtures from moisture, take at least one of the following precautions: 

  Locate cable junctions in dry areas (e.g. junction boxes in dry locations). 

  Use connectors or junction boxes that are protected to IP67 or higher. 

  Fill junction boxes with potting compound to seal the ends of cables and to protect connections from 

corrosion. 

Connecting to power 

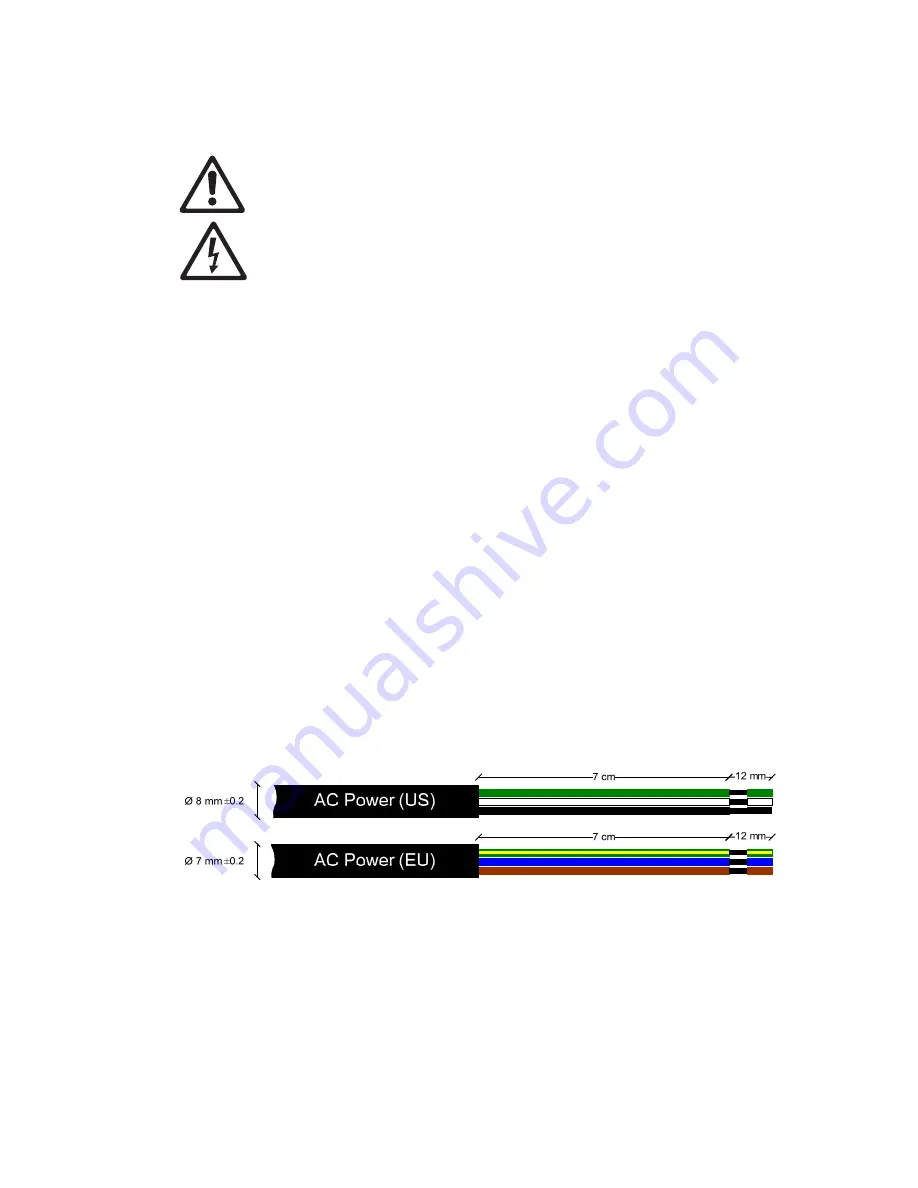
The fixture is supplied with a power cable installed ready for connection. See illustration below: 


AC power cable details 


To connect to a single-phase system or to one phase of a three-phase four-wire system: 
1.  Lock out power to the installation. 
2.  Connect the conductors in the power cable to the distribution circuit inside a suitable junction box as 

follows: 

3.  Connect the green wire (US models) or yellow/green wire (EU models) to ground (earth). 
4.  Connect the white wire (US models) or blue wire (EU models) to neutral. 
5.  Connect the black wire (US models) or brown wire (EU models) to live (one phase). 

Содержание Exterior Wash 100

Страница 1: ...Exterior Wash 100 Series User manual...

Страница 2: ...the information contained in this document 2013 2018 HARMAN Professional Denmark ApS All rights reserved Martin is a registered trademark of HARMAN Professional Denmark ApS registered in the United S...

Страница 3: ...Connecting to power 15 Control data link 17 Connecting the data link 17 Setup 19 Accessing and navigating the control menus 19 DMX settings 19 Programming a standalone show 20 Manual mode 21 Display s...

Страница 4: ......

Страница 5: ...re hazard or a risk of eye injury if the safety precautions below are not followed Respect all locally applicable laws codes and regulations when installing operating or servicing the fixture If you h...

Страница 6: ...ing water pollution temperature and UV resistance Protection from burns and fire Do not operate the fixture if the ambient temperature Ta exceeds 45 C 113 F The surface of the fixture can reach up to...

Страница 7: ...them At distances greater than 1 6 m 5 25 ft potential eye and skin injury hazards from the light output are normally prevented by natural aversion reflexes Position the Exterior Wash 100 so that pers...

Страница 8: ...to a rigging clamp Do not use safety cables as the primary means of support If the fixture is installed in a location where it may cause injury or damage if it falls provide a secondary attachment su...

Страница 9: ...ructures building features and landscaping All models have a built in display for ease of use a wide selection of beam angles and sealed construction suited to permanent outdoor use A discreet optiona...

Страница 10: ...or setting up the fixture before it is hard wired to a mains supply install a local power plug not supplied to the end of the supplied power cable 4 Before operating ensure that the voltage and frequ...

Страница 11: ...sh 100 Series fixtures must be corrosion resistant and strong enough to mount the fixture safely A washer must be installed directly under the head of each fastener when anchoring the base of the moun...

Страница 12: ...with a safety cable or similar secondary attachment that is approved for the weight of the fixture so that the safety cable will hold the fixture if the rigging clamp fails Loop the safety cable thro...

Страница 13: ...m angle 110 model Half peak beam angle 100 120 models None 10 7 Narrow 91610145 10 14 12 Medium 91610146 20 22 21 Wide 91610147 40 41 40 Very Wide 91610148 60 61 60 Asymmetric 91610149 10 x 60 14 x 61...

Страница 14: ...al snoot for Exterior Wash 100 Series fixtures may be installed with or without a diffuser lens see above To install shut down power to the fixture then align the snoot to fit over the front of the fi...

Страница 15: ...is easily accessible and is located close to the fixtures Do not use an external dimming system to supply power to the fixture as this may cause damage to the fixture that is not covered by the produc...

Страница 16: ...able for temporary use such as setting up a fixture before installation for example only If you choose to do this install a grounding type earthed plug with integral cable grip that is rated minimum 2...

Страница 17: ...the end of each branch by placing a 120 ohm resistor available from Martin P N 04150308 across the data output hot ve and data output cold ve conductors of the last fixture in the chain Avoid creatin...

Страница 18: ...r shell as this may cause interference Wires Input pair red tube Output pair black tube Shield Wire color White green Green White brown Brown Black Signal DMX in DMX in DMX out DMX out Common Male XLR...

Страница 19: ...green blue and white LEDs Since fixtures are uncalibrated slight differences in color and or intensity between different fixtures may be visible in the light output from multiple fixtures but you can...

Страница 20: ...same DMX control mode may share the same address and control channels if identical behavior is desired The DMX address may be set from the control panel or by RDM To set the fixture s DMX address fro...

Страница 21: ...s ENTER Display auto turn off The display can be set to stay on or to turn off 1 minute after the last key press To set display behavior 1 Access the control menu and select DISPLAY SETTINGS Press ENT...

Страница 22: ...fixtures This means that standalone operation is only possible if no DMX signal is present If you want master slave operation set only the first fixture on the link to MASTER Set all the other fixtur...

Страница 23: ...changes 4 Press ENTER White balance In Exterior Wash 100 and 110 models you can modify the white balance of the fixture s output by adjusting the amount of each color used in the mix to give white To...

Страница 24: ...t to reduce the risk of unauthorized access to the control menus you can set the fixture to require a user password before the control panel becomes operative Password protection is disabled by defaul...

Страница 25: ...mple shown but all Exterior Wash fixtures are similar Setting Effects Speed via RDM The example below shows how you can change the speed at which the fixture changes effects from Slow optimized for sm...

Страница 26: ...o not use products that contain solvents abrasives or caustic agents for cleaning as they can cause surface damage to the fixture The aluminum housing and front glass can be cleaned with mild detergen...

Страница 27: ...ability to control overall intensity level on DMX channel 1 Output is not calibrated Channel Value Function 1 0 255 Dimmer 0 100 2 0 255 Red 0 100 3 0 255 Green 0 100 4 0 255 Blue 0 100 5 0 255 White...

Страница 28: ...and 2 Channel 3 gives color temperature control from warm to cold at maximum output intensity When set to a level above 26 channel 3 overrides channels 1 and 2 Channel Value Function 1 0 255 Warm Whit...

Страница 29: ...0 255 Edit Scene Color Exterior Wash 120 1 last scene Cold white 0 255 Individual scene color temperature Warm white 0 255 Fade Time 0 120 secs 3 secs Transition time between scenes Hold Time 0 600 s...

Страница 30: ...Dimming behavior see page 22 Square Law Inverse Square Law S Curve Effects speed Fast Optimize effects for speed Slow Optimize effects for smoothness White Balance Exterior Wash 100 and 110 Red 90 10...

Страница 31: ...nk defective Check number of DMX channels required by each fixture and check DMX addresses on fixtures and DMX controller Check fixture s DMX MODE setting Inspect connections and cables Correct poor c...

Страница 32: ...Receiver RS 485 Firmware update Serial upload via DMX link DMX compliance USITT DMX512 A RDM compliance ANSI ESTA E1 20 Exterior Wash 100 and 110 DMX channels 3 4 or 5 Exterior Wash 120 DMX channels...

Страница 33: ...ge Maximum total power consumption 50 W Typical half cycle RMS inrush current at 240 V 50 Hz 9 7 A Typical power and current Exterior Wash 100 100 V 60 Hz 0 5 A 42 W PF 0 99 120 V 60 Hz 0 4 A 42 W PF...

Страница 34: ...es wide beam diffuser kit P N 91610147 Exterior Wash 100 Series very wide diffuser kit P N 91610148 Exterior Wash 100 Series asymmetric diffuser kit P N 91610149 Exterior Wash 100 Series glare shield...

Страница 35: ...uipment where applicable Help preserve the environment Ensure that this product is recycled at the end of its life Your supplier can give details of local arrangements for the disposal of Martin produ...

Страница 36: ...www martin com Olof Palmes All 18 8200 Aarhus N Denmark Tel 45 8740 0000 Fax 45 8740 0010...

Отзывы: