background image


MA400 


INSTALLATION 

Before you Begin 

Before you begin, always disconnect the battery negative terminal. 

Important Notes 


Before final installation, test the wiring connections to make sure the unit is connected 
properly and the system works. 


Use only the parts included with the unit to ensure proper installation. The use of 
unauthorized parts can cause malfunctions.   


Consult with your nearest dealer prior if installation required the drilling of holes or other 
modifications to your vessel. 


Install the unit where it does not interfere with driving and cannot injure passengers if there 
is a sudden or emergency stop. 


Avoid installing the unit where it will be subject to high temperatures from direct sunlight, 
hot air, or from a heater, or where it would be subject to excessive dust, dirt or vibration. 


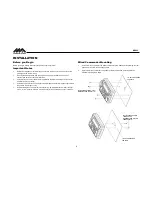
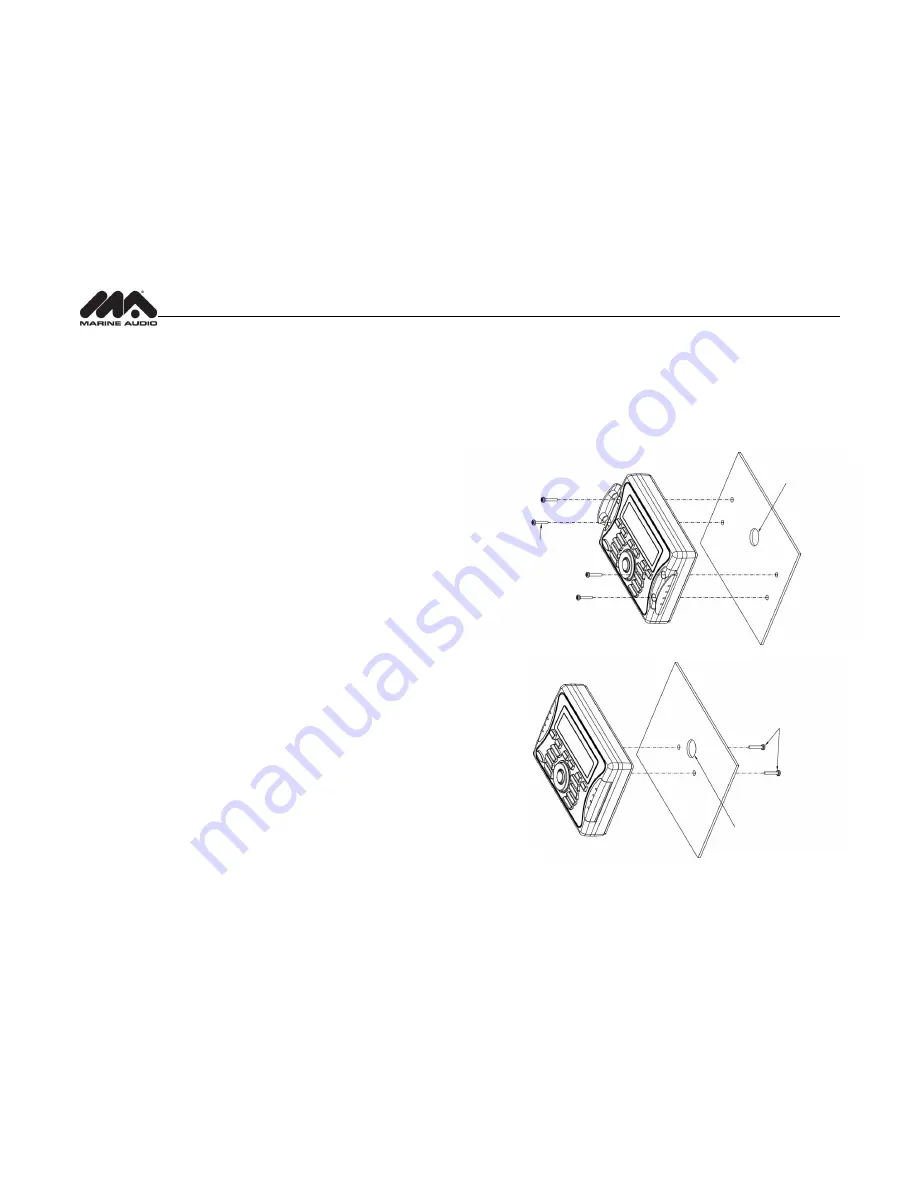
Wired Commander Mounting   

1. 

Choose a mounting area for the wired commander that is clean and flat, allowing the rear 

gasket to fully seal to the mounting surface 

2. 

Secure the wired commander using either of the recommended mounting methods 

detailed in the diagrams below. 


7/8

” HOLE IS REQUIRED 

FOR CABLE 

M4 MOUNTING SCREWS (4-PCS) 
MINIMUM SCREW LENGTH 1 1/2

” 

M5 x 8 SCREWS REQUIRED 
FOR MOUNTING 
MAXIMUM SCREW DEPTH IN 
COMMANDER 

1/4” 

7/8

” HOLE IS REQUIRED 

FOR CABLE 

Содержание MA400

Страница 1: ...MA400 MARINE AUDIO SYSTEM Installation and Operation Manual ...

Страница 2: ...s are trademarks of Sirius XM Radio Inc All rights reserved Made for iPod and Made for iPhone mean that an electronic accessory has been designed to connect specifically to iPod or iPhone respectively and has been certified by the developer to meet Apple performance standards Apple is not responsible for the operation of this device or its compliance with safety and regulatory standards Please not...

Страница 3: ...Pod Ready USB Interface Weatherband Tuner with SAME Technology Mute Bluetooth Supports A2DP AVRCP and ID3 APP Ready Pre set Equalizer 5 settings User Flat Pop Classical Rock Electronic Bass Treble Balance and Fader Controls Output Power 50W x 4 4 Channel Pre amp Line Level Outputs Front Rear RCA 2 Wire Power Supply Auxiliary Audio Input RCA Content List Tuner Amplifier Module Wired Commander Wired...

Страница 4: ...LOCATIONS THAT MIGHT HINDER VEHICLE OPERATION Doing so may obstruct vision or hamper movement which can result in a serious accident INSTALL THE WIRING SO THAT IT IS NOT CRIMPED OR PINCHED BY SCREWS OR SHARP METAL EDGES Route the cables away from moving parts or sharp pointed edges This will prevent crimping and damage to the wiring If the wiring must pass through a metal hole be sure to use a rub...

Страница 5: ...erfere with driving and cannot injure passengers if there is a sudden or emergency stop Avoid installing the unit where it will be subject to high temperatures from direct sunlight hot air or from a heater or where it would be subject to excessive dust dirt or vibration Wired Commander Mounting 1 Choose a mounting area for the wired commander that is clean and flat allowing the rear gasket to full...

Страница 6: ...an cause damage to the wires 4 Follow the wiring diagram carefully and make certain all connections are secure and insulated with crimp connectors or electrical tape to ensure proper operation 5 After completing the wiring connections reconnect the negative terminal of the battery and turn the unit on to confirm operation vessel accessory switch must be on If the unit does not operate disconnect b...

Страница 7: ...MA400 6 WIRING TUNER AMP MODULE WIRED COMMANDER ...

Страница 8: ...d function buttons do not operate error symbol on the display Use a ball point pen or thin metal object to press the RESET button located on the tuner box You can recover factory default settings using the RESET function located on the system menu With YES flashing press the MODE button 8 to activate Audio Menu Press the AUDIO button 20 on the control panel to access the audio menu You can navigat...

Страница 9: ...the radio will issue a low battery display warning and an audio beep once per minute The warning and sound will continue until the unit is turned off or the voltage is restored to more than 10 8 Volts Battery Auto Off Off On Reset To Defaults ENTER Press the INFO ENTER button 14 to return the MA400 to factory default set up values Equalizer Press the EQ LOUD button 19 to choose one of the followin...

Страница 10: ...sly stored Preset Scan Select a band Press AS PS button 10 to scan preset stations stored in the current band The unit will pause for 5 seconds at each preset station Press AS PS again to stop scanning when the desired station is reached RBDS Operation This unit is equipped to display RBDS Radio Broadcast Data Service information if broadcast by the current radio station NOTE Radio stations broadc...

Страница 11: ...llowing table Table 1 WB Frequencies Frequency MHz Preset 162 400 2 162 425 4 162 450 5 162 475 3 162 500 6 162 525 162 550 1 The above table also shows which preset button will access the frequency Note that one frequency cannot be accessed using a preset button The frequency can only be reached using the tuning controls Use the buttons 15 13 or the preset buttons to tune to each of the seven cha...

Страница 12: ...ack at the current track Random Play Press the 3 button 4 during disc playback to play all tracks in the current folder in random shuffled order Press 3 again to stop random playback Folder Navigation MP3 Only Press the PTY CAT MENU button 21 to view a list of all songs in the current folder Press the PTY CAT MENU button again to navigate up through the file structure Press the and 16 17 buttons t...

Страница 13: ...The current channel number within the chosen category will always be the first channel tuned 4 Press the INFO ENTER button 14 to play the highlighted channel and return to channel tuning mode Channel Up Down Tuning Press the buttons 13 15 to search for a channel Press and hold the SEEK buttons to fast search Direct Tuning Mode 1 Press and hold the INFO ENTER button 14 to enter direct tuning mode 2...

Страница 14: ...s 17 16 to enter the first digit of the default code b Press the INFO ENTER button 14 to move to the next digit c Repeat above steps to enter all 4 digits of the default code d Press the buttons to enter the first digit of the new code e Press the INFO ENTER button to move to the next digit f Repeat above steps to enter all 4 digits g Repeat above steps to confirm the new code 2 After setting a ne...

Страница 15: ...reconnect the tuner and then contact your dealer Scrolling Subscription Updated press any key to continue Subscription Updated The radio has detected a change in your SiriusXM subscription status Press any key to clear the message No further action is required Questions about your subscription in the United States please visit www siriusxm com activatenow or call SiriusXM Listener Care at 1 866 63...

Страница 16: ...ol page 13 for more information on the Parental Control feature and how to access locked channels Enter Code followed by Enter Lock Code User prompted to enter the lock unlock code Enter the four digit code to play the audio Wrong Code Invalid Lock Code The unlock code entered by the user is incorrect Input the correct four digit code to unlock the channel Reset lock code to default following inst...

Страница 17: ...rrent song Repeat will appear on the LCD Press 1 again to stop repeat playback Random Play During playback press the 3 button 4 to play all songs in the current category in random order Random play will begin once the current song has finished playing Shuffle will appear on the LCD Press 3 again to stop random playback Selecting Tracks During playback press the buttons 13 15 to play the previous o...

Страница 18: ...device press the ENTER button to temporarily remove the Bluetooth link The link can be re established through your phone menu by selecting the MA400 for connection DELETE To delete a device from the list press the ENTER button Pairing a Bluetooth Device Before you begin consult the owner s manual for the Bluetooth device you want to pair with the MA400 1 Make sure the device is on and ready to rec...

Страница 19: ...f all the primary functions of your MARINE AUDIO stereo right from your phone or tablet by transforming your mobile device into a functional stereo remote control Features This app controls all of the primary functions of your stereo features including Power on off Volume and mute AM FM radio tuner access station recall store presets switch songs Bluetooth streaming audio File structure visibility...

Страница 20: ...m Most vessels employ this wire and resistor but it may be necessary to check them for correct operation Another method of suppression is the use of additional noise suppressors These can be obtained from most CB A radio or electronic supply shops Interference Radio reception in a moving environment is very different from reception in a stationary environment home It is very important to understan...

Страница 21: ...d found to comply with the limits for a Class B digital device pursuant to Part 15 of the FCC Rules These limits are designed to provide reasonable protection against harmful interference in a residential installation This equipment generates uses and can radiate radio frequency energy and if not installed and used in accordance with the instructions may cause harmful interference to radio communi...

Страница 22: ...www asaelectronics com v 160915 ...

Отзывы: