8. Updating via USB-B (U2506)
8.1. Preparation
(1) Personal Computer (Install "
Marantz_DriverSetup_x.x.x
" V0.1.0 or later.).
(2) USB cable (A type-B type).
8.2. Operations
(1) Connect the USB cable to the rear USB port and PC.
(2) Press the power button to turn on the power.
(3) Move the dedicated driver to the installed folder.
(If the installation location of the dedicated driver has not been changed, it is stored in
"
C:\Program Files\Marantz\Marantz_USB_Driver
". )
(4) Rename the binary file for USB update as shown below.
ModelName_DFU_MX25L4006E.bin
(Ex.) ND8006_DFU_MX25L4006E.bin (Do not include a hyphen in the model name.)
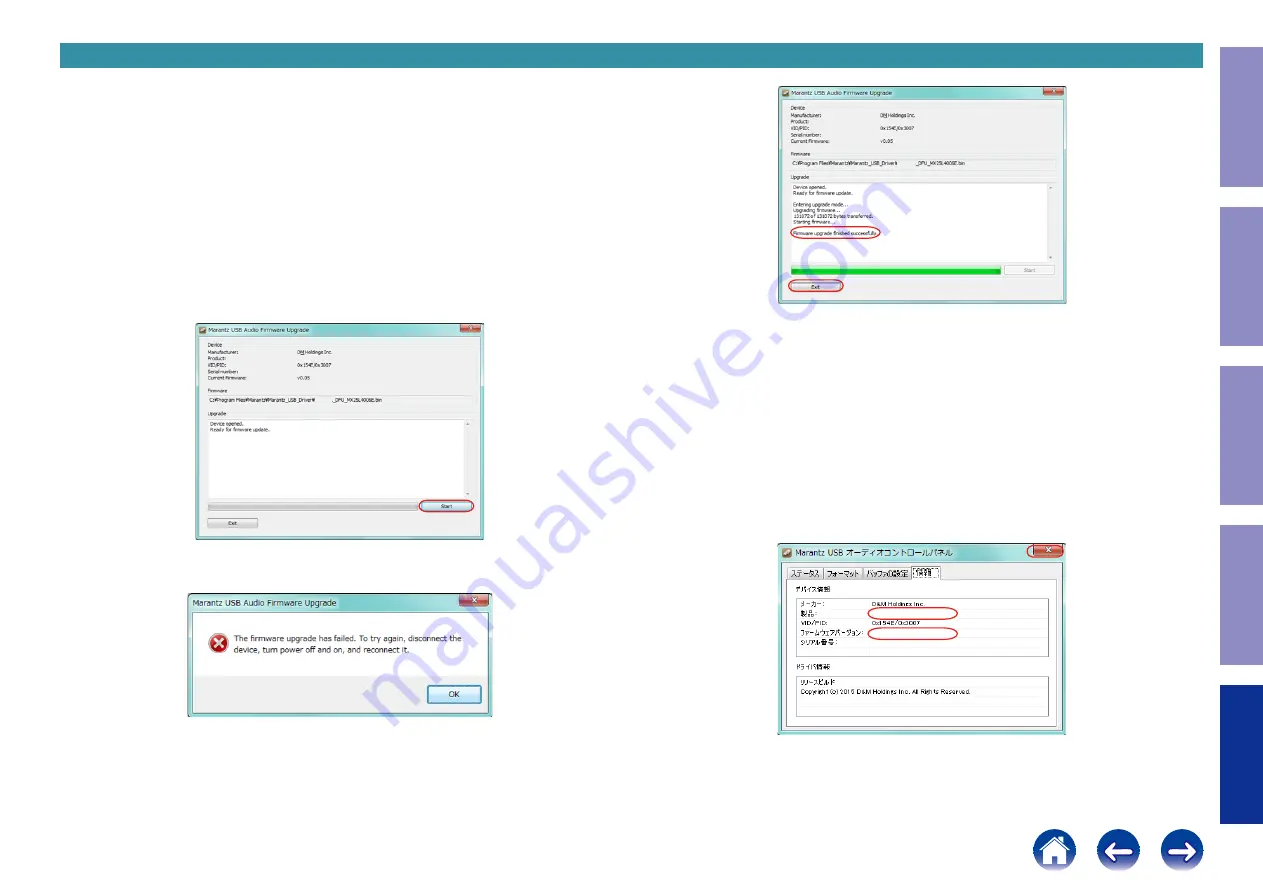
(5) Start "
MarantzUSBAudioDfu.exe
".
(6) Click "
Start
".
If the error message below is displayed, close the application and check that the renamed file name is
correct.
XXXXXX
XXXXXX
XXXXXX
(6)ーー→
XXX-XXX
(7) In "
Upgrade
", wait until "
Firmware upgrade finished successfully.
" is displayed.
(8) Press the "
Exit
"button to exit the application.
(9) Press the "
X
" button to turn off the power.
(10) Remove the USB cable.
8.3. Checking after update
(1) Connect the USB cable to this unit.
(2) Press the power button to turn on the power.
(3) Move the dedicated driver to the installed folder.
( If the installation location of the dedicated driver has not been changed, it is installed in
"
C:\Program Files\Marantz\Marantz_USB_Driver
" )
(4) Start "
MarantzUSBAudioCplApp.exe
".
(5) Select the "
Information
" tab, and check that the model name and firmware versions are correct.
(6) Press the "
Close
" button to exit the application.
(7) Press the "
X
" button to turn off the power.
(8) Remove the USB cable.
(9) After updating the firmware, check the version.
See "
XXX-XXX
XXXXXX
←ーー(7)
←ーー(8)
←ーー(5)
←ーー(5)
(6)ーー→
XXX-XX
vX.XX
Before Servicing
This Unit
Electrical
Mechanical
Repair Information
Updating
84


