background image


www.rossomaranello.com

  11 

 
9. Rimozione delle batterie 

Prima di sostituire le batterie, disconnettere tutte le fonti di 
alimentazione. Seguire poi le indicazioni dal passo 1 al passo 3.   
 

Rimozione del pannello frontale 


Passo 1 


Rimozione del coperchio batterie 


Passo 2 


Dopo la rimozione del coperchio batterie, estrarre delicatamente le 
batterie scollegando i due fili connessi al gruppo. Assicurarsi di 
sostituirle con altre dello stesso tipo e predisporre le batterie usate in 
modo appropriato per un corretto smaltimento.   


  Passo 3 

Содержание DAYTONA 1000

Страница 1: ...MANUALE D USO USER MANUAL DAYTONA 1000 DAYTONA 2000 Uninterruptible Power Supply ...

Страница 2: ...installazione e alla manutenzione dell UPS modello Daytona 1000 e 2000VA IMPORTANT SAFETY INSTRUCTIONS SAVE THESE INSTRUCTIONS This manual contains important instructions for models Daytona 1000 and 2000VA that should be followed during installation and maintenance of the UPS and batteries Lingua italiana Pag 3 17 English language Pag 18 32 ...

Страница 3: ...ONAMENTO 9 4 CONNESSIONE AL COMPUTER 10 5 CONNESSIONE MODEM LINEA TELEFONICA 10 6 CONNESSIONE DEL CAVO SERIALE 11 7 ACCENSIONE SPEGNIMENTO 11 8 ACCENSIONE DC DA BATTERIA 11 9 RIMOZIONE DELLE BATTERIE 12 3 INSTALLAZIONE DEL SOFTWARE WIN POWER 13 4 RISOLUZIONE DEI PROBLEMI 14 5 SPECIFICHE TECNICHE 15 6 NORME DI SMALTIMENTO DELL APPARECCHIATURA 16 ...

Страница 4: ...tura z Questa unità è destinata ad un installazione in un ambiente chiuso temperatura controllata area interna libera da contaminazioni di tipo conduttivo Non installare il dispositivo in luoghi con presenza di acqua corrente o stagnante o contraddistinti da eccessiva umidità z Non collegare l ingresso dell UPS alla sua stessa uscita z Non collegare un soppressore di picchi all UPS z Non collegare...

Страница 5: ...a personale specializzato z Sostituire le batterie con altre dello stesso tipo sigillate al piombo z Questa apparecchiatura di tipo A con batterie già installate dal fornitore può essere messa in servizio dall utente ed utilizzata da personale non esperto z Durante l installazione dell apparecchiatura assicurarsi che la somma delle correnti di perdita dell UPS e dei carichi collegati non superi i ...

Страница 6: ... 6 1 Descrizione del sistema Pannello Frontale Pannello posteriore 1 Porta USB 2 Porta RS232 3 Ventola di raffreddamento 4 Protezione di linea telefono Modem 5 Interruttore magnetotermico 6 Uscita AC 7 Ingresso AC 1000 2000 ...

Страница 7: ...ll UPS sono z Controllo a microprocessore per garantire alta affidabilità z Regolatore automatico di tensione in salita e discesa AVR z Porte RS232 ed USB per interfacciarsi al PC z Software WinPower per il monitoraggio dell UPS z Funzione di avviamento DC da batteria z Riavvio automatico al rientro della rete AC z Forma compatta peso leggero z Protezione contro scariche per linea telefonica integ...

Страница 8: ...ppropriata e lasciare che l UPS si ricarichi completamente per almeno 6 ore senza carico nessun apparecchio elettronico come computer monitor ecc collegato 3 Posizionamento Installare il gruppo in un ambiente chiuso caratterizzato da un adeguato ricircolo d aria privo di polvere eccessiva fumi corrosivi e contaminazioni di tipo conduttivo Non posizionare l UPS in un ambiente caratterizzato da temp...

Страница 9: ...cchi correlati alle uscite presenti sul retro dell UPS 5 Connessione modem linea telefonica Inserire il cavo della linea internet nella presa in sul retro del gruppo Usare un altro cavo dello stesso tipo ed inserire uno dei connettori alla presa out sempre sul retro dell UPS Collegare l altro connettore alla presa d ingresso del modem come mostrato di seguito Linea Internet ...

Страница 10: ...e come mostrato in figura 7 Accensione Spegnimento Per accendere il gruppo premere leggermente l interruttore ON OFF Per spegnerlo premerlo nuovamente 8 Accensione DC da batteria La funzione DC Start consente al gruppo di partire quando la rete non è disponibile e la batteria è completamente carica Semplicemente premere l interruttore ON OFF per accendere l UPS ...

Страница 11: ...l passo 1 al passo 3 Rimozione del pannello frontale Passo 1 Rimozione del coperchio batterie Passo 2 Dopo la rimozione del coperchio batterie estrarre delicatamente le batterie scollegando i due fili connessi al gruppo Assicurarsi di sostituirle con altre dello stesso tipo e predisporre le batterie usate in modo appropriato per un corretto smaltimento Passo 3 ...

Страница 12: ...serire il cd nel computer L installazione del programma partirà automaticamente 2 Seguire le indicazioni che appaiono sul monitor 3 Inserire il numero seriale 511C1 01220 0100 478DF2A quando richiesto per iniziare l installazione del software Quando il computer riparte il software WinPower apparirà come un icona verde a forma di spina posizionata sulla barra strumenti vicino all orologio Visitate ...

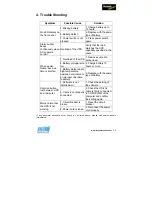
Страница 13: ...ssa batteria scarica 2 Ricaricare le batterie per 10 o più ore In mancanza di rete l autonomia è ridotta 3 Batteria difettosa dovuta ad elevata temperatura ambiente o utilizzo improprio 3 Sostituire con lo stesso tipo di batterie 1 Software non installato correttamente 1 Controllare l installazione del software Perdita della comunicazione tra UPS e PC 2 Cavo non connesso in maniera corretta 2 Cont...

Страница 14: ...I INTERVENTO Tipico 4 6ms 4 8ms Il primo led verde luminoso AC Mode Indicatore di livello carico a LED dal 2 al 5 led verde Il primo led verde luminoso lampeggiante Backup Mode Indicatore di livello batteria a LED dal 2 al 5 led verde lampeggiante INDICATORI Avaria LED rosso acceso Backup Mode Suono ogni 10 secondi Battery Low Suono ogni 1 secondo Overload Suono ogni 0 5 secondi ALLARMI SONORI Fau...

Страница 15: ... o indirettamente sull uomo Tali effetti non sono gravi nel singolo caso ma possono portare ad inquinamento nel caso di continuo uso improprio o smaltimento improprio z Il simbolo riportato sui nostri prodotti identifica appunto l obbligo di smaltimento dell apparecchiatura attraverso una raccolta separata e di non considerarli come rifiuti urbani z Sanzioni previste chiunque dopo il 1 luglio 2006...

Страница 16: ...RATION 22 1 INSPECTION 22 2 CHARGING 23 3 PLACEMENT 23 4 COMPUTER CONNECTION 24 5 MODEM PHONELINE CONNECTION 24 6 SERIAL CABLE CONNECTION 25 7 TURN ON OFF 25 8 DC START FUNCTION 25 9 BATTERY REMOVAL 26 3 WIN POWER SOFTWARE INSTALLATION 27 4 TROUBLE SHOOTING 28 5 SPECIFICATION 29 6 WEEE DIRECTIVE 30 ...

Страница 17: ...near the unit z This unit intended for installation in a controlled environment temperature controlled indoor area free of conductive contaminants Avoid installing the UPS in locations where there is standing or running water or excessive humidity z Do not plug the UPS input into its own output z Do not attach a power strip or surge suppressor to the UPS z Do not attach non computer related device...

Страница 18: ...ber and type of the sealed lead acid batteries z This pluggable type A equipment with battery already installed by the supplier is operator installable and may be operated by laymen z During the installation of this equipment it should be assured that the sum of the leakage currents of the UPS and the connected loads does not exceed 3 5mA z Attention hazardous through electric shock Also with disc...

Страница 19: ...ssomaranello com 19 1 System Description Front Panel Back Panel 8 USB Port Option 9 RS232 Port Option 10 Cooling Fan 11 Modem Phone Line Surge Protection 12 Circuit Breaker 13 AC Output 14 AC Input 1000 2000 ...

Страница 20: ...nside status The main features of the UPS are listed below z Microprocessor control guarantees high reliability z Equipped with Boost and Buck AVR z Built in RS 232 Communication Port z Win Power monitoring software included z DC Start Function z Auto restart while AC recovery z Compact size Light Weight z Provides Modem Phoneline surge protection 2 Installation and Operation Be aware of the Power...

Страница 21: ...S to charge fully by leaving it plugged in for 6 hours with no load no electrical devices such as computers monitors etc connected 3 Placement Install the unit in any protected environment that provides adequate airflow around the unit and is free from excessive dust corrosive fumes and conductive contaminants Do not operate your UPS in an environment where the ambient temperature or humidity is h...

Страница 22: ...ice into each of the power receptacles supplied on the back of the UPS 5 Modem Phoneline Connection Plug incoming internet line into the in socket at the back of the UPS Use one more Internet line cable and plug one end of the Internet line cable to the out socket at the back of the UPS Plug the other end to the modem input socket as shown ...

Страница 23: ...ial cable as per diagram below 7 Turn On Off To turn on the unit press the ON OFF switch lightly To turn off the unit press the switch again 8 DC Start Function DC Start Function enables the unit to be started up when AC utility power is not available and battery is fully charged Just simply press the power switch to turn on the UPS ...

Страница 24: ... Step 3 to replace the batteries Remove the front panel Step 1 Remove the battery cover Step 2 After removing battery cover gently extract the battery by disconnecting the two wires connecting to the UPS Be sure to replace the same type of batteries and dispose of old batteries properly at an appropriate recycling facility Step 3 ...

Страница 25: ...rocedure 1 Insert the disk into the cd driver The software installation will start automatically 2 Follow the instruction on the monitor 3 Enter the serial No 511C1 01220 0100 478DF2A to install the software When your computer restarts the WinPower software will appear as a green plug icon located in the system tray near the clock Visit the www rossomaranello com website for any updates Note Set t...

Страница 26: ...arge battery 10 hours or more When power failure back up time is shorten 3 Battery defect due to high temperature operation environment or improper operation to battery 3 Replace with the same type of battery 1 Software is not installed well 1 Check the setting of the software Communication lost between UPS and computer 2 Cable is not properly connected 2 Check the RS 232 cable is firmly connected...

Страница 27: ... 4 8ms The 1st green LED lighting AC Mode The 2nd to 5th green LEDs gradually lighting indicating load level The 1st green LED flashing Backup Mode The 2nd to 5th green gradually lighting indicating battery capacity INDICATOR Fault Red LED lighting Backup Mode Sounding every 10 seconds Battery Low Sounding every 1 second Overload Sounding every 0 5 seconds AUDIBLE ALARM Fault Continuous sounding P...

Страница 28: ...dentifies the obligation to store the equipments separately from all other waste and not to consider them as urban waste The WEEE Directive restricts the use of certain substances lead mercury cadmium hexavalent chromium and two flame retardants PBB and PBDE in electrical and electronic products sold in the European Union after July 1 2006 European WEEE Directive 2002 96 EC on Waste of Electronic ...

Отзывы: