14.A
13-05-03
Step 22
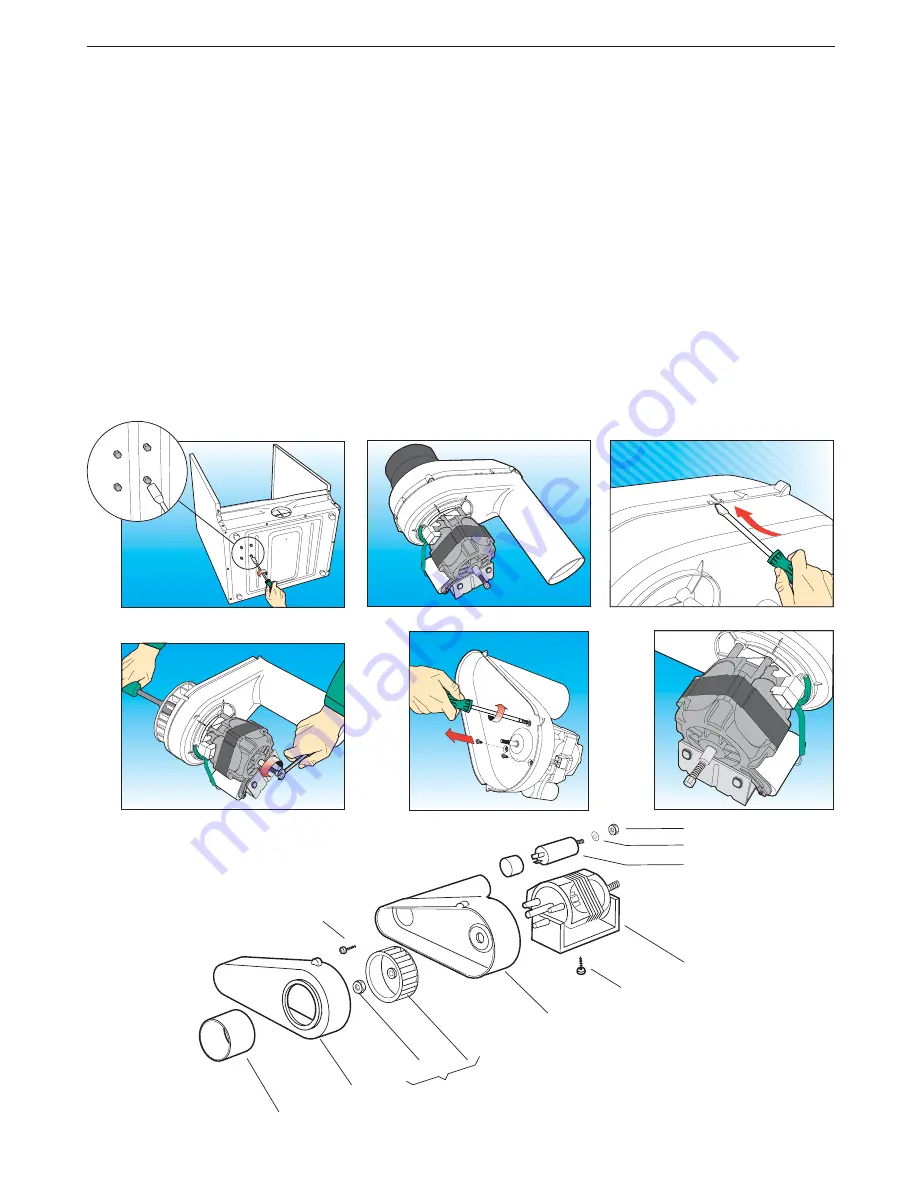
Removing and/or replacing the motor (A120):
(a)
Remove the top cover (
B360
) as described in
Step 1
.
(b)
Remove the rear panel (
B580
) following
Step 16
, dismantling only those parts necessary.
(c)
Manually remove the belt (
A290
) from the drum and motor.
(d)
Remove the two fixing screws (
A510
) securing the tie rods (
B350
) to the back of the drier.
Push the side panels apart and extract the drum.
(e)
Lie the machine on its front on a piece of cardboard to gain access to the components.
(f)
Disconnect the electric wiring and the earth wire from the motor.
(g)
Use a 10 mm box spanner to remove the four hexagonal head fixing screws (
A390
) while holding
the motor from the other side to prevent it from falling. Remove the motor assembly by pulling it
away from the rubber connector (
A230
).
Use a flat screwdriver to release the blower casing (
A170
) and (
A210
) to gain access
to the fan + nut (
A078
).
(h)
Use a 13 mm box spanner (fan side) and a 10 mm open-ended spanner (motor side) remove
the fan (
A078
) from the motor (
A120
). Then unscrew the brass nut (
A110
).
(i)
At this point, remove the motor (
A120
) from the plastic blower housing (
A170
) using
a cross-head screwdriver to remove the three fixing screws (
A190
). Then recover the
condenser (
A150
) by unscrewing the nut using a 13 mm open-ended spanner.
NB:
When replacing the fan and/or motor, it is advisable to also replace the brass nut (
A110
) with a new one.
(j)
To re-assemble, follow the same procedure in reverse order, following
Step 19
to re-assemble the
drum and then
Step 18
to refit the belt.
MAINTENANCE PROCEDURES
A190
A230
A210
A110
A170
A390
A078
A130
A120
A140
A150


