background image

17

03/00

SCHEDA DI MANUTENZIONE PERIODICA

SCHEDA DI MANUTENZIONE PERIODICA

SCHEDA DI MANUTENZIONE PERIODICA

SCHEDA DI MANUTENZIONE PERIODICA

SCHEDA DI MANUTENZIONE PERIODICA

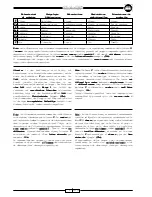
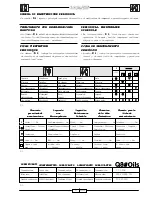
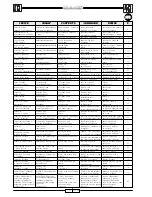
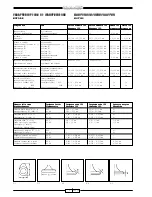
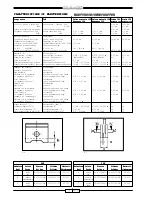
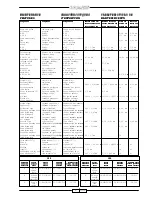
•La tabella (T. 1

T. 1

T. 1

T. 1

T. 1) riporta i principali interventi di controllo e di sostituzione di componenti e prodotti soggetti ad usura.

FICHE D’ENTRETIEN

FICHE D’ENTRETIEN

FICHE D’ENTRETIEN

FICHE D’ENTRETIEN

FICHE D’ENTRETIEN

PERIODIQUE

PERIODIQUE

PERIODIQUE

PERIODIQUE

PERIODIQUE

•Le tableau (T. 1

T. 1

T. 1

T. 1

T. 1) indique les principales interventions

de contrôle et de remplacement de pièces et des articles

susceptibles d’usure.

FICHA DE MANTENIMIENTO

FICHA DE MANTENIMIENTO

FICHA DE MANTENIMIENTO

FICHA DE MANTENIMIENTO

FICHA DE MANTENIMIENTO

PERIÓDICO

PERIÓDICO

PERIÓDICO

PERIÓDICO

PERIÓDICO

•La tabla (T. 1

T. 1

T. 1

T. 1

T. 1) indica las principales intervenciones de

control y de sustitución de componentes y productos
sujetos a desgaste.

TERMINKARTE ZUR REGELMÄSSIGEN

TERMINKARTE ZUR REGELMÄSSIGEN

TERMINKARTE ZUR REGELMÄSSIGEN

TERMINKARTE ZUR REGELMÄSSIGEN

TERMINKARTE ZUR REGELMÄSSIGEN

W A R T U N G

W A R T U N G

W A R T U N G

W A R T U N G

W A R T U N G

•Die Tabelle (T. 1

T. 1

T. 1

T. 1

T. 1) enthält die wichtigsten Eingriffe betreffend

die Kontrolle des Fahrzeugs sowie die Auswechselung von
Verschleißkomponenten und - produkten.

PERIODICAL MAINTENANCE

PERIODICAL MAINTENANCE

PERIODICAL MAINTENANCE

PERIODICAL MAINTENANCE

PERIODICAL MAINTENANCE

S C H E D U L E

S C H E D U L E

S C H E D U L E

S C H E D U L E

S C H E D U L E

•The following table (T. 1

T. 1

T. 1

T. 1

T. 1) lists the main checks and

operations to be made, and the components and items

subject to wear to be replaced.

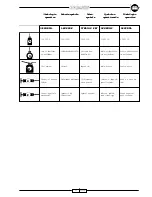
T. 3

Trasmissione

Getriebe

Transmission

Transmission

Transmisión

T 35 80W

Filtri aria

Luftfilter

Air cleaners

Filtres à air

Filtros aire

AIR FILTER OIL

Liquido radiatore

Kühlflüssigkeit

Radiator fluid

Liquide du radiateur Líquido radiador

TOP FLUID

LUBRIFICANTI

LUBRIFICANTI

LUBRIFICANTI

LUBRIFICANTI

LUBRIFICANTI SCHMIERMITTEL

SCHMIERMITTEL

SCHMIERMITTEL

SCHMIERMITTEL

SCHMIERMITTEL

LUBRICANTS

LUBRICANTS

LUBRICANTS

LUBRICANTS

LUBRICANTS

LUBRIFIANTS

LUBRIFIANTS

LUBRIFIANTS

LUBRIFIANTS

LUBRIFIANTS

LUBRICANTES

LUBRICANTES

LUBRICANTES

LUBRICANTES

LUBRICANTES

Candela

Zündkerze

Spark plug

Bougie

Bujía

Filtro aria

Luftfilter

Air cleaner

Filtre à air

Filtro aire

Minimo

Minimum

Idle speed

Ralenti

Mínimo

Olio trasmissione

Getriebeöl

Transmission oil

Huile transmission

Aceite transmisión

Bulloneria

Schrauben

Bolts and nuts

Boulonnerie

Pernos

Liquido

Flüssigkeit

Fluid

Liquide de

Líquido

raffreddamento

Kühlmittel

Coolant

refroidissement

refrigerante

Olio motore

Motorenöl

Engine oil

Huile moteur

Aceite motor

I

1.000

4.000

7.000

10.000

T. 1

12

12

12

12

12

6

6

6

6

6

18

18

18

18

18

I

Primi ..... Km

Nach den ersten... km

First ..... km

Aux premiers .... Km Primeros ...........Km.

Controllare - Pulire -

Kontrollieren-Säubern- Check - Clean -

Contrôler - Nettoyer - Controlar - Limpiar -

Regolare

Einstellen

Adjust

Remplacer

Regular

Sostituire

Auswechseln

Replace

Régler

Sustituir

Ogni ..... Km

Alle ..... km

Every ..... km

Tous les ....... Km

Cada ............ Km.

Oppure ogni

œ Oder alle

Or every

Ou bien tous

O bien cada

mesi .....

... Monate

..... months

les ...... mois

meses .........

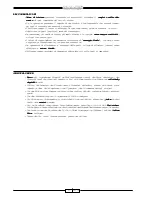
Glossario

Glossario

Glossario

Glossario

Glossario

per scheda di

per scheda di

per scheda di

per scheda di

per scheda di

manutenzione

manutenzione

manutenzione

manutenzione

manutenzione

T. 2

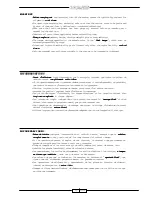
Legende

Legende

Legende

Legende

Legende

zur

zur

zur

zur

zur

Wartungskarte

Wartungskarte

Wartungskarte

Wartungskarte

Wartungskarte

Legend to

Legend to

Legend to

Legend to

Legend to

Maintenance

Maintenance

Maintenance

Maintenance

Maintenance

Schedule

Schedule

Schedule

Schedule

Schedule

Glossaire

Glossaire

Glossaire

Glossaire

Glossaire

de la fiche

de la fiche

de la fiche

de la fiche

de la fiche

d’entretien

d’entretien

d’entretien

d’entretien

d’entretien

Glosario para la

Glosario para la

Glosario para la

Glosario para la

Glosario para la

ficha de

ficha de

ficha de

ficha de

ficha de

mantenimiento

mantenimiento

mantenimiento

mantenimiento

mantenimiento

Содержание MADISON 125

Страница 1: ...1 12 99 MALAGUTIMADISON125 150 ...

Страница 2: ...what described herewith Interventions which are superficially carried out or even omitted can cause injuries to buyer damages to the motorbike etc or most probably unpleasant disputes Tempari intervention time for operations carried out within the duration of guarantee AVANT PROPOS Les informations qui figurent dans ce manuel d atelier concernent les principaux contrôles sur les parties électrique...

Страница 3: ...Couple de serrage Par de apretado Min Minuti Minuten Minutes Minutes Minutos P Pagina Seite Page Page Página Pr Paragrafo Kapitel Paragraph Paragraphe Párrafo S Sezione Abschnitt Section Section Sección Sc Schema Schema Diagram Schéma Esquema T Tabella Tabelle Table Tableau Tabla V Vite Schraube Screw Vis Tornillo Abbreviazioni di redazione Festgelegte Abkürzungen Abbreviations Abréviations rédact...

Страница 4: ...provoquer un incendie DANGER D EXPLOSION Opérations qui pourraient provoquer une explosion EMANATIONS TOXIQUES Signale le danger d intoxication ou inflammation des premières voies respiratoires TECHNICIEN CHARGE DE L ENTRETIEN MECANIQUE Opérations impliquant des compétences dans le domaine mécanique motoriste TECHNICIEN CHARGE DE L ENTRETIEN ELECTRIQUE Opérations impliquant des compétences dans le...

Страница 5: ...lcro D 32 motore Motors pin fulcrum d appui moteur motor Manubrio Lenkung Handlebar Guidon Manillar B 4 3 Controllo livelli Standkontrolle Levels control Contrôle des Control niveles liquidivari verschiedene variousfluids niveaux líquidosvarios Flüssigkeiten liquidesdivers Batteria Batterie Battery Batterie Batería E 10 Liquido di Kühlflüssigkeit Coolant Liquide Líquido A 30 raffreddamento de refr...

Страница 6: ...el motociclo il libretto di garanzia opportunamente timbrato e firmato ed il manuale di uso e manutenzione Es ist ratsam einige Einstellungen wie z B die Neigung des Lenkers die Eichung der Stossdämpfer den Reifendruck auf Verlangen des Kunden durchzuführen Es ist ratsam die Batterie vorbeugend zu aktivieren Geben Sie bei der Lieferung des Kraftrads das abgestempelte und unterschriebene Garantiebu...

Страница 7: ...ich failure de démarrage no arranca 27 Pneumatici Schlauchlose Tubeless Pneus Neumáticos Tubeless Reifen tyres Tubeless Tubeless 28 Serbatoio Benzintank Fuel tank Réservoir Depósito carburante carburant combustible 29 Serbatoio liquido Kühlflüssigkeitstank Coolant Réservoir liquide Depósito líquido refrigerante tank réfrigérant refrigerante 30 Olio motore Motoröl Motor oil Huile moteur Aceite moto...

Страница 8: ...one Abmontieren der Handlebar Dépose des Desmontaje de los C comandi Bedienungselemente controls commandes mandos en el 16 al manubrio am Lenker removal au guidon manillar Rimozione Abmontieren des Front fender Dépose Desmontaje parafango Vorderschutz removal garde boue guardabarro 18 anteriore bleches avant delantero Rimozione Abmontieren Leg guard removal Depose des protege Desmontaje protección...

Страница 9: ... Auswechselung der Rear caliper unit Substitution groupe Sustitución grupo pinza posteriore Zangengruppe hinten replacement pince arrière pinza posterior 10 Rimozione Abmontieren des Exhaust pipe Dépose pot Remoción D marmitta Auspuffschall removal d échappement silenciador 12 dämpfers del escape Forcella rimozione Gabel Abmontieren Fork leg assembly Fourche dépose Horquilla remoción stelo portaru...

Страница 10: ...nterni componentes internos Sostituzione Auswechselung der Bulb Remplacement Sustitución lampadine Glühbirnen replacement lampes lamparillas 6 Regolatore Regler Regulator Régulateur Regulador 8 Bobina Zündspule Spark coil Bobine Bobina 8 Batteria Batterie Pre delivery Batterie Batería Operación a Intervento di Eingriff vor intervention intervention efectuar antes de la 10 preconsegna der Lieferung...

Страница 11: ...ITE CAPACIDAD l Carburante Benzin Fuel Carburant Combustible 12 Riserva Benzinreserve Fuel reserve Réserve de Reserva de carburante carburant combustible 3 Olio motore Motoröl Motor oil Huile moteur Aceite motor 1 4 Olio trasmissione Getriebeöl Transmission oil Huile transmission Aceite transmisión 0 14 Liquido Kühlflüssigkeit Coolant Liquide Líquido de 1 refrigerante réfrigérant refrigeración TRA...

Страница 12: ...o con Scheibenbremse Oleo dynamic à disque avec de disco con trasmissione mit öldynamischer transmission disc transmission transmisión Ø 220 mm oleodinamica 2 Steuerkolben brakesworkingwith oléodynamique oleodinámica a 2 pistoncini Transmission two small pistons à 2 pistons de 2 pistoncitos IMPIANTO ELEKTRISCHE ELECTRICAL CIRCUIT CIRCUITO ELETTRICO ANLAGE EQUIPMENT ELECTRIQUE ELÉCTRICO Batteria Ba...

Страница 13: ...king itself which will have to be discharged in conformity with the regulation in force AESTHETIC CONTROL Have a look and verify the correct installation of all plastic components and at the same time that there aren t any scratches or marks etc on each part of the scooter DECAISSEMENT Déballer la moto en observant les indications fournies sur l emballage qui ensuite devra être éliminé conformémen...

Страница 14: ... numero di identificazione del motore è visibile sul carter sinistro del motore stesso B F 2 IDENTIFIKATIONSDATEN RAHMEN Um Zugang zur Identifikationsnummer des Rahmens zu erhalten folgendermaßen vorgehen Den Motorroller auf dem Zentralen Ständer aufblocken Den Zündschlüssel einstecken und ohne zu drücken gegen den Uhrzeigersinn drehen um das Schloss des Sattels zu öffnen Den Sattel hochklappen De...

Страница 15: ... le sens inverse des aiguilles d une montre sans appuyer pour débloquer la serrure de la selle soulever la selle enlever le petit couvercle A F 1 placé sur le fond du coffre à casque sous lequel on peut voir le numéro d identification du châssis MOTEUR le numéro d identification du moteur est visible sur le carter gauche du moteur B F 2 DATOSDEIDENTIFICACIÓN CHASIS Para acceder al número de identi...

Страница 16: ...indscreen 2 Front direction indicator on the left 3 Front direction indicator on the right 4 Parking light 5 Front light 6 Fuel tank 7 Anti theft hook 8 Silencer 9 Helmet compartment 10 Two seats saddle IDENTIFICATION DES ELEMENTS PRINCIPAUX Côtédroit 1 Pare brise 2 Clignotant avant gauche 3 Clignotant avant droit 4 Feu de position 5 Feu avant 6 Réservoir carburant 7 Anneau antivol 8 Pot d échappe...

Страница 17: ... 15 Plate holder 16 Air cleaner 17 Main stand 18 Carburettor 19 Side stand 20 Battery compartment 21 Central glove compartment 22 Leg guard case 23 Coolant tank 24 Right mirror 25 Left mirror IDENTIFICATION DES ELEMENTS PRINCIPAUX Côtégauche 11 Démarreur à clef 12 Boîte à gants 13 Feu de position et stop 14 Clignotant arrière 15 Porte plaque 16 Filtre à air 17 Béquille centrale 18 Carburateur 19 B...

Страница 18: ...nabbaglianti 6 Interruttore d emergenza arresto motore Posizione Avviamento motore Posizione Arresto motore A F 6 F 5 BEDIENUNGSELEMENTE Bedienungselement rechts 1 Öltank Bremsen vorne 2 Bremshebel vorne 3 Drehgasgriff 4 Druckknopf elektrische Zündung 5 Lichtschalter nach rechts aus in der Mitte Stand und Armaturenlichter nach links Abblendlichter 6 Notschalter Motor ausschalten Position Motor anl...

Страница 19: ...ignée accélérateur 4 Touche démarrage électrique 5 Interrupteur feux à droite éteint au centre feux de position et tableau de bord à gauche codes 6 Interrupteur d urgence arrêt moteur Position Démarrage moteur Position Arrêt moteur MANDOS EN EL MANILLAR Mando derecho 1 Depósito aceite freno delantero 2 Palanca freno delantero 3 Puño acelerador 4 Interruptor arranque eléctrico 5 Interruptor luces a...

Страница 20: ... passing 4 Pulsante avvisatore acustico 5 Interruttore indicatori di direzione 6 Interruttore luci abbaglianti anabbaglianti BEDIENUNGSELEMENTE Bedienungselement links 1 Öltank Bremsen hinten 2 Bremshebel hinten 3 Flash Hebel Fernlichter Passing 4 Druckknopf Signalhorn 5 Schalter Richtungsanzeiger 6 Lichtschalter Fernlichter Abblendlichter MADISON 125 150 ...

Страница 21: ...eft control 1 Rear brake oil tank 2 Rear brake lever 3 Driving beam flash passing 4 Acoustic alarm button 5 Direction indicators button 6 Light button traffic beam driving beam A MANDOS EN EL MANILLAR Mando izquierdo 1 Depósito aceite freno trasero 2 Palanca freno trasero 3 Palanca flash luces de carretera passing 4 Interruptor claxon 5 Interruptor indicadores di dirección 6 Interruptor de las luc...

Страница 22: ...nker gesperrt LENKERSPERRE Lenker sperren Bei nach links gedrehtem Lenker den Schlüssel ganz einschieben und dann gegen den Uhrzeigersinn drehen Abb 10 Lenker entsperren Den Schlüssel im Uhrzeigersinn drehen Hinweis Das Kraftrad ist nicht mit Anlasstretkurbel ausgestattet BLOCCASTERZO Inserimento Col manubrio sterzato a sinistra inserire a fondo la chiave e suc cessivamente ruotarla in senso antio...

Страница 23: ...a introducir a fondo la llave y girarla seguidamente en el sentido contrario a las agujas del reloj F 10 Desconexión Girar la llave en el sentido de las agujas del reloj Nota el vehículo de motor no está equipado con pedal de arranque INTERRUPTEUR DE DEMARRAGE CLEFS L interrupteur principal F 9 contrôle le circuit de démarrage le verrou de direction et l ouverture de la selle tout contact électriq...

Страница 24: ...d mobility of the side stand and the correct anchoring of the springs 1 2 Then check the correct working of the micro switch A F 11 which has to inhibit the engine starting when the side stand is not in its resting position lifted Donotremoveortamperwiththissafetydevise for any reason BÉQUILLE LATERALE Vérifier si la béquille latérale est solidement fixée si elle est suffisamment mobile et si l an...

Страница 25: ...r working failures or a insufficient level of fluid 2 Fuel level indicator This indicator B reveals when we are very low on petrol reserve 3 Tachometer white numbers Km red numbers mi les and odometer 4 Green Indicator traffic beam 5 Blue Indicator driving beam 6 Indicator direction indicator 7 Clock TABLEAU DE BORD 1 Indicateur de température liquide réfrigérant La zone rouge A indique une tempér...

Страница 26: ...rear one Press the starter button Release the starter button as soon as the engine starts Note if the engine will not start release the starter switch wait some seconds then try again Do not press the star ter for more than 10 seconds each attempt otherwise the battery will discharge To ensure long engine life never accelerate hard when the engine is cold DÉMARRAGE ÉLECTRIQUE Positionner le scoote...

Страница 27: ...y described test the engine does not start verify the side stand to be in its resting position and the engine cut off devise 1 F 14 to be in position If the side stand and the engine cut off devise result to be in correct position then carry out controls on the electrical equipment ABSENCE DE DEMARRAGE Si pendant le test décrit précédemment le moteur ne démarre pas vérifier si la béquille latérale...

Страница 28: ...mi kontrolliert und reguliert werrden PNEUS TUBELESS Dimensions 120 70 13 53L avant 130 60 13 53L arrière CONTROLE PRESSION La pression des pneus doit être réglée quand les pneus sont froids TUBELESS TYRES Sizes 120 70 13 53L front 130 60 13 53L rear PRESSURE CONTROL Wheel pressure has to be controlled and regulated when tyres are cold NEUMATICOS TUBELESS Dimensiones 120 70 13 53L delantero 130 60...

Страница 29: ...lgen Sie die folgenden Anweisungen Den Motorroller auf dem zentralen Ständer aufblocken Den Zündschlüssel herausziehen Auf den oberen Teil des Deckels 1 Abb 15 der sich vor dem Sattel befindet drücken Den Schlüssel einschieben den Deckel 2 aufdrehen und Benzin tanken Falls nach dem Tanken Benzinspuren auf der Karosserie vorhanden sind sollte die Oberfläche sofort gereinigt werden GRÜNES BLEIFREIES...

Страница 30: ...abei Druck auf den Bereich A ausüben KONTROLLE Den Motor anlassen und einige Minuten im Leerlauf drehen lassen Anschließend den Motor abstellen Den Motor in geschlosse nen Räumen oder in Räumen mit ungenügender Belüftung nicht anlassen Warten Sie einige Minuten und drehen Sie den Deckel B Abb 17 mit großer Vorsicht auf Kontrollieren Sie dass sich der Stand zwischen den zwei Zeichen Min Max Abb 18 ...

Страница 31: ...ec du liquide Q8 TOP FLUID Nepasremettreàniveau avec de l eau DEPOSITOLIQUIDO REFRIGERANTE El recipiente de expansión del líquido refrigerante se encuentra en la parte anterior del scooter véase F 16 Para acceder al mismo quitar la tapa 1 presionando en la parte A CONTROL NIVEL Poner el motor en marcha y hacerlo marchar al ralentí durante un par de minutos seguidamente apagarlo No dejar nunca el m...

Страница 32: ...einstallare la guarnizione 3 la molla 2 F 21 e la retina 1 Avvitare il gruppo tappo di sca rico B F 20 e serrarlo alla coppia prescritta Rifornire il motore di olio Q8 CLASS 10W 40 quantitàmax 1 4l quantitàolio perricambioperiodicomax 1 2 l Riavvitare l asta di controllo A F 19 Smaltire l olio esausto nel pieno rispetto delle Normative vigenti Avviare il motore Lasciarlo scal dare quindi spegnerlo...

Страница 33: ... periodicalchange max1 2litres Screw again the control rod A F 19 Dispose of the exhausted oil in full compliance with the regulations in force Start the engine Leave that it gets warm and then stop it by checking again the oil level and be sure of the total absence of oil leakages VIDANGE Note la substitution de l huile doit être faite quand le moteur est chaud Placer un récipient adéquat sous le...

Страница 34: ...ltyp Q8 T 35 80 W bis zu 0 14 l nachfüllen 7 Den Ablasspfropfen B wieder bis zum beschriebenen Drehmoment festschrauben 8 Das Öl in das Gehäuse schütten und den Deckel A Abb 22 festschrauben F 23 F 22 Cs Nm B 22 SOSTITUZIONE Nota effettuare le operazioni de scritte ai punti 1 2 3 4 5 Chiudere il tappo di scarico e ri fornire con 0 14 l di olio Q8T35 80W Riavvitare il tappo A F 22 Attenzione alle s...

Страница 35: ...le bouchon de vidange et ravitailler avec 0 14 l d huile Q8 T 35 80 W Revisser le bouchon A F 22 Attention aux brûlures Faire attention à ne pas faire pénétrer des corps étrangers dans le carter moteur et à ne pas salir le pneu et la roue arrière avec de l huile Note contrôler l absence de fuites au niveau de la roue arrière Be careful not to get scalded Payattentionthatnoforeign body enters the e...

Страница 36: ...out through the oil window S of the tanks A front brake B rear brake with the scooter in a perfect vertical position The level is correct when oil results to be at 3 mm from the lower limit of the window HUILE FREINS avant arrière Le contrôle visuel doit être effectué à travers le regard S des réservoirs A frein avant B frein arrière après avoir placé la moto en position parfaitement verticale le ...

Страница 37: ...tened the two fixing screws V2 It is advisable to use oil Q8 BRAKE FLUID DOT4 Hydraulic oil is corrosive and can cause dama ges and injuries Do not mix oils of different qualities Control the perfect sealing of the lining REMISE A NIVEAU DE L HUILE DES FREINS Les remises à niveau se font en enlevant les couvercles A après avoir dévissé les deux vis de fixage V2 Nous conseillons d utiliser l huile ...

Страница 38: ... HUILE POUR TIGE FOURCHE ACEITE PARA VARILLAS HORQUILLA FORK OIL OLIO TRASM MOTORE ÖL MOTORGETRIEBE ENGINE TRANSMISSION OIL HUILE TRANSMISSION MOTEUR ACEITE TRANSMISION MOTOR T35 80W LUBR PER FILTRI D ARIA SCHMIERMITTEL FÜR LUFTFILTER AIR FILTER LUBRICANT LUBRIFIANT POUR FILTRES A AIR LUBRICANTE PARAFILTROS DEAIRE AIR FILTER OIL LUBRIFICANTI SCHMIERMITTEL LUBRICANTS LUBRIFIANTS LUBRICANTES OLIO MO...

Страница 39: ...m engi ne and an oil temperature equal to 70 C By proceeding clockwise revolutions increase By proceeding anti clockwise revolutions decrease The optimal rpm revolutions per minute of the engine must be verified by means of an electronic revolutions counter connected to the spark plug cable Before re assembling the re moved parts open and close many times the accelerator in order to check the idli...

Страница 40: ...ori po steriori Fissaggio superiore dadi A F 3 F 4 Fissaggio inferiore viti V2 F 4 Cs Nm V2 24 15 STOSSDÄMPFER EINSTELLUNG Die Vorbelastung der Feder kann an den hinteren Stossdämpfern eingestellt werden Die Einstellung erfolgt indem mit dem dafür bestimmten Schlüssel die untere Nutmutter A Abb 2 gedreht wird Durch Drehen in die vom Pfeil angegebene Richtung siehe Abbildung wird die Kraft der Fede...

Страница 41: ...f prévue à cet effet Dans le sens indiqué par la flèche voir figure on augmente la force du ressort la charge transportable devient alors majeure VERIFICATION DES SERRAGES Avant la livraison et lors des contrôles techniques prévus par la garantie vérifier le bon serrage des amortisseurs arrière Fixage supérieur écrou A F 3 Fixage inférieur vis V2 F 4 AMORTIGUADORES AJUSTE Los amortiguadores traser...

Страница 42: ...ernt werden Die Nutmutter losschrauben A Abb 5 Die Nutmutter drehen B um die Fliessfähigkeit der Kugeln einzustellen NachderEinstellung dieNutmutter A bis zum beschriebenen Drehmoment befestigen KONTROLLE DER LENKER BEFESTIGUNG Kontrollieren Sie dass die Schraubenmutter C Abb 25 richtig befestigt ist Cs Nm A 140 Cs Nm C 50 A B C B REGOLAZIONE INCLI NAZIONE MANUBRIO Nota per accedere alle viti di f...

Страница 43: ...mecanismo de dirección es necesario quitar primero el protector de manillar trasero véase S C P 9 y el protector de manillardelantero véaseS C P 9 Aflojar el casquillo A F 5 Actuar sobre el casquillo B para ajustar el deslizamiento de las bolas Una vez terminada la regulación apretar el casquillo A según el par de apriete indicado CONTROL APRIETE DEL MANILLAR Comprobar que la tuerca C F 5 esté cor...

Страница 44: ...alla parte posteriore Se necessario risollevarla e ripetere la regolazione F 7 F 8 EINSTELLUNG SATTELKUPPLUNG Der Sattel hakt beim schließen ein und wird von zwei Kupplungen A eine pro Seite blockiert Bei Widerstand während des Schließen des Sattels oder bei zuviel Spiel nach dem Schließen des Sattels die Einstellung der Kupplungsvorrichtung durchführen indem Sie folgendermaßen vorgehen Den Motorr...

Страница 45: ...ones Colocar el scooter sobre el caballete central Introducir la llave de contacto y girarla en el sentido contrario a las agujas del reloj sin presionar desbloqueando así la cerradura del asiento Seguuidamente levantar el asiento Introducir una llave hexagonal de 5 en el orificio central situado debajo del asiento F 8 y actuar sobre el tornillo Volver acerrar el asiento y controlar que se enganch...

Страница 46: ...8 12 99 NOTE HINWEIS NOTES NOTES NOTAS ...

Страница 47: ...roit gauche Cubretúnel der izq 17 Rear engine cover Carter moteur arrière Cubierta de motor posterior 18 Front engine cover Carter moteur avant Cubierta de motor anterior 19 Kickstand Etrésillon Perfil carenado inferior N DESCRIZIONE BESCHREIBUNG 1 Parabrezza Windschutzscheibe 2 Scudo centrale ZentraleFrontschutzplatte 3 Scudo Frontschutzplatte 4 Parafango anteriore Schutzblech vorne 5 Parafango S...

Страница 48: ...e di posizione D F 5 Rimuovere le viti V6 MONTAGGIO Posizionare il parabrezza con cautela per non graffiarlo Impuntare le viti V6 ed avvitarle a fondo procedendo con sequen za incrociata MONTAGE Die Windschutzscheibe vorsichtig ohne sie zu verkratzen positionieren Die Schrauben V6 ansetzen und nacheinander über Kreuz vollkommen zuschrauben Die Glühbirne C des Standlichtes D entfernen V6 A B C D V6...

Страница 49: ...er l ampoule C du feu de position D Enlever les vis V6 MONTAGE Positionner le pare brise avec soin afin de ne pas le rayer Enfiler les vis V6 et visser à fond suivant un schéma en croix Remettre l ampoule C F 3 du feu de position Remonter le tablier avant A F 2 et le fixer à l aide des vis V2 PARABRISAS PREPARACION PARA EL MON TAJE OPERACIONES A EFEC TUAR ANTES DE LA ENTREGA Quitar el escudo front...

Страница 50: ...ietto in modo che la superfi cie a specchio sia rivolta verso l alto inserire quindi la linguet ta di ritegno C nella apposita sede creata nel corpo B Avvicinare il gruppo porta spec chio B al supporto D ruotan dolo verso destra fino ad ave re l allineamento dei tre perni di ritegno E con i fori contrap posti relativi alle mollette di ag gancio F F 7 F 9 Nota si consiglia di ingrassare i tre perni...

Страница 51: ...nt of the three check pins E with the holes with the opposite holes relative to the coupling springs F F 7 Tourner le rétroviseur B de manière que la surface portant la glace soit tournée vers le haut puis introduire la languette de retenue C dans le placés en face logement créé à cet effet dans le rétroviseur B Rapprocher le groupe avec glace B au support D en le tournant vers la droite jusqu à c...

Страница 52: ...di ritegno B Scollegare il connettore C rimuovere lo specchietto e riporlo su di una superficie antigraffio F 10 F 11 ABMONTIEREN DER SEITENSPIEGEL Das Motorrad auf dem zentralen Ständer aufblocken Den Lenker in die Richtung des abzumontierenden Spiegels drehen Mit beiden Händen ziehen und gleichzeitig den Körper des Spiegels A in alle vier Richtungen verschieben um ihn aus den Kupplungen zu befre...

Страница 53: ...emble Pull with both hands and at the same time shift the mirror body A towards the four directions so that to release it from its fastenings Rotate the mirror A leftwards so that to release the check tang B Disconnect the fitting C remove the mirror and lay it on a soft surface in order to avoid scratches DESMONTAJE DE LOS ESPEJOS RETROVISORES LATERALES Colocar el vehículo de motor sobre el cabal...

Страница 54: ...ike is supplied with its plate holder The assembly of the plate must be performed by the dealer Assembly the plate on its relative support 1 fastening it on the slots A by means of screws or rivets For plate fastening do not use glues bi adhesive tapes etc MONTAGEDELAPLAQUED IMMATRICULATION Opération avant livraison Note le scooter est fourni avec support pour la plaque d immatriculation Le montag...

Страница 55: ...entral Aflojar los tornillos V3 y extraer el protector de manillar trasero A F 13 levantándolo DELANTERO Aflojar los tornillos V4 y extraer el protector de manillar delantero B F 14 Nota durante estas operaciones tener cuidado con no extraer las tres placas metálicas roscadas C ABMONTIERENDERLENKERVERKLEIDUNG HINTEN Das Motorrad auf dem zentralen Ständer aufblocken Die Schrauben V3 losschrauben un...

Страница 56: ...are le viti sotto stanti V3 F 18 V2 ABMONTIEREN DES FRONTSCHUTZPLATTES Hinweis Um die Frontschutzplatte abzumontieren müssen zuerst die folgenden Bestandteile abmontiert werden zentrale Frontschutzplatte S C S 10 Rückspiegel S C S 6 Windschutzscheibe S C S 2 Schutzblech vorne S C S 18 Hinterrad S D S 0 Die Schrauben V2 Abb 15 los schrauben Die Schrauben V2 Abb 16 los schrauben Die Schrauben V2 Abb...

Страница 57: ...l escudo central S C P 10 los espejos retrovisores S C P 6 el parabrisas S C P 2 elguardabarrosdelantero S C P 18 la rueda delantera S D P 0 Aflojar los tornillos V2 F 15 Aflojar los tornillos V2 F 16 Aflojar los tornillos V2 F 17 Quitar la estera apoyapiés y aflojar los tornillos que se encuentran debajo de la misma V3 F 18 DEPOSE DU TABLIER Note avant d enlever le tablier il faut enlever le tabl...

Страница 58: ...vitare le viti V2 Rimuovere lo sgocciolatoio 1 estraendolo dall al to V2 V Die Schrauben losschrauben V2 Abb 19 Die sich am oberen Teil der Ausnehmungen befindenden Schrauben losschrauben V2 a Abb 19 Die sich in der Mitte des unteren Teiles der Frontschutzplatte befindende Schraube V Abb 20 losschrauben Die Frontschutzplatte vorsichtig entfernen und mit der lackierten Seite nach oben niederlegen A...

Страница 59: ...flojar el tornillo V F 20 situado en el centro de la parte inferior del escudo Quitar el escudo con cuidado y apoyarlo con la parte pintada mirando hacia arriba DESMONTAJE RECOGEGOTAS Nota para desmontar el recogegotas 1 es necesario desmontar primero el escudo Aflojar los tornillos V2 Quitar el recogegotas 1 extrayéndolo por arriba Dévisser les vis V2 F 19 Dévisser les vis V2 a F 19 placées dans ...

Страница 60: ...n V2 losschrauben und die Armaturenbrettgruppe entfernen Um die Instrumen tenhalterung C abzumontieren die Schrauben V4 losschrauben C V4 B A V2 F 23 CONTROLLO LEVE FRENI Operazione di pre consegna Agire sulle leve dei freni tirando le e rilasciandole ripetutamente rilevando eventuali attriti o durez ze meccaniche anomale La corsa a vuoto delle leve min 10 mm F 23 a va regola ta allentando il dado...

Страница 61: ... efectuar antes de la entrega Accionar las palancas de freno tirando y soltándolas varias veces comprobando si se nota fricción o durezas mecánicas anómalas El desplazamiento en vacío de las palancas min 10 mm F 23 a se regula aflojando la tuerca D F 23 y actuando sobre el tornillo E F 23 CONTROLE DES LEVIERS DE FREINAGE Opération avant livraison Agir sur les leviers de freinage en les tirant et e...

Страница 62: ...Steuerelemente abzumontieren muss die Lenkerverkleidung hinten abmontiert werden um den Zugang zu den Verbindern A B Abb 24 zu ermöglichen Um die Drehgriffe des Lenkers auszuwechseln müssen die zwei Gegengewichte D abmontiert werden Svitare le viti V2 F 25 Separare con cautela le due parti componenti il dispositivo C Per sostituire le manopole del manubrio è necessario svitare ed estrarre i contra...

Страница 63: ... il faut enlever le protège guidon arrière pour accéder aux connecteurs A B F 24 DESMONTAJE MANDOS EN EL MANILLAR Para extraer los dispositivos de los dos mandos eléctricos situados sobre el manillar es necesario quitar primero el protector de manillar trasero para poder así acceder a los conectores A B F 24 HANDLEBAR CONTROLS REMOVAL To remove the two electric controls devices placed on the handl...

Страница 64: ...3 Cs Nm V4 3 5 10 F 29 F 30 RIMOZIONE PARAGAMBE Aprire con la chiave d accen sione il vano portaoggetti Svitare la vite centrale V e ri muovere la piastrina A Sganciare e rimuovere il coper chio B del vano portaoggetti Estrarre il vano portaoggetti A SCHUTZBLECH FRONTSCHUTZPLATTE Die Schrauben V3 losschrauben und darauf achten dass die Dracomet Clips B nicht verloren gehen Das Schutzblech der Fron...

Страница 65: ...der shield fender C GUARDABARROS DEBAJO DEL ESCUDO Aflojar los tornillos V3 teniendo cuidado con no perder los clip de Dracomet B Quitar el guardabarros debajo del escudo C DEPOSE DU TABLIER AVANT Ouvrir la boîte à gants à l aide de la clef de contact Dévisser la vis centrale V et enlever la plaquette A Décrocher et enlever le couvercle B de la boîte à gants LEG MUDGUARD REMOVAL Open the glove com...

Страница 66: ...el öffnen und entfernen Die mitgelieferten Werkzeuge und die Batterie S E S 10 entfernen Svitare le viti V2 poste nella parte anteriore del vano batte ria Die sich an der Vorderseite des Batteriesitzes befindenden Schrauben V2 losschrauben Den Deckel B des Schlüsselumschalters entfernen Rimuovere il coperchietto B del commutatore a chiave Estrarre i tappetini poggiapiedi C Die Fußbrettstropfen C e...

Страница 67: ... the cover A of the battery compartment on the tunnel and remove it Remove the tool outfit and the battery S E P 10 Unscrew the screws V2 placed in the front part of the battery compartment Remove the small cap B of the key switch Remove the footboard mats C Abrir la tapa A del alojamiento batería en el túnel con la llave de contacto y extraer la tapa Extraer el kit de herramientas en dotación y l...

Страница 68: ...ung vorsichtig entfernen F 36 V3 Cs Nm V3 2 10 F 38 Svitare le viti V6 Svitare le viti V4 ABMONTIEREN DER STREBE Das Motorrad auf dem zentralen Ständer aufblocken Die sich am unteren Teil der Frontschutzplatte befindende Schraube V losschrauben Die Schrauben V6 losschrauben Die Schrauben V4 losschrauben Cs Nm V4 2 10 Cs Nm V6 2 10 V3 V V6 V6 V4 Die Schrauben V4 losschrauben Die Tunnelverkleidung r...

Страница 69: ...STAND REMOVAL Position the motorbike on its main stand Unscrew the screw V placed in the lower part of the shield DESMONTAJE PERFIL CARENADO INFERIOR Colocar el vehículo de motor sobre el caballete central Aflojar el tornillo V situado en la parte inferior del escudo Dévisser les vis V6 Dévisser les vis V4 Unscrew the screws V6 Unscrew the screws V4 Aflojar los tornillos V6 Aflojar los tornillos V...

Страница 70: ...taggio della peda na reinserire opportunamente questi componenti ABMONTIEREN DES FUßBRETTES Hinweis Um das Fußbrett abzumontieren müssen zuerst der Sattel S C S 28 das Helmfach und die Batterie S C S 24 abmontiert werden Die Schrauben V6 losschrauben und das Fußbrett von oben entfernen Während das Fußbrett gehoben wird um es zu entfernen denEntlüfterschlauch A unddieVerkabelung B der Batterie hera...

Страница 71: ...letely forward DESMONTAJE PLATAFORMA APOYAPIES Nota para desmontar la plataforma apoyapiés es necesario quitar primero el asiento S C P 28 el hueco portacascos S C P 24 y la batería S E P 10 Aflojar los tornillos V6 y quitar la plataforma tirándola hacia arriba DESMONTAJE HUECO PORTACASCOS Volcar el asiento completamente hacia adelante During the footboard lifting for removal slip off the bre athe...

Страница 72: ...trata di corpi estranei Svitare la vite anteriore V Svitare e rimuovere le viti V4 Sollevare con caute la il vano casco Scollegare il connet tore F Sfilare il cablaggio della luce vano casco optional Estrarre il vano ca sco con il relativo ca blaggio Die Schrauben V4 losschrauben und entfernen Das Helmfach vorsichtig heben Den Verbinder F trennen Die Verkabelung der Helmfachlampe herausziehen opti...

Страница 73: ...caution the helmet compartment Disconnect the fitting F Slip off the harness of the helmet compartment light optional Remove the helmet compartment with its relative harness Quitar el tapón A del depósito combustible Extraer la protección antigoteo B junto con el tubo de ventilación Nota cubrir la boquilla del depósito combustible con un paño para evitar que penetren materias extrañas Aflojar el t...

Страница 74: ... und mit der Polsterung nach oben hinlegen A ABMONTIEREN DER HINTEREN VERKLEIDUNG Hinweis Zuerst die Tunnelverkleidung rechts links abmontieren Die Schrauben V2 losschrauben RIMOZIONE CARENATURA POSTERIORE Nota rimuovere preventivamen te il copritunnel dx sx Svitare le viti V2 Die Schrauben V4 für die Befestigung des Spoilers A losschrauben Den hinteren Spoiler A abmontieren B V4 A RIMOZIONE SELLA...

Страница 75: ...with the ignition key Unscrew the screws V2 operating from the front part of the saddle Remove the saddle and lay it down with the stuffed part upwards REAR FAIRING REMOVAL Note first of all remove the tunnel cover dx sx Unscrew the screws V2 Unscrew the spoiler A fastening screws V4 Remove the rear spoiler A DESMONTAJE ASIENTO Abrir la tapa A de acceso al depósito combustible Aflojar los tornillo...

Страница 76: ... posteriore Estrarre la carenatura posteriore e riporla in modo da non procu rare graffi ecc Den Verbinder A der Hauptverkabelung trennen Die Verkleidung am vorderen Teil aufbiegen und vorsichtig von hinten entfernen Die hintere Verkleidung entfernen und so hinlegen dass sie nicht verkratzt wird V2 Svitare le viti V2 di fissaggio parte inferiore della carenatura posteriore Svitare la vite centrale...

Страница 77: ...onnect the fitting A of the main harness Open out the fairings in the front part and remove it with caution from the rear part Remove the rear fairing and lay it down so that to avoid scratches etc Aflojar los tornillos V2 de fijación parte inferior del carenado trasero Desacoplar el conector A del cableado principal Abrir el carenado por la parte delantera y extraerlo con cuidado por la parte tra...

Страница 78: ... ABMONTIEREN DES GEHÄUSES VORNE A Die Schrauben V3 losschrauben und das vordere Gehäuse entfernen Die gegenüber der Bohrungen X Y linke Seite a n g e b r a c h t e n Schrauben V2 osschrauben Die Schrauben V2 F 54 rechte Seite losschrauben Das Schutzblech C F 52 abmontieren RIMOZIONE PARAFANGO POSTERIORE Svitare le viti V2 in corrispondenza dei fori X Y lato sini stro Svitare le viti V2 F 54 lato d...

Страница 79: ...R ARRIERE B Dévisser les vis V2 et extraire le carter B DEPOSE DU CARTER MOTEUR Note le moteur est protégé par deux carters A B en matériau antichoc DEPOSE DU CARTER AVANT A Dévisser les vis V3 et extraire le carter avant DEPOSE DU GARDE BOUE ARRIERE Dévisser les vis V2 placées à l endroit des trous X Y côté gauche Dévisser les vis V2 F 54 côté droit Extraire le garde boue C F 52 REAR FENDER REMOV...

Страница 80: ...legare il cablaggio C Svitare le viti V6 B ABMONTIEREN DES HECKES Hinweis Um das Heck A abzumontieren müssen Sie zuerst die hintere Verkleidung S C S 28 abmontieren F 57 F 56 F 55 Cs Nm V6 2 10 Cs Nm V2 2 10 RIMOZIONE CODONE Nota per rimuovere il codone A è necessario rimuovere preven tivamente la carenatura posterio re S C P 28 RIMOZIONE PARASPRUZZI Nota per rimuovere il paraspruz zi B F 55 occor...

Страница 81: ...the plate lamp and unscrew the screws V2 which are fastened on clips Desconectar el cableado C Aflojar los tornillos V6 DESMONTAJE PARAGOTAS Nota para desmontar el paragotas B F 55 es necesario desconectar el cableado D de la luz de matrícula y aflojar los tornillos V2 atornillados sobre clip DEPOSE DE LA QUEUE Note avant d enlever la queue A il faut enlever le carénage arrière S C P 28 TAIL REMOV...

Страница 82: ...e am entsprechenden Sitz positionieren Befestigungsla schen D Den Radbolzen einschieben Die Schraubenmutter A befestigen und bis zum beschriebenen Drehmoment festschrauben F 2 F 3 Svitare il dado A del perno ruo ta Die Schraubenmutter A des Radbolzens losschrauben Nonazionarelalevadelfre no con la ruota smontata perché le pastiglie verrebbero a chiudersi Per il rimontaggio operare nel modoseguente...

Страница 83: ...er l écrou A suivant le couple indiqué Never operate the brake lever when the wheel is removed as this would cause the pads to lock To re assemble proceed as follows Insert the wheel being careful to replace the speed indicator intermediate gear in its proper seat stopping tangs D Insert the wheel pin Tighten the nut A and fasten it to the appointed torque wrench setting Unscrew the nut A of the w...

Страница 84: ...montieren indem Sie die Schrauben V2 losschrauben Die Befestigungsschraube unten V des Stoßdämpfers rechts losschrauben Cs Nm V 24 15 Cs Nm V2 30 20 Cs Nm V2 a 23 20 Cs Nm D 100 15 V2 a A V D B Svitare le viti V2 a di fissaggio braccio B Posizionare il gruppo pinza A fuori dall ingombro della ruota Svitare il dado D di fissaggio ruota Estrarre la ruota con cautela verificando l effettiva sta bilit...

Страница 85: ...uellement placer un support approprié sous le moteur Enlever la pince A du frein arrière en dévissant les vis V2 Dévisser la vis de fixage inférieure V amortisseur droit Unscrew the screws V2 a which fasten the arm B Place the caliper unit A outside the wheel working area Unscrew the nut D which fasten the wheel Remove the wheel with caution checking the real stability of the motorbike D Dévisser ...

Страница 86: ...st unddieLackteiledesMotorradesbeschädigenkönnte Die Lenkerverkleidung vorne und hinten S C S 9 abmontieren ABMONTIERENDERBREMSPUMPEN 1 F 6 Svitare le viti V2 e rimuo vere il cavallotto D Rimuovere il gruppo pom pa E Il rimontaggio avviene im puntando con una chiave a T a stelo lungo prima la vite inferiore senza ser rarla Dopo il montaggio della pompa freno anteriore posteriore in stallare il tub...

Страница 87: ...accord A Enlever le tube B et les joints C Dévisser la vis V Extraer el protector manillar delantero y trasero S C P 9 Desenroscar y extraer el racor A Extraereltubo B ylasguarniciones C Aflojar el tornillo V Unscrew the screws V2 and remove the U bolt D Remove the pump unit E The reassembly must be carried out by positioning by means of a long T wrench the lower screw first without fastening it A...

Страница 88: ...eichen fürAnomalienimöldynamischenBremssystem Am Ende jedes Eingriffes am Bremssystem stets sicherstellen daß das Bremsflüssigkeitsrohr nicht verdreht ist Bremsscheibe und Bremsbeläge nicht mit Öl oder Fett verschmutzt sind alle Schrauben und Verbindungselemente korrekt festgezogen sind RIMOZIONE GRUPPO PINZA FRENO POSTERIORE Nota rimuovere la marmitta a motore freddo S D P 12 Svitare le viti V2 E...

Страница 89: ... oleodinámico Cuandoseterminecualquieroperaciónenla instalacióndefrenos comprobarsiempreque El tubo del líquido de frenos no esté enroscado El disco y las zapatas no estén impregnadas de aceite o grasa Todos los tornillos y empalmes estén ajustados correctamente REAR BRAKE CALIPER UNIT REMOVAL Note remove the silencer by cold engine S D P 12 Unscrew the screws V2 Remove the whole caliper unit A FR...

Страница 90: ...Dopo aver rimosso il gruppo pinza svitare ed estrarre il raccordo A e la relativa guarnizione Nella rimozione della pinza prestarelamassi ma attenzione a non danneg giare il condotto dell olio il di sco e le pastiglie del freno KONTROLLE DER BREMSBELAGABNU TZUNG VORNE HINTEN Im gegebenen Falle die Abnutzung der Bremsbeläge kontrollieren Falls die Beläge gefurcht oder abgenutzt erscheinen den Fehle...

Страница 91: ...pointed container according to the regulations in force for its disposal CONTROLE USURE PLAQUETTES FREIN AVANT ARRIERE Lors de ce contrôle vérifier aussi l état d usure des disques S ils sont rayés ou anormalement usés effectuer une rectification Si elles sont très abîmées ou si leur épaisseur est inférieure à 2 mm procéder à leur substitution CONTROL DESGASTE PASTILLAS FRENO DELANTERO TRASERO En ...

Страница 92: ...belägederBremsenichtzu beschädigen F 15 Dopo aver rimosso il gruppo pin za svitare ed estrarre il raccor do A e le relative guarnizioni Lo spessore minimo delle pa stiglie è di mm 2 F 14 D Nach dem Abmontieren der Zangengruppe die Verbindungselemente A und die entsprechenden Dichtungen aufschrauben Die Mindeststärke der Bremsbeläge ist 2 mm AUSWECHSELUNG DER ZANGENGRUPPE HINTEN Den öldynamischen K...

Страница 93: ...it by pouring the fluid into an appointed container according to the regulations in force for its disposal After the caliper unit removal unscrew and remove the fittings A and the relative linings The minimum thickness of the pads is 2 mm SUBSTITUTIONDU GROUPE PINCE ARRIERE Vider entièrement le circuit oléodynamique en versant le liquide dans un récipient adéquat pour l éliminer conformément aux R...

Страница 94: ...ppresenta zione di F 18 Nel rimontaggio della marmitta sostituire sem pre la guarnizione C F 18 V3 B D Den Auspuffschalldämpfer abkühlen lassen Die Strebe S C S 22 abmontieren Die Schraubmütter A die das Auspuffrohr B am Motor befestigen losschrauben Die Schrauben V3 losschrauben und den gesamten Auspuffschalldämpfer entfernen Hinweis Die Vorgangsweise für das Abmontieren der Bestandteile der Ausp...

Страница 95: ...22 Aflojar las tuercas A que fijan el tubo de escape B al motor DEPOSE DU POT D ECHAPPEMENT Laisser refroidir le pot d échappement Enlever l étrésillon S C P 22 Desserrer les écrous A qui fixent le tube d échappement B au moteur Dévisser les vis V3 et extraire le pot d échappement complet Aflojar los tornillos V3 y extraer el silenciador de escape completo Nota el criterio de despiece de los eleme...

Страница 96: ...lich unterdemMotorab DasVorderradmußüberdenRand derHebeplattformherausragen Hinweis Für das Abmontieren eines oder beider Schäfte der Gabel einschließlich Radaufhängung müssen zunächst entfernt werden Frontschutzplatte Lenkerverkleidung vorne hinten Kilometerzählerzwischengetriebe Vorderrad S D S 0 Vorderschutzblech S C S 18 Bremszange S D S 6 falls der linke Schaft ausgebaut werden muß F 19 Allen...

Страница 97: ... que quitar la barra izquierda FOURCHE DEPOSE DU GROUPE TIGE PORTE ROUE S assurer que le motocycle est parfaitement stable éventuellement placer un support approprié sous le moteur La roue avant doit dépasser du bord du tapis d élévation Note pour déposer une des deux tiges de la fourche ou bien les deux avec le porte roue il est nécessaire de retirer d abord tablier protège guidon avant arrière r...

Страница 98: ...ompleta mente dall olio nel quale era immer sa Portare a finecorsa lo stelo F Mantenendo lo stelo portaruota per fettamente verticale inserire un metro o l asta di un calibro e ve rificare il corretto livello dell olio che dovrà essere a mm 105 dal bor do superiore dello stelo F 21 Eventualmente rabboccare vedi tabella lubrificanti Ripetere le operazioni appena de scritte per l altro stelo Prima d...

Страница 99: ...s on the other leg Before re assembling grease the O ring D or replace with a new one Perfectly align the upper ring nut with the groove on the inner tube HUILE DE FOURCHE Contrôle du niveau En cas de fin de course de la fourche ou de bruit anormal sur celle ci il est nécessaire d effectuer le contrôler du niveau d huile dans les tiges en procédant comme suit retirer le bouchon supérieur A enlever...

Страница 100: ...Abmontieren der Gabel müssen zunächst entfernt werden Vorderschutzschild S C S 10 Vorderschutzblech S C S 18 Vorderrad optional S D S 0 Kilometerzählerzwischengetriebe Bremsölkanal Bremszangen optional S D S 6 Lenker AUSWECHSELUNG DES GABELÖLS Bocken Sie das Kraftrad auf dem mittleren Ständer auf Setzen Sie einen geeigneten Behälter unter die Radaufhängung und entfernen Sie die Schraube V Lassen S...

Страница 101: ... huile restante REMOCIÓN HORQUILLA COMPLETA Colocarunsoporteadecuado debajo del motor La rueda delanteratendráquesobresalirdel bordedelestriboelevador demodo que permita la remoción de la horquilla y en su caso también con la rueda de hecho no es indispensable quitar la rueda delantera para quitar la horquilla Nota para quitar la horquilla completa es necesario quitar anteriormente escudo delanter...

Страница 102: ...ile a richiesta cod 086 014 00 F 27 RIMOZIONE AVVISATORE ACUSTICO Nota per accedere all avvisato re acustico A è necessario ri muovere lo scudo S C P 10 Scollegare i cavi elettrici B C Svitare la vite V e rimuovere l avvisatore acustico A Estrarre il commutatore A prestando attenzione a cavi e connettori A B A V2 A V B C C ABMONTIERENDES SCHLÜSSELUMSCHALTERS Hinweis UmzurSchlüsselumschal tergruppe...

Страница 103: ...lever le tablier S C P 10 Dévisser complètement les vis V2 spéciales Les vis de fixage V2 sont réa lisées avec une tête spéciale qui les protège de toute violation Pour les enlever il est donc indispensable de se servir d une clef spéciale qui peut être fourniesurdemande code086 014 00 Extraire le commutateur A en faisant attentionauxcâblesetauxconnecteurs ACOUSTIC ALARM REMOVAL Note to reach the ...

Страница 104: ...o del serbatoio attendere il comple to raffreddamento del motore ed utilizzare una pompa manuale Per la rimozione del serbatoio procedere come segue estrarre la protezione antisgocciolo A Proteggere il bocchettone con il tappo originale B Rimuovere con una pinza la fascetta C e sfilare il tubo D all interno del quale è installato il filtro del carburante Rimuovere la fascetta E ed estrarre il tubo...

Страница 105: ...arénage arrière S C P 28 Pour vider le réservoir attendre que le moteur soit tout à fait froid et utiliser une pompe manuelle Pour enlever le réservoir procéder comme suit extraire la protection anti goutte A protéger le goulot en mettant le bouchon original B à l aide d une pince enlever le collier C et dégager le tube D à l intérieur duquel se trouve le filtre du carburant enlever le collier E e...

Страница 106: ...on der vorderen Seite des Benzintankes trennen Den Benzintank entfernen indem Sie ihn zuerst vorne anheben um Ihn von den sich am Rahmen des Motorrades befindenden stoßdämpfenden Puffern M zu befreien Von Wärmequellen entfernt halten Für den Wiedereinbau des Benzintankes zuerst auf den Puffern positionieren und dann mit den Schrauben hinten befestigen Cs Nm V4 1 10 RIMOZIONE DEL GRUPPO GALLEGGIANT...

Страница 107: ...ock absorbers bumpers M present on the frame of the motorbike Keep it away from any source of heat To reassemble place it first on the rubber bumpers and then fix it with the rear screws Extraire le réservoir en le soulevant tout d abord du côté avant pour le libérer des tampons amortissants M présents sur le châssis du scooter Le poser loin des sources de chaleur Pour le remonter l introduire d a...

Страница 108: ...isperso nel l ambiente Nel caso si debba rimuovere la pompa A svitare le viti V3 A C I V2 V3 F D H G E ABMONTIERENDESKÜHLERS Die Frontschutzplatte S C S 10 abmontieren Den Beinschutz S C S 18 abmontieren Warten bis der Motor vollkommen abgekühlt ist Einen angemessenen Behälter unter die Kühlflüssigkeitspumpe A stellen Die Schelle B entfernen Den Schlauch C herausziehen und in den Sammelbehälter le...

Страница 109: ... P 18 Attendre que le moteur ait tout à fait refroidi Positionner un récipient d une capacité adéquate sous la pompe A du liquide réfrigérant Enlever le collier B Dégager le tube C et l introduire dans le récipient Enlever le bouchon du réservoir d expansion Laisser couler tout le liquide à l intérieur du récipient Verser le liquide épuisé dans un récipient convenant à une élimination conforme aux...

Страница 110: ...ici del coperchio A per evitare aspirazione di aria non filtrata Nel caso il filtro risulti danneggiato sostituirlo con altro identico Bei der Installation des Filters den perfekten KontaktderDeckeloberflächen A sicherstellen damitdieAnsaugungungefilterterLuftvermiedenwird Sollte der Filter beschädigt sein diesen durch einen identischenersetzen LUFTFILTER Wartung Der Luftfilter ist auf der linken ...

Страница 111: ... or replace the filter Clean with compressed air also the filter housing The clean or new filter can be fitted again from one side or from the other side FILTRE A AIR entretien Le filtre à air est placé sur le côté gauche à l arrière du véhicule Dévisser la vis V1 Enlever le couvercle A F 34 Extraire l élément filtrant B F 34 Nettoyer soigneusement le filtre à l aide d un jet d air comprimé de l i...

Страница 112: ...saggio ammortizzatore sinistro Estrarre il motore con estrema cautela ABMONTIEREN DES MOTORS Für die Demontage des Motors vom Rahmen muß zunächst die hintere Verkleidung S C S 28 abgenommen werden Trennen Sie die elektrischen Anschlüsse vom Anlasser Entleeren Sie vollständig den Benzintank S A S 27 Den Kühler und den Luftfilter befreien Die Zange der Bremse hinten abmontieren Entleeren Sie die Küh...

Страница 113: ...ment Déposer le pot d échappement S D P 4 Dévisser l écrou 1 F 35 côté droit Dégager le pivot du moteur 2 F 35 côté gauche REMOCIÓN DEL MOTOR Para quitar el motor del chasis es necesario quitar antes el carenado posterior S C P 28 Desconectar los conectores eléctricos del motor de arranque Vaciar completamente el depósito combustible S A P 27 Liberar el carburador y el filtro de aire Quitar la pin...

Страница 114: ...l telaio Non deformare il telaio per ripristinare le quote A e B originali KONTROLLE DER RAHMENABMESSUNGEN Falls das Kraftrad in einen Unfall verwickelt wurde aufgrund dessen eine auch nur leichte Deformation des Rahmens vermutet wird muß unbedingt eine Kontrolle der Abmessungendurchgeführtwerden bevorirgendeinsonstiger Eingriffzur ReparaturoderEinstellung vorgenommenwird Das Kontrollmaß Abb 37 Fü...

Страница 115: ... un contrô le dimensionnel avant toute autre in tervention de restructuration et de mise au point La cote de contrôle F 37 La cote mesurée pourra présenter une tolérance de 2 mm Si ce n est pas le cas remplacer entièrement le cadre Ne pas déformer le châssis pour rétablir les cotes A et B originales COMPROBACIÓN DE LAS DIMENSIONES DEL CHASIS Si el vehículo a motor ha tenido un accidente y se sospe...

Страница 116: ...strarre il portalampada E F 3 e sostituire la lampadi na fulminata con altra identica 0 E Die Fassung der Glühbirne E Abb 3 herausziehen und die durchgebrannte Glühbirne mit einer des selben Typs ersetzen DOPPELLEUCHTE VORNE Um Zugang zu den Glühbirnen A und B Abb 1 der Doppelleuchte zu erhalten müssen Sie die vordere Frontschutzplatte aufbiegen oder entfernen S C S 10 AUSWECHSELUNG DER GLÜHBIRNEN...

Страница 117: ...es A et B F 1 du double optique il faut écarter ou enlever le tablier avant S C P 10 SUBSTITUTION DES AMPOULES Appuyer avec deux doigts sur les languettes C F 2 pour les libérer des éléments qui les retiennent D Extraire la douille E F 3 et remplacer l ampoule sautée par une ampoule identique DOBLE FARO ANTERIOR Para acceder a las lamparillas A y B F 1 del doble faro es necesario abrir o quitar el...

Страница 118: ... altra identica F 4 F 5 LUCE DI POSIZIONE Estrarre il fanalino F F 4 e sfi lare il portalampada G H F G E STANDLICHT Die Lampe F Abb 4 herausnehmen und die Fassung der Glühbirne G herausziehen Die durchgebrannte Glühbirne H Abb 5 herausnehmen und mit einer des selben Typs ersetzen ...

Страница 119: ...it with a new one which should be absolutely identical FEU DE POSITION Extraire le feu F F 4 et dégager la douille G Extraire l ampoule H F 5 sautée et la remplacer par une autre identique LUCES DE ESTACIONAMIENTO Extraer el piloto F F 4 y quitar el casquillo portalámpara G Extraer la lamparilla H F 5 fundida y sustituirla por otra del mismo tipo ...

Страница 120: ...ulla ghiera posta nel faro sotto lo scudo F 6 oppure in assenza dello scudetto frontale dall alto agendo sulla ghiera A F 7 F 8 FANALE POSTERIORE Per accedere alle lampade del fanale posteriore è indi spensabile rimuovere il vano casco S C P 24 Rimuovere i coperchietti B oppure C F 8 estrarre la lampada fulminata e sostituirla con una identica E A C B SCHEINWERFER HINTEN Um Zugang zu den Glühbirne...

Страница 121: ... revestimiento F 6 o bien si el vehículo no está provisto de revestimiento frontal interviniendo en la tuerca por arriba A F 7 E TAIL LIGHT To reach the light bulbs of the tail light it is absolutely essential to remove the helmet compartment S C P 24 Remove the small covers B or C F 8 take out the burnt light bulb and substitute it with a new one which should be absolutely identical FEU ARRIERE P...

Страница 122: ... die Lampen fassung des betroffenen Instruments heraus Nehmen Sie die durch Druck eingesetzte Glühbirne heraus und ersetzen Sie diese durch eine neue Nota èconsigliabi le effettuare una prova di funziona mento prima di ri montarelepartiri mosse E Hinweis Es empfiehltsichein Funktionstestvor demWiedereinbau derentfernten Teile A V2 RICHTUNGSANZEIGER VORNE Die Schrauben V2 Abb 9 mit denen der durchs...

Страница 123: ...rs to the indicator to replace Take out the burnt light bulb and substitute it with a new one which should be absolutely identical DASHBOARD Note to reach the inner components of the dashboard it is necessary to remove the front shield S C P 10 CLIGNOTANTS AVANT Dévisser les vis V2 F 9 qui fixent le cache transparent Enlever le cache transparent A Extraire l ampoule sautée et la remplacer par une ...

Страница 124: ... In questa confi gurazione è ac cessibile anche la candela sfi lando il cappuc cio F F 12 F 13 A B C F REGLER Hinweis Um zum Druckregler A Abb 12 Zugang zu erhalten müssen Sie die Stütze abmontieren S C S 22 TEMPERATUR REGLER DES STARTERS B Abb 12 TEMPERATUR REGLER DES ELEKTRISCHEN LÜFTERRADES C Abb 12 Hinweis In dieser Ausführung sind beide Thermistoren und das Elektrogehäuse D zugänglich SPULE H...

Страница 125: ...cas la bougie aussi est accessible en dégageant son capuchon F REGULATEUR Note pour accéder au régulateur de tension A F 12 il faut enlever l ètrèsillon S C P 22 THERMOSTAT STARTER B F 12 THERMOSTAT ELECTRO VENTILATEUR C F 12 Note dans ce cas les deux thermistors et l unité centrale sont accessibles D BOBINA Nota para acceder a la bobina E F 13 es necesario quitar primero el carenado trasero S C P...

Страница 126: ...chend zu laden Um ins Batteriefach zu gelangen den Kasten A Abb 14 durch Lösen der Schrauben V4 entfernen Falls die Batterie angeschlossen ist die Speisekabel abtrennen Die blaue und himmelblaue Litze am positiven Pol und die beiden schwarzen Litzen am negativen Pol anschließen Beim Wiedereinbau der Batterie achten Sie darauf daß der Entlüfterschlauch angeschlossen ist und aus dem Sitz der Batteri...

Страница 127: ...correctement et la charger Pour accéder au compartiment de la batterie enlever le petit tiroir A F 14 en dévissant les vis V4 Si la batterie est connectée déconnecter les câbles d alimen tation Conectar los cables azul y celeste al polo y los dos cables negros al polo Tras colocar la batería nuevamente en su sitio controlar que el tubo de ventilación esté conectado correctamente y que salga del al...

Страница 128: ...torestopdx Stopschalterrechts Rightstopswitch Interrupteurstopdroit Interruptorparadader 5 Commutatorisx Umschalterlinks Left switch Commutateursgauches Conmutadoresizq 6 Commutatoridx Umschalterrechts Right switch Commutateursdroits Conmutadoresder 7 Faroant completo VollständigerScheinwerfervorne Completefrontlamp Phareavantcomplet Faroant completo 7 1 Faro sx Scheinwerferlinks Leftlamp Pharegau...

Страница 129: ...1 3 12 99 MADISON 125 150 A3 E ...

Страница 130: ...1 4 12 99 MADISON 125 150 A3 E ...

Страница 131: ...TO ELETTRICO ELEKTRISCHE ANLAGE WIRING DIAGRAM CIRCUIT ELECTRIQUE INSTALACIÓN ELÉCTRICA 2 4 6 9 11 5 1 3 E 3 5 3 4 1 9 8 7 7 1 7 2 7 3 1 0 1 2 1 3 1 4 1 5 1 6 1 7 1 8 2 0 2 1 22 30 3 6 2 3 2 4 2 6 2 5 2 9 2 8 2 7 3 1 3 2 32 1 3 3 12 1 10 1 ...

Страница 132: ...chwarz Yellow Black Jaune Noir Amarillo Negro GL V Giallo Verde Gelb Grün Yellow Green Jaune Vert Amarillo Verde GL R Giallo Rosso Gelb Rot Yellow Red Jaune Rouge Amarillo Rojo G R Grigio Grau Grey Gris Gris M B Marrone Bianco Braun Weiß Brown White Marron Blanc Marrón Blanco N Nero Schwarz Black Noir Negro N R Nero Rosso Schwarz Rot Black Red Noir Rouge Negro Rojo R Rosso Rot Red Rouge Rojo R S R...

Страница 133: ...STRO VERKABELUNG LINKE SEITE LEFT SIDE HARNESSES CABLAGES COTE GAUCHE CABLEADOS LADO IZQUIERDO 24 14 30 4 6 5 13 11 9 10 20 23 18 21 31 32 15 6 17 22 13 11 321 181 8 32 321 21 18 181 30 5 9 8 4 3 14 22 17 23 24 20 15 3 34 35 34 35 OPTIONAL OPTIONAL ...

Страница 134: ...50 E CABLAGGI LATO DESTRO VERKABELUNG RECHTE SEITE RIGHT SIDE HARNESSES CABLAGES COTE DROIT CABLEADOS LADO DERECHO 36 16 12 121 21 10 101 1 29 26 27 25 28 33 2 73 71 72 7 16 36 25 28 71 7 72 2 27 26 29 1 10 121 12 21 33 19 19 ...

Страница 135: ... PER SCOOTER MOTORI A QUATTRO TEMPI PER SCOOTER MOTORI A QUATTRO TEMPI PER SCOOTER SKOOTER VIER TAKT MOTOREN SKOOTER VIER TAKT MOTOREN SKOOTER VIER TAKT MOTOREN SKOOTER VIER TAKT MOTOREN SKOOTER VIER TAKT MOTOREN SCOOTER FOUR STROKE ENGINES SCOOTER FOUR STROKE ENGINES SCOOTER FOUR STROKE ENGINES SCOOTER FOUR STROKE ENGINES SCOOTER FOUR STROKE ENGINES MOTEURS A QUATRE TEMPS POUR SCOOTERS MOTEURS A ...

Страница 136: ...Eingriffe bezüglich Kontrolle Wartung Reparatur Auswechselung von Teilen Kontrolle Wartung Reparatur Auswechselung von Teilen Kontrolle Wartung Reparatur Auswechselung von Teilen Kontrolle Wartung Reparatur Auswechselung von Teilen Kontrolle Wartung Reparatur Auswechselung von Teilen usw betreffend unsere gesamte Kraftradpalette erfordern Sachkenntnis und Erfahrung der mit den Arbeiten beauftragte...

Страница 137: ...ons techniques courantes sur toute la gamme des moteurs à 4 temps pour motocycles MALAGUTI en production au moment de la divulgation des manuels Les informations mentionnées concernent la PARTIE CYCLE PARTIE CYCLE PARTIE CYCLE PARTIE CYCLE PARTIE CYCLE des motocycles avec quelques remarques sur certaines parties se rattachant au moteur Nous avons volontairement omis certaines informations car à no...

Страница 138: ...he servicing of pre modified models The table of contents table of contents table of contents table of contents table of contents will be duly updated in case of the insertion of new pages causing difficulty in the rational consultation of the manual IMPORTANT IMPORTANT IMPORTANT IMPORTANT IMPORTANT The set of service manuals is to be considered as an essential work instrument work instrument work...

Страница 139: ...llocazione a fianco di un testo fianco di un testo fianco di un testo fianco di un testo fianco di un testo s o n o r i f e r i t i q u i n d i s o l o a t a l e t e s t o a fianco di a fianco di a fianco di a fianco di a fianco di una figura una figura una figura una figura una figura s o n o r i f e r i t i a l l a r g o m e n t o i l l u s t r a t o i n f i g u r a e d a l r e l a t i v o t e s...

Страница 140: ...orios recordatorios recordatorios recordatorios Consultar está página cada vez que surjan dudas sobre su significado Hinweis Hinweis Hinweis Hinweis Hinweis Falls keinerlei Angabe gemacht wurde an der Stelle des Kästchens bedeutet dies daß sich die auf der Seite enthaltenen Informationen auf alle Motoren der Produktpalette des jeweiligen Herstellers beziehen IGEÄNDERTE SEITEN IGEÄNDERTE SEITEN IGE...

Страница 141: ...ions impliquant des compétences dans le domaine électrique électronique NON Opérations à éviter MANUEL D ATELIER DU MOTEUR Informations pouvant être déduites de cette documentation CATALOGUE DES PIECES DETACHEES Informations pouvant être déduites de cette documentation ATENCIÓN Consejos pru denteseinformacionesquehacen referencia a la seguridad del motociclista usuario del vehículo a motor y la sa...

Страница 142: ... followed by a number followed by a number followed by a number followed by a number followed by a number i n d i c a t e s a single screw single screw single screw single screw single screw In case o f different screws different screws different screws different screws different screws b e i n g r e f e r r e d t o i n t h e i l l u s t r a t i o n t h e l e t t e r V V V V V is followed by a num...

Страница 143: ...ndisulfid Öl Molibdenum Huile au bisulfure Aceite de bisulfuro di molibdeno d i s u l f i t eo i l de molybdène de molibdeno Olio motore Motoröl Engine oil Huile moteur Aceite motor Grasso al sapone L i t h i u m f e t t a u f t r a g e n Lithium soap Graisse à base de Grasa a base de d il i t i o base grease savon lithium l i t i o Grasso speciale Spezialöl für Special grease Graisse s p é c i a ...

Страница 144: ...e r v e n t i e f f e t t u a t i e g l i a p p u n t i s u e v e n t u a l i c o n t r o l l i f u t u r i F 1 ALLGEMEINE ARBEITSNORMEN ALLGEMEINE ARBEITSNORMEN ALLGEMEINE ARBEITSNORMEN ALLGEMEINE ARBEITSNORMEN ALLGEMEINE ARBEITSNORMEN Die nachfolgenden Ratschläge Empfehlungen Ratschläge Empfehlungen Ratschläge Empfehlungen Ratschläge Empfehlungen Ratschläge Empfehlungen und Hinweise Hinweise Hin...

Страница 145: ...Pour serrer les vis et les écrous commencer par ceux qui ont un diamètre plus grand diamètre plus grand diamètre plus grand diamètre plus grand diamètre plus grand ou bien par ceux internes puis continuer en c r o i x c r o i x c r o i x c r o i x c r o i x p a r tractions tractions tractions tractions tractions successives L utilisation correcte des clés fixes à fourche s effectue par tractions t...

Страница 146: ...er vanno effettuate a motore freddo motore freddo motore freddo motore freddo motore freddo Utilizzare sempre cacciaviti di dimensioni adatte alle viti sulle quali si deve agire EMPFEHLUNGEN EMPFEHLUNGEN EMPFEHLUNGEN EMPFEHLUNGEN EMPFEHLUNGEN Bevor Bevor Bevor Bevor Bevor mit irgendeinem Eingriff am Kraftrad begonnen wird den Motor abschalten den Startschlüssel abziehen und abwarten bis alle Kompo...

Страница 147: ... étanchéité les bagues élastiques et les goupilles doivent être toujours remplacés toujours remplacés toujours remplacés toujours remplacés toujours remplacés à chaque dépose Les valeurs de couple indiqués dans les manuels concernent le serrage final serrage final serrage final serrage final serrage final e t e l l e s doivent être obtenues progressivement par passes successives Les opérations de ...

Страница 148: ... in locali chiusi o poco aerati F 3 F 2 Arbeiten Sie nicht unter ungünstigen Bedingungen oder bei mangelnder Stabilität des Kraftrades Arbeiten Sie nicht unter ungünstigen Bedingungen oder bei mangelnder Stabilität des Kraftrades Arbeiten Sie nicht unter ungünstigen Bedingungen oder bei mangelnder Stabilität des Kraftrades Arbeiten Sie nicht unter ungünstigen Bedingungen oder bei mangelnder Stabil...

Страница 149: ...s Ne pas laisser des récipients Ne pas laisser des récipients Ne pas laisser des récipients Ne pas laisser des récipients ouverts ou non prévus pour contenir de l essence dans des positions de passage à proximité de sources de chaleur etc Ne pas utiliser d essence Ne pas utiliser d essence Ne pas utiliser d essence Ne pas utiliser d essence Ne pas utiliser d essence comme détergent pour nettoyer l...

Страница 150: ...ny servicing Before any servicing Before any servicing Before any servicing Before any servicing make sure that the motor bike is perfectly stable The front wheel should preferably be anchored to the equipment A F 4 integral with the lifting board Avant toute intervention Avant toute intervention Avant toute intervention Avant toute intervention Avant toute intervention s assurer que le motocycle ...

Страница 151: ... LUBRIFICANTI LUBRIFICANTI SCHMIERMITTEL SCHMIERMITTEL SCHMIERMITTEL SCHMIERMITTEL SCHMIERMITTEL LUBRICANTS LUBRICANTS LUBRICANTS LUBRICANTS LUBRICANTS LUBRIFIANTS LUBRIFIANTS LUBRIFIANTS LUBRIFIANTS LUBRIFIANTS LUBRICANTES LUBRICANTES LUBRICANTES LUBRICANTES LUBRICANTES Candela Zündkerze Spark plug Bougie B u j í a F i l t r oa r i a L u f t f i l t e r A i rc l e a n e r F i l t r eàa i r F i l ...

Страница 152: ...pachi opachi opachi opachi i n d i c a n o che la temperatura di funzionamento è troppo bassa grado grado grado grado grado t e r m i c o t e r m i c o t e r m i c o t e r m i c o t e r m i c o della candela t r o p p o e l e v a t o t r o p p o e l e v a t o t r o p p o e l e v a t o t r o p p o e l e v a t o t r o p p o e l e v a t o c a r b u r a z i o n e t r o p p o r i c c a o a c c e n s i ...

Страница 153: ... régler en agissant seulement sur l électrode de masse électrode de masse électrode de masse électrode de masse électrode de masse SPARK PLUG CHECK 1 000 K SPARK PLUG CHECK 1 000 K SPARK PLUG CHECK 1 000 K SPARK PLUG CHECK 1 000 K SPARK PLUG CHECK 1 000 Km m m m m Remove the spark plug while the engine is hot engine is hot engine is hot engine is hot engine is hot taking utmost care to avoid scald...

Страница 154: ...n mit Rissen auf der Isolierung oder Alle Kerzen mit Rissen auf der Isolierung oder rostigen Elektroden müssen ersetzt werden rostigen Elektroden müssen ersetzt werden rostigen Elektroden müssen ersetzt werden rostigen Elektroden müssen ersetzt werden rostigen Elektroden müssen ersetzt werden AUSWECHSELUNG DER ZÜNDKERZE AUSWECHSELUNG DER ZÜNDKERZE AUSWECHSELUNG DER ZÜNDKERZE AUSWECHSELUNG DER ZÜND...

Страница 155: ...e sus piezas nuevo montaje del motor y de cada una de sus piezas nuevo montaje del motor y de cada una de sus piezas nuevo montaje del motor y de cada una de sus piezas nuevo montaje del motor y de cada una de sus piezas con herramientas no idóneas para dichas con herramientas no idóneas para dichas con herramientas no idóneas para dichas con herramientas no idóneas para dichas con herramientas no...

Страница 156: ...le valvole cod 08601800 Werkzeug für die Ventilnachstellung cod 08601800 Valve adjusting tool cod 08601800 Outil pour le réglage des soupapes cod 08601800 Herramienta para el ajuste de las válvulas cod 08601800 Morsetto per comprimere la molla frizione Kupplungsfeder Druckbacke Clutch spring compression clamp Etau pour comprimer le ressort friction Mordaza para comprimir el muelle de embrague Staf...

Страница 157: ...reddato a liquido flüssigkeitsgekühlt flüssigkeitsgekühlt flüssigkeitsgekühlt flüssigkeitsgekühlt flüssigkeitsgekühlt liquid cooling system liquid cooling system liquid cooling system liquid cooling system liquid cooling system refroidissement par liquide refroidissement par liquide refroidissement par liquide refroidissement par liquide refroidissement par liquide refrigeración líquida refrigerac...

Страница 158: ...ompressionsdrucks Kontrolle Motorenölstand Motorenölwechsel Getriebeölwechsel L u f t f i l t e r r e i n i g u n g Gehäusefilterreinigung Motorenüberholung Zylinderkopf Auseinanderbau Entfernung des Zylinderkopfes Prüfung des Zylinderkopfes Einbau des Zylinderkopfes Nockenwelle und Kipphebel Entfernung Kipphebel und Kipphebelwelle Prüfung der Nockenwelle Prüfung des Kipphebels und der Kipphebelwe...

Страница 159: ...scheibe Entfernung Sekundärscheibe und Keilriemen Entfernung der Sekundärscheibe Kupplungsprüfung Keilriemenprüfung Gewichtsprüfung Prüfung der Sekundärscheibe Hauptscheibengruppe Einbau der Sekundärscheibe A C Generator und Anfahrkupplung Generatordeckel und Statorspule Entfernung A C Generator und Anfahrkupplung Entfernung Auseinanderbau des Läufers des A C Generators Prüfung des Anfahrzahnrads ...

Страница 160: ...ento Centrifugo automatico Impiantoelettrico Accensione T C I D i g i t a l Generatore Magnete AC 170W Tipobatteria 12 V 9AH Motor Motor Motor Motor Motor Motortyp Viertaktmotor 125 150 wassergekühlt obenliegende Einzelnockenwelle Zylinderanordnung Einzylinder nach vorne geneigt Hubraum 125 0 124 L 124 cm3 Hubraum 150 0 152 L 152 cm3 Bohrung pro Hub 125 53 7 x 54 8 mm Bohrung pro Hub 150 59 5 x 54...

Страница 161: ... 1 4 L Aceite transmisión 0 14 L Q8 T35 80W Capacidad total F i l t r od ea i r e lado carburador Elemento filtrante húmedo lado cárter Elemento filtrante en seco Carburador Tipo Z24V YD 5DS Fabricante TEIKEI B u j í a Tipo CR8E U24ESR N Fabricante Ngk Nippon Denso Distancia entre 0 6 0 7 mm electrodos Tipo embrague Embrague centrífugo automático en seco Tipo de transmisión Automática correa trape...

Страница 162: ...sser SCAR 4 500 4 512 mm 4 500 4 512 mm 4 542 mm Componente Componente Componente Componente Componente T e i l T e i l T e i l T e i l T e i l Valore nominale 125 Valore nominale 125 Valore nominale 125 Valore nominale 125 Valore nominale 125 Valore nominale 150 Valore nominale 150 Valore nominale 150 Valore nominale 150 Valore nominale 150 Limite 125 Limite 125 Limite 125 Limite 125 Limite 125 L...

Страница 163: ...eje balancín Rocker arm inner Ø Ø interne balancier Ø interior balancín 12 000 12 018 mm 12 000 12 018 mm 12 030 mm 12 030 mm Rocker arm shaft outer Ø Ø externe arbre balancier Ø exterior eje balancín 11 981 11 991 mm 11 981 11 991 mm 11 990 mm 11 990 mm Rocker arm shaft allowance Jeu arbre balancier Juego eje balancín 0 009 0 012 mm 0 009 0 012 mm Valves valve seats Soupapes sièges Válvulas asien...

Страница 164: ...lbenringe Segmento superiore Oberring T i p o c i l i n d r i c o zylindrisch Distanza tra le estremità Abstand zwischen den Enden a segmento montato beim angebrachten Ring 0 15 0 25 mm 0 15 0 30 mm 0 40 mm 0 45 mm Gioco laterale Seitenspiel a segmento montato beim angebrachten Ring 0 03 0 07 mm 0 12 mm Raschia olio Ölabstreifer tipo conico konisch Distanza tra le estremità Abstand zwischen den En...

Страница 165: ...eite Conical type type conique Tipo cónico 0 15 0 30 mm 0 30 0 45 mm 0 45 mm 0 60 mm Distance between ends D i s t a n c e e n t r e l e s e x t r é m i t é s D i s t a n c i a e n t r e l o s e x t r e m o s w i t h f i t t e d r i n g segment monté c o n e l s e g m e n t o m o n t a d o 0 02 0 06 mm 0 12 mm Side allowance J e u l a t é r a l Juego lateral w i t h f i t t e d r i n g segment mon...

Страница 166: ...se f r i z i o n e Innendurchmesser 120 mm 135 mm Lunghezza libera Freie Länge molla ceppo frizione Kupplungsbackenfeder 28 mm 28 mm Ø esterno peso Gewicht Außendurchmesser 20 mm 20 mm 19 5 mm 19 5 mm F r i z i o n e g i r i i n n e s t o Kupplung Einschaltumdrehungen 3 800 250 rpm 3 700 250 rpm F r i z i o n e g i r i b l o c c o Kupplung Sperrumdrehungen 6 400 500 rpm 5 700 400 rpm Cinghia trape...

Страница 167: ...intérieur cloche Ø i n t e r i o r d e l a c a m p a n a d e diameter d embrayage embrague 120 mm 135 mm Clutch block spring Longueur libre ressort bloc Longitud libre muelle free length f r i c t i o n mordaza de embrague 28 mm 28 mm Weight outer diameter Ø extérieur poids Ø exterior peso 20 mm 20 mm 19 5 mm 19 5 mm Clutch engage F r i c t i o n t o u r s Embrague vueltas revolutions embrayage ac...

Страница 168: ... Check if the fuel pipe and the vacuum pipe are intact Canalisation carburant Vérifier si le tube carburant et le tube dépression sont intacts Tubería de combustible Comprobar que el tubo del combustible y el tubo de depresión estén íntegros Regime minimo Controllare e regolare regime minimo del motore Leerlaufdrehzahl Die Motor Leerlaufdrehzahl prüfen und einstellen Idling speed Check and regulat...

Страница 169: ...PRES RODAGE APRES RODAGE TRAS EL RODAJE TRAS EL RODAJE TRAS EL RODAJE TRAS EL RODAJE TRAS EL RODAJE 1 000 K 1 000 K 1 000 K 1 000 K 1 000 Km m m m m OGNI OGNI OGNI OGNI OGNI ALLE ALLE ALLE ALLE ALLE EVERY EVERY EVERY EVERY EVERY TOUS LES TOUS LES TOUS LES TOUS LES TOUS LES CADA CADA CADA CADA CADA 6 00 6 00 6 00 6 00 6 000 K 0 K 0 K 0 K 0 Km o 6 mesi m o 6 mesi m o 6 mesi m o 6 mesi m o 6 mesi 12 ...

Страница 170: ...IN STELLUNG STELLUNG STELLUNG STELLUNG STELLUNG Beim kalten Motor kalten Motor kalten Motor kalten Motor kalten Motor und bei Umgebungstemperatur e i n s t e l l e n Entfernen Entfernen Entfernen Entfernen Entfernen Zündkerze Ventildeckel Einlassseite Ventildeckel Auslassseite Entfernen Entfernen Entfernen Entfernen Entfernen Gummiverschluss Abb 9 Den Steckschlüssel CH 19 auf der Schwungrad Befest...

Страница 171: ...means of a lamellar thickness gauge Adjust the valve allowance Adjusting operation Adjusting operation Adjusting operation Adjusting operation Adjusting operation Loosen the counter nut 1 F 10 Tighten or unscrew the register 2 by means of the tool cod 08601800 up to reaching the prescribed valve allowance value Tighten Tighten Tighten Tighten Tighten valve allowance decreases decreases decreases d...

Страница 172: ...EHZAH LEERLAUFDREHZAH LEERLAUFDREHZAH LEERLAUFDREHZAH LEINSTELLUNG LEINSTELLUNG LEINSTELLUNG LEINSTELLUNG LEINSTELLUNG Den Motor in Betrieb setzen und einige Minuten bis zum Anwärmen warten Anschließen Anschließen Anschließen Anschließen Anschließen Den induktiven Drehzahlmesser an das Zündkerzenkabel Abb 12 anschließen Prüfen Prüfen Prüfen Prüfen Prüfen Leerlaufdrehzahl des Motors Die Feststellsc...

Страница 173: ...decreases decreases decreases Check Check Check Check Check Engine idling speed I n s t a l l e r I n s t a l l e r I n s t a l l e r I n s t a l l e r I n s t a l l e r le couvercle de la soupape côté admission 1 F 11 La bague d étanchéité 2 neuve neuve neuve neuve neuve Le couvercle de la soupape côté échappement La bague d étanchéité neuve neuve neuve neuve neuve La bougie 1 600 1 800 rpm V V V...

Страница 174: ... non corretta non corretta non corretta non corretta c o n t r o l l a r e i l s i s t e ma di accensione Nota Nota Nota Nota Nota la fase dell accensione non è regolabile 1 600 1 800 giri min PRÜFUNG DES PRÜFUNG DES PRÜFUNG DES PRÜFUNG DES PRÜFUNG DES ZÜNDTAKTES ZÜNDTAKTES ZÜNDTAKTES ZÜNDTAKTES ZÜNDTAKTES Anmerkung vor Anmerkung vor Anmerkung vor Anmerkung vor Anmerkung vor der Kontrolle des Zünd...

Страница 175: ... Procedimiento de control Procedimiento de control Procedimiento de control Procedimiento de control Procedimiento de control Poner el motor en marcha y dejarlo funcionar durante algunos minutos para que se caliente Hacer girar el motor al régimen indicado Comprobar que el punto de referencia f i j o B F 1 6 e s t é s i t u a d o d e n t r o d e l campo de encendido prescrito A indicado sobre el v...

Страница 176: ... alta Pistoni usurati della precedente o danneggiati Pressione uguale Fasce elastiche valvole alla precedente guarnizione testa del cilindro o pistone potrebbero essere difettosi r i p a r a r e Al termine dell operazione di verifica rimontare la candela Pressione in fase di compressione Minima 11 1 kPa Kg cm2 b a r a a a a a Vor der Entfernung der Zündkerze evtl Vor der Entfernung der Zündkerze e...

Страница 177: ...al to Piston rings valves the previous value cylinder head gasket or piston may be defective repair Pressure during the compression phase Minimum 11 1 kPa Kg cm2 b a r Medir Medir Medir Medir Medir Presión en la fase de compresión Nota Nota Nota Nota Nota si resulta superior a la presión máxima consentida controlar que no haya depósitos carbonados sobre la culata las superficies de las válvulas y ...

Страница 178: ...ota Nota attendereperqualcheminutocheillivellodel l o l i os is t a b i l i z z i p r i m ad ie f f e t t u a r ei lc o n t r o l l o F 1 8 Den Öleinlass und Ölstandschraube aus dem Motorgehäuse ausschrauben 1 Abb 18 Den Messstab reinigen und in seinen Sitz ohne ohne ohne ohne ohne Einschrauben Einschrauben Einschrauben Einschrauben Einschrauben wieder einsetzen Auf diese Weise wird der Ölstand ge...

Страница 179: ...bio periódico máx 1 3 L 1 3 L 1 3 L 1 3 L 1 3 L Aceite aconsejado Q8 CLASS 10W 40 Q8 CLASS 10W 40 Q8 CLASS 10W 40 Q8 CLASS 10W 40 Q8 CLASS 10W 40 No añadir aditivos No añadir aditivos No añadir aditivos No añadir aditivos No añadir aditivos químicos o usar y mezclar químicos o usar y mezclar químicos o usar y mezclar químicos o usar y mezclar químicos o usar y mezclar aceites cuya gradación aceite...

Страница 180: ...o Avviare il motore e farlo scaldare quindi verificare che non vi siano perdite Se così non fosse arrestare il mo tore e scoprirne la causa 1 1 1 1 1 1 1 1 1 1 3 3 3 3 3 2 2 2 2 2 1 1 1 1 1 Cs Nm 32 MOTORENÖLWECHSEL MOTORENÖLWECHSEL MOTORENÖLWECHSEL MOTORENÖLWECHSEL MOTORENÖLWECHSEL Einige Minuten bis zum Anwärmen des Motors warten Den Motor ausschalten und einen Behälter mit geeigneten Inhalt und...

Страница 181: ...ce Replace Replace Replace Replace O r i n g 3 F 2 0 new new new new new F i t F i t F i t F i t F i t O ring compression spring 2 F 2 0 o i l n e t a n d d r a i n p l u g Note Note Note Note Note make sure that the O ring is pla ced in a correct way Tighten the drain plug at the prescribed tightening torque Filltheenginewithoilandinsertthe d i p s t i c k Start the engine and let it warm up then...

Страница 182: ... ruota sul pneumatico o sulla ruota Installare Installare Installare Installare Installare Tappo introduzione olio 1 F 21 Anello di tenuta Avviare il motore e lasciarlo scaldare per alcuni minuti verificando che non vi siano perdite d olio 2 2 2 2 2 Cs Nm 22 GETRIEBEÖLWECHSEL GETRIEBEÖLWECHSEL GETRIEBEÖLWECHSEL GETRIEBEÖLWECHSEL GETRIEBEÖLWECHSEL Anmerkung Anmerkung Anmerkung Anmerkung Anmerkung p...

Страница 183: ...t dans le gers ne pénètrent dans le gers ne pénètrent dans le gers ne pénètrent dans le gers ne pénètrent dans le carter de la transmission Eviter de carter de la transmission Eviter de carter de la transmission Eviter de carter de la transmission Eviter de carter de la transmission Eviter de verser de l huile sur le pneu ou sur verser de l huile sur le pneu ou sur verser de l huile sur le pneu ou...

Страница 184: ...e Esaminare Esaminare Esaminare Elemento filtrante Danneggiato sostituire Pulire Pulire Pulire Pulire Pulire Elemento filtrante 1 F 24 Usare aria compressa LUFTFILTERREINIGUNG LUFTFILTERREINIGUNG LUFTFILTERREINIGUNG LUFTFILTERREINIGUNG LUFTFILTERREINIGUNG Entfernen Entfernen Entfernen Entfernen Entfernen Schraube des Luftfilterkastendeckels 1 Abb 23 Deckel des Luftfilterkastens 2 Dichtung 3 F i l ...

Страница 185: ...Faire marcher le moteur sans même Faire marcher le moteur sans même Faire marcher le moteur sans même Faire marcher le moteur sans l élément filtrant modifie aussi la l élément filtrant modifie aussi la l élément filtrant modifie aussi la l élément filtrant modifie aussi la l élément filtrant modifie aussi la carburation ce qui provoque une carburation ce qui provoque une carburation ce qui provoq...

Страница 186: ... che la superficie di tenuta aderisca perfettamente con quella dell alloggia mento stesso in modo tale che non vi siano perdite d aria GEHÄUSEFILTER GEHÄUSEFILTER GEHÄUSEFILTER GEHÄUSEFILTER GEHÄUSEFILTER REINIGUNG REINIGUNG REINIGUNG REINIGUNG REINIGUNG Entfernen Entfernen Entfernen Entfernen Entfernen Schrauben V3 Abb 25 Gehäusefilterdeckel 1 Abb 25 Dichtring des G e h ä u s e f i l t e r d e c ...

Страница 187: ...de l eau de la graisse ou de l eau de la graisse ou de l eau de la graisse ou de l eau de la graisse ou de l eau Nettoyer Nettoyer Nettoyer Nettoyer Nettoyer l élément filtrant du carter 3 F 2 5 Souffler de l air comprimé sur la surface extérieure pour éliminer la poussière présente dans l élément comme le montre la F 26 Positionner Positionner Positionner Positionner Positionner l é l é m e n tf ...

Страница 188: ...a in tabella Per il rimontaggio invertire la sequenza della procedura di rimozione F 2 7 MOTORENÜBERHOLUNG MOTORENÜBERHOLUNG MOTORENÜBERHOLUNG MOTORENÜBERHOLUNG MOTORENÜBERHOLUNG MOTORENTFERNUNG MOTORENTFERNUNG MOTORENTFERNUNG MOTORENTFERNUNG MOTORENTFERNUNG Anmerkung Anmerkung Anmerkung Anmerkung Anmerkung um den Motor aus dem Skooterfahrwerk zu entfernen das Werkstatthandbuch Fahrräder lesen Den...

Страница 189: ...move the engine from the scooter chassis refer also to the cycle workshop manual Place the motorcycle in such a way that it is completely stable Empty the fuel tank and the coolant circuit Remove the carburettor Then remove the engine according to the sequence indicated in the table In order to assemble the engine again follow the same operation with inverted sequence REVISION DU MOTEUR REVISION D...

Страница 190: ...rare Serrare Serrare Dado 2 F 29 F 2 9 2 2 2 2 2 Cs Nm 32 1 1 1 1 1 MOTORENTFERNUNG MOTORENTFERNUNG MOTORENTFERNUNG MOTORENTFERNUNG MOTORENTFERNUNG F 2 8 EINBAU DES MOTORS EINBAU DES MOTORS EINBAU DES MOTORS EINBAU DES MOTORS EINBAU DES MOTORS Den Vorgang für die Entfernung in umgekehrter Folge durchführen siehe Tabelle Einbauen Einbauen Einbauen Einbauen Einbauen Motor Gabelbolzen 1 Abb 29 Mutter...

Страница 191: ... Engine F o r kp i n 1 F 2 9 N u t 2 F 2 9 Note Note Note Note Note temporary fit the engine and then tighten screws and nuts according to the prescribed tightening torque Tighten Tighten Tighten Tighten Tighten N u t 2 F 2 9 REMONTAGE DU MOTEUR REMONTAGE DU MOTEUR REMONTAGE DU MOTEUR REMONTAGE DU MOTEUR REMONTAGE DU MOTEUR Exécuter la procédure de dépose à l inverse voirtableau Positionner Positi...

Страница 192: ...TE DE CYLINDRE Décomposition Décomposition Décomposition Décomposition Décomposition Les éléments indiqués par doivent être remplacés après chaque démontage du groupe auquel ils appartiennent CULATA CULATA CULATA CULATA CULATA Despiece Despiece Despiece Despiece Despiece Los elementos indicados con el signo tienen que ser sostituidos cada vez que se desmonta el grupo al cual pertenecen N E W N E W...

Страница 193: ...rettor pipe Tube carburateur Tubo carburador 9 Coperchio valvola Ablassventildeckel Exhaust valve Couvercle soupape Tapa válvula scarico OR O R OR cover échappement OR descarga OR 10 Coperchio valvola Einlassventildeckel Suction valve Couvercle soupape Tapa válvula aspirazione OR O R OR cover admission OR aspiración OR 11 Pompa acqua Wasserpumpe Water pump Pompe eau Bomba agua 12 Tubo by pass Bypa...

Страница 194: ...mmen ösen ösen ösen ösen ösen Schrauben 1 Abb 32 Entfernen Entfernen Entfernen Entfernen Entfernen Spannungsgruppe Steuerkette Dichtung des Steuerkettenspanners Nockenwellenritzel 2 Steuerkette 3 F 3 1 F 3 2 Allentare Allentare Allentare Allentare Allentare V i t e 1 F 3 2 Rimuovere Rimuovere Rimuovere Rimuovere Rimuovere Gruppo tenditore catena distribu zione Guarnizione tenditore catena di strib...

Страница 195: ... Note Note Note Note Note remove the screw 1 F 33 holding the fixing nut of the change gear 2 with a wrench Remove Remove Remove Remove Remove Cylinder head Note Note Note Note Note enlever la vis 1 F 33 en retenant l écrou de montage du variateur 2 àl aided uneclé Enlever Enlever Enlever Enlever Enlever l a t ê t e d u c y l i n d r e Nota Nota Nota Nota Nota extraer el tornillo 1 F 33 sujetando ...

Страница 196: ...00 600 400 600 400 600 400 600 praticando un mo vimento incrociato a 8 F 35 Zylinderkopfverformung Niedriger als 0 03 mm Verformungsprüfung und Verformungsprüfung und Verformungsprüfung und Verformungsprüfung und Verformungsprüfung und Schleifen Schleifen Schleifen Schleifen Schleifen Auf dem Zylinderkopf einen Rechenstab stellen und durch eine Dickenlehre die Verformung messen Stimmt die Verformu...

Страница 197: ...U CYLINDRE DU CYLINDRE Eliminer Eliminer Eliminer Eliminer Eliminer les dépôts carbonés de la chambre de combustion au moyen d un r a c l o i r a r r o n d i Note Note Note Note Note n ep a su t i l i s e rd o u t i lp o i n t ua f i n d éviter d endommager ou de rayer le filetage de la bougie ou les sièges des soupapes Examiner Examiner Examiner Examiner Examiner l a t ê t e d u c y l i n d r e r...

Страница 198: ...inbauen Einbauen Einbauen Einbauen Einbauen Gleichzeitig Nockenwellenritzel 1 Abb 37 mit der Steuerkette 2 Abb 37 Einbauverfahren Einbauverfahren Einbauverfahren Einbauverfahren Einbauverfahren Die Steuerkette auf dem Ritzel s t e l l e n Das Ritzel auf der Nockenwelle einbauen und die Steuerzeitenmarke E Abb 37 i nd e ng e f r ä s t e nS i t z F A b b 3 8 einsetzen Die Kette springen lassen um di...

Страница 199: ...ead Montar Montar Montar Montar Montar Contemporáneamente piñón del árbol de levas 1 F 37 con la cadena de d i s t r i b u c i ó n 2 F 3 7 Procedimiento de montaje Procedimiento de montaje Procedimiento de montaje Procedimiento de montaje Procedimiento de montaje Colocar la cadena de distribución sobre el piñón Montar el piñón en el árbol de levas encastrando el encaje E F 37 de puesta en fase en ...

Страница 200: ...rare Serrare Vite pignone albero a camme 1 F 4 0 Controllare Controllare Controllare Controllare Controllare Gioco delle valvole Fuori specifica procedere alla regolazione F 4 0 Einbauverfahren Einbauverfahren Einbauverfahren Einbauverfahren Einbauverfahren Die Schraube der Spannenschraube 1 Abb 39 und die Feder 2 entfernen Die einseitig gerichtete Nocke 3 des Steuerkettenspanners drücken und die ...

Страница 201: ...ant sa mise en place afin d éviter de provoquer place afin d éviter de provoquer place afin d éviter de provoquer place afin d éviter de provoquer place afin d éviter de provoquer des dégâts ou d exécuter un des dégâts ou d exécuter un des dégâts ou d exécuter un des dégâts ou d exécuter un des dégâts ou d exécuter un calage incorrect des soupapes calage incorrect des soupapes calage incorrect des...

Страница 202: ...LLE UND KIPPHEBEL NOCKENWELLE UND KIPPHEBEL NOCKENWELLE UND KIPPHEBEL NOCKENWELLE UND KIPPHEBEL NOCKENWELLE UND KIPPHEBEL Die mit gekennzeichneten Teile sollen nach jedem Auseinanderbau der Gruppe zu der sie gehören ersetzt werden ENTFERNUNG KIPPHEBEL ENTFERNUNG KIPPHEBEL ENTFERNUNG KIPPHEBEL ENTFERNUNG KIPPHEBEL ENTFERNUNG KIPPHEBEL UND KIPPHEBELWELLE UND KIPPHEBELWELLE UND KIPPHEBELWELLE UND KIP...

Страница 203: ...ANCIN Y EJE DE BALANCIN EJE DE BALANCIN EJE DE BALANCIN EJE DE BALANCIN EJE DE BALANCIN EMPUJAVALVULAS EMPUJAVALVULAS EMPUJAVALVULAS EMPUJAVALVULAS EMPUJAVALVULAS Extraer Extraer Extraer Extraer Extraer El eje de balancín empujaválvulas admisión El eje de balancín empujaválvulas escape CAMSHAFT CAMSHAFT CAMSHAFT CAMSHAFT CAMSHAFT AND ROCKER ARMS AND ROCKER ARMS AND ROCKER ARMS AND ROCKER ARMS AND ...

Страница 204: ... Limite 29 92 mm Scarico Scarico Scarico Scarico Scarico a 30 811 30 911 mm Limite 26 45 mm b 25 152 25 252 mm Limite 29 17 mm PRÜFUNG DER PRÜFUNG DER PRÜFUNG DER PRÜFUNG DER PRÜFUNG DER NOCKENWELLE NOCKENWELLE NOCKENWELLE NOCKENWELLE NOCKENWELLE Prüfen Prüfen Prüfen Prüfen Prüfen Nockennasen A Grübchenbildung Kratzen blaue Farbe die Nockenwelle und die Lager B C ersetzen Abmessen Abmessen Abmesse...

Страница 205: ...hanger l arbre à cames Examiner Examiner Examiner Examiner Examiner le passage de l huile dans l arbre à cames S il est bouché déboucher en y soufflant de l air comprimé F 45 Admission Admission Admission Admission Admission a 30 811 30 911 mm Limite 36 45 mm b 25 145 25 245 mm Limite 29 92 mm Echappement Echappement Echappement Echappement Echappement a 30 811 30 911 mm Limite 26 45 mm b 25 152 2...

Страница 206: ...030 mm Misurare il diametro esterno dei b i l a n c i e r i F 4 8 S e f u o r i l i m i t e s o s t i t u i r e Diametro esterno bilanciere 11 981 11 991 mm Limite 11 995 mm 2 2 2 2 2 1 1 1 1 1 2 2 2 2 2 PRÜFUNG DES KIPPHEBELS PRÜFUNG DES KIPPHEBELS PRÜFUNG DES KIPPHEBELS PRÜFUNG DES KIPPHEBELS PRÜFUNG DES KIPPHEBELS UND DER KIPPHEBELWELLE UND DER KIPPHEBELWELLE UND DER KIPPHEBELWELLE UND DER KIPP...

Страница 207: ...rmation d alvéoles Usure Formation d alvéoles Rayures Coloration bleu Rayures Coloration bleu Rayures Coloration bleu Rayures Coloration bleu Rayures Coloration bleu changer ou contrôler changer ou contrôler changer ou contrôler changer ou contrôler changer ou contrôler l installation de lubrification l installation de lubrification l installation de lubrification l installation de lubrification l...

Страница 208: ...re Installare la parte filettata ver l albero bilanciere Installare la parte filettata ver l albero bilanciere Installare la parte filettata ver so l esterno so l esterno so l esterno so l esterno so l esterno I n s t a l l a r e I n s t a l l a r e I n s t a l l a r e I n s t a l l a r e I n s t a l l a r e P i a s t r ad if i s s a g g i o 5 a l b e r ib i l a n c i e r i M M M M M O O O O O 2 2...

Страница 209: ... balancier échappement en l introduisant bien à fond Positionner Positionner Positionner Positionner Positionner l eb a l a n c i e r l arbrebalancier 4 admission Ne pas confondre la Ne pas confondre la Ne pas confondre la Ne pas confondre la Ne pas confondre la direction d installation de direction d installation de direction d installation de direction d installation de direction d installation ...

Страница 210: ...ESSORTS DE SOUPAPES DE SOUPAPES DE SOUPAPES DE SOUPAPES DE SOUPAPES Les éléments indiqués par doi vent être remplacés après chaque démontage du groupe auquel ils appartiennent N E W N E W N E W N E W N E W VALVULAS Y MUELLES DE VALVULAS Y MUELLES DE VALVULAS Y MUELLES DE VALVULAS Y MUELLES DE VALVULAS Y MUELLES DE VALVULAS VALVULAS VALVULAS VALVULAS VALVULAS Los elementos indicados con el signo ti...

Страница 211: ...o damage the in order not to damage the valve spring valve spring valve spring valve spring valve spring VALVE AND VALVE VALVE AND VALVE VALVE AND VALVE VALVE AND VALVE VALVE AND VALVE SPRING REMOVAL SPRING REMOVAL SPRING REMOVAL SPRING REMOVAL SPRING REMOVAL Place the tool A special clamp with the movable adapter B on the upper plate with the fixed stop resting on the cylinder head Tourner le lev...

Страница 212: ...pirazione 5 975 5 990 mm Limite 5 94 mm Scarico 5 960 5 975 mm Limite 5 92 mm L L L L L PRÜFUNG DER VENTILE PRÜFUNG DER VENTILE PRÜFUNG DER VENTILE PRÜFUNG DER VENTILE PRÜFUNG DER VENTILE UND DER VENTILFEDER UND DER VENTILFEDER UND DER VENTILFEDER UND DER VENTILFEDER UND DER VENTILFEDER Abmessen Abmessen Abmessen Abmessen Abmessen Ventilschaftdurchmesser Abb 55 Nicht innerhalb der Grenze ersetzen ...

Страница 213: ...ite changer Mesurer Mesurer Mesurer Mesurer Mesurer la longueur libre L ressort de la soupape F 57 Si elle est hors limite changer Limite d excentration 0 01 mm Diamètre de la tige de la soupape Admission 5 975 5 990 mm Limite 5 94 mm Echappement 5 960 5 975 mm Limite 5 92 mm CONTROL VALVULAS Y CONTROL VALVULAS Y CONTROL VALVULAS Y CONTROL VALVULAS Y CONTROL VALVULAS Y MUELLES DE LAS MUELLES DE LA...

Страница 214: ...ola S ef u o r il i m i t e s o s t i t u i r el a guida della valvola F 6 0 Limite del gioco tra il gambo e la guida Aspirazione 0 08 mm Scarico 0 10 mm 1 7 mm 1 7 mm 1 7 mm 1 7 mm 1 7 mm Abmessen Abmessen Abmessen Abmessen Abmessen Federneigung Abb 58 Nicht innerhalb der Grenze ersetzen Prüfen Prüfen Prüfen Prüfen Prüfen Berührungsfläche der Feder Abb 59 Verschleiß Grübchenbildung Kratzen ersetz...

Страница 215: ...t r ed el at i g es o u p a p e S ilesthorslimite changerleguide de la soupape Limite du jeu entre la tige et le guide Admission 0 08 mm Echappement 0 10 mm Medir Medir Medir Medir Medir Inclinacióndelmuelle F 58 En el caso resulte estar fuera del l í m i t e s u s t i t u i r Inspeccionar Inspeccionar Inspeccionar Inspeccionar Inspeccionar La superficie de contacto del muelle F 5 9 En caso de des...

Страница 216: ...nello spazio tra la guida penetri nello spazio tra la guida penetri nello spazio tra la guida penetri nello spazio tra la guida penetri nello spazio tra la guida e il gambo della valvola e il gambo della valvola e il gambo della valvola e il gambo della valvola e il gambo della valvola b b b b b PRÜFUNG DER PRÜFUNG DER PRÜFUNG DER PRÜFUNG DER PRÜFUNG DER VENTILSITZE VENTILSITZE VENTILSITZE VENTILS...

Страница 217: ...est trop large trop serré ou excentré il faut le changer Procédure d abrasage Procédure d abrasage Procédure d abrasage Procédure d abrasage Procédure d abrasage Appliquer un composé pour abrasage de dégrossissage b F 63 sur la surface d étanchéité de la soupape S assurer que le composé S assurer que le composé S assurer que le composé S assurer que le composé S assurer que le composé d abrasage n...

Страница 218: ... d e lc i l i n d r o F 6 6 a a a a a O O O O O F 6 5 Nota Nota Nota Nota Nota aver cura di rimuovere tutto il composto dalla super ficie e dalla sede della valvola dopo ogni lappatura Den Ventilschaft mit Molybdändisulfitöl beschichten Abb 64 Das Ventil in den Zylinderkopf Abb 65 einsetzen Das Ventil innerhalb des Kopfes so lange drehen bis die Dichtoberfläche und der Sitz poliert scheinen Dann d...

Страница 219: ...ns plusieursfoisdesuitesurlesiègetout en tournant la soupape en avant et en arrière avec les mains Appliquer un composé pour abrasage fin sur la surface d étanchéité de la soupape et répéter les phases décrites précédemment Appliquer le bleu de Prusse Dykem a F 66 surlasurfaced étanchéité de la soupape Mettre la soupape en place dans la tête du cylindre Note Note Note Note Note éliminer soigneusem...

Страница 220: ... t t e l l o s u p e r i o r e 5 Nota Nota Nota Nota Nota installare le molle con le spire maggiormente di stanziate a in alto Spire meno distanziate b F 6 8 Das Ventil im Sitz durch die Führung drücken bis eine sichtbare Marke vorhanden ist Die Sitzweite nochmals abmessen c Abb 67 EINBAU DER VENTILE UND DER EINBAU DER VENTILE UND DER EINBAU DER VENTILE UND DER EINBAU DER VENTILE UND DER EINBAU DE...

Страница 221: ...ibdène à la tige de soupape 3 F 68 et un pare huile 2 Huile au bisulfure de molibdène Positionner Positionner Positionner Positionner Positionner le disque inférieur de la soupape 1 F 6 8 Lepare huile 2 neuf neuf neuf neuf neuf Las o u p a p e 3 d a n sl at ê t ed uc y l i n d r e Ressort de soupape 4 Le disque supérieur 5 Note Note Note Note Note positionner en haut les ressorts avec les spires l...

Страница 222: ...so orario sulla leva C F 69 per comprimere la mol la della valvola tramite l adatta t o r e B F 7 0 F 7 1 Non comprimere eccessi Non comprimere eccessi Non comprimere eccessi Non comprimere eccessi Non comprimere eccessi vamente per non danneg vamente per non danneg vamente per non danneg vamente per non danneg vamente per non danneg giare la molla della valvola giare la molla della valvola giare ...

Страница 223: ... Do not excessively compress Do not excessively compress in order not to damage the in order not to damage the in order not to damage the in order not to damage the in order not to damage the valve spring valve spring valve spring valve spring valve spring Placethetool A specialclamp with the movable adapter B on the upper plate with the fixed stop resting on the cylinder head Tool A Kitcode 08601...

Страница 224: ...Anmerkung Anmerkung Anmerkung Anmerkung vor der Entfernung des Drahtsprengrings von dem Kolbenbolzen das Gehäuse mit einem Lappen oder einem reinigen Tuch decken um das Fallen des Drahtsprengringes ins Gehäuse zu vermeiden Abb 73 ZYLINDER UND KOLBEN ZYLINDER UND KOLBEN ZYLINDER UND KOLBEN ZYLINDER UND KOLBEN ZYLINDER UND KOLBEN Die mit gekennzeichneten Teile sollen nach jedem Auseinanderbau der Gr...

Страница 225: ...périeur superior 11 Segmento pistone Kolbenring Piston ring Segment piston Segmento pistón 2 2 2nd 2e 2 12 Segmento Ölabstreifer Scraper ring Segment racleur Segmento raschiaolio d h u i l e rascador Note Note Note Note Note before removing the locking ring of the piston pin cover the case opening with a cloth or a clean rag in ordertopreventthelockingringtofall into the case cavity F 73 Note Note...

Страница 226: ...0 03 mm 1 1 1 1 1 3 3 3 3 3 2 2 2 2 2 ENTFERNUNG KOLBEN ENTFERNUNG KOLBEN ENTFERNUNG KOLBEN ENTFERNUNG KOLBEN ENTFERNUNG KOLBEN UND KOLBENRINGE UND KOLBENRINGE UND KOLBENRINGE UND KOLBENRINGE UND KOLBENRINGE Entfernen Entfernen Entfernen Entfernen Entfernen Drahtsprengring Kolbenbolzen 1 Abb 74 Kolbenbolzen 2 Kolben 3 Entfernen Entfernen Entfernen Entfernen Entfernen Oberer Kolbenring 2 Kolbenring...

Страница 227: ... cylindre S il est hors limite aléser de nouveau ou changer Note Note Note Note Note mesurer l alésage du cylindre à l aide d un calibre pour cylindres Mesurer l alésage du cylindre parallèlement et à angle droit par rapport à l arbre moteur Faire ensuite la moyenne des mesures obtenues Mesurer Mesurer Mesurer Mesurer Mesurer la déformation Si elle est hors limite changer L i m i t ed ed é f o r m...

Страница 228: ... 991 15 000 mm Limite 16 975 mm Esaminare Esaminare Esaminare Esaminare Esaminare Spinotto pistone Colorazione blu scanalature p u l i r e o s o s t i t u i r e 5 mm 5 mm 5 mm 5 mm 5 mm PRÜFUNG KOLBEN UND PRÜFUNG KOLBEN UND PRÜFUNG KOLBEN UND PRÜFUNG KOLBEN UND PRÜFUNG KOLBEN UND KOLBENBOLZEN KOLBENBOLZEN KOLBENBOLZEN KOLBENBOLZEN KOLBENBOLZEN Abmessen Abmessen Abmessen Abmessen Abmessen Durchmess...

Страница 229: ...a jupe du piston 53 670 53 675 mm Mesurer Mesurer Mesurer Mesurer Mesurer le diamètre interne du siège de l axe dupiston F 79 S il est hors prescription changer Diamètre interne du siège de l axe du piston 15 002 15 013 mm Limite 17 045 mm 0 02 0 04 mm Mesurer Mesurer Mesurer Mesurer Mesurer le diamètre externe de l axe du p i s t o n F 8 0 S ilesthorslimite changer Diamètre externe de l axe du pi...

Страница 230: ...15 0 30 mm Limite 0 45 mm Raschiaolio 0 20 0 70 mm a a a a a 1 1 1 1 1 PRÜFUNG DER PRÜFUNG DER PRÜFUNG DER PRÜFUNG DER PRÜFUNG DER KOLBENRINGE KOLBENRINGE KOLBENRINGE KOLBENRINGE KOLBENRINGE Abmessen Abmessen Abmessen Abmessen Abmessen Seitenspiel mittels Dickenlehre a Abb 81 N i c h ti n n e r h a l bd e rG r e n z e K o l b e nu n d Kolbenringe zusammen ersetzen Anmerkung Anmerkung Anmerkung Anm...

Страница 231: ...te pousser le segment dans le cylindre en utilisant le piston de manière que le segment reste perpendiculaire à l axe du cylindre Mesurer Mesurer Mesurer Mesurer Mesurer la lumière à l extrémité du segment Si elle est hors limite changer Note Note Note Note Note il n est pas possible de mesurer lalumièreàl extrémitédel entretoise d expansion du segment racleur d h u i l e Si le segment racleur d h...

Страница 232: ...1 Abb 83 2 Ring dunkel 2 S e i t e n f ü h r u n g e n Ö l a b s t r e i f e r 3 Distanzstück Ö l a b s t r e i f e r 4 Anmerkung Anmerkung Anmerkung Anmerkung Anmerkung die Kolbenringe so einbauen daß die vom Hersteller gedruckten Marken oder Nummer auf der Oberseite der Ringe g e s t e l l t s i n d Kolben und Kolbenringe mit Motorenöl schmieren Einbauen Einbauen Einbauen Einbauen Einbauen Kolbe...

Страница 233: ...ON Y SEGMENTOS PISTON Y SEGMENTOS PISTON Y CILINDRO CILINDRO CILINDRO CILINDRO CILINDRO Montar Montar Montar Montar Montar Segmento superior claro 1 F 8 3 2 segmento oscuro 2 Pistas laterales rascador de a c e i t e 3 Distanciador de expansión rascador de aceite 4 Nota Nota Nota Nota Nota montar los segmentos del pistón de modo que las marcas o los números impresos por el fabricante resultenvisibl...

Страница 234: ... altra mano F 8 6 F 8 7 F 8 8 Passare la catena di distri buzione e la sua guida lato scarico attraverso la cavità per la catena di distribuzio n e M M M M M F 8 9 Einbauen Einbauen Einbauen Einbauen Einbauen Z e n t r i e r s t i f t e 1 A b b 8 6 Einsetzen Einsetzen Einsetzen Einsetzen Einsetzen Kolbenringe Anmerkung Anmerkung Anmerkung Anmerkung Anmerkung Versetzen die Kolbenringstoßöffnungen w...

Страница 235: ...segment Lubrifier Lubrifier Lubrifier Lubrifier Lubrifier la surface externe du piston les segments du piston la surface interne du cylindre Positionner Positionner Positionner Positionner Positionner l e c y l i n d r e Note Note Note Note Note d une main positionner le cylindre et de l autre comprimer les segments du piston Passer la chaîne de distribution et son guide côté échappement à travers...

Страница 236: ... o no essere sostituiti dopo ogni smontaggio del gruppo a cui appartengono N E W N E W N E W N E W N E W KEILRIEMEN KUPPLUNG UND SEKUNDÄR KEILRIEMEN KUPPLUNG UND SEKUNDÄR KEILRIEMEN KUPPLUNG UND SEKUNDÄR KEILRIEMEN KUPPLUNG UND SEKUNDÄR KEILRIEMEN KUPPLUNG UND SEKUNDÄR HAUPTSCHEIBE HAUPTSCHEIBE HAUPTSCHEIBE HAUPTSCHEIBE HAUPTSCHEIBE GEHÄUSEFILTERDECKEL UND DECKEL DES LINKEN GEHÄUSEFILTERDECKEL UND...

Страница 237: ... t b e r e p l a c e d a f t e r every disassembly of the unit they are p a r to f N E W N E W N E W N E W N E W COURROIE TRAPEZOIDALE COURROIE TRAPEZOIDALE COURROIE TRAPEZOIDALE COURROIE TRAPEZOIDALE COURROIE TRAPEZOIDALE EMBRAYAGE ET POULIE EMBRAYAGE ET POULIE EMBRAYAGE ET POULIE EMBRAYAGE ET POULIE EMBRAYAGE ET POULIE SECONDAIRE PRIMAIRE SECONDAIRE PRIMAIRE SECONDAIRE PRIMAIRE SECONDAIRE PRIMAI...

Страница 238: ...GGIA SECONDARIA PRIMARIA PULEGGIA SECONDARIA PRIMARIA PULEGGIA SECONDARIA PRIMARIA PULEGGIA SECONDARIA PRIMARIA Rimozione Rimozione Rimozione Rimozione Rimozione F 9 1 KEILRIEMEN KUPPLUNG UND KEILRIEMEN KUPPLUNG UND KEILRIEMEN KUPPLUNG UND KEILRIEMEN KUPPLUNG UND KEILRIEMEN KUPPLUNG UND SEKUNDÄR HAUPTSCHEIBE SEKUNDÄR HAUPTSCHEIBE SEKUNDÄR HAUPTSCHEIBE SEKUNDÄR HAUPTSCHEIBE SEKUNDÄR HAUPTSCHEIBE En...

Страница 239: ...oulement Cojinete 9 Contrappesi Gegengewichte Counterweights Contrepoids Contrapesos 10 Piste dei Bahne der Counterweight Chemins des Aros de los contrappesi Gegengewichte t r a c k s contrepoids contrapesos V BELT CLUTCH AND V BELT CLUTCH AND V BELT CLUTCH AND V BELT CLUTCH AND V BELT CLUTCH AND SECONDARY PRIMARY SECONDARY PRIMARY SECONDARY PRIMARY SECONDARY PRIMARY SECONDARY PRIMARY PULLEY PULLE...

Страница 240: ...N E W N E W N E W SEKUNDÄRSCHEIBE SEKUNDÄRSCHEIBE SEKUNDÄRSCHEIBE SEKUNDÄRSCHEIBE SEKUNDÄRSCHEIBE Auseinanderbau Auseinanderbau Auseinanderbau Auseinanderbau Auseinanderbau Die mit gekennzeichneten Teile sollen nach jedem Auseinanderbau der Gruppe zu der sie gehören ersetzt werden N E W N E W N E W N E W N E W F 9 2 3 3 3 3 3 2 2 2 2 2 1 1 1 1 1 4 4 4 4 4 5 5 5 5 5 8 8 8 8 8 9 9 9 9 9 9 9 9 9 9 7 ...

Страница 241: ...móvil 8 Anello OR O Ring O ring Bague OR A n i l l o t o r o i d a l 9 Paraolio Dichtring O i l s e a l Pare huile Retén de aceite 10 Puleggia Feste Fixed secondary Poulie secondaire Polea secundaria secondaria fissa Sekundärscheibe pulley f i x e f i j a SECONDARY PULLEY SECONDARY PULLEY SECONDARY PULLEY SECONDARY PULLEY SECONDARY PULLEY Disassembly Disassembly Disassembly Disassembly Disassembly...

Страница 242: ... secondaria trattenendo la campa na frizione con l attrezzo bloccag giopuleggia a a a a a F 9 3 F 9 4 a a a a a a a a a a 1 1 1 1 1 ENTFERNUNG DER ENTFERNUNG DER ENTFERNUNG DER ENTFERNUNG DER ENTFERNUNG DER HAUPTSCHEIBE HAUPTSCHEIBE HAUPTSCHEIBE HAUPTSCHEIBE HAUPTSCHEIBE Entfernen Entfernen Entfernen Entfernen Entfernen Mutter Hauptscheibe Flachscheibe Feste Hauptscheibe 1 Abb 93 Anmerkung Anmerku...

Страница 243: ...OULIE DEPOSE DE LA POULIE DEPOSE DE LA POULIE SECONDAIRE ET DE LA SECONDAIRE ET DE LA SECONDAIRE ET DE LA SECONDAIRE ET DE LA SECONDAIRE ET DE LA COURROIE TRAPEZOIDALE COURROIE TRAPEZOIDALE COURROIE TRAPEZOIDALE COURROIE TRAPEZOIDALE COURROIE TRAPEZOIDALE Enlever Enlever Enlever Enlever Enlever l écrou poulie secondaire la cloche de l embrayage 1 F 94 Note Note Note Note Note desserrer l écrou pou...

Страница 244: ... bloccaggio molla f r i z i o n e c o d K i t 08601600 08601600 08601600 08601600 08601600 Spessore ganasce frizione 2 0 mm Limite 1 0 mm b b b b b 1 1 1 1 1 a a a a a 1 1 1 1 1 AUSEINANDERBAU DER AUSEINANDERBAU DER AUSEINANDERBAU DER AUSEINANDERBAU DER AUSEINANDERBAU DER SEKUNDÄRSCHEIBE SEKUNDÄRSCHEIBE SEKUNDÄRSCHEIBE SEKUNDÄRSCHEIBE SEKUNDÄRSCHEIBE Entfernen Entfernen Entfernen Entfernen Entfern...

Страница 245: ...Ø Ø Ø Ø Ø 30 mm épaisseur 2 3 mm 30 mm épaisseur 2 3 mm 30 mm épaisseur 2 3 mm 30 mm épaisseur 2 3 mm 30 mm épaisseur 2 3 mm CONTROLE DE L EMBRAYAGE CONTROLE DE L EMBRAYAGE CONTROLE DE L EMBRAYAGE CONTROLE DE L EMBRAYAGE CONTROLE DE L EMBRAYAGE Mesurer Mesurer Mesurer Mesurer Mesurer l épaisseur de la mâchoire de l embrayage F 98 Rayures polir avec de la toile émeri pour dégrossissage Usure Dégâts...

Страница 246: ...re Esaminare Diametro esterno minimo del peso F 100 Crepe Usura Sfaldamento Scheggiatura sostituire S e f u o r i l i m i t e s o s t i t u i r e Larghezza cinghia 22 mm Limite 19 8 mm Diametro esterno 20 0 mm Limite 19 5 mm 1 1 1 1 1 2 2 2 2 2 2 2 2 2 2 1 1 1 1 1 KEILRIEMENPRÜFUNG KEILRIEMENPRÜFUNG KEILRIEMENPRÜFUNG KEILRIEMENPRÜFUNG KEILRIEMENPRÜFUNG Prüfen Prüfen Prüfen Prüfen Prüfen Keilriemen...

Страница 247: ... de torsion 1 F 1 0 1 Usure Dégâts changer Examiner Examiner Examiner Examiner Examiner le goujon de guidage 2 Usure Dégâts changer CONTROLE DU POIDS CONTROLE DU POIDS CONTROLE DU POIDS CONTROLE DU POIDS CONTROLE DU POIDS Examiner Examiner Examiner Examiner Examiner le diamètre externe minimum du poids F 100 Fissures Usure Effritement Ecornure changer S ilesthorslimite changer Largeur de la courro...

Страница 248: ... puleggia prima r i am o b i l e Superficie puleggia prima r i af i s s a Cuscinetto 1 Contrappesi 2 Piste contrappesi Einbauen Einbauen Einbauen Einbauen Einbauen Bewegliche Scheibe Scheibe Feste Halbscheibe Scheibe Mutter 55 Nm Einbauen Einbauen Einbauen Einbauen Einbauen Gegengewichte Lager Anmerkung Anmerkung Anmerkung Anmerkung Anmerkung Mit Fett beschichten Mit Fett beschichten Mit Fett besc...

Страница 249: ...r toute la partie extérieure des contrepoids Appliquer de la graisse Appliquer de la graisse Appliquer de la graisse Appliquer de la graisse Appliquer de la graisse Shell BT N 3 90890 69927 dans la partie intérieure du roulement Note Note Note Note Note éliminer la graisse en excès GROUPE POULIE GROUPE POULIE GROUPE POULIE GROUPE POULIE GROUPE POULIE PRIMAIRE PRIMAIRE PRIMAIRE PRIMAIRE PRIMAIRE Ne...

Страница 250: ...Applicare Applicare Applicare BEL RAY assembly lube alla scanalatura per la spina di g u i d a 1 F 1 0 7 e da lp a r a o l i o 2 nuovo nuovo nuovo nuovo nuovo 2 2 2 2 2 1 1 1 1 1 1 1 1 1 1 2 2 2 2 2 N E W N E W N E W N E W N E W P P P P P P P P P P P P P P P Einbauen Einbauen Einbauen Einbauen Einbauen Führungsstift 1 Abb 106 EINBAU DER EINBAU DER EINBAU DER EINBAU DER EINBAU DER SEKUNDÄRSCHEIBE S...

Страница 251: ... surface interne de la poulie secondairemobile 1 F 104 surla cannelure du graisseur et sur les pare huiles BEL RAY assembly lube sur les roulements le pare huile et la surface interne de la poulie secondaire fixe 2 Positionner Positionner Positionner Positionner Positionner la poulie secondaire mobile 1 Appliquer Appliquer Appliquer Appliquer Appliquer BEL RAY assembly lube sur la cannelure pour l...

Страница 252: ... 3 mm Morsetto compressione molla f r i z i o n e c o d K i t 08601600 08601600 08601600 08601600 08601600 Braccio bloccaggio molla f r i z i o n e c o d K i t 08601600 08601600 08601600 08601600 08601600 1 1 1 1 1 3 3 3 3 3 a a a a a b b b b b 2 2 2 2 2 1 1 1 1 1 F 110 3 3 3 3 3 Cs Nm 90 1 1 1 1 1 F 108 F 109 Einbauen Einbauen Einbauen Einbauen Einbauen Keilriemen 1 Abb 110 Kupplungseinheit 2 Anm...

Страница 253: ...mplète 1 F 1 0 8 le ressort de compression le disque portant de l embrayage 2 Note Note Note Note Note s e r r e rp r o v i s o i r e m e n tl é c r o u 3 en fixant l étau pour la compression du ressort d embrayage a et le bras pour le blocage du ressort d embrayage b et comprimer le ressort U t i l i s e r l e n t r e t o i s e U t i l i s e r l e n t r e t o i s e U t i l i s e r l e n t r e t o...

Страница 254: ...rnizione co perchio carter 6 nuova nuova nuova nuova nuova 1 1 1 1 1 a a a a a F 112 5 5 5 5 5 2 2 2 2 2 Einbauen Einbauen Einbauen Einbauen Einbauen Kupplungsgehäuse 1 Abb 111 Mutter des Kupplungsgehäuses 2 Abb 112 Anmerkung Anmerkung Anmerkung Anmerkung Anmerkung die Mutter Kupplungsgehäuse mit einer Scheibenbefestigungsvorrichtung anziehen a Keilriemen 3 Abb 112 einbauen und auf den min Hauptsc...

Страница 255: ...loquant la poulie avec l outil de blocage a Positionner la courroie trapézoïdale 3 F 112 la déplacer sur le diamètre minimum de la poulie primaire 4 sur le diamètre max delapouliesecondaire 5 F 111 F 112 et la tendre convenablement Positionner Positionner Positionner Positionner Positionner le joint du couvercle du carter 6 neuf neuf neuf neuf neuf Montar Montar Montar Montar Montar Campana embrag...

Страница 256: ...l gruppo a cui appartengono N E W N E W N E W N E W N E W A C GENERATOR UND A C GENERATOR UND A C GENERATOR UND A C GENERATOR UND A C GENERATOR UND ANFAHRKUPPLUNG ANFAHRKUPPLUNG ANFAHRKUPPLUNG ANFAHRKUPPLUNG ANFAHRKUPPLUNG GENERATORDECKEL UND GENERATORDECKEL UND GENERATORDECKEL UND GENERATORDECKEL UND GENERATORDECKEL UND STATORSPULE STATORSPULE STATORSPULE STATORSPULE STATORSPULE Entfernung Entfer...

Страница 257: ...GENERADOR DE COR GENERADOR DE COR RIENTE C A Y EMBRAGUE RIENTE C A Y EMBRAGUE RIENTE C A Y EMBRAGUE RIENTE C A Y EMBRAGUE RIENTE C A Y EMBRAGUE DE ACCIONAMIENTO DE ACCIONAMIENTO DE ACCIONAMIENTO DE ACCIONAMIENTO DE ACCIONAMIENTO TAPA GENERADOR Y TAPA GENERADOR Y TAPA GENERADOR Y TAPA GENERADOR Y TAPA GENERADOR Y BOBINA ESTATOR BOBINA ESTATOR BOBINA ESTATOR BOBINA ESTATOR BOBINA ESTATOR Extracción ...

Страница 258: ...IZIONE AVVIAMENTO Rimozione Rimozione Rimozione Rimozione Rimozione F 114 A C GENERATOR UND A C GENERATOR UND A C GENERATOR UND A C GENERATOR UND A C GENERATOR UND ANFAHRKUPPLUNG ANFAHRKUPPLUNG ANFAHRKUPPLUNG ANFAHRKUPPLUNG ANFAHRKUPPLUNG Entfernung Entfernung Entfernung Entfernung Entfernung 1 1 1 1 1 2 2 2 2 2 3 3 3 3 3 2 2 2 2 2 5 5 5 5 5 4 4 4 4 4 C C C C C s s s s s N m 7 ...

Страница 259: ...racción Extracción Extracción Extracción N N N N N Componenti Componenti Componenti Componenti Componenti T e i l T e i l T e i l T e i l T e i l Components Components Components Components Components Composants Composants Composants Composants Composants Componentes Componentes Componentes Componentes Componentes 1 Supporto albero Wellenhalter Shaftbearing idler Support arbre Soporte eje ingranag...

Страница 260: ...stellt entfernen AUSEINANDERBAU DES LÄU AUSEINANDERBAU DES LÄU AUSEINANDERBAU DES LÄU AUSEINANDERBAU DES LÄU AUSEINANDERBAU DES LÄU FERS DES A C GENERATORS FERS DES A C GENERATORS FERS DES A C GENERATORS FERS DES A C GENERATORS FERS DES A C GENERATORS Entfernen Entfernen Entfernen Entfernen Entfernen Läufermutter 1 Abb 115 Gewellte Scheibe Flachscheibe Anmerkung Anmerkung Anmerkung Anmerkung Anmer...

Страница 261: ...oduite dans les trous A B Desmontar Desmontar Desmontar Desmontar Desmontar R o t o r 1 F 1 1 6 Nota Nota Nota Nota Nota extraer el rotor 1 sirviéndose d e le x t r a c t o rd ev o l a n t e a c o m oi l u s t r a l af i g u r a DESMONTAJE ROTOR Y GENE DESMONTAJE ROTOR Y GENE DESMONTAJE ROTOR Y GENE DESMONTAJE ROTOR Y GENE DESMONTAJE ROTOR Y GENE RADOR DE CORRIENTE C A RADOR DE CORRIENTE C A RADOR...

Страница 262: ...so contrario la frizione di avviamento è difettosa Sostituirla Sostituirla Sostituirla Sostituirla Sostituirla Quando si fa ruotare la ruota dentata di avviamento in senso a n t i o r a r i o a n t i o r a r i o a n t i o r a r i o a n t i o r a r i o a n t i o r a r i o deve ruotare liberamente In caso contrario la frizione di avviamento è difettosa Sostituirla Sostituirla Sostituirla Sostituirla...

Страница 263: ...ns le sens des dans le sens des dans le sens des dans le sens des aiguilles aiguilles aiguilles aiguilles aiguilles d une montre d une montre d une montre d une montre d une montre l embrayage et la roue dentée de démarrage doivent être en prise l un avecl autre Dans le cas contraire l embraye de démarrage est défectueux Changer Changer Changer Changer Changer Quand on fait tourner la roue dentée ...

Страница 264: ...ana Inserirelarondellaondulata I n s e r i r ei ld a d o 2 es e r r a r l oa l l a coppia prescritta Cs Nm 2 2 2 2 2 8 0 4 4 4 4 4 3 3 3 3 3 1 1 1 1 1 2 2 2 2 2 V V V V V2 2 2 2 2 V V V V V3 3 3 3 3 2 2 2 2 2 EINBAU DES A C EINBAU DES A C EINBAU DES A C EINBAU DES A C EINBAU DES A C GENERATORLÄU GENERATORLÄU GENERATORLÄU GENERATORLÄU GENERATORLÄU FERS FERS FERS FERS FERS Einbauen Einbauen Einbauen...

Страница 265: ...JE ROTOR MONTAJE ROTOR MONTAJE ROTOR GENERADOR DE GENERADOR DE GENERADOR DE GENERADOR DE GENERADOR DE CORRIENTE C A CORRIENTE C A CORRIENTE C A CORRIENTE C A CORRIENTE C A Montar Montar Montar Montar Montar La chaveta 1 E le s t a t o r 2 La bobina captadora 3 encajando la ranura de la goma 4 en el alojamiento correspondiente obtenido de la quemadura del motor Place and tighten the screws V2 V3 F ...

Страница 266: ...23 e dalla rondella 6 occorre lo seeger 5 F 123 e dalla rondella 6 occorre lo seeger 5 F 123 e dalla rondella 6 occorre lo seeger 5 F 123 e dalla rondella 6 occorre prestare la massima attenzione a non perdere il perno prestare la massima attenzione a non perdere il perno prestare la massima attenzione a non perdere il perno prestare la massima attenzione a non perdere il perno prestare la massima...

Страница 267: ... 7 attention not to lose the pin 7 attention not to lose the pin 7 F 124 F 124 F 124 F 124 F 124 Si se quitase primero el Si se quitase primero el Si se quitase primero el Si se quitase primero el Si se quitase primero el engranaje conducto 3 engranaje conducto 3 engranaje conducto 3 engranaje conducto 3 engranaje conducto 3 sujeto sujeto sujeto sujeto sujeto en el eje de la bomba e la arandela en...

Страница 268: ...LPUMPE ÖLPUMPE ÖLPUMPE Prüfen Prüfen Prüfen Prüfen Prüfen Antriebsrad 1 Abb 125 Ölpumpengehäuse 2 Abb 1 2 5 Angetriebenes Rad Ölpumpe Abb 126 F 126 Coperchio alloggiamento pompa o l i o F 1 2 7 Controllare stato di conservazio ne della guarnizione A della g u a r n i z i o n e B ed e l l a n e l l od it e nuta O Ring C eventualmente procedere alla loro sostituzione Deckel Ölpumpengehäuse Verschlei...

Страница 269: ...TE ACEITE ACEITE ACEITE Inspeccionar Inspeccionar Inspeccionar Inspeccionar Inspeccionar Rueda conductora 1 F 125 Alojamiento bomba de aceite 1 F 1 2 5 Driven gear oil pump F 126 Rueda conducida bomba de aceite F 1 2 6 Rueda conducida bomba de aceite F 1 2 6 Oil pump housing cover F 127 Check the condition of the gasket A of the gasket B and of the O ring C If necessary replace Alojamiento bomba d...

Страница 270: ...e sostituire la pompa dell olio F 128 Abmessen Abmessen Abmessen Abmessen Abmessen Spiel zwischen Spiel zwischen Spiel zwischen Spiel zwischen Spiel zwischen den Läufern den Läufern den Läufern den Läufern den Läufern der Ölpumpe zwischenInnenläufer 1 undAußenläufer 2 Seitenspiel Seitenspiel Seitenspiel Seitenspiel Seitenspiel zwischen Außenläufer 2 und Pumpengehäuse 3 nicht innerhalb der Grenze n...

Страница 271: ...le jeu du logement rotor le jeu du logement rotor e n t r e l e logement de la pompe 3 et les rotors 1 2 S il est hors limite S il est hors limite S il est hors limite S il est hors limite S il est hors limite changer la pompe à huile Medir Medir Medir Medir Medir Juego entre los rotores Juego entre los rotores Juego entre los rotores Juego entre los rotores Juego entre los rotores de la bomba a c...

Страница 272: ... E W N E W N E W N E W 3 3 3 3 3 1 1 1 1 1 4 4 4 4 4 N E W N E W N E W N E W N E W 2 2 2 2 2 10 10 10 10 10 9 9 9 9 9 5 5 5 5 5 8 8 8 8 8 7 7 7 7 7 6 6 6 6 6 C C C C C s s s s s N m 16 O O O O O O O O O O O O O O O S S S S S S S S S S ANTRIEB ANTRIEB ANTRIEB ANTRIEB ANTRIEB Auseinanderbau Auseinanderbau Auseinanderbau Auseinanderbau Auseinanderbau Die mit gekennzeichneten Teile sollen nach jedem A...

Страница 273: ...in washer Rondelle plate Arandela plana 7 Ruota dentata 1 Zahnrad 1 Gearwheel 1s t Roue dentée Rueda dentada 1 8 Albero Antriebswelle Drive shaft Arbre Arbol de conduttore menant accionamiento 9 Albero principale Hauptwelle Main shaft Arbre principal Arbol principal 10 Ingranaggio Angetriebenes Main driven gear Engrenage menant Rueda conducida condotto primario Hauptrad primaire primaria DRIVE DRI...

Страница 274: ...tore F 130 1 1 1 1 1 4 4 4 4 4 5 5 5 5 5 6 6 6 6 6 8 8 8 8 8 N E W N E W N E W N E W N E W 2 2 2 2 2 3 3 3 3 3 7 7 7 7 7 5 5 5 5 5 C C C C C s s s s s N m 10 O O O O O C C C C C s s s s s N m 10 ENTFERNUNG DER ENTFERNUNG DER ENTFERNUNG DER ENTFERNUNG DER ENTFERNUNG DER ANTRIEBSWELLE ANTRIEBSWELLE ANTRIEBSWELLE ANTRIEBSWELLE ANTRIEBSWELLE Entfernen Entfernen Entfernen Entfernen Entfernen Antriebswe...

Страница 275: ...m the driveshaftpinion DEPOSE DE L ARBRE DEPOSE DE L ARBRE DEPOSE DE L ARBRE DEPOSE DE L ARBRE DEPOSE DE L ARBRE MOTEUR MOTEUR MOTEUR MOTEUR MOTEUR Enlever Enlever Enlever Enlever Enlever le groupe arbre moteur 1 F 131 la chaîne de distribution 2 Note Note Note Note Note avant d enlever le groupe ar bre moteur enlever la chaîne de di stribution du pignon de l arbre moteur EXTRACCION EXTRACCION EXT...

Страница 276: ...re Misurare Misurare Larghezza manovella S e f u o r i l i m i t e s o s t i t u i r e a l b e r o motore Larghezza manovella 47 95 48 00 mm PRÜFUNG DER PRÜFUNG DER PRÜFUNG DER PRÜFUNG DER PRÜFUNG DER ANTRIEBSWELLE ANTRIEBSWELLE ANTRIEBSWELLE ANTRIEBSWELLE ANTRIEBSWELLE Abmessen Abmessen Abmessen Abmessen Abmessen U n m i t t i g k e i td e rA n t r i e b s w e l l e Nicht innerhalb der Grenze A n...

Страница 277: ...on pendant la rotation lente de l arbre moteur Limite d excentration 0 03 mm Mesurer Mesurer Mesurer Mesurer Mesurer l ej e ul a t é r a ld el at ê t ed eb i e l l e S il est hors limite changer le roulement de la tête de bielle l axe de manivelle et ou la bielle Jeu latéral t ê t ed eb i e l l e 0 25 0 85 mm Mesurer Mesurer Mesurer Mesurer Mesurer la largeur manivelle Si elle est hors limite chan...

Страница 278: ...1215 Installare Installare Installare Installare Installare Spine di centraggio Catena di distribuzione 1 F 1 3 8 a a a a a Prüfen Prüfen Prüfen Prüfen Prüfen Antriebswellenritzel 1 Abb 135 Verschleiß Beschädigungen die Antriebswelle ersetzen Lager 2 Verschleiß Risse Beschädigungen die Antriebswelle ersetzen Antriebsrad Pumpe 3 Verschleiß Beschädigungen die Antriebswelle ersetzen Prüfen Prüfen Prü...

Страница 279: ...ITIONNEMENT DU CARTER CARTER CARTER CARTER CARTER Nettoyer Nettoyer Nettoyer Nettoyer Nettoyer soigneusement toute la surface de contact du joint et la surface de contact du carter Appliquer Appliquer Appliquer Appliquer Appliquer de la colle pour sceller sur les surfaces de contact du carter Adhésif Yamaha Bond N 1215 Positionner Positionner Positionner Positionner Positionner les goujons de cent...

Страница 280: ...E WASSERPUMPE WASSERPUMPE WASSERPUMPE WASSERPUMPE Auseinanderbau Auseinanderbau Auseinanderbau Auseinanderbau Auseinanderbau Die mit gekennzeichneten Teile sollen nach jedem Auseinanderbau der Gruppe zu der sie gehören ersetzt werden N E W N E W N E W N E W N E W 4 4 4 4 4 3 3 3 3 3 2 2 2 2 2 1 1 1 1 1 5 5 5 5 5 6 6 6 6 6 7 7 7 7 7 9 9 9 9 9 8 8 8 8 8 10 10 10 10 10 11 11 11 11 11 12 12 12 12 12 1...

Страница 281: ...Bolzen Pin Pivot Perno 9 Paraoliogirante Ölabdichtung Läufer Rotoroilseal P a r e h u i l er o t a t i f Sello de aceite rodete 10 Rotore Läufer Rotor Rotor Rotor 11 Guarnizione Dichtung Gasket J o i n t Guarnición 12 Coperchio Wasserpumpendeckel Water pump cover Couvercle pompe Tapa bomba agua pompa acqua à eau 13 Rondella rame Kupferscheibe Copper washer Rondelle de cuivre Arandela cobre WATER P...

Страница 282: ...rkung Anmerkung Anmerkung die Wasserpumpe benötigt nicht auseinandergebaut zu werden außer wenn Störungen wie z B eine übermäßige Änderung der Temperatur und oder des Kühlmittelstands unregelmäßige Farben des Kühlmittels oder Trübung des Getriebeöls festgestellt werden Wenn nötig die ganze Wasserpumpe ersetzen Entfernen Entfernen Entfernen Entfernen Entfernen Wasserpumpendeckel Abb 140 F 141 F 142...

Страница 283: ...oin est changer la pompe à eau dans son entier Enlever Enlever Enlever Enlever Enlever le couvercle de la pompe à eau F 1 4 0 Nota Nota Nota Nota Nota no es necesario desensamblar la bomba de agua a no ser que haya anomalías como una variación excesiva de la temperatura y o del nivel del líquido refrigerante coloraciones anómalas del refrigerante o erturbiamiento del aceite de la trasmisión Si fue...

Страница 284: ...v o Auf die Welle 2 drücken und den Läufer herausziehen Den O Ring 3 immer mit einem neuen O Ring ersetzen Esaminare il rotore e tutti i com ponenti smontati in precedenza In presenza di qualsiasi tipo di danno o usura anomala sostituir li oppuresostituirelapompacom p l e t a Den Läufer und die vorab abmontierten Teile prüfen Falls Beschädigungen oder Verschleiß vorhanden sind die Teile oder die k...

Страница 285: ...o Appuyer sur l arbre 2 et extraire le r o t o r Le joint d étanchéité O Ring 3 doit toujours être remplacé par un neuf Check the rotor and the components which have been removed If damages or wear are present replace the components or the whole pump Examinar el rotor y todos los componentes desmontados precedentemente Ante cualquier tipo de daño o desgaste anómalo sustituirlos o bien sustituir la...

Страница 286: ...Rotore 1 Anello O Ring 2 Disco 3 P e r n i 4 Guarnizione 5 Coperchio 6 Die Dichtung A des Getriebeöls prüfen Falls Beschädigungen oder Verschleiß vorhanden sind die Dichtungersetzen Siesollmitder Schrift Wasser nach außen eingesetzt werden Sich versichern die Bolzen B nichtzuverlieren ZUSAMMENBAU WASSERPUMPE ZUSAMMENBAU WASSERPUMPE ZUSAMMENBAU WASSERPUMPE ZUSAMMENBAU WASSERPUMPE ZUSAMMENBAU WASSER...

Страница 287: ...sant en ayant soin de placer l inscription eau water tournéeversl extérieur Veillerànepasperdrelespivots B ASSEMBLY WATER PUMP ASSEMBLY WATER PUMP ASSEMBLY WATER PUMP ASSEMBLY WATER PUMP ASSEMBLY WATER PUMP F i t F i t F i t F i t F i t Rotor 1 O r i n g 2 Disk 3 P i n 4 Gasket 5 Cover 6 MONTAGE POMPE A EAU MONTAGE POMPE A EAU MONTAGE POMPE A EAU MONTAGE POMPE A EAU MONTAGE POMPE A EAU Positionner...

Страница 288: ...1 3 3 3 3 3 2 2 2 2 2 C C C C C s s s s s N m 10 N N N N N Componenti Componenti Componenti Componenti Componenti T e i l T e i l T e i l T e i l T e i l Components Components Components Components Components Composants Composants Composants Composants Composants Componentes Componentes Componentes Componentes Componentes 1 Tubo in pressione Rohr unter Druck Pipe under pressure Tube sous pression ...

Страница 289: ...er continuously Note Note Note Note Note the thermostatic valve is sealed and its adjustment requires special competence If you have any doubts about its precision replace it A defective device can overheat or excessively cool down the engine causing serious consequences Check Check Check Check Check Thermostat cover Cracks damages replace FITTING FITTING FITTING FITTING FITTING Thermostatic valve...

Страница 290: ...CARBURATORE CARBURATORE CARBURATORE Rimozione Rimozione Rimozione Rimozione Rimozione F 151 VERGASUNG VERGASUNG VERGASUNG VERGASUNG VERGASUNG VERGASER VERGASER VERGASER VERGASER VERGASER Entfernung Entfernung Entfernung Entfernung Entfernung 2 2 2 2 2 4 4 4 4 4 1 1 1 1 1 6 6 6 6 6 5 5 5 5 5 3 3 3 3 3 ...

Страница 291: ...ents Components Components Components Components Composants Composants Composants Composants Composants Componentes Componentes Componentes Componentes Componentes 1 Connessione starter Anschluss automat Automatic starter Connexion démarreur Conexiones estarter automatico Starter connection automatique automático 2 Connessioni Anschlüsse Heater connections Connexion Conexiones riscaldatore Heizvor...

Страница 292: ...EINANDERBAU DES VERGASERS AUSEINANDERBAU DES VERGASERS AUSEINANDERBAU DES VERGASERS AUSEINANDERBAU DES VERGASERS AUSEINANDERBAU DES VERGASERS 1 1 1 1 1 16 16 16 16 16 7 7 7 7 7 8 8 8 8 8 2 2 2 2 2 11 11 11 11 11 9 9 9 9 9 10 10 10 10 10 15 15 15 15 15 13 13 13 13 13 5 5 5 5 5 4 4 4 4 4 3 3 3 3 3 6 6 6 6 6 14 14 14 14 14 12 12 12 12 12 ...

Страница 293: ...imo stellschraube regulating screw d u r a l e n t i del régimen g i r oa lr a l e n t í 4 Coperchio Deckel Cover diaphragm Couvercle ressort Tapa muelle molla diaframma Blendenfeder spring du diaphragme diafragma 5 Valvola pistone Kolbenventil Piston valve Clapet à piston Válvula a pistón 6 Gruppo spillo Nadeleinheit Needle unit Groupe pointeau Grupo punzón 7 Sovralimentatore Auflader Booster d i...

Страница 294: ...iante piegando la linguetta 1 F 156 sulgalleggiante Controllare nuovamente l altez za del galleggiante Nota Nota Nota Nota Nota la linguetta del galleggian te deve appoggiare sullo spillo del la valvola senza premere Altezza del galleggiante 27 mm S ef u o r il i m i t e s o s t i t u i r e 1 1 1 1 1 2 2 2 2 2 1 1 1 1 1 4 4 4 4 4 3 3 3 3 3 a a a a a EINBAU EINBAU EINBAU EINBAU EINBAU Den Vorgang A...

Страница 295: ...rocédure de contrôle et de réglage Procédure de contrôle et de réglage Procédure de contrôle et de réglage Procédure de contrôle et de réglage tenir le carburateur renversé mesurer la distance entre la surface de jonction de la cuvette sans joint etl extrémitésupérieureduflotteur silahauteurduflotteurnerentrepas dans les valeurs spécifiées examiner le siège de la soupape et le pointeau Si l un des...

Страница 296: ...erticale C o l l e g a r ei lm i s u r a t o r ed il i v e l l o 1 F 1 5 8 d e lc a r b u r a n t e altubettodidrenaggio 2 Allentarelavitedidrenaggio 3 Livello carburante 5 6 mm sotto la linea della vaschetta del galleggiante F 158 2 2 2 2 2 3 3 3 3 3 a a a a a 1 1 1 1 1 Um das Kolbenventil korrekt wieder einzubauen Um das Kolbenventil korrekt wieder einzubauen Um das Kolbenventil korrekt wieder e...

Страница 297: ...NIVEL DE AJUSTE NIVEL DE AJUSTE NIVEL DE AJUSTE NIVEL DE COMBUSTIBLE COMBUSTIBLE COMBUSTIBLE COMBUSTIBLE COMBUSTIBLE La gasolina y sus La gasolina y sus La gasolina y sus La gasolina y sus La gasolina y sus vapores son altamente vapores son altamente vapores son altamente vapores son altamente vapores son altamente inflamables y explosivos Mantener inflamables y explosivos Mantener inflamables y e...

Страница 298: ...sulta possibile sostituire unità Se l operazione risulta possibile sostituire unità di avviamento a freddo di avviamento a freddo di avviamento a freddo di avviamento a freddo di avviamento a freddo Se l operazione non è possibile buono stato Se l operazione non è possibile buono stato Se l operazione non è possibile buono stato Se l operazione non è possibile buono stato Se l operazione non è pos...

Страница 299: ...ssible bon état possible bon état possible bon état possible bon état Colocar el medidor en posición verticalycercadelalíneadelacuba d e l f l o t a d o r Medir el nivel de combustible a con el medidor Si el nivel del combustible no es correcto ajustarlo Extraer el carburador Inspeccionar el asiento de la válvula y la válvula de aguja En el caso de que uno o ambos elementos estén deteriorados sust...

Страница 300: ...mme libere ecc no scintille sigarette fiamme libere ecc I n s t a l l a r e I n s t a l l a r e I n s t a l l a r e I n s t a l l a r e I n s t a l l a r e P a n n e l l il a t e r a l i F 161 PRÜFUNG DER PRÜFUNG DER PRÜFUNG DER PRÜFUNG DER PRÜFUNG DER KRAFTSTOFFHAHNS KRAFTSTOFFHAHNS KRAFTSTOFFHAHNS KRAFTSTOFFHAHNS KRAFTSTOFFHAHNS Entfernen Entfernen Entfernen Entfernen Entfernen Seitenwände Prüfe...

Страница 301: ...rrect L essence et ses L essence et ses L essence et ses L essence et ses L essence et ses vapeurs sont fortement vapeurs sont fortement vapeurs sont fortement vapeurs sont fortement vapeurs sont fortement inflammables et explosives Ne inflammables et explosives Ne inflammables et explosives Ne inflammables et explosives Ne inflammables et explosives Ne pas en approcher d étincelles de pas en appr...

Страница 302: ...146 03 00 NOTE NOTE NOTE NOTE NOTE ANMERKUNGEN ANMERKUNGEN ANMERKUNGEN ANMERKUNGEN ANMERKUNGEN REMARKS REMARKS REMARKS REMARKS REMARKS NOTES NOTES NOTES NOTES NOTES NOTAS NOTAS NOTAS NOTAS NOTAS ...

Отзывы: