Mainstays Twin Twin 4473719WE Скачать руководство пользователя страница 1

Convertible Bunk 

Bed 

Weight Limit: 
200 Lb / 91 Kg for upper bed 
250 Lb / 113 Kg for lower bed

Twin Twin 

Pink

Содержание Twin Twin 4473719WE

Страница 1: ...Convertible Bunk Bed 1 Weight Limit 200 Lb 91 Kg for upper bed 250 Lb 113 Kg for lower bed Twin Twin Pink...

Страница 2: ...tools to assemble your furniture Power tools may strip or damage the parts Warranty Information warrants this product to be free from defects in material and workmanship and agrees to remedy any such...

Страница 3: ...are inner box es that include components required to complete this assembly A Post T981430 X 2 B C D D1 E2 E F H J Post T981440 X 1 Post T981450 X 1 Post T981540 X 2 Post T981580 X 2 End Guard Rail T9...

Страница 4: ...l the parts needed for the assembly There are inner box es that include components required to complete this assembly O Slats T930080 X 44 Slat Spacer T919490 X 42 Plastic Plug T392590 X 88 Slat Space...

Страница 5: ...entire assembly is complete unless otherwise indicated in the step by step instructions The screw s bolt s to be used at each step are shown in actual size in the lower right corner of the page 4 5 2...

Страница 6: ...with Attach E2 to A B with X 8 2 For your Safety please ensure that the warning on E1 is oriented towards upside and inside of the bed Warning label on part E1 should be oriented on the same side as...

Страница 7: ...7 Step 2 Attach E2 to D D1 with Repeat the same procedure for the remaining E2 D and D1 X 8 2 E2 E2 D D D1 D1...

Страница 8: ...8 Step 3 Upper Bed Attach J to A B and H to A C with X 8 Wide side of the slot should be facing up 6 Upper Bed A B A C J H H C Ladder holes on H must be located closest to C...

Страница 9: ...9 Step 4 Lower Bed Wide side of the slot should be facing up D D1 D D1 J J J D1 6 X 8 Lower Bed Attach J X 2 to D and D1 with...

Страница 10: ...10 Step 5 Upper Bed O O Y O J H O J J J 5 1 5 2 Upper Bed 5 1 Insert O into J and H as illustrated 5 2 lock O into place with Y...

Страница 11: ...11 Step 6 Lower Bed O O Y O J J J J J O 6 1 6 2 Lower Bed 6 1 Insert O into J x 2 as illustrated 6 2 lock O into place with Y...

Страница 12: ...12 Step 7 Upper Bed O W Q O W 7 1 7 2 Upper Bed 7 1 Press W onto O as illustrated 7 2 Press Q onto W alternating left and right as illustrated...

Страница 13: ...13 Step 8 Lower Bed W Q 8 1 8 2 Lower Bed 8 1 Press W onto O as illustrated 8 2 Press Q onto W alternating left and right as illustrated...

Страница 14: ...Upper Bed This bed offers you 2 status of bed Single Beds and Bunk Bed To assemble as Single Beds From Step 9 to Step 11 To assemble as Bunk Bed From Step 12 to Step 15 9 1 Press Y1 X 4 and S X 4 int...

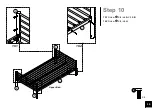
Страница 15: ...15 Step 10 Upper Bed A B A H A H 10 1 10 2 10 1 Screw X 6 into A X 2 B 10 2 Screw X 2 into H 2 X 8...

Страница 16: ...16 Step 11 Lower Bed D D1 D D1 D1 S Y1 Press Y1 X 4 and S X 4 into D X 2 and D1 X 2 SINGLE BEDS ASSEMBLY IS DONE...

Страница 17: ...17 Step 12 A B A H E F H E A 1 2 F 12 1 12 2 Upper Bed To assemble as Bunk Bed From Step 12 to Step 15 12 1 Attach E to B A with Attach F to A with 12 2 Attach F to H with 1 2 X 1 X 6...

Страница 18: ...18 Step 13 Lower Bed D D1 D D1 K K K K D K D Insert K X 4 into D X 2 D1 X 2 with 2 X 4...

Страница 19: ...19 Step 14 K K A K B A C C K With the help of an extra hand move Upper Bed on the top of Lower Bed and carefully slide A X 2 B C into K X 4 then properly tighten with 2 X 4...

Страница 20: ...20 Step 15 H Z H Z Attach Z to H with Fully tighten all the bolts BUNK BED ASSEMBLY IS DONE 5 X 2...

Страница 21: ...rated on this page and available for replacement Clean the product with a damp soft cloth DO NOT use harsh chemicals or abrasive cleaners Only applied for bunk bed with a lower bunk For the best comfo...

Страница 22: ...rseplay on or under the bed and prohibit jumping on the bed Prohibit more than one person on upper bunk Always use the ladder for entering and leaving the upper bunk Do not use substitute parts Contac...

Страница 23: ...y el material y se compromete a solucionar dichos defectos Este producto tiene una garant a limitada de 1 a o a partir de la fecha de compra original Esta garant a se limita a reparar o reemplazar pie...

Страница 24: ...a tubo T919480 cubierta de pl stico T982940 Cubierta T393990 A B C D D1 E1 E2 E F H J K Z O Q Y W S Y1 Paso 1 Una E1 con A C con Una E2 con A B con Paso 2 Una E2 con D D1 con Repita el mismo procedimi...

Страница 25: ...so 13 En la cama 2 Como se muestra a continuaci n introduzca los K X 4 a los D X 2 D1 X 2 y ensamble con Paso 14 Con ayuda de otra persona coloque la cama 1 encima de la cama 2 y con cuidado introduzc...

Страница 26: ...o utilice piezas sustitutas Entre en contacto con para las piezas de reemplazo El uso de una l mpara de noche puede proporcionar m s seguridad para un ni o que utilice la cama superior Utilice siempre...

Страница 27: ...garantie se limite uniquement la r paration ou au remplacement des pices d fectueuses La main d uvre d assemblage n est pas incluse Cette garantie ne s applique pas aux produits qui ont t mal assembl...

Страница 28: ...919480 Capuchon d extr mit T982940 Capuchon T393990 A B C D D1 E1 E2 E F H J K Z O Q Y W S Y1 tape 1 Attacher E1 A et C avec Attacher E2 B et A avec tape 2 Attacher E2 D et D1 avec R p ter la m me pro...

Страница 29: ...H avec tape 13 Ins rer K X 4 D X 2 D1 X 2 avec tape 14 Avec l aide d un coup de main d placez Bed 1 sur le dessus du lit 2 et soigneusementA X 2 B C dans des K X 4 puis serr les boulons tape 15 Attach...

Страница 30: ...c pour obtenir des pices de rechange L usage d une lumire de nuit peut fournir une pr caution suppl mentaire lorsqu un enfant utilise le lit du haut Utilisez toujours les garde corps sur les deux ct s...

Отзывы: