background image

Form 1503-1067                                                                                       Page 1 of 11 

Supplemental Valve Service Instructions 

for


ML106 & ML110 


Use the following instructions along with your Loader Operator’s Manual. 


Applies to: 

Loader Serial Number 043417976 and after for ML106. 
Loader Serial Number 043217581 and after for ML110. 
 
 
1.  If your loader is equipped with a Nimco manufactured valve, refer to your Loader 

Operator’s Manual for Installation and Operation Instructions.  

 
2.   If your loader is equipped with a Prince manufactured valve, use the following     

Installation and Operation Instructions.  


1

6

 Series, Model - 2

816

Содержание ML106 Series

Страница 1: ...contactus almats com Click here to go on INDEX Main Menu OPERATOR S MANUAL INSTALLATION INSTRUCTION ML106 Series...

Страница 2: ...Includes Operator s Manual and Installation Instructions Mahindra USA Model ML106 Front End Loader for Model 2615 Tractor 1503 1031 16 Series Model 2816...

Страница 3: ...ficially approved by Mahindra The Mahindra Loaders shall have been used in accordance with the procedures specified in the Operator s Manual This Warranty does not extend to damage resulting from misa...

Страница 4: ...w this manual and all safety messages contained within This safety symbol indicates important safety messages in this manual When you see this symbol carefully read the message that follows and be ale...

Страница 5: ...er Specifications 8 Introduction 9 Tractor Preparation 10 11 Loader Operation 12 15 Loader Removal 16 17 Loader Mounting 18 19 Lubrication and Maintenance 20 21 Trouble Shooting 22 25 Torque Tightenin...

Страница 6: ...e of your tractor make sure all operating controls are in park lock or neutral position Operate controls only when seated in the operator s seat Equip your tractor with a ROPS cab or frame for your pr...

Страница 7: ...learance between raised equipment and overhead power lines Add recommended rear tire liquid weight or rear wheel weights for increased stability A loader attachment should be transported in a low posi...

Страница 8: ...als with soap and water and dry with a soft cloth 3 Replace damaged or missing safety decals with new decals from your Mahindra Dealer 4 If a component with a safety decal s affixed is replaced with a...

Страница 9: ...lb Cycle Times sec RPM 1 000 1 500 2 000 2 900 Full Raise Boom 7 2 4 7 3 7 2 8 Lower Boom 3 6 3 0 3 6 2 2 Dump Bucket 2 5 2 2 1 9 1 9 Retract Bucket 4 2 2 8 2 2 1 8 Relief Valve Pressure Setting 2 05...

Страница 10: ...s recommended to ensure safe operation of tractor and loader Refer to the Safety Precautions section of this manual for information concerning safety Consult your dealer for further information Warran...

Страница 11: ...added by installation of Three Point Hitch mounted ballast CAUTION Certain specific conditions may not permit safe use of loader at loader rating or may require more careful restricted operation at t...

Страница 12: ...ntained at equal pressure within the recommended tire inflation range Unequal rear tire inflation can prevent loader attachment from contacting the ground across its full width Wheel Tread Settings Tr...

Страница 13: ...off Keep the unit clean and perform regular service Observe safety messages whenever cleaning servicing or lubricating We urge you to follow this advice 1 Read and understand this manual as well as t...

Страница 14: ...against rust and contamination which may cause damage to the cylinder rods or hydraulic system Cold Weather Operation For smooth operation in cold weather let the tractor warm up SLOWLY cycle the lif...

Страница 15: ...CAUTION Do not stand walk or work under a raised loader unless it is securely blocked or held in position Accidental movement of a control lever or leak in the hydraulic system could cause the loader...

Страница 16: ...ary to follow the contour of the surface To activate the float position lower the bucket or attachment and push the control handle all the way forward into detent The valve will stay in float detent p...

Страница 17: ...ight from being applied to loader parking stands STEP 1 Position loader on hard level surface Raise boom Put bucket in dump position Lower the loader until front edge of bucket is on the ground and sh...

Страница 18: ...y extend the lift cylinders as required to raise the subframe clear of the rear mount Back the tractor up slowly until the subframe front crosstube is just clear of the Front Mount Observe the four 4...

Страница 19: ...d to the control valve Note The tractor front mount should be aligned with the subframe front crosstube STEP 2 Shut the tractor OFF and connect the hydraulic couplings matching the color code rings ST...

Страница 20: ...es clevis pins and hitch pin clips to both sides Secure hinges with the 1 2 flat washer lock washer and nut as shown typical each side Carriage Bolt Assembly and hardware STEP 6 Start the tractor rais...

Страница 21: ...cation and Maintenance Chart for quick reference to Maintenance Operations CAUTION Do not operate the loader if the fittings are leaking or if the hoses are damaged A sudden line burst could cause the...

Страница 22: ...Connections Check for leaks wear Daily 10 hours Lift and Bucket cylinder rod packings Check for seepage service as needed Daily 10 hours Pivot pin clips Check replace if missing Daily 10 hours Subfram...

Страница 23: ...lied from hydraulic pump Check system pressure Repair or replace pump Control valve linkage broken Inspect Repair as required Quick disconnect coupler s are not fully connected or Flow Check Check cou...

Страница 24: ...n hoses tubeline kinked or pinched Check hoses and tubelines for evidence of restriction Lift cylinder piston assembly leakage Check cylinders for leakage Repair as needed Relief valve erratic or set...

Страница 25: ...y Reduce load Relief valve setting below specifications Check and reset valve setting as needed Hydraulic hose tubeline or quick disconnect coupler restriction Check for evidence of restriction in hyd...

Страница 26: ...triction in hydraulic hoses Hydraulic pump defective Refer to Tractor Operator s manual for recommended service procedures Replace hydraulic pump if determined to be defective Lift cylinder rods bend...

Страница 27: ...Bolt head identification marks as per grade Manufacturing marks will vary Thick nuts must be used with Grade 8 bolts METRIC FASTENER ISO TORQUE CHART Note Use these torques unless special torques are...

Страница 28: ...x 35mm bolts and 9 16 lock washers on each side NOTE Remove Front Weight Carrier bracket if present prior to installation of Front Mount Also remove the ground cable from RH side of the tractor frame...

Страница 29: ...m left hole Attach Single Lever Control SLC w regen decal to back of valve stand as shown insuring float position detail is on top STEP 8 Attach a straight Hydraulic Adapter to all four hydraulic port...

Страница 30: ...ositioning it over boot mount 6 Thread Knob onto end of handle STEP 10 Attach 9 16 JIC male end of 1 4 x 40 hydraulic hose to loader tubing Mark the quick coupler end of each hose with colored nylon t...

Страница 31: ...aulic Control Valve Stand and secure hoses as shown with a plastic tie strap supplied with loader kit STEP 13 When installing loader only on tractor attach a 90 hydraulic adapter to each port insuring...

Страница 32: ...illustration Line up cross tube with front mount and drive slowly forward until cross tube is seated in front mount as shown STEP 15 Lower loader onto Rear Mount Assemblies Attach Hinge Assemblies to...

Страница 33: ...w 2 Bucket cylinder rod end Red 3 Lift cylinder rod end Blue 4 Lift cylinder base end Green Colors should match STEP 17 Position Hydraulic Hoses insuring they do not come in contact with loader frame...

Страница 34: ...Clip STEP 19 Secure bucket to loader and cylinders using four 4 pivot pins and pivot pin clips two 2 each side The longest pivot pin should be used on the Bucket Cylinder Rod End right side and should...

Страница 35: ...aise the bucket approximately 4 feet above the ground and cycle the bucket cylinders three times Lower the bucket to the ground Check the tractor hydraulic oil reservoir and fill as required Refer to...

Страница 36: ...ped on cylinder barrel at rod end Also see picture Figure 1 below for help in identifying your cylinder design 2 If your loader is equipped with cylinder part number 3160 2045 for lift cylinders and p...

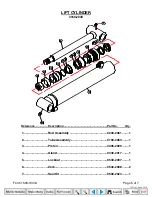
Страница 37: ...Description Part No Qty 1 Tube Assembly 0100 2055 1 2 Nut 0530 2000 1 3 Piston 0405 2001 1 4 Seal Kit 0590 2016 1 5 Head 0330 2012 1 6 Retaining Ring 0560 2002 1 7 Spacer 0541 2001 1 8 Retaining Ring...

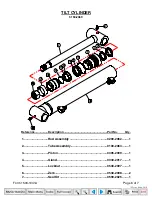
Страница 38: ...Description Part No Qty 1 Tube Assembly 0100 2043 1 2 Nut 0530 2000 1 3 Piston 0405 2001 1 4 Seal Kit 0590 2016 1 5 Head 0330 2012 1 6 Retaining Ring 0560 2002 1 7 Spacer 0541 2002 1 8 Retaining Ring...

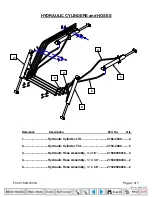
Страница 39: ...escription Part No Qty 1 Hydraulic Cylinder Lift 3160 2045 2 2 Hydraulic Cylinder Tilt 3150 2055 2 3 Hydraulic Hose Assembly x 18 21106506018 4 4 Hydraulic Hose Assembly x 44 21106506044 2 5 Hydraulic...

Страница 40: ...CYLINDER 3160 2049 Reference Description Part No Qty 1 Rod Assembly 0200 2061 1 2 Tube Assembly 0100 2063 1 3 Piston 0405 2009 1 4 Gland 0330 2017 1 5 Locknut 0530 2007 1 6 Zerk 0530 2008 2 7 Seal Kit...

Страница 41: ...CYLINDER 3150 2069 Reference Description Part No Qty 1 Rod Assembly 0200 2062 1 2 Tube Assembly 0100 2064 1 3 Piston 0405 2009 1 4 Gland 0330 2017 1 5 Locknut 0530 2007 1 6 Zerk 0530 2008 2 7 Seal Kit...

Страница 42: ...escription Part No Qty 1 Hydraulic Cylinder Lift 3160 2049 2 2 Hydraulic Cylinder Tilt 3150 2069 2 3 Hydraulic Hose Assembly x 18 21506506018 4 4 Hydraulic Hose Assembly x 44 21506506044 2 5 Hydraulic...

Страница 43: ...ial Number 043417976 and after for ML106 Loader Serial Number 043217581 and after for ML110 1 If your loader is equipped with a Nimco manufactured valve refer to your Loader Operator s Manual for Inst...

Страница 44: ...5 16 x 3 4 bolt and 5 16 lock washer in top left hole and two 2 5 16 x 3 4 bolt 5 16 lock washer and 5 16 flat washer in bottom left slot and right slot Attach Single Lever Control SLC w regen decal t...

Страница 45: ...ies Handle Cable Tie SLC Rubber Boot Lock Nut Knob Secure Form 1503 1067 Page 5 of 11 LOADER INSTALLATION STEP 6 Attach 3 8 x 42 hoses with fittings to the Power Beyond IN and Out ports on the Hydraul...

Страница 46: ...1 4 x 40 21003406040 4 5 Hydraulic Hose Assembly 3 8 x 42 22108506042 3 6 Plastic Tie Strap 0554 1013 4 7 Color Code Tie Strap Blue 0554 2001 2 Red 0554 2002 2 Yellow 0554 2003 2 Green 0554 2004 2 8 H...

Страница 47: ...IC VALVE ASSEMBLY Reference Description Part No Qty Hydraulic Valve complete 0580 6091 1 1 Valve Body Not Serviceable 1 2 Spool Not Serviceable 2 3 Seal Kit 0580 6096 1 4 Load Check Poppet 0580 6097 2...

Страница 48: ...ver Control Kit complete 1409 3076 1 1 Spool Stud 1409 3077 1 2 Rod End 1409 3078 1 3 Adapter Plate 1409 3079 1 4 Cap Screw 0563 2387 3 5 Rod End Assembly 1409 3080 2 6 Hex Nut 0555 2000 3 7 Cap Screw...

Отзывы: