Figure 2.
Device in Optional Charging cradle
Power - On and Off
To power on the device:
Press and hold the Power button for one
second. Upon powering up, it will display the “Welcome” screen and the
current device status.
To power off the device:
Press and hold the Power button for seven
seconds, or press the Power button for two seconds to display a “Power
Off?” screen with a Yes / No selection above the left and right function keys.
To power off, press the function key below Yes. To cancel powering off and
return to the Welcome screen, either wait 10 seconds or press the function
key below No. While the device is powering off, the display shows “Powering
off…” for three seconds before the display goes blank.
USB Connection
To connect DynaPro Go to a host computer or charger
using the Micro USB port, follow these steps:
Connect the small end of the USB cable to DynaPro Go as shown in Figure 3.
Connect the large end of the USB cable to the charger or to the host
computer’s USB port. As soon as DynaPro Go starts receiving power through
USB, it will automatically power on. If DynaPro Go is not automatically
recognized you may need to unplug and plug it in again.
Wireless (Wi-Fi) connection
Make sure the wireless access point, network, device, and host are set
up properly and tested. Check IP address registration on DHCP server,
check wireless MAC addresses as listed devices, and check firewalls for
communication. Provide the wireless access point SSID and passcode to the
advanced operator who will configure the devices. Power on the device and
make sure the device is configured to use the 802.11 wireless connection.
DynaPro Go supports multiple connection types, but only one interface can
be active at a time. To change the active connection, on the Welcome screen,
press Left Function Key 4 5 6 Right Function Key to show a confirmation
screen to begin using the currently inactive connection type. Make sure the
device is connected to the wireless network by checking the status icons. See
Installation and Operation Manual for complete details.
Bluetooth LE Connection
To connect DynaPro Go to a host via the Bluetooth LE
connection, follow these steps:
Make sure the host supports Bluetooth LE Secure Connections. Install
host software for DynaPro Go and power on the device. Check DynaPro Go
Bluetooth LE active connection. Press Left Function Key 1 2 3 Right Function
Key to enable pairing requests. Scan for Bluetooth devices on host and
select. Host and Device show 6-digit matching passcode. Accept pairing on
device and host. Check pairing by checking the device’s status icons. Check
the installation and Operation Manual for further details and troubleshooting.
Contents/Pre-Installation Checklist
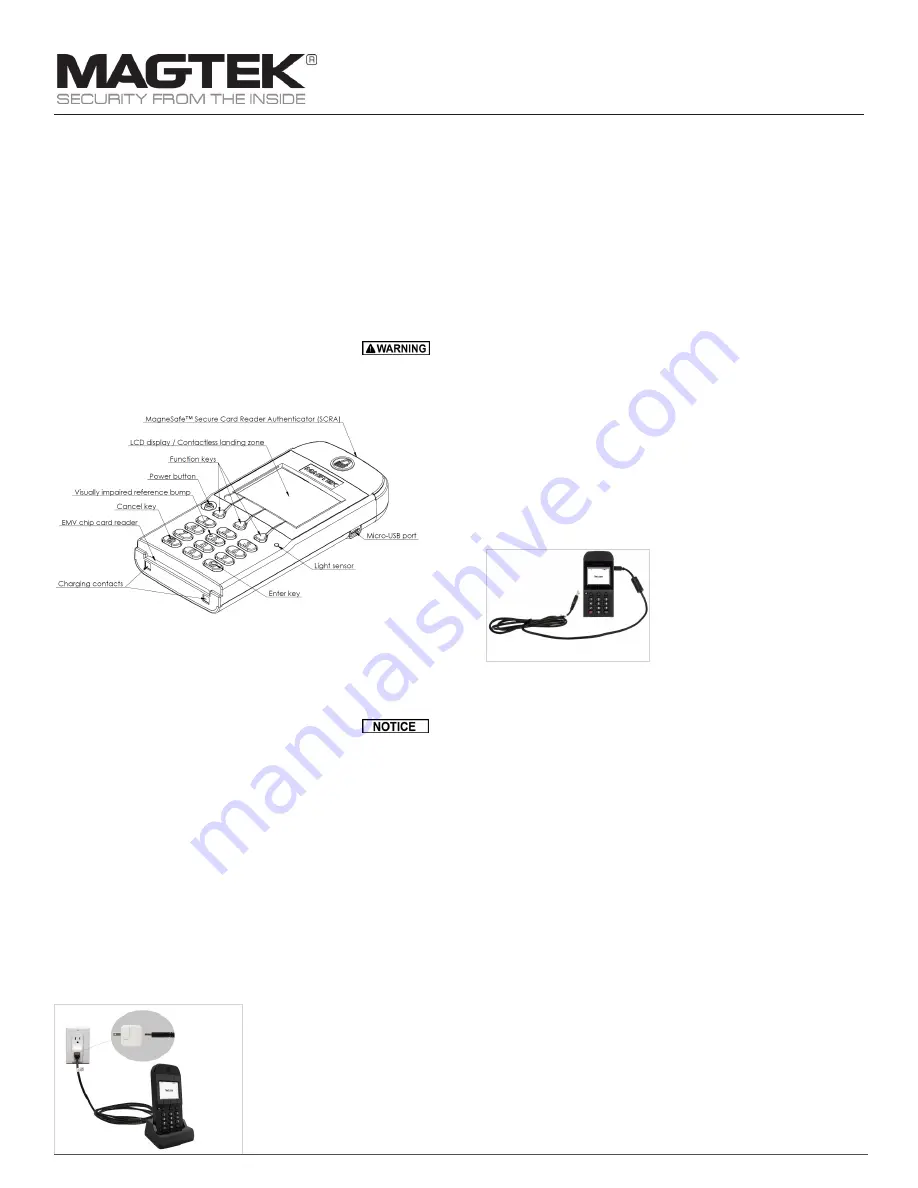
Major components of DynaPro Go are shown in Figure 1. In addition to the
components shown, the device has a tamper trigger recessed in the bottom
that is intended for manufacturer use only.
WARNING: DO NOT INSERT ANYTHING INTO THE TAMPER
TRIGGER HOLE! DOING SO WILL ERASE ALL INJECTED
KEYS; THE DEVICE WILL STOP FUNCTIONING, AND WILL
HAVE TO BE RETURNED TO THE MANUFACTURER FOR
RE-CONFIGURATION.
Major Components
Charging the Device
NOTICE: MagTek recommends charging at least every 6
months to maximize operation.
DynaPro Go’s power comes from an on-board rechargeable battery when
it is not connected to a host’s USB port. The battery must be periodically
recharged by connecting it to a charging cradle, a USB port, or a stand-alone
USB charger. Charging the device requires a micro-USB cable 6 feet (1.8
Meter) maximum length to ensure proper battery charging.
To charge the device in the charging cradle for power
only (no USB communication):
Connect the charging cradle to a USB port or to a USB charger. Place the
device in the charging cradle with the charging contacts pointing into
the charging cradle and the LCD display facing front. Both the charging
cradle and the device require a USB power supply that can provide at least
500mA @ 5V. DynaPro Go’s Lithium Polymer (LiPo) battery may be charged
from MagTek’s charging cradle or a USB charger until the device’s battery
indicator shows maximum charge has been reached. The device will stop
charging its battery automatically.
DynaPro Go
Handheld PIN Pad Device (MSR, EMV, NFC)
Quick Installation Guide
Setup and Installation
MagTek
®
Inc., 1710 Apollo Court, Seal Beach CA 90740 | p 562-546-6400 | support 651-415-6800 | f 562-546-6301 | www.magtek.com
Figure 3. USB connection
Figure 1.
Major Components


