background image

SMART DEADBOLT

www.macoware.com

Installation & User Guide

Содержание SMART DEADBOLT

Страница 1: ...SMART DEADBOLT www macoware com Installation User Guide...

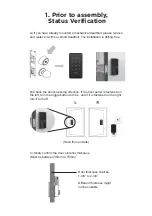
Страница 2: ...rn the toggle button to the L and if it is fastened on the right turn it to the R Seen from outside Door thickness shall be 1 3 8 to 2 3 4 Different thickness might not be suitable A If you have alrea...

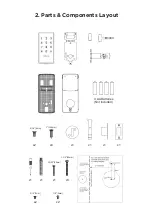
Страница 3: ...2 Parts Components Layout 4 AA Batteries Not included 1 25 4mm 5 16 8mm x2 x4 x1 x1 x1 x1 25 32 20mm 1 1 2 40mm x1 x1 x1 x3 3 16 5mm 1 8 3mm x2 x2...

Страница 4: ...3 General Assembly...

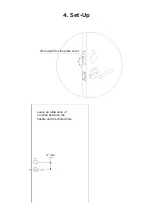
Страница 5: ...25 5 57 1 4 Set Up Leave an allowance of 4 inches between the handle and the drilled hole 4 min 4mm depth for the plate cover...

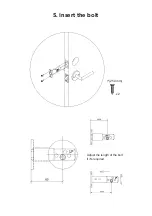
Страница 6: ...5 Insert the bolt 1 25 4mm Adjust the length of the bolt if it s required x2...

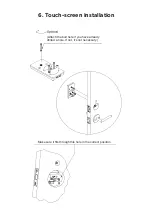
Страница 7: ...6 Touch screen installation Make sure it fits through this hole in the correct position Attach the bolt here if you have already drilled a hole If not it s not necessary...

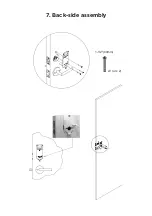
Страница 8: ...7 Back side assembly 1 1 2 40mm x3 or x 2...

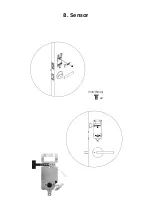
Страница 9: ...8 Sensor 3 16 5mm x2...

Страница 10: ...9 Rubber Pad...

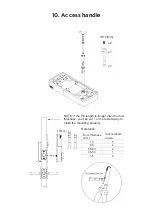
Страница 11: ...8 3mm x2 x1 x1 NOTE if the Pin length is longer than the door thickness you can cut 1 or more slot away to make the mounting properly Door thickness mm Slot numbers remain 70 65 55 60 45 50 35 5 4 2...

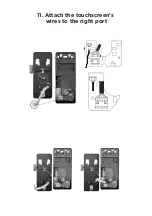
Страница 12: ...11 Attach the touchscreen s wires to the right port...

Страница 13: ...toggle to the L R position according to the door s opening di rection As mentioned in step 1 B If the lock pad front panel is fastened on the left turn the toggle to L and to R if it is fastened on t...

Страница 14: ...g properly the knob is in the right position 5 16 8mm x2 x1 25 32 20mm 2 Keep the bolt closed 2 Turn the knob properly If you turned the toggle to R in step 12 turn the knob clockwise to the end Fig 1...

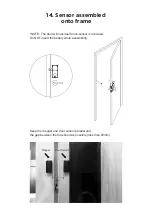
Страница 15: ...ame NOTE The door will lock itself once sensor is activated Do NOT insert the battery while assembling Keep the magnet and door sensor parallel and the gap between them as short as possible less than...

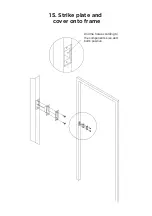
Страница 16: ...15 Strike plate and cover onto frame Drill the hole according to the component s size and bolt s position...

Страница 17: ...16 Batteries NOTE Do NOT close the door until the App is enabled Install 4 AA batteries and assemble the battery cover...

Страница 18: ...Bluetooth ii Check if Private mode is enabled If so just disable it 4 How can I enable and disable the Private mode If you want to stay alone or else you can enable the Private mode by long pressing...

Страница 19: ...ck the door s opening direction Uninstall and adjust the lock appropriately according to the information provided in step 12 and 13 11 Why isn t the lock screen active Make sure the batteries are full...

Страница 20: ...www macoware com...

Отзывы: