M3 SM10 Скачать руководство пользователя страница 1


User Manual 

Version 1.1 © 2015 


Содержание SM10

Страница 1: ...1 User Manual Version 1 1 2015...

Страница 2: ...software version This manual is created under the assumption that the device has all options For detailed information on available options contact the local distributor or refer to our Web site http...

Страница 3: ...3 you want to receive information on the latest OS please contact your local distributor This manual may include technical or editing errors...

Страница 4: ...on storage and retrieval system without the prior written permission of M3 Mobile Trademarks M3 Mobile and M3 logos are registered trademarks of M3 Mobile M3 SM10 is a registered trademark of M3 Mobil...

Страница 5: ...ice when there is thunder or lightning Lightning or fire may cause the device to break down or you may be electrocuted Turn the power of the device to off when device use is prohibited Hazardous or wa...

Страница 6: ...6 Loud sounds while walking or driving distract your attention and may cause traffic accidents...

Страница 7: ...7 Revision Release date of version 1 0 April 2015 Initial distribution...

Страница 8: ...urning the Device Off 16 1 3 3 Standby Mode 16 1 4 Memory Card 17 1 4 1 Inserting an External Memory Card 17 1 4 2 Checking Data 18 1 5 SIM Card 18 1 5 1 Inserting the SIM Card 18 1 6 SAM Card 19 1 6...

Страница 9: ...i 29 3 2 1 Setting the Wi Fi Feature 29 3 3 Scanner 30 3 3 1 How to Use the Scanner 30 3 3 2 Using the Scanner 31 3 4 Bluetooth 32 3 4 1 Setting the Bluetooth Feature 32 3 4 2 Connecting Bluetooth 33...

Страница 10: ...icro USB Cable Adaptor Quick Manual If one or more items above are damaged or are not included in the package contact the store where you purchased the device Only one package is provided to one devic...

Страница 11: ...battery slide the Slide button to the left to fix the locking device M3 SM10 uses 3 8 V 4 100 mAh Li ion standard battery or 3 8 V 6 150 mAh Li ion extended battery If an unapproved battery is used i...

Страница 12: ...e program Before the battery is removed save the data being used M3 SM10 can be used for up to 10 hours after the battery is fully charged The maximum time of using the device depends on the usage env...

Страница 13: ...ing the Battery Use a portable adaptor to connect with the micro USB port to supply external power Alternatively you may connect the device to a cradle that you can additionally purchase to charge the...

Страница 14: ...rade LED Color Description Red Battery is being charged Green Battery is fully charged If the battery is being used at the temperature other than 20 o C 4 o F 60 o C 140 o F the device may malfunction...

Страница 15: ...button until the device vibrates This will turn the device on and the initial screen will be displayed If the battery is completely discharged or charge is too low problems may occur when the device i...

Страница 16: ...ibly turn the device off 1 3 3 Standby Mode If the device is not used for a long time M3 SM10 automatically shifts to standby mode to decrease battery consumption To manually set the device in standby...

Страница 17: ...17 1 4 Memory Card 1 4 1 Inserting an External Memory Card The Micro SD card is used as an external memory of M3 SM10 After removing the battery insert the SD memory card into the Micro SD card slot...

Страница 18: ...on stored in the Micro SD card can be checked by tapping FOLDER SD Card 1 5 SIM Card 1 5 1 Inserting the SIM Card The SIM card supports voice call and data transfer through mobile communications The c...

Страница 19: ...hen using two SIM cards Slot 1 supports 3G 2G and Slot 2 supports GSM only When using only one SIM card Slot 1 supports 3G 2G and Slot 2 supports 2G only 1 6 SAM Card 1 6 1 Inserting the SAM Card If t...

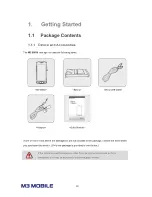
Страница 20: ...20 2 Basic Use 2 1 Features Device Layout...

Страница 21: ...ume Low Decrease the volume Camera Take pictures while executing the camera program Back Return to the previous stage Home Go to the Home screen Menu Display the menu Action Execute the work set to th...

Страница 22: ...22 Status Bar Home Screen Dock Bar 2 3 1 Status Bar The Status Bar displays the status of the device Notification Bar...

Страница 23: ...23 2 3 2 Notification Bar The Notification Bar displays device notifications...

Страница 24: ...shortcut icons of the main programs A shortcut icon can be added or deleted 2 3 4 Dock Bar Shortcut icons can be placed on the lower section to rapidly execute frequently used programs In the Dock Bar...

Страница 25: ...rd If focus is located in the input screen the virtual keyboard will be automatically displayed 2 5 Device Reset 2 5 1 Soft Reset 1 Press and hold the Power button to display the power management menu...

Страница 26: ...urs in the device or a problem is not resolved through soft reset perform factory reset For factory reset perform the following procedure Tap Backup Reset Factory data Reset Check if Erase internal SD...

Страница 27: ...ce Data cannot be sent 2 PC recognizes the device and automatically installs its driver 3 Once the driver is completely installed a file can be transferred through Explorer If the device does connect...

Страница 28: ...A and 3G UMTS HSPA networks 3 1 1 Basics Press the icon to use the Phone menu Press the icon to see the call history Press the icon to see the contacts Press the icon to add a contact Before making a...

Страница 29: ...Feature Activating the Wi Fi feature Tap and set the Wi Fi menu to ON OFF to activate or deactivate the Wi Fi feature Connecting to a Wi Fi network To connect to an AP perform the following procedure...

Страница 30: ...n option For detailed information on available options please contact the local distributor or refer to our Web site Home page http www m3mobile net 3 3 1 How to Use Scanner M3 Mobile provides the pro...

Страница 31: ...nnot be simultaneously used with a camera 3 3 2 Using the Scanner Place the device toward to the barcode desired and press the Scan button The laser beam of the scanner should completely cover the bar...

Страница 32: ...uetooth tab to ON OFF to activate or deactivate the Bluetooth feature If the Bluetooth signal is turned on the Bluetooth icon is displayed in the Status bar indicating that the Bluetooth feature is ac...

Страница 33: ...To connect using Bluetooth tap Bluetooth To activate the Bluetooth feature select the Bluetooth tab of the icon Connect M3 SM10 with a Bluetooth device to share information via wireless connection 1...

Страница 34: ...34 2 Select a Bluetooth device 3 If the Bluetooth pairing request screen is displayed enter the PIN code of a Bluetooth device to complete access to the device...

Страница 35: ...e and the antenna should be 1 5 cm or more from a user regardless of the antenna use It is recommended to refrain from using a metal belt clip case or accessory Do not wear an accessory 1 5 cm or shor...

Страница 36: ...36 Insert the NFC USIM into USIM SLOT1 front of Dual SIM Slot Tap More NFC to activate or deactivate the NFC feature...

Страница 37: ...a transfer would then start Caution when sharing data While sharing data the distance between devices should be less than 5 cm Caution when transferring data When transferring data between devices the...

Страница 38: ...pleted Generally data is displayed in the application Connecting to a Bluetooth Device with the NFC Feature 1 Hold M3 SM10 as shown below Do not cover the antenna area of the battery cover with hands...

Страница 39: ...evice tap About device and select the OS version The above image is a sample The latest OS is described in the online support page of M3 Mobile The OS of M3 SM10 can be updated through two methods i U...

Страница 40: ...40 4 2 Key Setting Conversion The M3 SM10 allows a user to change and modify the key settings for user convenience Keys can be set as follows i SM10 KEYTOOL application SM10 KEYTOOL...

Страница 41: ...41 The setting of the device s physical buttons except for the Power button can be changed...

Страница 42: ...40 Storage Temperature 30 80 22 176 Humidity 95 Non condense Tumble Test 1 000 1 6 ft 0 5 m tumbles 2 000 drops Bumper case mounted 500 1 6 ft 0 5 m tumbles 1 000 drops Bumper case not mounted Falling...

Страница 43: ...al problems For any questions on work programs please contact the program supplier for faster service 5 2 1 Contacts Head Office M3 Building 735 45 Yeoksam dong Gangnam gu Seoul 135 923 Korea Tel 82 2...

Отзывы: