


Page 19 of 51
(North America Edition)
©2019 Lytx, Inc. - Confidential & Proprietary.
Attach the Bracket and Event Recorder
CAUTION: The adhesive is very sticky. Once applied, it will not easily come off. Take care
to attach the bracket to the mounting location properly.
CAUTION: Do not apply excessive pressure as it may cause the windshield to break.
CAUTION: After removing the backing from the bracket's adhesive, apply the bracket to
the windshield immediately. If you leave the adhesive exposed for too long, it may be
compromised.
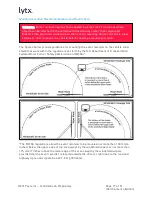
1. Remove the backing from the adhesive side of
the bracket. Carefully attach the bracket to the
windshield.
a. Place the left edge of the bracket against
the windshield, aligned with the marks,
and make sure it is level.
b. Press the bracket firmly against the wind-
shield starting at the left and pressing
downward to the right.
2. Check from outside the vehicle for large air
bubbles under the bracket. If you find any:
a. Apply additional pressure to the bracket.
b. Slide a pin between the bracket and wind-
shield to let out the air.
3. Wait 10 minutes to allow the bracket's adhesive to bond.
4. Place the event recorder in the bracket.
5. Adjust the event recorder so it hangs vertically (plumb).
See Figure C.
6. Secure the event recorder in the bracket using the two T-
27 Torx screws.
Connect Electrical Wiring
Connecting the electrical wiring consists of these subsections:
Electrical Connection Overview Diagram
Wiring and Wire Termination Suggestions


