IO-390-D Series Engine Maintenance Manual
72-20
© 2020 Avco Corporation. All Rights Reserved
Page 162
March 2020
IO-390-D Series Engine Maintenance Manual
NOTICE:
There are two types of springs used for the seal spring. One type has a hook on
each end; the hooks are joined together. The other type has threaded ends; one
end will be screwed into the other end.
(d)
Remove the spring from the groove (open portion) of a new solid-ring oil seal (Figure
48).
(e)
Put a brass pin approximately 9/32 in. diameter by 3 in. long through the crankshaft
propeller flange bushing to hold both sides of the seal in place as shown in Figure 49.
(f)
Apply a thin film of Lubriko
®
M-6 grease or equivalent on the sealing surface of the seal,
around the crankshaft at the sealing surface, and on the outer edge of the crankshaft
flange.
(g)
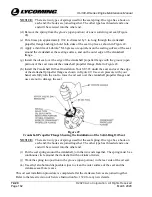
Install the oil seal over the edge of the crankshaft propeller flange with the groove (open
portion) of the seal towards the crankshaft propeller flange. Refer to Figure 49.
(h)
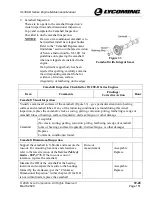
Install the Crankshaft Oil Seal Installation Tool ST-383 under the seal and over the edge
of the crankshaft propeller flange as shown in Figure 49. Use even pressure with your
hand, carefully turn the tool to force the oil seal over the crankshaft propeller flange and
use care not to damage the seal.
Figure 49
Crankshaft Propeller Flange Showing the Installation of the Solid-Ring Oil Seal
NOTICE:
There are two types of springs used for the seal spring. One type has a hook on
each end; the hooks are joined together. The other type has threaded ends; one
end will be screwed into the other end.
(i)
Put the seal spring around the crankshaft, join the two ends together. The spring must be a
continuous circle around the crankshaft with no kinks or twists.
(j)
Work the spring into position in the groove (open portion) in the rear side of the oil seal.
(k)
Use ethyl alcohol and disposable wipes to clean the outer surface of the seal and the
crankcase seal bore recess.
This oil seal installation procedure is completed after the crankcase halves are joined together.
Refer to the latest revision of Service Instruction No. 1324 for any new details.

