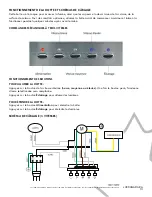
LUX KW30LCD Скачать руководство пользователя страница 1

TM

LUXCANADA.CA

TM

   HOTTE MURALE

IMPORTANT

Lire et conserver ces instructions. 

Laissez ce guide aux utilisateurs.

Conservez ce document pour référence future. 

Cette hotte a été concue pour un usage résidentiel SEULEMENT

MANUEL DE L’UTILISATEUR ET GUIDE D’INSTALLATION

Les informations contenues dans ce présent manuel s’appliquent aux modèles suivants :

LW30LCD

MW30LCD

KW30M

KW30LCD

SFW30M

KW36LCD

Содержание KW30LCD

Страница 1: ...utilisateurs Conservez ce document pour r f rence future Cette hotte a t concue pour un usage r sidentiel SEULEMENT MANUEL DE L UTILISATEUR ET GUIDE D INSTALLATION Les informations contenues dans ce...

Страница 2: ...murs les vides sanitaires les plafonds les greniers ni les garages vacuez TOUJOURS l air aspir par les ventilateurs l ext rieur Utilisez seulement des conduits en m tals Assurez vous TOUJOURS que l ap...

Страница 3: ...ppareil de ventilation N ALLUMEZ AUCUNE lumi re ni aucun autre type d appareil Ouvrez toutes les portes et fen tres afin de disperser le gaz Si vous sentez toujours une odeur de gaz appelez imm diatem...

Страница 4: ...istance de 30 33 entre la surface de cuisson et le bas de la hotte Nous recommandons que le conduit d vacuation de la hotte soit intall la verticale avec sortie sur le toit et que le conduit soit en m...

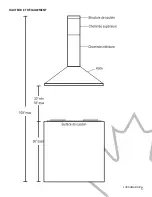
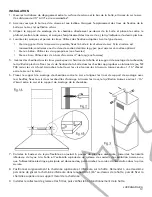
Страница 5: ...LUXCANADA CA 5 HAUTEUR ET D GAGEMENT...

Страница 6: ...nt difficiles d acc s et n offriront pas un rendement optimal Dans la mesure du possible veuillez consulter les exigences en mati re de d gagement de la hotte du fabriquant de la cuisini re Veuillez v...

Страница 7: ...LUXCANADA CA 7 OPTION 1 VACUATION HORIZONTALE PAR UN MUR...

Страница 8: ...LUXCANADA CA 8 OPTION 2 VACUATION VERTICALE PAR LE TOIT...

Страница 9: ...ricien qualifi et faites installer une prise lectrique au mur l endroit o sera install e la hotte dans la zone qui sera cach e par la chemin e d corative Veiller ce que l installation lectrique soit a...

Страница 10: ...appareil assurez vous que le syst me ou la structure de soutien utilis e est stable et bien ancr e au mur 3 Placez une couverte protectrice paisse sur le comptoir la cuisini re ou la hotte afin de les...

Страница 11: ...lateur en marche peut causer des blessures graves Tenez vous l cart du moteur lorsqu il est en marche La hotte peut comporter des rebords tranchants veuillez porter des gants pour vous prot ger si vou...

Страница 12: ...pport de montage de la chemin tel qu illustr plus bas Fixez les vis de fixation de la hotte dans les chevilles appropri es en laissant du jeu NE PAS serrer les vis fond Accrochez la hotte sur les vis...

Страница 13: ...n Alimentation pour teindre la hotte Appuyez sur le bouton clairage pour teindre les lumi res SCH MA DE C BLAGE 3 VITESSES Cette hotte a t con ue pour vacuer la fum e ainsi que les vapeurs et odeurs i...

Страница 14: ...e la mise en marche du moteur ventilateur pour vous rappeler qu il est temps de nettoyer le filtre en aluminium Une fois le filtre nettoy et lorsque le moteur est teint appuyer sur le bouton AUGMENTAT...

Страница 15: ...p serr e cela peut nuire la circulation de l air TOUTES LES LUMI RES FONCTIONNENT MAIS LE VENTILATEUR NE TOURNE PAS EST COINC OU FAIT DU BRUIT Le ventilateur peut tre bloqu ou les palmes peuvent frott...

Страница 16: ...isera le rendement de la hotte prolongera sa dur e de vie et maintiendra sa belle apparence NETTOYAGE DES SURFACES EXTERNES Nettoyez les surfaces p riodiquement avec de l eau savonneuse et un chiffon...

Страница 17: ...umi re fonctionne bien Les filtres us s peuvent tre remplac s en contactant LUX ou un distributeur agr Un filtre dont la maille est perc e bris e ou dont le cadre est pli bris devrait tre remplac RISQ...

Страница 18: ...n usage commercial ou pour un usage autre que celui pr vu Le produit est endommag par suite d un raccordement inappropri avec un appareil d un autre manufacturier ou s il est r par ou modifi par une p...

Страница 19: ...d inspecter la hotte pour tout d faut ou dommage avant de l installer Toute imperfection esth tique d couverte apr s l installation qui ne nuit pas la performance de la hotte ne sera pas couverte par...

Страница 20: ...KW36LCD INSTALLATION AND USER S GUIDE The information in this guide is applicable to the following models IMPORTANT Read and keep these instructions Leave this guide with the homeowner Keep this guid...

Страница 21: ...disperse air properly make sure to vent air to the outside DO NOT vent exhaust into spaces between walls or crawl spaces or into ceiling attic or garage ALWAYS vent ducted fans to the outside Use onl...

Страница 22: ...ish any open flame DO NOT turn on the range hood fan or any type of ventilator DO NOT turn on the lights or any type of appliance Open all doors and windows to disperse the gas if you still smell gas...

Страница 23: ...between the countertop stove and the range hood 30 to 33 is recommended 4 Height of hood and duct cover FOR THE MOST EFFICIENT QUIET OPERATION A distance of 30 to 33 is recommended between stove top...

Страница 24: ...LUXCANADA CA 5 HEIGHT CLEARANCE...

Страница 25: ...m airflow efficiency A flexible 6 round duct is provided for installation in decorative chimneys Always use rigid metal aluminum ducts if available to maximize airflow when connected to provided duct...

Страница 26: ...LUXCANADA CA 7 OPTION 1 VERTICAL ROOF VENTING...

Страница 27: ...LUXCANADA CA 8 OPTION 2 HORIZONTAL WALL VENTING...

Страница 28: ...tact a qualified electrician and have an electrical socket installed in the wall where the range hood will be installed in the area that will be hidden by the decorative chimneys Ensure that the elect...

Страница 29: ...clearance within the ceiling or wall for the exhaust vent 2 Due to the weight and size of this unit please make sure that the support system or framework being used is stable and properly secured to...

Страница 30: ...E INJURY Rotating fan can cause severe injury Star clear of fan when motor is running Hood may have very sharp edges Please wear protective gloves if it is necessary to remove any parts for installati...

Страница 31: ...sten screws all the way Hang the range hood on the screws and tighten them by hand Leave a gap of approximately 1 16 between the wall and range hood 6 Place the chimney mounting bracket against the wa...

Страница 32: ...n on the lights TURN OFF Press Power Switch to turn the power off Press Light Switch to turn the lights off WIRING DIAGRAM 3 SPEED This range hood is designed to remove smoke as well as cooking vapors...

Страница 33: ...aches 30 hours a beep will sound when the blower motor starts to rotate as a reminder to clean the aluminum filter After cleaning the filter and when the motor is not in use press and hold Increase Va...

Страница 34: ...SPINNING IS STUCK OR IS RATTLING The blower might be jammed or scraping the bottom due to shipping damage Please contact LUX immediately Slots holes and openings near the top of the upper chimney are...

Страница 35: ...regularly will optimize the range hood s performance prolong its life and preserve its appearance CLEANING EXTERIOR SURFACES Clean periodically with hot soapy water and a cotton cloth Do not use corr...

Страница 36: ...has been installed turn ON the breaker and the range hood to test that the new light bulb is working properly CLEANING ALUMINUM GREASE FILTERS BLOWER SAFETY GRILLS REPLACING FILTERS REPLACING GU10 LED...

Страница 37: ...improper connection with equipment of other manufacturers or repaired or modified by anyone other than a person mandated and authorized by LUX This limited warranty also does not apply to any product...

Страница 38: ...ure to inspect the range hood for damages and defects before installation Appearance flaws of the hood found after installation and not affecting performance are not covered under this warranty Servic...

Отзывы: