


12
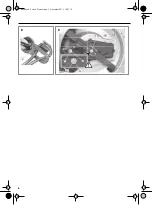
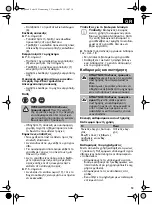
Changing the blades
Removing
– Release the screw (20).
– Remove the blade (19) carefully.
Installing
– Carefully attach the blade (19).
– Attach the washer (22).
– Tighten the blade using screw (20).
– Max. tightening torque = 20 Nm
Storage, transportation
Storage
– Clean unit before storing.
– Store the tool in a dry and well ventilated
place.
Transportation
– When dispatching, try to use the original
packaging, if possible.
Troubleshooting
What to do when something doesn’t
work…
Malfunctions are often caused by minor
faults. You can easily remedy most of these
yourself. Please consult the following table
before contacting the vendor. You will save
yourself a lot of trouble and possibly money
too.
If you can’t fix the fault yourself, contact your
nearest vendor. Please be aware that any
improper repairs will also invalidate the war-
ranty and additional costs may be incurred.
Disposal
Disposal of the appliance
Appliances which are labelled with
the adjacent symbol must not be dis-
posed of in household waste. You
must dispose of such old electrical
and electronic equipment separately.
CAUTION! Risk of injury!
Never
touch the blade on the cutting edge.
Wear gloves at all times when work-
ing with the blade.
NOTICE! Risk of damage to the
device!
Ensure the correct installa-
tion direction: the pegs (21) must line
up with the holes in the blade.
NOTICE! Risk of damage to the
device!
Pay attention to the rotation
direction of the blade (arrow).
DANGER! Risk of injury!
Store the
unit in such a way that it cannot be
started by unauthorised persons.
Ensure that no one is able to hurt
themselves on the stored unit.
NOTICE! Risk of damage to the
device!
Do not stored unprotected in
a damp environment.
DANGER! Risk of injury!
Unprofes-
sional repairs may mean that your
unit will no longer operate safely.
This endangers you and your envi-
ronment.
Error/Fault
Cause
Remedy
Unit does not switch on.
Did you wait for the delay?
Wait for the switch on delay
of 2 seconds.
Strange noise.
Screws/parts come loose?
Tighten screws.
Foreign objects in the blades? Remove foreign objects.
Blade damaged?
Have blade sharpened, or re-
place.
Cut result is not sufficient.
Blade is blunt?
GB
temp.book Seite 12 Donnerstag, 5. November 2015 10:07 10
Содержание 115 324
Страница 2: ...2 GB Original instructions 7 GR 14 temp book Seite 2 Donnerstag 5 November 2015 10 07 10...
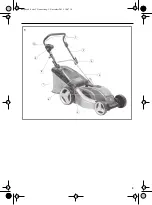
Страница 3: ...3 1 3 4 7 8 5 6 10 9 2 1 temp book Seite 3 Donnerstag 5 November 2015 10 07 10...
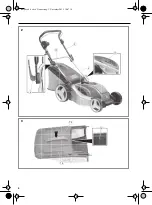
Страница 4: ...4 11 3 4 2 12 2 13 15 14 3 temp book Seite 4 Donnerstag 5 November 2015 10 07 10...
Страница 5: ...5 14 16 4 5 5 7 6 17 6 6 18 7 temp book Seite 5 Donnerstag 5 November 2015 10 07 10...
Страница 6: ...6 8 8 20 19 21 22 20 9 temp book Seite 6 Donnerstag 5 November 2015 10 07 10...
Страница 14: ...14 14 14 18 18 18 19 20 20 21 21 22 GR temp book Seite 14 Donnerstag 5 November 2015 10 07 10...
Страница 15: ...15 FI 30 mA GR temp book Seite 15 Donnerstag 5 November 2015 10 07 10...
Страница 16: ...16 GR temp book Seite 16 Donnerstag 5 November 2015 10 07 10...
Страница 17: ...17 115330 115324 GR temp book Seite 17 Donnerstag 5 November 2015 10 07 10...
Страница 19: ...19 6 P 6 8 8 P 3 1 9 1 2 P 5 6 17 18 GR temp book Seite 19 Donnerstag 5 November 2015 10 07 10...
Страница 20: ...20 P 6 9 20 19 19 22 20 20 Nm 21 2 GR temp book Seite 20 Donnerstag 5 November 2015 10 07 10...
Страница 23: ...23 temp book Seite 23 Donnerstag 5 November 2015 10 07 10...


