background image

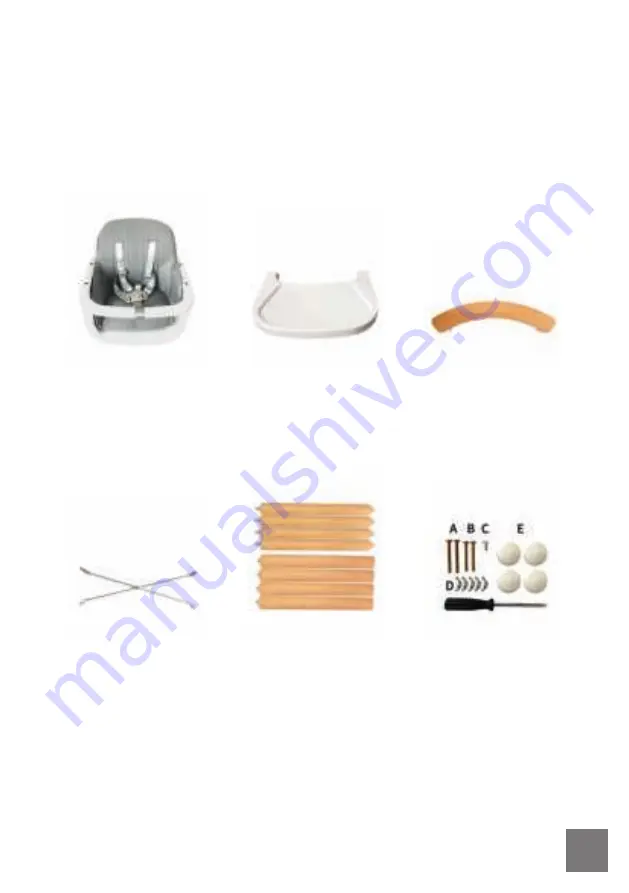
Componenti

Controllare tutte le parti e seguire le fasi di montaggio per assemblare il se-
ggiolone per bambini.
Non utilizzare il prodotto in caso di rottura o assenza di componenti.

Seduta

(1 pz.) 

Vassoio

(1 pz.)

Poggiapiedi

(1 pz.)

Piede di supporto 

(2 pz.)

Piedi d’appoggio 

superiori (4 pz.)

Piedi d’appoggio 

inferiori (4 pz.)

Viti (5 pz.)

Dadi (5 pz.)

Utensili (1 pz.)

Cuscinetti 

antiscivolo per la 

sedia normale

(4 pz.)

23

IT

Содержание MZ802

Страница 1: ...READ CAREFULLY AND KEEP FOR FUTURE REFERENCE WICHTIG AUFMERKSAM LESEN UND F R SP TERE FRAGEN AUFBEWAHREN BELANGRIJK LEES DE HANDLEIDING AANDACHTIG DOOR EN BEWAAR DEZE VOOR LATERE RAADPLEGING IMPORTANT...

Страница 2: ...oute autre surface au risque que la chaise haute se renverse NE LAISSEZ PERSONNE grimper ou monter debout sur la chaise haute Elle ne doit tre utilis e ni comme escabeau ni comme chelle Pour pr venir...

Страница 3: ...monter la chaise haute N utilisez pas le produit si l un des l ments est cass ou manquant Si ge 1 pi ce Plateau 1 pi ce Repose pieds 1 pi ce Barres de renforcement 2 pi ces Pieds sup rieurs 4 pi ces...

Страница 4: ...des vis A B C et des crous D Fig 4 a Commencez par assembler les deux barres de renforcement en ins rant la vis C dans le trou central et en l immobilisant avec un crou Les trous pr vus pour les vis...

Страница 5: ...i ge est bien en place Fig 6 Inspectez une nouvelle fois la chaise avant de l utiliser afin de v rifier que tout est en ordre Utilisez toujours le harnais et ajustez le correctement Les chutes sont la...

Страница 6: ...tachez le harnais de s curit nettoyez le coussin l eau ti de et faites le s cher en vitant de l exposer des temp ratures lev es N utilisez pas d eau de Javel ni de liquide haute proportion acide ou ba...

Страница 7: ...hen your chiId can push its feet against a table or any other structure DO NOT allow the child to climb or stand on or inside of this highchair lt is not a step stool or ladder To reduce the risk of i...

Страница 8: ...g steps for complete baby high chair Do not use the product if any part is broken or missing Chair Seat 1 pc Tray 1 pc Foot rest 1 pc Leg support 2 pcs Upper Legs 4 pcs Lower legs 4 pcs Screw 5 pcs Nu...

Страница 9: ...g screw C and a nut through the center hole The holes on the leg supports should extend downwards b Next install the footrest onto the front side of chair Screws A the two longer screws needs to pass...

Страница 10: ...gh chair again to make sure everything is OK before use The harness must always be used and correctly fitted Most injuries from highchairs are caused by falls The way to change high chair to junior ch...

Страница 11: ...cushion Unfasten the safety belt Wash it with warm water and dry it to avoid exposure under high temperature Do not use bleach and strong acid base liquid for cleaning the chair frame Avoid contact w...

Страница 12: ...gegen einen Tisch oder eine sonstige Konstruktion dr cken kann Lassen Sie NICHT zu dass jemand auf den Hochstuhl klettert oder sich auf oder in diesen stellt Er ist keine Steighilfe oder Leiter Um die...

Страница 13: ...es Babyhochstuhls Verwenden Sie das Produkt nicht wenn Teile fehlen oder besch digt sind Stuhlsitzfl che 1 Stck Tablett 1 Stck Fu st tze 1 Stck Beinst tze 2 Stck Obere Beine 4 Stck Untere Beine 4 Stck...

Страница 14: ...rauben A B C und den Muttern D Abb 4 a Beginnen Sie mit dem Zusammensetzen der zwei 2 Beinst tzen mit Schrau be C und einer Mutter durch das Mittelloch Die L cher auf den Beinst tzen m ssen nach unten...

Страница 15: ...7 6 Stellen Sie sicher dass der Sitzbezug richtig auf der Sitzfl che positioniert ist Abb 6 berpr fen Sie den Hochstuhl vor dem Gebrauch erneut um sicherzustellen dass alles in Ordnung ist Der Sicher...

Страница 16: ...Sicherheitsgurt Waschen Sie es mit warmem Wasser und trocknen Sie es um es nicht hohen Temperaturen auszusetzen Verwenden Sie keine Bleichmittel und starken Reinigungsmittel auf Basis von S uren und...

Страница 17: ...risico van achterover kantelen wanneer uw kind zijn voeten tegen een tafel of iets stevigs kan afzetten Laat NIEMAND op of in deze kinderstoel klimmen of staan Het is geen opstapje of ladder Om het r...

Страница 18: ...van de kinderstoel Gebruik het product niet als een onderdeel kapot is of ontbreekt Stoelzitting 1 stuk Eetblad 1 stuk Voetsteun 1 stuk Beensteun 2 stuks Bovenste poten 4 stuks Onderste poten 4 stuks...

Страница 19: ...roeven en moeren A B C en D Figuur 4 a Begin met het vastzetten van de twee beensteunen met behulp van schroef C en een moer door het middelste gat De gaten in de beensteunen moeten aan de onderzijde...

Страница 20: ...zit Figuur 7 6 Zorg ervoor dat de stoelbekleding op de juiste manier in de zitting is geplaatst Figuur 6 Controleer nogmaals of alles in orde is voor gebruik De veiligheidsgordels moeten altijd gebrui...

Страница 21: ...iniging van het kussen Maak de gordel los Was het kussen in warm water en droog het om hoge temperaturen te vermijden Gebruik geen bleekmiddel of sterke schoonmaakmiddelen op basis van zuren voor het...

Страница 22: ...ibaltamento quando il bambino spinge i suoi piedi contro al tavolo a a un altra struttura NON permettere a nessuno di arrampicarsi o stare in piedi su questo seggiolo ne Non uno sgabello n una scala P...

Страница 23: ...per bambini Non utilizzare il prodotto in caso di rottura o assenza di componenti Seduta 1 pz Vassoio 1 pz Poggiapiedi 1 pz Piede di supporto 2 pz Piedi d appoggio superiori 4 pz Piedi d appoggio infe...

Страница 24: ...poggiapiedi utilizzando le viti e i dadi A B C e D Fig 4 a Unire i due piedi di supporto con le viti e i dadi C attraverso il foro centrale I fori e i piedi di supporto devono fuoriuscire verso il ba...

Страница 25: ...he il cuscino della seduta venga posizionato correttamente Fig 6 Verificare ancora una volta il seggiolone in modo da essere sicuri che tutto sia in ordine prima dell utilizzo Usare e allacciare sempr...

Страница 26: ...re il cuscino slacciare la cintura di sicurezza Lavare con acqua calda ed asciugare Evitare l esposizione a temperature elevate Non utilizzare sbiancanti e detergenti acidi basici per pulire il telaio...

Страница 27: ...riesgo de vuelco cuando el beb pueda empujar una mesa u otra estructura con los pies NO permita a ning n ni o subir por s solo ni ponerse de pie en o dentro de esta trona Para reducir el riesgo de les...

Страница 28: ...a No utilice el producto si falta alguna pieza o si alguna est rota Asiento 1 pza Bandeja 1 pza Reposapi s 1 pza Reposapiernas 2 pzas Patas superiores 4 pzas Patas inferiores 4 pzas Tornillo 5 pzas Tu...

Страница 29: ...s usando los tornillos A B y C y las tuercas D Fig 4 a Comience por unir los dos reposapiernas colocando el tornillo C y una tuer ca a trav s del orificio central Los orificios en los reposapiernas d...

Страница 30: ...eta Fig 7 6 Aseg rese de que la funda del asiento est bien colocada en el asiento Fig 6 Compruebe que la trona alta est montada correctamente antes de usarla Utilice y ajuste el arn s siempre de la fo...

Страница 31: ...go Para limpiar el acolchado desabroche el cintur n de seguridad L velo con agua tibia y s quelo para evitar la exposici n a temperaturas altas No utilice lej a ni un l quido base o cido agresivo para...

Страница 32: ...eguir empurrar os p s contra uma mesa ou qualquer outra estrutura N O permita que ningu m suba ou se apoie sobre a ou no interior da cadeira alta Esta cadeira n o um escadote nem uma escada Para reduz...

Страница 33: ...uto se qualquer uma das pe as estiver partida ou em falta Assento da cadeira 1 pe a Tabuleiro 1 pe a Apoio para p s 1 pe a Apoio para pernas 2 pe as Pernas superiores 4 pe as Pernas inferiores 4 pe as...

Страница 34: ...arafusos A B C e as porcas D Fig 4 a Comece por unir os dois apoios para pernas utilizando o parafuso C e uma porca atrav s do orif cio central Os orif cios nos apoios para pernas devem prolongar se p...

Страница 35: ...se de que a cobertura do assento est devidamente colocada no respetivo assento Fig 6 Verifique novamente a cadeira alta para garantir que est tudo em confor midade antes de ser utilizada O arn s tem...

Страница 36: ...encial perigo Limpeza da almofada Desaperte o cinto de seguran a Lave com gua morna e seque para evitar a exposi o a temperaturas elevadas N o utilize lix via nem produtos de limpeza cidos fortes para...

Страница 37: ...37...

Страница 38: ...38...

Страница 39: ...39...

Страница 40: ...gd in China Prodotto in Cina Hecho en China Fabricado na China Z I de Montbertrand Rue du Claret 38230 Charvieu FRANCE LUNAMZ802 CONFORME LA NORME EN 14988 2017 CONFORMS TO EN 14988 2017 ENTSPRICHT EN...

Отзывы: