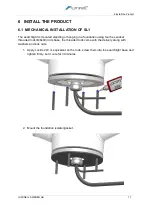
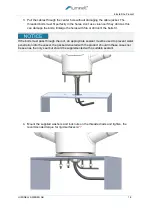


6 Install the Product
LUMINELL SWEDEN AB
31
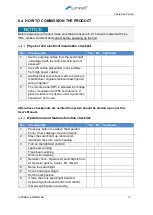
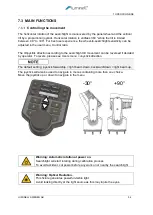
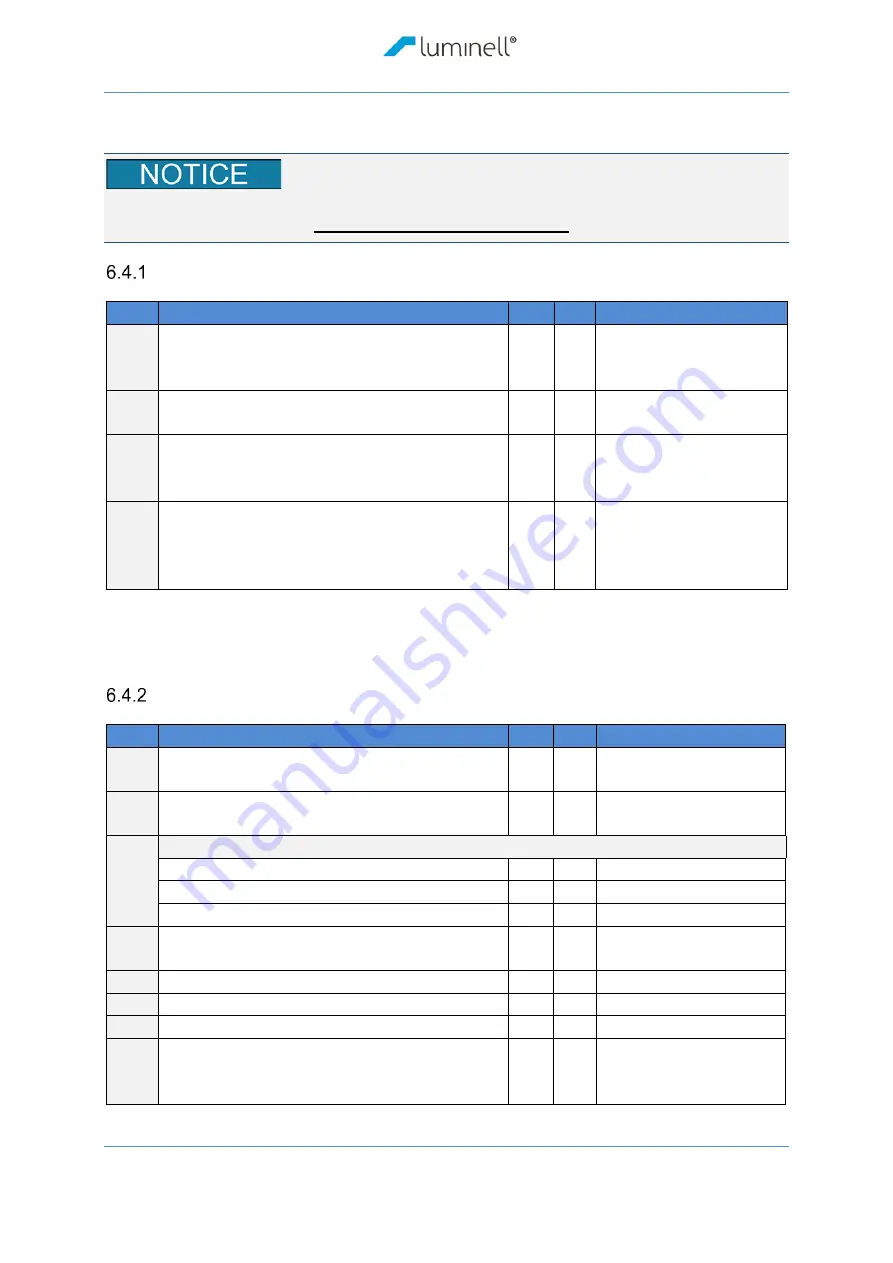
6.4 HOW TO COMMISSION THE PRODUCT
Before powering up the unit, make sure that all boxes in 6.4.1 below is marked with Yes.
If No, make a comment and correct before powering up the unit.
Physical and electrical installation checklist.
After above checkpoints are verified the system should be started up as per this
User’s Manual.
Operational and features function checklist:
Pos. Check points
Yes No
Comment
1
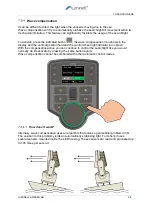
Press any button to awaken the Operator
Panel. Check display screen and signs.
2
Steer the searchlight up-/down-/port-
/starboard-wise into a safe heading.
3
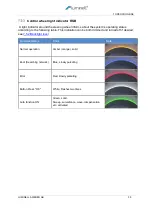
Turn on the light and confirm:
spot beam working
Flood beam working
Dimfunction working
5
Network check - Operate all searchlights from
all Operator panels. Center, PS, SB, Aft.
6
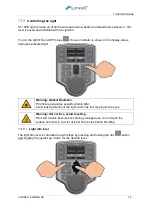
Name the searchlight
7
Check and adjust Origin
Set the park position
8
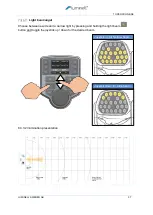
If more than one searchlight installed:
Activate Synchronized control and confirm
that all searchlights are mowing.
Pos. Check points
Yes No Comment
1
Are the outgoing cables from the searchlight
undamaged with the radius smooth and not
stressed?
2
Are LAN cables placed/laid to not interfere
from high power cables?
3
Are Electrical connections made according to
manufacturer original electrical drawings and
wiring diagram?
4
The remote panel (OP) is screwed into bridge
panel, mounted in an IP56 environment. If
placed outdoors it must be under a protection
hood when not in use.
Содержание SL1
Страница 7: ...LUMINELL SWEDEN AB 7 ...
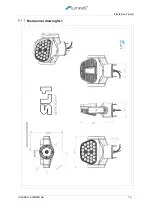
Страница 19: ...6 Install the Product LUMINELL SWEDEN AB 19 Mechanical drawing SL1 ...
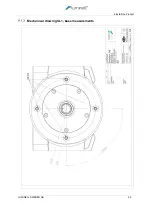
Страница 20: ...6 Install the Product LUMINELL SWEDEN AB 20 Mechanical drawing SL1 base measurements ...
Страница 21: ...6 Install the Product LUMINELL SWEDEN AB 21 6 2 MECHANICAL INSTALLATION OF OPERATOR PANEL ...
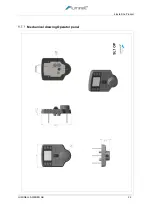
Страница 22: ...6 Install the Product LUMINELL SWEDEN AB 22 Mechanical drawing Operator panel ...
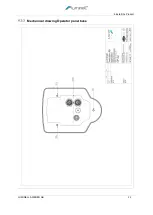
Страница 23: ...6 Install the Product LUMINELL SWEDEN AB 23 Mechanical drawing Operator panel base ...
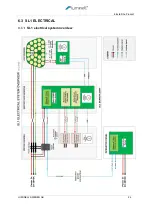
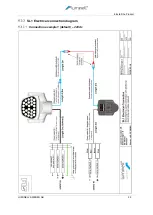
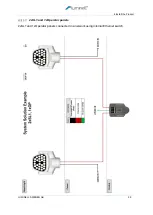
Страница 24: ...6 Install the Product LUMINELL SWEDEN AB 24 6 3 SL1 ELECTRICAL SL1 electrical system overview ...
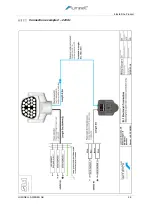
Страница 26: ...6 Install the Product LUMINELL SWEDEN AB 26 Connection example 2 24Vdc ...
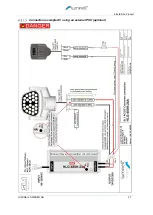
Страница 27: ...6 Install the Product LUMINELL SWEDEN AB 27 Connection example AC using an external PSU optional ...
Страница 66: ...12 Declaration of conformity CE LUMINELL SWEDEN AB 66 12 DECLARATION OF CONFORMITY CE ...
Страница 67: ...13 type approval certificate DNV LUMINELL SWEDEN AB 67 13 TYPE APPROVAL CERTIFICATE DNV ...
Страница 68: ...13 type approval certificate DNV LUMINELL SWEDEN AB 68 ...
Страница 69: ...13 type approval certificate DNV LUMINELL SWEDEN AB 69 NOTES ...
Страница 70: ...13 type approval certificate DNV LUMINELL SWEDEN AB 70 NOTES ...
Страница 71: ...13 type approval certificate DNV LUMINELL SWEDEN AB 71 NOTES ...
Страница 72: ...Luminell Sweden AB Seldonsvägen 8 SE 302 62 Halmstad Sweden Phone 46 35 38280 www glamox com ...


