V1.0-EU (11/2019)
LUCCI
ATLANTA
DC CEILING FAN
INSTALLATION
OPERATION
MAINTENANCE
WARRANTY INFORMATION
CAUTION
READ INSTRUCTIONS CAREFULLY FOR SAFE
INSTALLATION AND FAN OPERATION.
Страница 1: ...V1 0 EU 11 2019 LUCCI ATLANTA DC CEILING FAN INSTALLATION OPERATION MAINTENANCE WARRANTY INFORMATION CAUTION READ INSTRUCTIONS CAREFULLY FOR SAFE INSTALLATION AND FAN OPERATION...
Страница 2: ...hich gives a greater choice of comfort levels SAFETY PRECAUTIONS 1 In Europe This appliance can be used by children aged from 8 years and above and persons with reduced physical sensory or mental capa...
Страница 3: ...ances can leak into the ground water and get into the food chain damaging your health and well being 6 The structure to which the fan is to be mounted must be capable of supporting a weight of 28kg 7...
Страница 4: ...e components on a smooth surface and make sure there are no components missing before assembling If parts are missing return the complete product to the place of purchase for inspection or replacement...
Страница 5: ...bjects or walls Install the hanging bracket to the ceiling joist or structure that is capable of carrying a load of at least 30kg with two long screws provided Ensure at least 30mm of the screw is thr...
Страница 6: ...rping or unbalancing Take care not to over tighten the screws as this can damage the blades 4 Repeat the same process for the other blades INSTALLATION OF LIGHT KIT Fig 5 NOTE The light kit must be in...
Страница 7: ...ELECTRICIAN NOTE AN ADDITIONAL ALL POLE DISCONNECTION SWITCH MUST BE INCLUDED IN THE FIXED WIRING NOTE IF THERE ARE TWO OR MORE DC CEILING FANS INSTALLED IN THE ONE LOCATION AN ISOLATION SWITCH IS REQ...
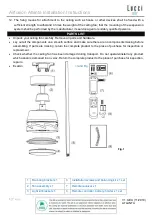
Страница 8: ...he supply wiring from the mounting bracket to the input of the DC motor driver receiver Plug the light connector and the fan connector from the DC motor driver receiver to the input wires of the fan m...
Страница 9: ...sen the 2 screws at the bottom of the mouthing bracket 3 Slide the canopy up to the mounting bracket and align the key holes on the canopy with the screws on the mounting bracket Turn the canopy until...
Страница 10: ...the remote Press the Light button to switch OFF and then ON again within 3 seconds for dimming to 50 brightness Press the Light button to switch OFF and then ON again within 3 seconds for dimming to...
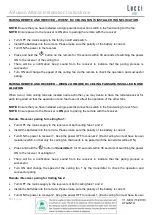
Страница 11: ...one fan does not affect the operation of the other fans NOTE Ensure that you have installed a single pole disconnection switch in the fixed wiring for each fan NOTE Ensure power to the Receiver is ON...
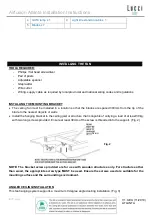
Страница 12: ...and method to repair the pairing of the DC ceiling fan remote and receiver Issues Loss of control Fan is only running at high speed after installation Loss of control No reverse function after install...
Страница 13: ...do so Do not soak or immerse your ceiling fan in the water or other liquids It could damage the motor or the blades and create the possibility of an electrical shock Ensure that the fan does not come...
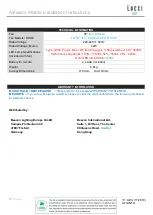
Страница 14: ...htness 100 1100lm 50 550lm 20 220lm Gx53 LED lamp SKU 121354 Battery for remote 2 x AAA Included Weight 6 8kg Canopy Dimensions H 51mm Dia 140mm WARRANTY INFORMATION IN AUSTRALIA NEW ZEALAND Please re...