

Package Contents
NR900X_QSG_EN_R1
USB Mouse
Ethernet Cable
Power Adapter
HDMI Cable
4K Network Video Surveillance Recorder
Remote Control
Dimensions
Connect your IP cameras (not included) using one of the following methods:
a. Connect cameras directly to the recorder (recommended).
NR900X Series
Quick Setup Guide
Physical setup of recorder and essential system settings
b. Connect cameras to a PoE switch or router on your network (not included). See “Adding
Cameras from the LAN” on reverse for more details.
1
/
2
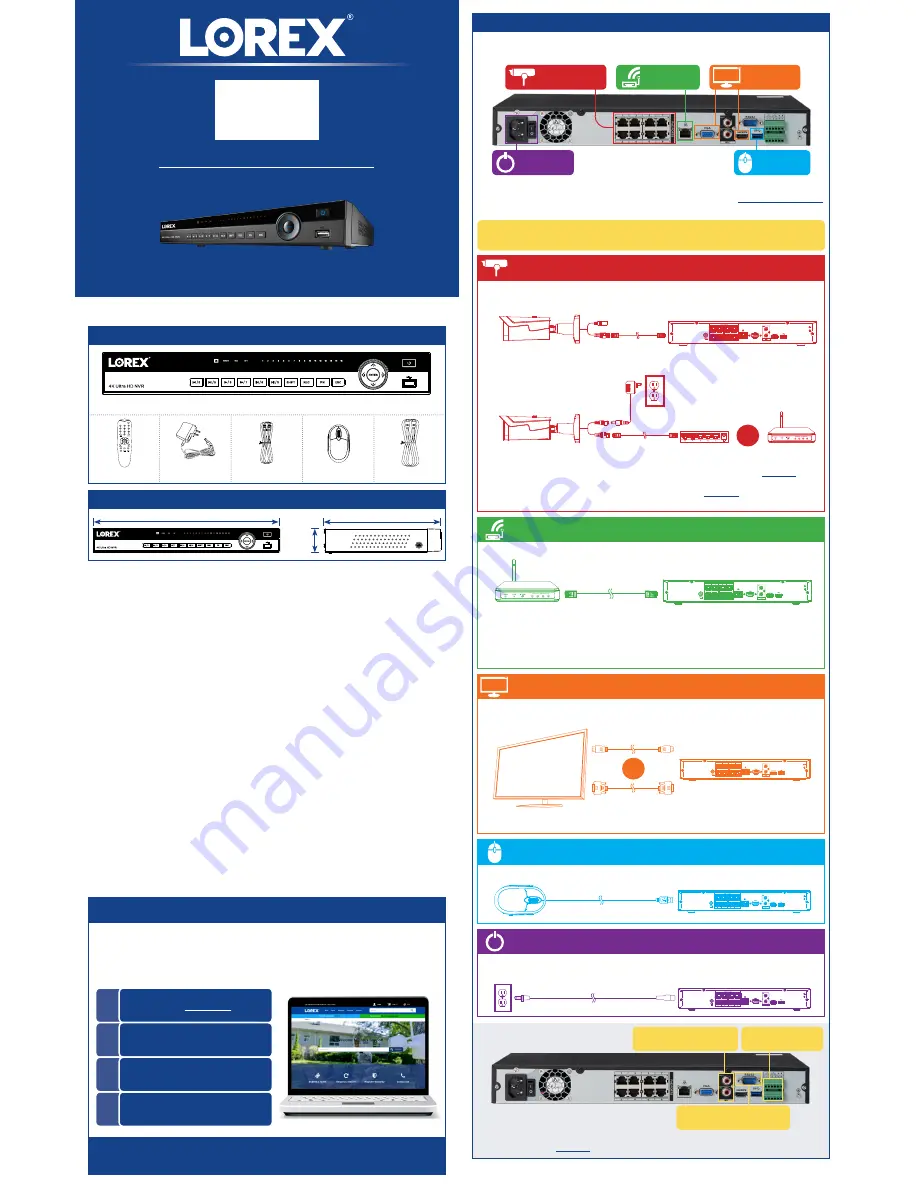
Setting Up Your Recorder
Follow the steps below to complete physical setup of your recorder.
To set up your recorder:
STEP 1:
Connect IP cameras*
STEP 2:
Connect router*
STEP 3:
Connect monitor*
STEP 4:
Connect mouse
STEP 5:
Connect power
STEP 1:
Connect IP cameras*
STEP 2:
Connect router*
STEP 3:
Connect monitor*
STEP 4:
Connect mouse
STEP 5:
Connect power
Connect the recorder to your router using the included Ethernet cable.
Connect the recorder to a monitor using the included HDMI cable or a VGA cable
(not included). The HDMI port supports up to 4K resolution, and VGA supports up to
1080p.
Connect the included mouse to a USB port on the recorder.
Use the included power adapter to connect the recorder to a nearby outlet. Turn the
recorder on using the power switch on the back panel.
14.7” / 375mm
12.9” / 327mm
2.1”
53mm
* Not included / sold separately.
NOTES:
• This guide covers connecting IP cameras to your security recorder only. For full instructions
on installing your cameras, please refer to your camera’s documentation at
lorex.com
.
• Connecting cameras to a router, or a network switch without PoE, requires a power adapter
for each camera. Refer to your camera’s documentation at
lorex.com
for the correct power
adapter model number.
OR
NOTES:
• If you are using a PoE switch, ensure the switch is connected to the same network as your
recorder.
• To receive automatic firmware updates and enable remote viewing with computer and
mobile apps, a high speed Internet connection is required (minimum 3.5Mbps upload
speed). All other system features can be used without an Internet connection.
OR
NOTE:
To optimize picture quality, set the recorder’s video output to match the resolution of
your monitor.
8-channel configuration shown. 16/32 channel will have the respective number of video inputs.
For camera compatibility information, visit
lorex.com/compatibility
.
Overview of extra ports:
NOTE:
For full instructions on using the extra ports, please refer to your security recorder’s
instruction manual at
lorex.com
.
Alarm Block
Connect alarm devices*
Audio I/O
Connect microphone / speaker*
RS232
Connect access control systems*
Back panels shown below are for illustration only. Your recorder’s back panel
may appear different, with all the same ports in different locations.
Copyright © 2019 Lorex Corporation
As our products are subject to continuous improvement, Lorex reserves the right to modify product design,
specifications and prices, without notice and without incurring any obligation. E&OE. All rights reserved.
Need Help?
Visit us online for up-to-date software
and complete instruction manuals
Click on the
Downloads
tab
4
Visit
lorex.com
Search for the model
number of your product
Click on your product
in the search results
3
2
1


