background image

Using the Main Menu

13

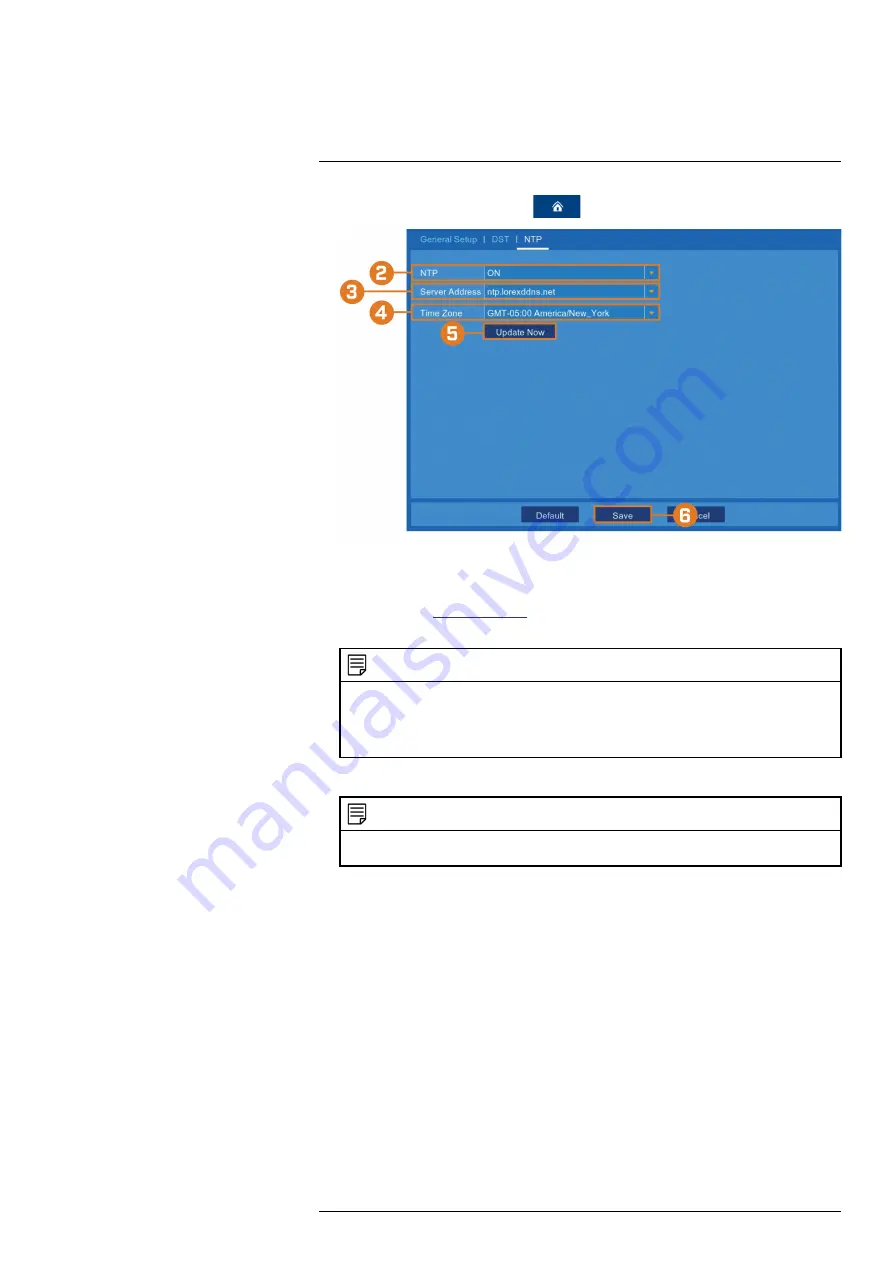
1. From the live viewing screen, click

>

System

>

General

>

NTP

.

2. Select

Enable

from the dropdown next to

NTP

.

3. Select the desired NTP server from the dropdown next to

Server Address

(we recommend

using the default

ntp.lorexddns.net

).

4. If needed, use the dropdown next to

Time Zone

to set the correct region.

NOTE

In most cases, the region should already be correct as it was configured during the recorder setup wizard. In
addition to determining the time zone, the selected region is also used by the system to intelligently deter-
mine the correct video format (NTSC or PAL) for that region, which may change automatically when
changing the region. For example, changing the region from New York to London will also switch the video
format of the system from NTSC to PAL.

5. Click

Update Now

to sync with the NTP.

NOTE

If the video format changes between NTSC and PAL based on your new choice of region, the recorder will
reboot automatically.

13.3.7

View System Information

View system information such as device ID, IP address, MAC address, model number, firmware
version and more.

#LX400115; r. 3.0/57178/57178; en-US

56

Содержание L222A8 Series

Страница 1: ...User Manual L222A8 Series...

Страница 2: ......

Страница 3: ...User Manual L222A8 Series LX400115 r 3 0 57178 57178 en US iii...

Страница 4: ...QUALIFIED SERVICE PERSONNEL The lightning flash with arrowhead symbol within an equilateral triangle is intended to alert the user to the presence of uninsulated dangerous voltage within the product s...

Страница 5: ...etection 20 7 2 Configuring Manual Recording 21 7 3 Changing Recording Resolution 22 7 4 Setting a Recording Schedule 23 8 Playback 25 8 1 Using Playback 25 8 2 Playback Controls 25 9 Search Backup 27...

Страница 6: ...13 4 3 Exporting System Settings 60 13 4 4 Importing System Settings 61 13 4 5 IPC Upgrade 62 13 4 6 Configuring System Warning Settings 63 14 Connecting to Your System Using PC or MAC 65 15 Connectin...

Страница 7: ...ected to this product should bear the UL listing mark or CSA certification mark on the accessory itself and should not be modified so as to defeat the safety features This will help avoid any potentia...

Страница 8: ...r or heat register This product should not be placed in a built in installation such as a bookcase or rack unless proper ventilation is provided and the product manufacturer s in structions have been...

Страница 9: ...duct manufacturer can prevent fire electric shock or other hazards 4 Safety Check Upon completion of any service or repairs to this product ask the service technician to perform safety checks recommen...

Страница 10: ...ecurity Cameras Rechargeable Power Pack Camera Antenna HD Recorder Toolkit Mounting Kit HDMI Cable Power Pack Adapter Ethernet Cable USB Mouse Recorder Power Adapter Per camera in multi camera packs L...

Страница 11: ...Hard drive size number of channels and camera configuration may vary by model Check your package to con firm that you have received the complete system including all components shown above LX400115 r...

Страница 12: ...r local and re mote connectivity 3 HDMI Connect the included HDMI cable to view the system interface on an HDMI monitor or TV 1080p output supported 4 USB Mouse Backup Connect the included mouse or a...

Страница 13: ...er Packs NOTE Power packs come fully charged with no need for initial charging To prepare the cameras 1 Attach an antenna to each camera Twist the adjustment ring counterclockwise to reposition each c...

Страница 14: ...harged Power Packs into each camera base Push up until the Power Pack clicks into place U222AA Series 4 2 STEP 2 Setting Up the Recorder Next you must set up the recorder To set up the recorder 1 Conn...

Страница 15: ...few minutes for the system to start 4 3 STEP 3 Connecting with Lorex Cirrus Connect to your system using the free Lorex Cirrus app for smartphones and tablets iOS and Android To connect with Lorex Cir...

Страница 16: ...page 76 4 4 STEP 4 Installing the Cameras 4 4 1 Installation Tips Follow the tips below for more accurate motion detection and to optimize battery life See images below for ideal setup It is recommend...

Страница 17: ...4 1 Installation Tips page 10 To install your cameras 1 Set the mounting bracket in the desired mounting position Mark holes through the mounting bracket shown as orange X s below 2 Drill holes where...

Страница 18: ...into the 2 slots in the camera base U222AA Series 5 Insert the security screw through the fasteners on the top of the camera base and mounting bracket to secure the camera to the mounting bracket Tig...

Страница 19: ...ill need to loosen the locking screw to remove the Power Pack in the future 7 Adjust the angle of the camera U222AA Series Twist the adjustment ring counterclockwise to reposition the camera Tighten t...

Страница 20: ...b Detection Enable disable motion detection or person detection per channel c Area Selection Configure the active area for motion detection so that only areas of in terest are selected and detected d...

Страница 21: ...em 4 5 Quick Access to System Information To quickly open a window with system information Click on the recorder s Taskbar NOTE The QR code shown in the System Info screen can be scanned during mobile...

Страница 22: ...reen viewing 2 Right Button During live viewing in split screen view click to open the Quick Menu see 6 2 Using the Quick Menu page 17 In menus click to go back close menus 3 Scroll Wheel In menus scr...

Страница 23: ...not included For details on using the Backup menu see 9 Search Backup page 27 5 Audio Controls Use the scroll bar to change system volume Click to mute unmute the system 6 System Information Displays...

Страница 24: ...ve display 1 Move Mini Menu Click and drag to move the Mini Menu to a different part of the screen 2 Pair Click to pair a wire free camera to the selected channel For more information on pair ing see...

Страница 25: ...far right side of the keyboard Click to move the cursor Click to backspace delete characters Click to confirm what you have entered Right click to close the Full Keypad To use the Number Keypad 1 Usin...

Страница 26: ...recording has been enabled and the system is currently recording video 2 Certain wire free systems have an option for continuous recording In order to take ad vantage of continuous recording Your reco...

Страница 27: ...Depending on your system you may have the option to record continuously by setting Camera Record ing Time to Continuous This option is only available on systems that use a hard drive for storage rath...

Страница 28: ...ave 5 OPTIONAL Use the Copy function to copy your settings to another or all connected cam eras See 13 1 1 Copying Channel Settings to Another Channel page 43 for details on using the copy function 7...

Страница 29: ...em is set to record whenever a camera detects motion You have the option to set a recording schedule so that a particular camera only records at certain times The recording schedule repeats weekly and...

Страница 30: ...el support continuous recording you will have the option to choose between Motion and Continuous schedules for each day of the week Continuous recording will only occur if you set a recording schedule...

Страница 31: ...2 Use the calendar on the left side of the screen to select the date to search for video record ings from 3 Check off the channels you would like to search for recordings from on the left side of the...

Страница 32: ...o play as slow as 1 16 of normal speed 7 Play 8 Pause 9 Stop 10 Fast Forward 11 Digital Zoom Click then click and drag on a camera image during playback to zoom in on the selected area Right click to...

Страница 33: ...period recording type and channel You can then select which files you want to back up to a USB flash drive not included To use back up you must connect a USB flash drive to one of the recorder s USB...

Страница 34: ...NOTE For details on viewing your backup files on a PC or Mac computer see page 9 2 Backing Up Videos using Playback Mode You can search for and back up single or multiple video recordings from Playbac...

Страница 35: ...uld like to search for recordings from on the left side of the screen 4 Click to search for recordings 5 Recordings that fit your search criteria appear Check off any recordings you would like to back...

Страница 36: ...oose the exact section of video recording you want to back up from Playback mode Prerequisites To use back up you must connect a USB flash drive to one of the recorder s USB ports la belled Mouse Back...

Страница 37: ...ls page 31 for an overview of drive menu controls Navigate to the folder you want the backup files to be saved in Click OK to begin The progress bar at the bottom of the window shows you the progress...

Страница 38: ...n the root folder has no effect 7 Browsing Area Shows files and folders contained in the selected USB flash drive not included 8 Move Cursor Click the arrow keys to move the cursor in the Selected Dir...

Страница 39: ...access to the system 10 1 Changing Passwords To change the password for the administrator or user accounts 1 From the live viewing screen click System Users 2 Click the account you want to change the...

Страница 40: ...ame for the account 6 Click the field next to Password to enter the desired password 7 Click the field next to Confirm to reenter the password 8 Click Save 10 3 Setting User Permissions The administra...

Страница 41: ...er accounts see 10 2 Adding a New User 3 Click Permission 4 Edit the user permissions to your preference Check the boxes next to any system menus or capabilities you would like the user to access Clic...

Страница 42: ...To pair cameras to your system using the Lorex Cirrus see 11 1 Pairing Cameras with Lorex Cirrus page 36 To pair cameras to your system using the recorder interface see 11 2 Pairing Cameras using the...

Страница 43: ...essage should appear on screen If you do not see this message repeat the steps above 11 2 Pairing Cameras using the Recorder Interface 1 From the live viewing screen click Settings Camera Camera Setup...

Страница 44: ...and hold the pair button on the back of the camera for 3 seconds U222AA Series NOTE A pairing successful message should appear on screen If you do not see this message repeat the steps above LX400115...

Страница 45: ...ing that the system deletes the oldest footage when storage is full to make way for new recordings You can also select a number of days or hours the system should retain data for For example if you se...

Страница 46: ...recording To format storage 1 From the live viewing screen click Device Storage 2 Click to select the storage device you want to format 3 Click Format Storage 4 Enter your recorder s user name defaul...

Страница 47: ...e live viewing screen 2 Hover over one of the options in the menu to browse options in full view Click to make a se lection If prompted enter the user name default admin and your secure password NOTE...

Страница 48: ...e system date and time user profiles and system information including logs See 13 3 System Menu page 52 for full instructions on using the System menu 6 Advanced Perform firmware upgrades restore unit...

Страница 49: ...ct All to copy to all connected channels then click Copy 3 Click Save to save your settings 13 2 Settings Menu Configure options for display recording parameters network settings and preferences for s...

Страница 50: ...to the hard drive To enable disable cameras 1 From the live viewing screen click Settings Camera Camera Setup 2 Select the channel for the camera you want to enable disable 3 Select ON or OFF 4 Click...

Страница 51: ...ncluded cameras support audio recording but must be enabled through the recorder inter face This is due to the fact that audio recording is unlawful in certain jurisdictions Please ensure your install...

Страница 52: ...dropdown next to Output Resolution to select the resolution of your monitor or TV 3 OPTIONAL If you are experiencing cropping of the recorder s display it is recommended that you check the Support Ov...

Страница 53: ...y of the taskbar and menu screens 3 Click Save 13 2 7 Configuring Basic Network Settings The basic network menu allows you to change port numbers if needed and configure the network protocol type DHCP...

Страница 54: ...server recommended page 48 For instructions on enabling email notifications using a different mailing server see 13 2 8 2 Email Notifications Using your own server information page 49 13 2 8 1 Email N...

Страница 55: ...l to set the minimum amount of time between email notifi cations This can be used to limit the number of notifications you receive throughout the day 11 Click Save Email notifications are now enabled...

Страница 56: ...recording schedule For blank areas of the schedule click or click and drag to add sections to the recording schedule 5 Click Save 6 OPTIONAL Use the Copy function to copy your settings to another or...

Страница 57: ...t to Area to configure the active area for motion detection The live view ap pears with a red grid overlay covering the whole image meaning the whole image is active Click or click and drag to enable...

Страница 58: ...he Date and Time If you need to change the date and time after completing the setup wizard follow the steps below To change the recorder s date and time 1 From the live viewing screen click System Gen...

Страница 59: ...ce you exit the main menu 13 3 3 Changing Video Output NTSC and PAL Manually switch between NTSC and PAL video output NOTE The video output is determined intelligently based on the region you set duri...

Страница 60: ...The system will reboot to properly set the new video output mode 13 3 4 Configuring Menu Time out Option By default system menus are set to time out after a set time period taking you back to the mai...

Страница 61: ...Time to select a mode of entry for effective dates Select Week to choose DST time changes that are relative to the day of the week for ex ample on the second Sunday of March Select Date to choose a s...

Страница 62: ...the time zone the selected region is also used by the system to intelligently deter mine the correct video format NTSC or PAL for that region which may change automatically when changing the region Fo...

Страница 63: ...acking Up The system log shows you important system events such as motion alarms and system warnings You can easily create a backup file of the system log for a set time period to a USB flash drive no...

Страница 64: ...this time on the end date 7 Click Search 8 Browse system log events from your search period Video events can be played back instantly by clicking in the Playback column Right click to return to your s...

Страница 65: ...s firmware 1 From the live viewing screen click Advanced Maintenance 2 Click Firmware Upgrade 3 The drive menu appears Navigate to and select the bin firmware file then click OK 4 A confirmation windo...

Страница 66: ...menus 4 Click Save to confirm The recorder will reboot automatically 13 4 3 Exporting System Settings You can export the main menu settings you have configured to a USB flash drive not included Export...

Страница 67: ...tions see 9 3 Drive Menu Controls page 31 See 13 4 4 Importing System Settings page 61 for instructions on importing saved system settings 13 4 4 Importing System Settings Once you have created a syst...

Страница 68: ...boot in order to properly im port your saved settings Click OK to proceed NOTE For more details on using the drive menu including a full overview of buttons and their functions see 9 3 Drive Menu Cont...

Страница 69: ...dow appears Click OK to confirm 5 Allow 5 10 minutes for the system to upgrade and reboot CAUTION Do not power off the recorder or disconnect cameras during firmware upgrade 13 4 6 Configuring System...

Страница 70: ...occurs NOTE Enabling Send Email requires you to set up email notifications See 13 2 8 Setting up Email Notifications page 48 for full instructions 4 Use the dropdown next to Buzzer to have the record...

Страница 71: ...ewing The Lorex Client 13 software allows you to View live video from cameras over the Internet Play back recorded video from the hard drive Manually record video clips or save snapshots to your compu...

Страница 72: ...ng fees for live viewing The Lorex Cirrus app allows you to View live video from cameras Play back recorded video from the hard drive Manually record video clips or take a snapshot of live video Set p...

Страница 73: ...10 256MB RAM 16MB video memory Prerequisites Connect the USB flash drive not included used for recorder backup to your computer En sure at least one backed up video file is on the USB drive Back up v...

Страница 74: ...xt File 7 Stop 8 Fast Forward 9 Enable Disable Watermark 10 Take Snapshot 11 Hide Show Playlist 12 Mute Unmute and Volume Bar 13 Add File 14 Remove File 15 Delete File 16 Playlist 17 Advanced Menu 16...

Страница 75: ...ac 16 To use the Advanced Menu 1 Click the button 2 Click Select to change the snapshot save folder Then select the folder and click OK 3 Check to enable the watermark 4 Click OK to save changes LX400...

Страница 76: ...home options that make accessing your system even easier For compatibility information as well as full instructions on setup and use visit lorex com SmartHome To enable Smart Home services on the rec...

Страница 77: ...You must port forward the HTTP and Client ports default 80 and 9000 on your router to your recorder s IP address before you can remotely connect to your system using DDNS There are several methods to...

Страница 78: ...sign up for a DDNS account To add your address to your LOREX account 1 From your LOREX account click the ADDRESSES tab 2 Click Add an Address 3 Enter your address information 4 Click Submit Once subm...

Страница 79: ...From your LOREX account click the DDNS tab 2 Click Set up a New DDNS 3 Select your recorder warranty from the dropdown next to Warranty Enter the rest of your product information NOTE The Device Name...

Страница 80: ...required see 15 Connecting to Your System Using Smartphone or Tablet Apps page 66 Prerequisites You must create a free Lorex DDNS account See 18 5 STEP 5 Sign Up for a DDNS Account page 73for full se...

Страница 81: ...DDNS Setup Advanced 18 7 Click Save LX400115 r 3 0 57178 57178 en US 75...

Страница 82: ...for details Move the camera closer to the recorder Remove obstructions between the recorder and camera Materials such as brick concrete and wood can significantly impact the wireless signal strength...

Страница 83: ...d or discolored The system uses the region entered in the setup wizard to intelligently deter mine the video format for your region To change the region enter the main menu Under System click General...

Страница 84: ...ackward 2x 4x 8x Slow Forward Step Forward Backward 20 1 4 Recording Video Compression H 264 H 265 Recording Resolution 1920 1080 FHD Event Type Motion Detection Person Detection Modes Motion Only def...

Страница 85: ...alled with either a non upgradable 2 5 SATA Hard Disk Drive or a microSD card which can be upgraded to a maximum of 256GB Class 10 or higher Re cording time may vary based on recording resolution and...

Страница 86: ...LX400115 r 3 0 57178 57178 en US 80...

Страница 87: ......

Страница 88: ...er registered trademarks or trademarks of Lorex Corporation and or its subsidiaries All other trademarks trade names or company names referenced herein are used for identification only and are the pro...

Отзывы: