


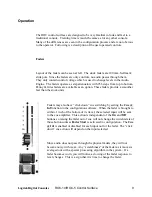

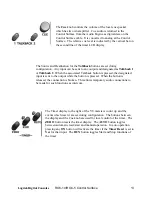


The Change push buttons allow selection of various options
pre-assigned to the fader during configuration. When one of the
buttons is pressed, the LED lights at the button. This indicates
that a change can now be selected. Use the Select knob at the
upper right corner of the control surface to scroll through the
choices programmed for the button. The choices are displayed
in the LCD panel at the top of the fader. When the desired
choice is found, press the Take button near the Select knob to
activate the choice. The choice mode can be cancelled before
pressing the Take button by pressing the Change button a
second time so that the LED goes out or by pressing a different
Change button.
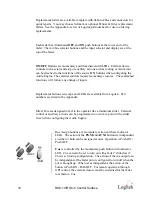
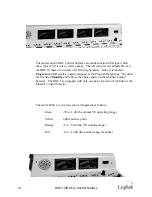
The Input Change button allows selection of any of the inputs assigned to the
fader during configuration. This can be as many or as few of the Audio Engine
inputs as you desire. All faders must have at least one input assigned. Remember
that as inputs change, any attributes attached to that input such as muting or
machine starts will change along with it.
The Mode Change button provides for selection of fader modes
such as Stereo (ST), Mono (MN), Left Channel only (LL), Right
Channel only (RR), or Phase Reverse(PR). The availability of
modes on any input is set during configuration. The default mode
for stereo and mono inputs is set automatically when the input is
selected.
The Bus Change button is used to assign the additional mix bus assignments.
The predefined mix busses are Program, Aux 1, Aux 2, and Aux 3. Any fader
may be assigned to any or all of these busses and these busses may be assigned to
any of the Audio Engine outputs. In addition, other outputs may be configured as
Mono outputs or mix-minus outputs. You are free to make these assignments as
you wish during Audio Engine configuration.
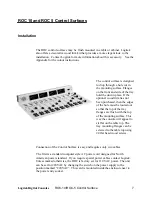
Logitek Digital Consoles
ROC-10/ROC-5 Control Surface
11
Содержание ROC 10
Страница 1: ...ROC 10 and ROC 5 Digital Audio Consoles...
Страница 4: ...This page is intentionally blank iv ROC 10 ROC 5 Control Surface...
Страница 17: ...This page is intentionally blank Logitek Digital Consoles ROC 10 ROC 5 Control Surface 17...
Страница 18: ...This page is intentionally blank 18 ROC 10 ROC 5 Control Surface...
Страница 26: ...26 Appendix...
Страница 27: ...Logitek Digital Consoles Appendix 27 ROC 10 Installation Cutout...
Страница 28: ...28 Appendix ROC 5 Installation Cutout...