ENGLISH
Go Green! playhouse™
Ages: 2 years and up
Please save sales receipt for proof of purchase.
WarnInG:
aDulT asseMBly reQuIreD.
• Keep these instructions for future reference.
• Prior to assembly, this package contains small parts:
hardware which is a choking hazard and may contain
sharp edges and sharp points. Keep away from children
until assembled.
• This product is intended for use by children ages 2 years
and up.
• This product is intended for outdoor domestic family use
only.
• Protect your eyes. Always wear safety glasses when using
power tools.
• Observing the following statements and warnings
reduces the likelihood of serious or fatal injury.
• Place this product on level ground, at least 6.5’ (2 m)
away from any object. Objects to be avoided include,
but are not limited to, fences, buildings, garages, houses,
overhead branches, laundry lines or electrical wires.
• It is recommended that the orientation of the assembled
product be such that direct sunlight is minimized on
surfaces intended for standing or sitting.
• Instruct children on proper use of this product, only
after properly placed, and not in a manner other than
intended.
• Instruct children not to attach items to the product that
are not specifically designed for use with the product
such as, but not limited to, jump ropes, clotheslines,
pet leashes, cables and chains, as they may cause a
strangulation hazard.
• Intended for use with the supplied accessories only.
• Never fill with anything except clean tap water. Use of
other liquids may be harmful or damage the unit.
• Do not store or leave water in product when not in use.
MaInTenanCe
• Check all hardware twice monthly during the usage
period and tighten as required. It is particularly
important that this procedure be followed at the
beginning of each season. If these checks are not carried
out, the toy could overturn or otherwise become a
hazard. Replace if they are loose, cracked, or missing.
• Take this product indoors or do not use outdoors when
temperatures fall below 0°F (-18°C).
DIsposal
• Disassemble and dispose of equipment in such a manner
that no hazardous conditions, such as but not limited to,
small parts and sharp edges, exist at the time equipment
is discarded.
1
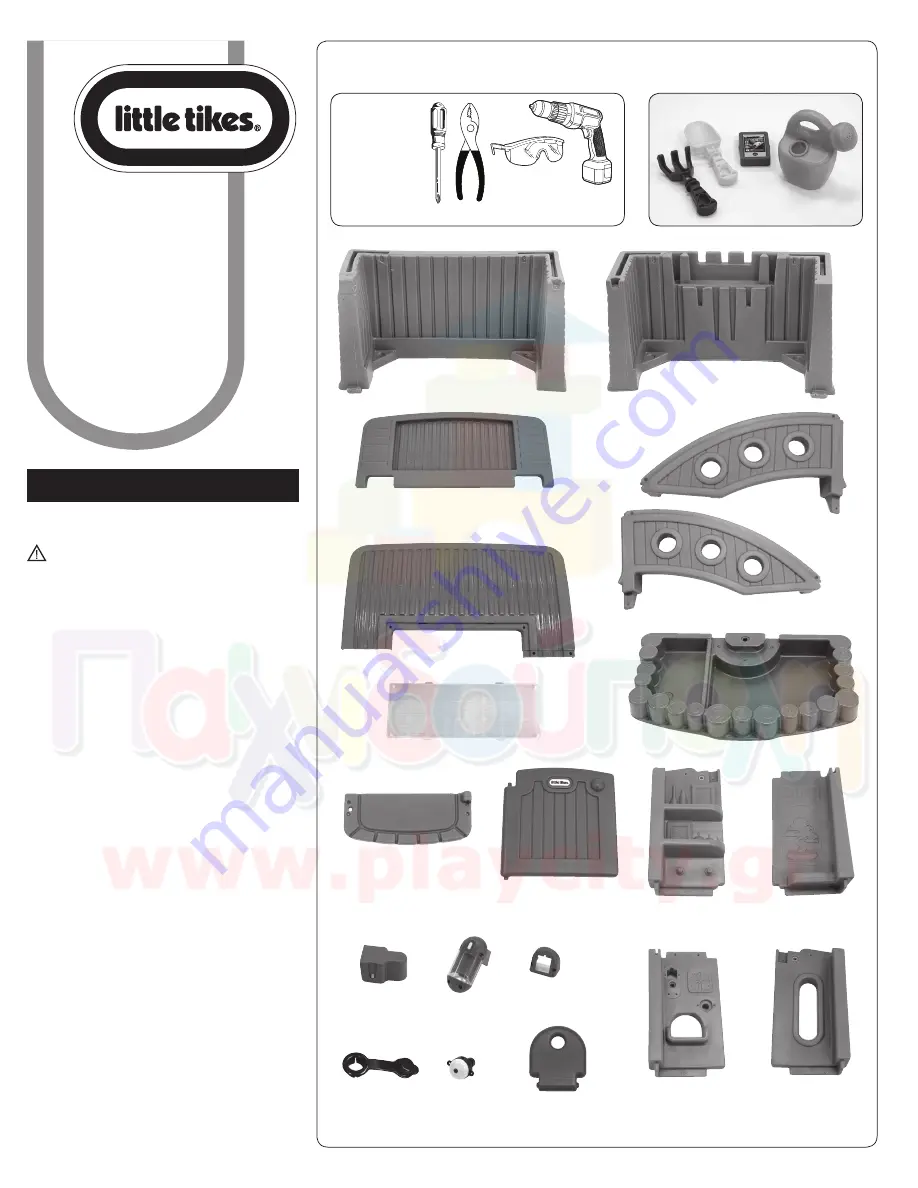
Tools required
(Not included):
Outils Requis
(Ne sont pas inclus):
Herramientas Requeridas
(No se incluye):
Adult assembly required /
Le montage devra être effectué par un adulte /
Debe ser armado por un adulto
(Recommended)
(Recommandé)
(Recomendado)
A
B
A. Lower Wall - RIGHT
Mur inférieur - DROIT
Pared inferior DERECHA
E. Small Roof
Petit toit
Techo pequeño
B. Lower Wall - LEFT
Mur inférieur - GAUCHE
Pared inferior IZQUIERDA
D. Arch - FRONT
Arche - AVANT
Arco FRONTAL
P - 1
P - 2
P-2
.
Solar Light
Éclairage solaire
Lámpara solar
P-1. Solar Light
Éclairage solaire
Lámpara solar
640216M
640216
640216E4C
XIM640216 - 12/15
www.littletikes.com
www.littletikes.co.uk
www.littletikes.nl
www.littletikes.pl
C. Arch - BACK
Arche - ARRIÈRE
Arco POSTERIOR
C
D
E
F
F. Large Roof (2)
Grand toit (2)
Techo grande (2)
G. Sky Light
Fenêtre de toit
Claraboya
G
H
I
I. Front Threshold
Seuil avant
Umbral delantero
J. Door
Porte
Puerta
J
H. Garden/Sandbox /
Jardinière/Bac à sable / Jardín /Arenero
O. Door Hinge
Charnière de porte
Bisagra de la puerta
Q. Drain Plug
Bouchon de vidange
Tapón de desagüe
Q
R
O
K. Corner Wall with Shelves
Mur d'angle avec étagères
Pared esquinera con estantes
L. Corner Wall with Tree
Mur d'angle avec arbre
Pared esquinera con árbol
M. Corner Wall with Mailbox
Mur d'angle avec boîte aux
lettres
Pared esquinera con buzón
N. Corner Wall with Window
Mur d'angle avec fenêtre
Pared esquinera con ventana
K
L
M
N
R. Doorbell
Sonnette
Timbre
S. Mailbox door
Porte de boite aux lettres
Puerta del buzón
S
Continued •
Suite • Continuación
Accessories •
Accessoires • Accesorios


