background image

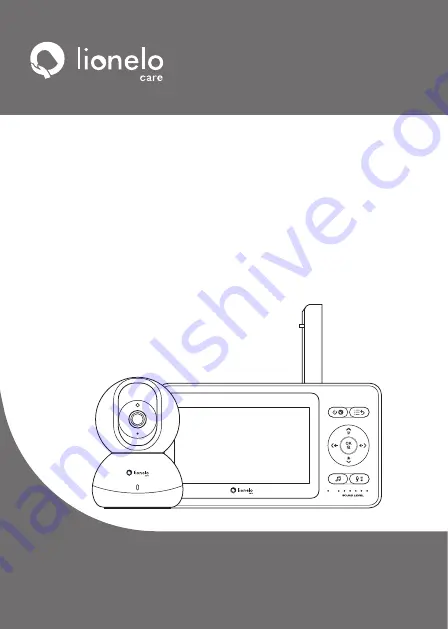
Babyline 8.2

Baby video monitor
Niania elektroniczna
Baby-Videomonitor

Детский видеомонитор

Baby monitor video
Moniteur vidéo bébé

www.lionelo.com

Manual de usuario

Handleiding

Naudojimo instrukcija

Návod k obsluze

Használati utasítás

Manual utilizare

User manual

Instrukcja obsługi

Bedienungsanleitung

Инструкция по эксплуатации

Manuale d’uso

Manuel de l’Utilisateur

Monitor de video para bebés
Videomonitor voor baby’s

Vaikų vaizdo monitorius
Dětský video monitor

Baba videomonitor

Monitor video pentru bebeluși

Содержание Babyline 8.2

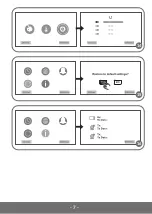
Страница 1: ...de usuario Handleiding Naudojimo instrukcija N vod k obsluze Haszn lati utas t s Manual utilizare User manual Instrukcja obs ugi Bedienungsanleitung Manuale d uso Manuel de l Utilisateur Monitor de v...

Страница 2: ...2 A B...

Страница 3: ...3 C 1 3 2...

Страница 4: ...4 4 5...

Страница 5: ...5 6 7 8 9...

Страница 6: ...6 13 12 11 10...

Страница 7: ...7 16 15 14...

Страница 8: ...e plug not the cable 7 If you do not use the device for a long time unplug it 8 Please use the power adapter supplied only 9 It is forbidden to place the product near a cooker or other sources of heat...

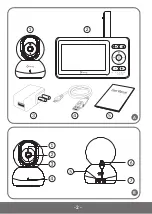
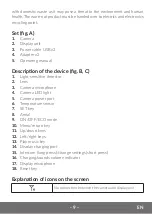
Страница 9: ...the device fig B C 1 Light sensitive detector 2 Lens 3 Camera microphone 4 Camera LED light 5 Camera power port 6 Temperature sensor 7 SET key 8 Aerial 9 ON OFF ECO mode 10 Menu return key 11 Up down...

Страница 10: ...camera in a desired place e g on the table or shelf and point the lens at the area you want to monitor fig 1 NOTE Do not place the camera within child s reach In case of any sound or image interferenc...

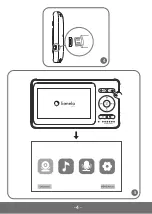
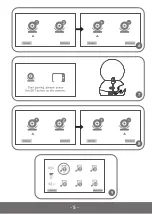
Страница 11: ...scribed in the subchapter How to add and delete the camera 3 To gain access to the menu press the menu key fig 5 How to add and delete the camera How to add the camera 1 In the menu select icon and pr...

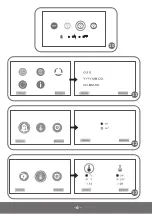
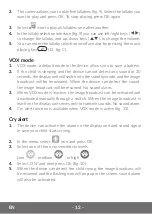
Страница 12: ...e and the image broadcast will be terminated When the device can detect the sound the image broadcast will be resumed No sound alarm 3 When VOX mode is inactive the image broadcast can be activated an...

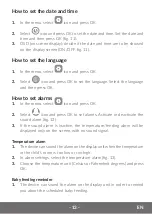
Страница 13: ...s 1 In the menu select icon and press OK 2 Select icon and press OK to set alarms Activate or deactivate the sound alarm fig 12 3 If the sound alarm is inactive the temperature feeding alarm will be d...

Страница 14: ...NOTE If you restore default settings you will delete all previous values How to reset the device If the display unit does not work properly use a needle to press the reset key located on the left sid...

Страница 15: ...nie przew d 7 Je li urz dzenie nie b dzie u ytkowane przez d u szy okres czasu od cz je od pr du 8 Nale y korzysta wy cznie z zasilacza do czonego do zestawu 9 Nie wolno umieszcza produktu w pobli u...

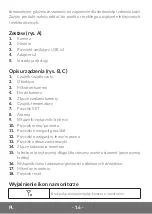
Страница 16: ...Mikrofon kamery 4 Dioda kamery 5 Z cze zasilania kamery 6 Czujnik temperatury 7 Przycisk SET 8 Antena 9 W cznik wy cznik tryb eco 10 Przycisk menu powrotu 11 Przyciski nawigacji g ra d 12 Przyciski na...

Страница 17: ...ioda z prawej strony wieci na czerwono Instrukcja obs ugi Umie kamer w dogodnej lokalizacji np na stole lub p ce i skieruj obiektyw na obszar kt ry chcesz monitorowa rys 1 UWAGA Nie umieszczaj kamery...

Страница 18: ...uzyska dost p do menu wci nij przycisk menu rys 5 Dodawanie i usuwanie kamery Dodawanie kamery 1 W menu wybierz ikonk i wci nij przycisk OK 2 Z listy wybierz kamer kt ra ma zosta dodana i wci nij prz...

Страница 19: ...urz dzenie zarejestruje d wi k transmisja obrazu zostanie przywr cona Brak alarmu d wi kowego 3 Gdy tryb VOX jest wy czony transmisja obrazu jest w czana i wy czana r cznie za pomoc w cznika W przypad...

Страница 20: ...ij przycisk OK 2 Wybierz ikonk i wci nij przycisk OK aby przej do ustawie alarm w W cz lub wy cz alarm d wi kowy rys 12 3 Je li alarm d wi kowy jest wy czony alarm temperatury karmienia wy wietli si w...

Страница 21: ...fabrycznych usunie wszelkie ustawione wcze niej warto ci Resetowanie urz dzenia Je li monitor nie dzia a prawid owo u yj ig y aby wcisn przycisk resetu umiejscowiony po lewej stronie tylnej obudowy m...

Страница 22: ...abzuschalten ziehen Sie am Stecker und nicht am Kabel 7 Falls das Ger t durch einen l ngeren Zeitraum ber nicht verwendet wird schalten Sie es vom Strom ab 8 Man soll nur das Ladeger t verwenden das i...

Страница 23: ...b A 1 Kamera 2 Monitor 3 Versorgungskabel USB x2 4 Adapter x2 5 Bedienungsanleitung Beschreibung des Ger ts Abb B C 1 Lichtsensor 2 Objektiv 3 Mikrofon der Kamera 4 Diode der Kamera 5 Versorgungsansch...

Страница 24: ...ist eingeschaltet Niedriger Ladestand der Batterie Lautst rke der empfangenen T ne 5 Dioden blinken gr n Ladung die erste Diode rechts leuchtet rot Bedienungsanleitung Stellen Sie die Kamera auf eine...

Страница 25: ...angeschlossen ist soll man den Kopplungsprozess der im Unterkapitel Kamera hinzuf gen und l schen beschrieben ist erneut durchf hren 3 Um den Zugang zum Men zu haben dr cken Sie die Men Taste Abb 5 K...

Страница 26: ...dank dem ein niedrigerer Batterieverbrauch m glich ist 2 Wenn das Kind schl ft und das Ger t keine T ne innerhalb von 30 Sekunden erkennt geht der Bildschirm in den Standby Modus ber und die Bildwied...

Страница 27: ...auf dem Monitor angezeigt werden sollen ON OFF Abb 11 Spracheinstellungen 1 Auf dem Men w hlen Sie das Symbol und dr cken Sie die OK Taste 2 W hlen Sie das Symbol und dr cken Sie die OK Taste um zu Sp...

Страница 28: ...Sie die OK Taste 3 Die Nachricht auf dem Bildschirm fragt nach dem Zur cksetzen der Werkseinstellungen W hlen Sie JA und dr cken Sie die OK Taste Abb 15 4 ACHTUNG Das Zur cksetzen der Werkseinstellun...

Страница 29: ...29 RU RU help lionelo com BrandLine Group Sp A Kr glewskiego 1 61 248 1 2 3 4 5 6 7 8 9 10 11 12 1 13 14...

Страница 30: ...30 RU 2012 19 EU A 1 2 3 USB x2 4 x2 5 B C 1 2 3 4 5 6 7 SET 8 9 10 11 12 13 14 15 Interkom 16 17 18...

Страница 31: ...31 RU 1...

Страница 32: ...32 RU 1 USB 2 3 2 1 USB 4 2 3 5 1 9 C 2 3 5 1 OK 2 OK 6 3 7 SET 7 B 4 5 1 OK...

Страница 33: ...33 RU 2 OK 8 1 OK 2 9 OK OK 3 4 9 5 13 C VOX 1 VOX 2 30 3 VOX 4 Cry VOX 12 Cry alert 1 2 OK...

Страница 34: ...34 RU 3 4 ON OK 10 5 1 OK 2 OK OK 11 3 OSD on screen display ON OFF 11 1 OK 2 OK OK 1 OK 2 OK 12 3...

Страница 35: ...35 RU 1 2 13 3 OK 1 2 14 3 OK 1 OK 2 OK 3 OK 15 4 18 C 1 OK...

Страница 36: ...are il dispositivo con le mani bagnate 4 Non utilizzare il dispositivo se il cavo o la spina sono danneggiati 5 Se il dispositivo non funziona come dovrebbe o caduto o stato allagato contattare il ser...

Страница 37: ...nione Europea In conformit alla direttiva 2012 19 UE questo prodotto soggetto a raccolta differenziata Il prodotto non deve essere smaltito con i rifiuti urbani perch pu rappresentare un rischio per l...

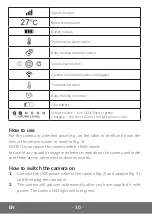
Страница 38: ...Significato delle icone sullo schermo Nessuna connessione tra telecamera e monitor Forza del segnale Temperatura ambiente Livello di ricarica della batteria Allarme di temperatura attivato stato attiv...

Страница 39: ...USB al monitor fig 4 e all adattatore quindi collegare il monitor a una fonte di alimentazione 2 Una ricarica completa richiede circa 3 5 ore L icona indicante il livello delllo stato di ricarica dell...

Страница 40: ...Nell interfaccia di selezione della ninna nanna fig 9 puoi usare i pulsanti a sinistra a destra per cambiare la ninna nanna e pulsanti s gi per cambiare le impostazioni di volume 5 Nell interfaccia di...

Страница 41: ...to del bambino la trasmissione dell immagine viene ripristinata un icona lampeggiante appare sullo schermo e si attiva un allarme acustico Impostazioni della data e ora 1 Nel menu selezionare l icona...

Страница 42: ...ra fig 13 3 Selezionare unit di temperatura gradi di Celsio o Fahrenheit e premere il pulsante OK Promemoria di allattamento del bambino 1 Il dispositivo permette di impostare un allarme sul monitor p...

Страница 43: ...FR Cher client Si vous avez des questions ou remarques relatives au produit achet n h sitez pas nous contacter l adresse help lionelo com Producteur BrandLine Group Sp z o o ul A Kr glewskiego 1 61 2...

Страница 44: ...ni ses c bles dans le parc pour b b ou dans la port e de la main du b b Placez les distance d au moins 1 m 13 Ne placez pas le moniteur proximit de l eau ou d une source de feu 14 Ne touchez pas les...

Страница 45: ...de l cran 15 Interphone tenez enfonc pendant longtemps ajustement des param tres tenez enfonc bri vement 16 Indicateur de l tat de charge du volume des sons re us 17 Microphone de l cran 18 Le bouton...

Страница 46: ...ble d alimentation lectrique USB la cam ra fig 2 et l adaptateur secteur fig 3 puis branchez la cam ra une source d alimentation lectrique 2 La cam ra s allumera automatiquement apr s l avoir branch e...

Страница 47: ...ours la source d alimentation lectrique Enl vement de la cam ra 1 Dans le menu choisissez l ic ne et appuyez sur le bouton OK 2 De la liste choisissez la cam ra que vous souhaitez enlever et appuyez s...

Страница 48: ...mode VOX est allum dans le dispositif fig 12 Cry alert 1 L appareil permet l allumage de l alarme sur le moniteur et du signal sonore en cas de d tection des pleurs de l enfant 2 Dans le menu choisiss...

Страница 49: ...de temp rature d allaitement s affichera uniquement sur l cran sans signal sonore Alarme de temp rature 1 L appareil permet l allumage de l alarme sur l cran quand la temp rature dans la chambre du b...

Страница 50: ...ne fonctionne pas correctement utilisez une aiguille pour appuyer sur le bouton de r initialisation qui se trouve sur le c t gauche du bo tier arri re de l cran 18 fig C Apr s un instant l appareil s...

Страница 51: ...able de alimentaci n agarre el enchufe no el cable 7 Si el dispositivo no se va a utilizar durante un per odo de tiempo m s largo descon ctelo de la fuente de alimentaci n 8 Utilice nicamente el adapt...

Страница 52: ...de usuario Descripci n del dispositivo fig B C 1 Sensor fotosensible 2 Lente 3 Micr fono de c mara 4 LED de la c mara 5 Conector de alimentaci n de la c mara 6 Sensor de temperatura 7 Bot n SET 8 Ante...

Страница 53: ...aci n Alarma de temperatura Recordatorio de alimentaci n del beb Bater a baja Volumen de los sonidos recibidos cinco LED parpadean en verde Cargando el primer LED de la derecha es rojo Manual de usuar...

Страница 54: ...el interruptor de encendido 9 fig C 2 El monitor se ha emparejado con la c mara en la f brica En el caso de que el monitor no muestre una imagen aunque la c mara est conectada a la fuente de alimenta...

Страница 55: ...ra cambiar la configuraci n del volumen 5 Tambi n puede ingresar a la interfaz de selecci n de canciones de cuna presionando el bot n de reproducci n de m sica 13 fig C Modo VOX 1 El modo VOX es el mo...

Страница 56: ...a y hora 1 En el men seleccione el cono y presione el bot n OK 2 Seleccione el cono y presione el bot n OK para ir a la configuraci n de fecha y hora Configure la fecha y la hora y presione el bot n O...

Страница 57: ...sobre la alimentaci n planificada del beb 2 En la configuraci n de la alarma elija un recordatorio para alimentar a su beb fig 14 3 Seleccione la alarma hora de la alarma y presione el bot n OK Restab...

Страница 58: ...spelen 2 Het product is alleen geschikt voor gebruik in droge ruimten Het mag niet buiten of op een natte ondergrond worden gebruikt 3 Raak het apparaat niet met natte handen aan 4 Gebruik het appara...

Страница 59: ...Het product voldoet aan de eisen van de richtlijnen van de Europese Unie In overeenstemming met Richtlijn 2012 19 EU moet dit product gescheiden worden ingezameld Het product mag niet met het huisvui...

Страница 60: ...ving van de pictogrammen op de monitor Geen verbinding tussen de camera en de monitor Signaal sterkte Kamertemperatuur Laadniveau batterij Temperatuur alarm geactiveerd Herinnering om het kind te voed...

Страница 61: ...ingskabel aan op de monitor afb 4 en op de adapter en sluit u vervolgens de monitor aan op een voedingsbron 2 Een volledige lading duurt ongeveer 3 5 uur Het icoon van het batterijniveau op het beelds...

Страница 62: ...4 In de interface voor de keuze van het slaapliedje afb 9 kunt u met de knoppen links rechts om het slaapliedje te veranderen en de omhoog omlaag knoppen om het volume te wijzigen 5 De interface voor...

Страница 63: ...het scherm en klinkt er een geluidsalarm Datum en tijd instellen 1 Selecteer in het menu het pictogram en druk op de OK knop 2 Kies pictogram en druk op de OK knop om naar de instelling voor datum en...

Страница 64: ...tellingen de herinnering babyvoeding afb 14 3 Selecteer de tijd van het de alarm en en druk op de OK knop Fabrieksinstellingen herstellen 1 Selecteer in het menu het pictogram en druk op de OK knop 2...

Страница 65: ...oduktas tinkamas naudoti tik sausose vietose Jo negalima naudoti lauke arba ant lapi pavir i 3 Nelieskite prietaiso lapiomis rankomis 4 Nenaudokite prietaiso jei pa eistas laidas arba ki tukas 5 Jei r...

Страница 66: ...jis gali kelti gr sm aplinkai ir moni sveikatai Panaudot gamin reikia pristatyti elektros ir elektronini prietais perdirbimo punkt Rinkinys A pav 1 Kamera 2 Monitorius 3 USB maitinimo laidas x2 4 Adap...

Страница 67: ...s maitinti k dik jungtas jungtas garsinis signalas Kamera nesuporuota Kamera buvo atjungta nuo maitinimo altinio Temperat ros signalizacija K dikio maitinimo priminimas Senka baterija Priimam gars gar...

Страница 68: ...mirks ti Monitoriaus jungimas 1 junkite monitori laikydami jungikl 9 C pav 2 Gamykloje monitorius buvo suporuotas su kamera Jei monitorius nerodo vaizdo nors kamera yra prijungta prie maitinimo altini...

Страница 69: ...n s pasirinkimo s saj paspausdami muzikos paleidimo mygtuk 13 C pav VOX re imas 1 VOX re imas yra numatytasis renginio re imas leid iantis sunaudoti ma iau baterijos 2 Jei k dikis miega ir prietaisas...

Страница 70: ...as turi b ti rodomi monitoriaus ekrane ON OFF 11 pav Kalbos nustatymas 1 Meniu pasirinkite piktogram ir paspauskite OK 2 Pasirinkite piktogram ir paspauskite mygtuk OK kad pereitum te prie kalbos nust...

Страница 71: ...pasirodys prane imas kuriame bus papra yta atkurti gamyklinius nustatymus Pasirinkite TAIP ir paspauskite mygtuk OK 15 pav 4 D MESIO Atk rus gamyklinius nustatymus visos anks iau nustatytos vert s bu...

Страница 72: ...dpojit nap jec kabel uchopte z str ku ne kabel 7 Pokud za zen nebudete del dobu pou vat odpojte jej od zdroje nap jen 8 Pou vejte pouze nap jec adapt r kter je sou st balen 9 V robek nesm b t um st n...

Страница 73: ...Objektiv 3 Mikrofon kamery 4 LED dioda fotoapar tu 5 Nap jec konektor kamery 6 Sn ma teploty 7 Tla tko SET 8 Ant na 9 Zap na vyp na eko re im 10 Tla tko Menu zp t 11 Naviga n tla tka nahoru dol 12 Na...

Страница 74: ...LED vpravo sv t erven U ivatelsk manu l Um st te kameru na vhodn m sto nap klad na st l nebo poli ku a nami te objektiv na oblast kterou chcete sledovat obr 1 POZOR Neumis ujte kameru do dosahu d t V...

Страница 75: ...a stiskn te tla tko OK 2 Ze seznamu vyberte kameru kterou chcete p idat a stiskn te tla tko OK Pot vyberte p idat kameru obr 6 3 Jakmile se na obrazovce zobraz v zva obr 7 stiskn te tla tko SET na fo...

Страница 76: ...n pomoc p ep na e Pokud je p enos obrazu vypnut monitor se pou v pouze pro p enos zvuku dn zvukov alarm 4 Funkce Cry alert je dostupn kdy je za zen v re imu VOX obr 12 Cry alert 1 Za zen umo uje zapno...

Страница 77: ...m vypnut zobraz se alarm teploty krmen pouze na obrazovce bez zvukov ho sign lu Teplotn alarm 1 Za zen umo uje aktivovat alarm na monitoru kdy je teplota v d tsk m pokoji p li n zk nebo p li vysok 2 V...

Страница 78: ...a stiskn te tla tko OK 2 Vyberte ikonu a stisknut m tla tka OK p ejd te na informace o za zen obr 16 Fotografie jsou pouze ilustra n skute n vzhled produkt se m e li it od vyobrazen na fotografi ch H...

Страница 79: ...t l 11 Az elektronikus babafigyel nem helyettes ti a megfelel gondoz st s a sz l i gondoskod st 12 Ne tegye a babafigyel t s a vezet keket a gyerek gyba vagy a gyermek keze ltal el rhet helyre Helyezz...

Страница 80: ...a 13 Zenelej tsz s gomb 14 Monitor t lt csatlakoz ja 15 InterCom hosszan nyomva tartva Be ll t sok m dos t sa r viden nyomva tartva 16 T lt si llapot fogadott hanger jelz 17 Monitor mikrofon 18 Reset...

Страница 81: ...kek a k zelben A kamera bekapcsol sa 1 Csatlakoztassa az USB t pk belt a kamer hoz 2 bra valamint az adapterhez 3 bra majd csatlakoztassa a kamer t az ramforr shoz 2 A kamera automatikusan bekapcsol...

Страница 82: ...lata k zben ramforr shoz csatlakoztatva kell maradnia Kamera elt vol t sa 1 V lassza ki az ikont a men ben s nyomja meg az OK gombot 2 V lassza ki a list b l a t r lni k v nt kamer t majd nyomja meg a...

Страница 83: ...sz l k lehet v teszi hogy aktiv ljon egy riaszt st a monitoron s egy hangjelz st amikor a baba s r s t szleli 2 A men ben v lassza ki a ikont s nyomja meg az OK t 3 V lassza ki a gyermeks r s rz kel s...

Страница 84: ...rs klet riaszt s 1 A k sz l k lehet v teszi hogy a monitor riaszt st adjon ha a gyermek szob j ban t l alacsony vagy t l magas a h m rs klet 2 A riaszt si be ll t sokn l v lassza ki a h m rs klet ria...

Страница 85: ...z ikont a men ben s nyomja meg az OK gombot 2 V lassza ki az ikont s nyomja meg az OK gombot az k sz l kinform ci k megjelen t s hez 16 bra A f nyk pek illusztr ci k a term kek megjelen se elt rhet a...

Страница 86: ...setului departe de copil 11 Bona electronic nu nlocuie te preocuparea i ngrijirea p rinteasc adecvat 12 Nu a eza i bona electronic i cablurile acesteia n arc sau la ndem na copilului dvs A eza i le l...

Страница 87: ...monitorului 15 Interkom ap sare lung ajusta i set rile ap sare scurt 16 Indicator st rii de nc rcare volumul sunetelor recep ionate 17 Microfonul monitorului 18 Buton de resetare Explicarea pictogram...

Страница 88: ...video 1 Conecta i cablul de alimentare USB la camera video fig 2 i adaptor fig 3 apoi conecta i camera la o surs de alimentare 2 Camera video porne te automat c nd este conectat la o surs de alimentar...

Страница 89: ...pozitivul ndep rtarea camerei video 1 n meniu selecta i pictograma i ap sa i butonul OK 2 Selecta i de pe list camera video care trebuie tears de pe list i ap sa i butonul OK Apoi selecta i terge came...

Страница 90: ...l n modul VOX fig 12 Cry alert 1 Dispozitivul permite activarea alarmei pe monitor i a semnalului acustic atunci c nd detecteaz pl nsul copilului 2 n meniu selecta i pictograma i ap sa i butonul OK 3...

Страница 91: ...itor atunci c nd temperatura din camera copilului este prea sc zut sau prea ridicat 2 n set rile alarmei selecta i alarma de temperatur fig 13 3 Selecta i unitatea de temperatur grade Celsius sau Fahr...

Страница 92: ...ituat n partea st ng a capacului din spate al monitorului 18 Fig C Dup un timp dispozitivul va fi din nou activat Informa ii despre dispozitiv 1 n meniu selecta i pictograma i ap sa i butonul OK 2 Sel...

Страница 93: ...erkl rung ist unter folgender Internetadresse erh ltlich RU EC Brandline Group BABYLINE 8 2 2014 53 EU RED Directive 2014 30 EU EMC Directive 2014 35 EU LVD Directive 2011 65 EU RoHS Directive EC CE I...

Страница 94: ...up Sp z o o t mto prohla uje e v robek BABYLINE 8 2 vyhovuje sm rnici 2014 53 EU RED Directive 2014 30 EU EMC Directive 2014 35 EU LVD Directive 2011 65 EU RoHS Directive pln zn n EU prohl en o shod j...

Страница 95: ...je Podrobn z ru n podm nky jsou k dispozici na webov ch str nk ch A r szletes garanci lis felt telek el rhet k a weboldalon Condi ii detaliate de garan ie sunt disponibile pe site www lionelo com Tha...

Страница 96: ...www lionelo com...

Отзывы: