13
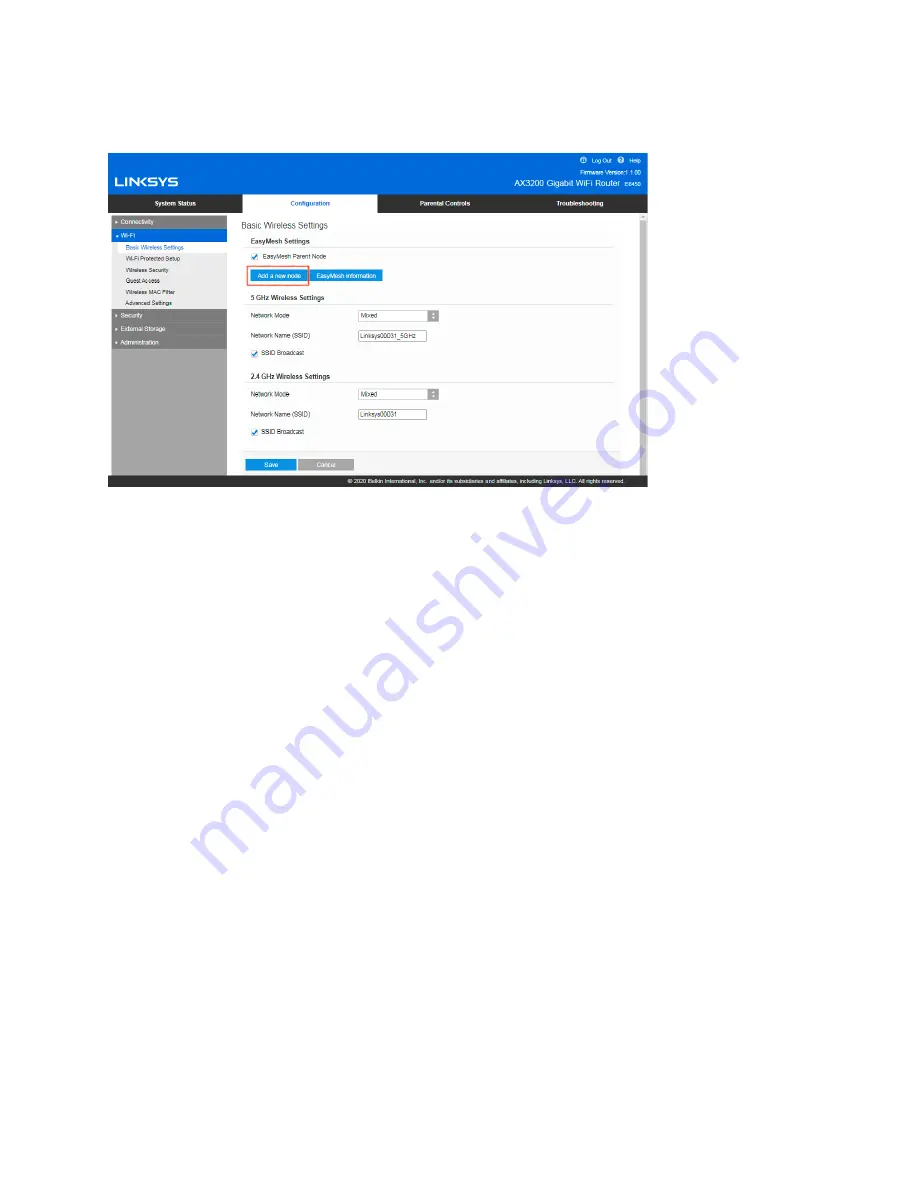
Basic Wi-Fi Settings
EasyMesh Settings
If one router isn’t providing whole-home Wi-Fi coverage, you can turn on the EasyMesh feature and
add more E8450 routers to your network. Once the feature is turned on by checking the box for
EasyMesh Parent Node, the router connected to your modem becomes the parent node in your mesh
network. Add child nodes by clicking ‘‘Add a new node.’’ Then, press the WPS button on your child node
for 3 seconds. Connecting a child node should take between 70~80 seconds in most cases. You can
check the progress on the parent node’s setting screen.
Once the child node is added, click Mesh information to see node and the devices connected to them
for the entire mesh network.
If a child node fails to join your network, move the child node closer to the parent node. Follow the
prompts on the parent node’s settings screen to try again.
Once you add a child node wirelessly, you can connect it with an ethernet cable to ensure a consistent
signal. This is called wired backhaul. Make sure the cable comes from one of the ports labeled
Ethernet on the parent node and into the port labeled Internet on the child node.
You can turn off Easy Mesh Parent Mode at any time and use the parent node as a traditional router.
Any child nodes will be disconnected from your Wi-Fi.
Note
—You can’t add an E8450 router to an EasyMesh system if the router has already been set up.
If you have used the router before, reset it to factory settings. Press and hold the reset button on the
back of the router for 10 seconds or reset it in the Administration tab of the router’s settings.
If you don’t see the EasyMesh option in your router settings, make sure to upgrade to the latest
firmware. Firmware version needs to be 1.1.00 or above to support EasyMesh.
If a child node is too far away from another working node, the power light on the front of the child
node will be solid yellow. Move the child node closer to a working node until the child node's power
Содержание E8450
Страница 1: ...USER GUIDE AX3200 DUAL BAND GIGABIT WiFi 6 ROUTER Model E8450 ...
Страница 9: ...9 Basic Router Settings This screen allows you to change the router s basic configuration ...
Страница 24: ...GUIDE D UTILISATION AX3200 ROUTEUR DOUBLE BANDE SANS FIL 6 GIGABIT Modèle E8450 ...
Страница 32: ...9 Paramètres de base du routeur Cet écran vous permet de modifier la configuration de base du routeur ...
Страница 48: ...ユーザーガイド AX3200 デュアル バンド ギガビット WiFi 6 ルーター モデル E8450 ...
Страница 56: ...基本的なルーター設定 この画面により ルーターの基本的な構成を変更できます ...
Страница 71: ... 用户指南 AX3200 双频千兆位 WiFi 6 路由器 型号 E8450 ...
Страница 79: ...9 基本路由器设置 该窗口允许您更改路由器的基本配置 ...
Страница 80: ...10 语言 选择您的语言 如需更改语言 请从下拉菜单中选择一种语言 基于浏览器工具的语言将在5秒钟内进行变 更 ...
Страница 91: ...用戶指南 AX3200 雙頻 GIGABIT WiFi 6 路由器 型號 E8450 ...
Страница 99: ...9 基本路由器設定 此畫面讓您可以變更路由器的基本設定 ...
Страница 100: ...10 語言 選擇您的語言 若要變更語言 請從下拉式功能表中選擇一種語言 瀏覽器公用程式的語言將會在五秒內變 更 ...
Страница 102: ...12 無線橋接器 無線橋接器可以無線連接至您的主路由器 且可以與連線至橋接器乙太網路連接埠的裝置共用網際網路 連線 ...
Страница 112: ...คู มือผู ใช AX3200 DUAL BAND GIGABIT WiFi 6 ROUTER รุ น E8450 ...
Страница 120: ...9 การตั งค าเราเตอร พื นฐาน คุณสามารถเปลี ยนแปลงการกําหนดค าพื นฐานของเราเตอร ได ในหน าจอนี ...
Страница 133: ...HƯỚNG DẪN SỬ DỤNG BỘ ĐỊNH TUYẾN GIGABIT WiFi 6 BĂNG TẦN KÉP AX3200 Mã sản phẩm E8450 ...
Страница 141: ...9 Cài đặt bộ định tuyến cơ bản Màn hình này cho phép bạn thay đổi cấu hình cơ bản của bộ định tuyến ...


